

If you’re craving a dessert that feels like a warm hug from the South, you absolutely have to try Paula Deen’s Classic Chocolate Pie Recipe. This pie has been a family favorite for me ever since I first whisked together that silky chocolate filling and baked it into a perfectly flaky crust. Not only does it taste divine, but once you make this, you’ll understand why it has such a legendary status — rich, creamy, and just the right amount of chocolatey goodness that practically melts in your mouth. Stick with me, and I’ll share all my tips and tricks so your pie turns out just like Paula’s.
Why You’ll Love This Recipe
- Classic Southern Flavor: It’s the kind of chocolate pie your grandma would be proud of, with that homemade, no-fuss charm.
- Silky Smooth Filling: The filling is perfectly rich and creamy — not too dense, not too light, just spot-on.
- Easy To Make: Despite its fancy taste, it uses simple ingredients and straightforward steps you can follow easily.
- Crowd-Pleaser: Whether it’s a holiday or just a regular Sunday, you’ll find everyone asking for seconds.

Ingredients You’ll Need
To nail Paula Deen’s classic chocolate pie, you’ll want fresh, quality ingredients that complement each other beautifully — the richness of cream, the smoothness of chocolate, and that tender crust. I’ve picked out tips to help you shop smart and get the best results.
- Pie Crust: I love using a store-bought pie shell when I’m in a hurry, but if you have time, homemade crust adds that extra buttery flakiness.
- Sugar: Regular granulated sugar does just fine here; it sweetens the filling without overpowering the chocolate.
- Cocoa Powder: Use unsweetened cocoa powder for a deep chocolate flavor. I learned the hard way that subpar cocoa can make a difference — go for a good quality brand.
- Milk and Heavy Cream: Whole milk and some cream make the filling beautifully smooth and luscious — don’t skip on these!
- Cornstarch: This is the secret to thickening the pie filling without lumps. Make sure to mix it well with sugar before adding liquids.
- Egg Yolks: They add richness and help thicken the custard so your pie sets perfectly.
- Butter: A little bit of butter stirred in at the end adds silkiness and a hint of richness you’ll notice with every bite.
- Vanilla Extract: Just a splash lifts the chocolate flavor beautifully without competing.
Variations
I love giving this pie a little twist depending on the occasion or mood. Don’t be afraid to make it your own — that’s part of the fun! Here are some ideas based on what I’ve tried and loved personally.
- Chocolate Ganache Topping: Once, I topped the pie with a quick ganache instead of whipped cream, and it was a dream come true — richer and even fudgier.
- Kahlúa or Coffee Flavor: Adding a tablespoon of coffee liqueur or espresso powder to the filling amps up the chocolate flavor wonderfully.
- Salted Caramel Drizzle: For a fancy touch, drizzle some homemade or store-bought salted caramel over each slice — my guests went wild for it.
- Nutty Crunch: Toasted pecans or walnuts sprinkled on top bring a satisfying texture contrast I recommend giving a try.
How to Make Paula Deen’s Classic Chocolate Pie Recipe
Step 1: Prep Your Pie Crust and Ingredients
Start by letting your pie crust come to room temperature if using frozen, or pre-bake it lightly if you prefer a crisper bottom. I like to blind bake for 8-10 minutes with pie weights — it keeps the crust from getting soggy. Meanwhile, gather all your ingredients and measure them out carefully to keep the process smooth.
Step 2: Whisk Together the Dry Ingredients
Mix the sugar, cocoa powder, and cornstarch really well in a medium saucepan before adding any liquids. This step is key — it avoids lumps and makes sure the filling thickens evenly. I always take a moment here because a smooth filling is what makes or breaks this pie.
Step 3: Cook the Filling Gently
Slowly whisk in your milk and cream, then set the pan over medium heat. Keep stirring constantly — patience here means silky, no-lumps custard. Once it thickens and starts to bubble, cook for about a minute more, then remove from heat. That moment when it thickens perfectly always feels like a little win to me.
Step 4: Temper and Add Egg Yolks
Beat your egg yolks separately, then slowly add a small amount of the hot chocolate mixture to the yolks while whisking vigorously — this tempers the eggs and prevents scrambling. Pour the yolk mixture back into the saucepan and cook gently for another 2 minutes. I discovered this step was crucial for that creamy, custardy texture.
Step 5: Stir in Butter and Vanilla
Take the pan off the heat and stir in the butter and vanilla extract until smooth and glossy. This final touch adds richness and a subtle aroma. Trust me — don’t skip this because it makes the whole filling sing.
Step 6: Pour and Chill
Pour the warm filling into your prepared pie shell, smoothing out the top. Cover with plastic wrap directly on the surface to prevent a skin from forming. Pop it into the fridge for at least 4 hours, but overnight is best. Patience pays off here — the pie sets up beautifully for that melt-in-your-mouth texture.
Pro Tips for Making Paula Deen’s Classic Chocolate Pie Recipe
- Use Quality Chocolate and Cocoa: I used to use low-grade cocoa and learned my filling lacked depth — upgrading made all the difference.
- Constant Stirring is Key: When cooking the filling, don’t walk away; stirring slows evaporation and prevents lumps.
- Cover the Surface to Avoid Skin: Pressing plastic wrap directly on the pie filling keeps it perfectly smooth — a game changer I swear by.
- Taste Before Chilling: I always lick a little filling before chilling — if it tastes great warm, you’re going to love it cold!
How to Serve Paula Deen’s Classic Chocolate Pie Recipe
Garnishes
I keep it simple with freshly whipped cream, sometimes adding a sprinkle of shaved chocolate or toasted pecans on top. If you want a little extra fancy, a few fresh raspberries brighten the plate and balance the richness — I promise it’s heavenly.
Side Dishes
This chocolate pie pairs beautifully with a strong cup of coffee or a scoop of vanilla bean ice cream for a classic combo. For a Southern-inspired meal, try it after some creamy pecan pie or alongside a glass of rich milk.
Creative Ways to Present
For special occasions, I like presenting individual mini chocolate pies in ramekins topped with a dollop of whipped cream and a single chocolate curl. It feels extra special and makes serving a breeze. You could even dust them lightly with cocoa or powdered sugar for that professional touch.
Make Ahead and Storage
Storing Leftovers
Wrap leftover pie airtight and keep it refrigerated — the flavor and texture stay amazing for up to 3 days. I always make sure to remove the plastic wrap used during chilling and use cling film for storage instead to keep the whipped cream fresh if you added that topping.
Freezing
I’ve frozen this pie successfully a couple of times by wrapping it tightly in foil and placing it in a freezer bag. Just thaw overnight in the fridge before serving. It might be best to add whipped cream fresh after thawing, but the pie itself holds up surprisingly well.
Reheating
This pie is best served chilled, but if you want it a bit warmer, let it sit out for 10-15 minutes at room temperature. Avoid microwaving as it can change the texture — I’ve found the slow warm-up lets the pie soften nicely without losing its silky charm.
FAQs
-
Can I make Paula Deen’s Classic Chocolate Pie Recipe gluten-free?
Absolutely! Swap out the regular pie crust for your favorite gluten-free crust, either store-bought or homemade, and follow the filling recipe as is. The rich chocolate filling is naturally gluten-free, so no other adjustments needed.
-
How long can I store the pie in the fridge?
You can safely store the pie covered in the refrigerator for up to 3 days. To keep it fresh longer, avoid adding toppings like whipped cream until serving time.
-
Can I use a graham cracker crust instead?
Yes, a graham cracker crust is a delicious alternative that adds a little extra crunch and flavor. Just press it firmly and chill it before pouring the filling in.
-
Is there a shortcut to speed up chilling time?
If you’re short on time, you can chill the pie in the fridge uncovered for 2 hours, then cover it to prevent skin. Using a shallow dish or individual servings can also reduce setting time.
Final Thoughts
Paula Deen’s Classic Chocolate Pie Recipe isn’t just a dessert—it’s a slice of Southern comfort you can make in your own kitchen. I’ve made this pie countless times, and each batch wins over my friends and family with its creamy, chocolatey goodness. If you love a good, old-fashioned chocolate pie that’s both fuss-free and decadent, this recipe will quickly become your new go-to. Give it a try—you deserve that perfect homemade chocolate pie moment!
Print
Paula Deen’s Classic Chocolate Pie Recipe
- Prep Time: 20 minutes
- Cook Time: 1 hour 30 minutes
- Total Time: 1 hour 50 minutes
- Yield: 6 servings
- Category: Main Course
- Method: Roasting
- Cuisine: Southern American
Description
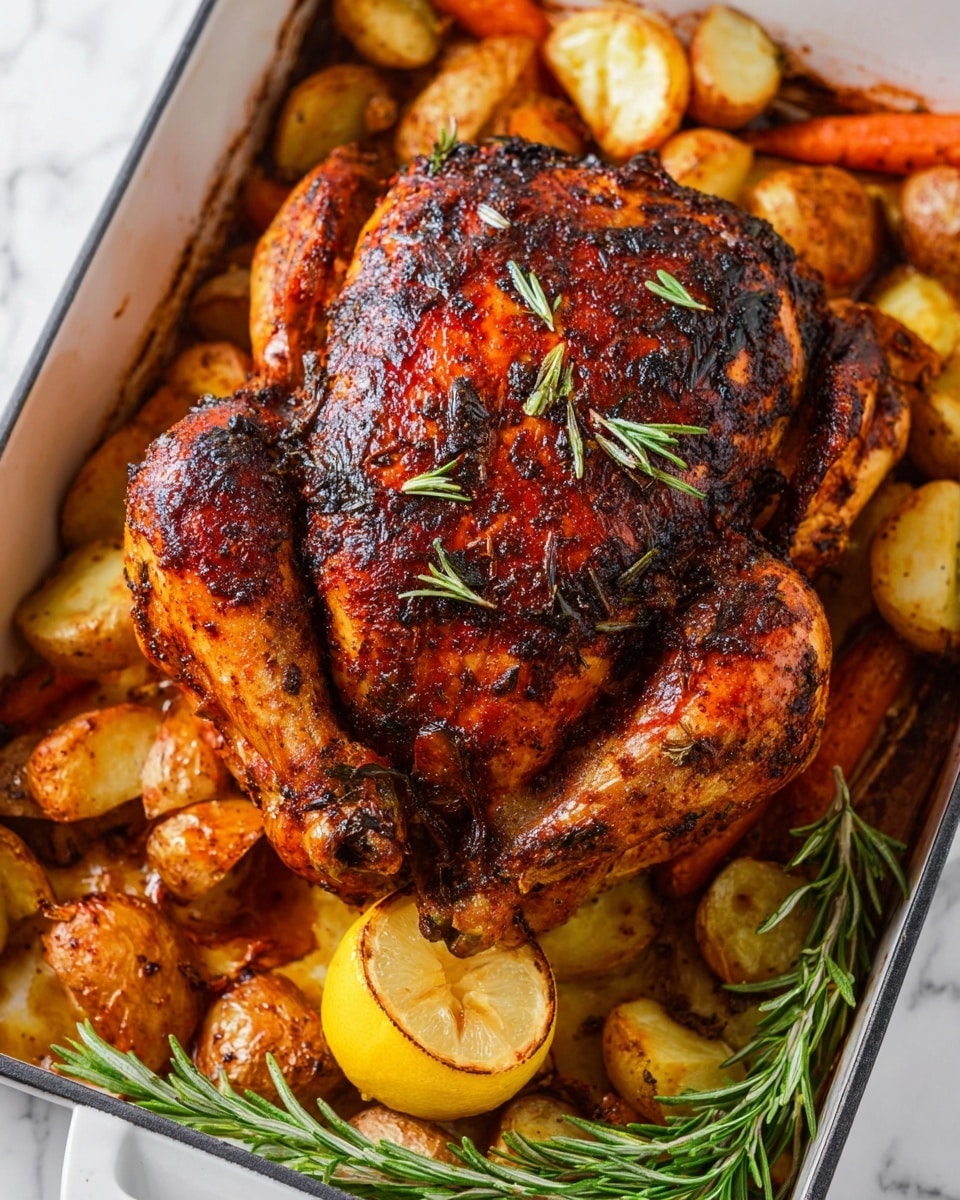
This classic roasted chicken recipe features a whole bird seasoned with a flavorful Creole garlic butter, baked alongside tender baby potatoes, carrots, and onions. The chicken is infused with aromatic herbs like rosemary, thyme, and sage and basted regularly for a juicy, crispy-skinned finish. Perfect for a comforting family dinner, this dish pairs deliciously with pan drippings served on the side.
Ingredients
Roasted Chicken and Veggies
- 1 whole chicken (4-5 lbs)
- 1 lb baby potatoes, halved
- 1 lb carrots, roughly chopped
- 1 large onion, quartered
- 4 tbsp olive oil
- 2 tbsp salt, divided
- 2 tsp black pepper
- 1 tbsp Bayou City All Purpose Seasoning
- 2 sprigs rosemary
- 4 sprigs thyme
- 2 sprigs sage
- 1/2 cup white wine or chicken stock
Garlic Butter
- 1 1/2 sticks butter, softened
- 4 cloves garlic, minced
- 1 tbsp Bayou City All Purpose Seasoning or creole seasoning
- 1 tsp smoked paprika
- 1 tsp cayenne pepper (optional but recommended)
- 1 tsp onion powder
- 1 lemon, zest only
- 1 tbsp rosemary, chopped
- Salt and pepper to taste
Instructions
- Preheat Oven: Preheat your oven to 425°F (220°C) to ensure it’s hot enough for roasting the chicken and vegetables.
- Season Chicken: Season the whole chicken with 1 tablespoon of salt and set it aside. This step helps draw out excess moisture and encourages crispy skin during roasting.
- Make Garlic Butter: In a small bowl, combine the softened butter, minced garlic, Bayou City All Purpose (or Creole) seasoning, smoked paprika, cayenne pepper (if using), onion powder, chopped rosemary, and lemon zest. Mix thoroughly, then season with salt and pepper to taste.
- Prepare the Chicken: Pat the chicken dry carefully using paper towels. Rub the prepared Creole garlic butter all over the chicken, including underneath the skin and inside the cavity. Stuff the cavity with lemon wedges, thyme, rosemary, sage sprigs, and half the onion quarters for added aroma and flavor.
- Prepare Vegetables: In a large bowl, toss the halved baby potatoes, chopped carrots, and remaining onion with olive oil, remaining salt, black pepper, Bayou City seasoning, and dried thyme.
- Assemble for Roasting: Spread the seasoned vegetables evenly in a large roasting pan. Pour the white wine or chicken stock over the veggies to keep them moist. Place the chicken on a rack breast-side up above the vegetables or directly on top of the veggies in the pan.
- Roast the Chicken: Roast in the preheated oven for about 1 hour and 30 minutes, or until the internal temperature of the chicken reaches 165°F (75°C) and the skin is golden and crispy. Baste the chicken with pan drippings every 30 minutes to enhance moisture and flavor.
- Rest the Chicken: Once cooked, remove the chicken from the oven and let it rest for 10-15 minutes before carving. Resting allows juices to redistribute throughout the meat, ensuring it stays moist.
- Serve: Carve the roasted chicken and serve it alongside the pan-roasted vegetables. Use pan drippings as a delicious dipping sauce. Enjoy your flavorful, herb-infused roasted chicken dinner!
Notes
- For a Spicier Kick: Add more cayenne pepper to the Creole garlic butter or include seeded jalapeños in the green sauce.
- Substitutions: If Bayou City All Purpose Seasoning is unavailable, you can use Cajun or Creole seasoning or a blend of paprika, garlic powder, onion powder, and cayenne pepper.
- Resting the Chicken: Letting the chicken rest after roasting helps the juices redistribute, keeping the meat juicy and tender.
- Pat the Chicken Dry: Ensuring the chicken is dry before seasoning helps achieve crispy, golden skin.
- Season Under the Skin: Applying garlic butter under the skin adds deeper flavor and moisture to the meat.
Nutrition
- Serving Size: 1 serving (approx. 1/6 of recipe)
- Calories: 480 kcal
- Sugar: 4 g
- Sodium: 900 mg
- Fat: 32 g
- Saturated Fat: 14 g
- Unsaturated Fat: 15 g
- Trans Fat: 0 g
- Carbohydrates: 20 g
- Fiber: 3 g
- Protein: 35 g
- Cholesterol: 125 mg
