

If you’re on the hunt for a warm, comforting meal that feels like a hug on a plate, you absolutely have to try this Homemade Stromboli Recipe. Seriously, once you make it, you’ll see why it’s a favorite in my kitchen — golden, cheesy, packed with savory fillings, and a crust that’s perfectly crispy yet tender. Whether you’re new to stromboli or just looking to level up your game, this recipe will guide you there in the tastiest way.
Why You’ll Love This Recipe
- Simple but Impressive: This stromboli looks fancy but is surprisingly easy to put together — perfect for those cozy nights in.
- Customizable Fillings: You can tailor it to whatever you have on hand or love most, making it a versatile crowd-pleaser.
- Great Make-Ahead Option: Prep ahead or freeze for later — it reheats beautifully without losing that fresh-baked feeling.
- Family Favorite: My kids and guests always ask for seconds, which says a lot about how delicious and comforting this dish is.

Ingredients You’ll Need
Getting your ingredients ready for this Homemade Stromboli Recipe is the first step to success. The combination of quality dough, savory meats, cheeses, and fresh herbs creates that magic blend of flavors and textures you’ll love. I always recommend grabbing the freshest mozzarella you can find — it melts like a dream!
- Pizza dough: You can buy pre-made dough or make your own; fresh and elastic dough is key for a tender crust.
- Italian sausage: Adds hearty, spicy flavor — I prefer mild if you want to keep it family-friendly.
- Ham or salami: These cured meats bring a nice salty balance; you can mix and match!
- Mozzarella cheese: Fresh or shredded both work, but fresh mozzarella gives that gooey pull I adore.
- Provolone cheese: Adds a subtle sharpness and melts beautifully.
- Parmesan cheese: For sprinkling on top and adding a slight nutty kick after baking.
- Bell peppers and onions: Optional veggies that add sweetness and crunch — perfect roasted.
- Fresh basil or parsley: Brightens the flavor and makes it pop visually.
- Olive oil: Used for brushing the dough to get that golden crust.
- Italian seasoning and garlic powder: Simple spices that tie everything together.
Variations
I love how versatile this Homemade Stromboli Recipe is because it invites you to make it your own. Sometimes I swap out the fillings or experiment with spices depending on what’s in season or what my family’s craving. Don’t be shy — try these ideas or get creative with what you’ve got!
- Meatless option: Use sautéed mushrooms, spinach, and roasted red peppers along with your favorite cheeses for a vegetarian-friendly stromboli that’s just as satisfying.
- Spicy kick: Add crushed red pepper flakes or use spicy Italian sausage for that extra zing that wakes up your taste buds.
- Herb swap: Fresh oregano or thyme in place of basil can add a different herbaceous twist that’s equally delicious.
- Stuff it with pesto: A thin layer of basil pesto inside adds incredible depth and richness you won’t regret.
How to Make Homemade Stromboli Recipe
Step 1: Prepare and Roll Out Your Dough
First things first, flour your surface generously and roll out your pizza dough into a rectangle about 12×16 inches. This shape makes it easier to layer your fillings and roll it up neatly without stuffing spilling out. I use a rolling pin with a little patience: roll a bit, let the dough rest for a minute, then roll some more. This keeps it elastic and prevents shrinking.
Step 2: Layer on the Fillings
Next, spread the sausage, ham or salami evenly over the dough, leaving about a one-inch border around the edges — this helps seal the stromboli later so all that deliciousness stays inside. Then sprinkle the cheeses on top, add your sautéed or raw veggies, and scatter fresh herbs for that pop of flavor. Be generous but don’t overload it; you want every bite balanced.
Step 3: Roll and Seal
Here comes my favorite part: carefully roll the dough up from one long side, like a jelly roll. Use your fingertips to tuck it tightly as you go. Once rolled, pinch the edges and ends to seal so nothing leaks out while baking. I discovered that brushing the edges with water before sealing works wonders for a tight hold — a little trick I picked up to avoid disappointing spills!
Step 4: Brush and Bake
Place your stromboli seam-side down on a parchment-lined baking sheet. Brush the top with olive oil and sprinkle lightly with garlic powder, Italian seasoning, and Parmesan cheese. This creates a golden, flavorful crust. Bake at 400°F (200°C) for about 25-30 minutes or until the crust is golden and crisp. You’ll know it’s ready when it sounds hollow if you gently tap the bottom — that’s one of my kitchen hacks!
Step 5: Rest and Slice
Once out of the oven, let the stromboli rest for about 5-10 minutes before slicing. This helps the cheese set a bit so it doesn’t ooze out with every cut. I like to slice it into generous 1–2-inch pieces — perfect for sharing, dipping, or packing as leftovers.
Pro Tips for Making Homemade Stromboli Recipe
- Don’t Overstuff Your Stromboli: It’s tempting to load it up, but overfilling causes tears and messy leaks — less is more for neat slices.
- Use Parchment Paper: Prevents sticking and makes transferring your stromboli easier — trust me, cleanup gets way simpler.
- Let It Rest Before Slicing: This helps everything set nicely so the cheese doesn’t escape and your slices stay intact.
- Sharp Knife for the Win: Use a serrated bread knife to slice through without squishing the stromboli — smoother cuts make serving so much easier.
How to Serve Homemade Stromboli Recipe
Garnishes
I love topping my stromboli slices with a sprinkle of freshly chopped parsley or basil — it adds a fresh, herbaceous brightness that balances the rich cheeses and meats. A drizzle of marinara or garlic butter on the side for dipping is my absolute favorite — it feels like restaurant-level indulgence at home.
Side Dishes
To round out the meal, I often serve this Homemade Stromboli Recipe with a crisp green salad dressed with balsamic vinaigrette or some roasted garlic parmesan broccoli. A bowl of tomato soup is another classic pairing that my family adores — comforting, easy, and perfectly complements the stromboli.
Creative Ways to Present
For special occasions, I’ve rolled the stromboli dough into bite-sized pinwheels — perfect finger food for parties or game nights. You can also slice the stromboli thick and serve it on wooden boards alongside assorted dips and olives for a fun Italian-style spread that’ll wow your guests.
Make Ahead and Storage
Storing Leftovers
Any leftovers from this Homemade Stromboli Recipe I wrap tightly in foil or plastic wrap and store in the refrigerator. It stays fresh for about 3-4 days, and I love having it ready for quick lunches or snack cravings. Just make sure to cool it completely before wrapping to avoid sogginess.
Freezing
I’ve had great success freezing the stromboli before baking — just prepare it fully, wrap it tightly in plastic then foil, and freeze for up to 2 months. When I’m ready, I thaw it overnight in the fridge and bake fresh. This trick means you always have a wholesome meal ready to go!
Reheating
To reheat, I prefer popping it in a preheated oven at 350°F (175°C) for about 10-15 minutes to get the crust crispy again. Avoid microwaving if you want to keep that crunch; but if you’re in a hurry, the microwave works—just don’t expect a crispy crust.
FAQs
-
Can I use store-bought pizza dough for this Homemade Stromboli Recipe?
Absolutely! Store-bought pizza dough works perfectly if you want to save time. Just make sure to let it come to room temperature before rolling out for easier handling.
-
What meats can I use as filling?
You can use a combination of Italian sausage, ham, salami, pepperoni, or even cooked chicken. Feel free to get creative based on your family’s favorites.
-
How do I prevent the stromboli from getting soggy?
To keep the crust crispy, don’t overload the dough with wet ingredients. Also, brush the crust with olive oil before baking and let the stromboli rest for a bit before slicing to help the cheese set.
-
Can I make this recipe dairy-free?
Yes! Substitute the cheeses with dairy-free alternatives or omit them entirely. Use olive oil liberally to keep the crust flavorful and moist.
-
What dipping sauces go well with stromboli?
Marinara sauce is a classic choice, but you can also try garlic butter, ranch dressing, or spicy arrabbiata sauce to change things up.
Final Thoughts
Honestly, this Homemade Stromboli Recipe has become one of those dishes I turn to when I want something comforting but impressive without spending all day in the kitchen. It’s rewarding to see your family’s eyes light up with the first bite, and the leftovers always make the next day even better. Give it a try — I bet it’ll become a staple in your recipe rotation just like it did in mine!
Print
Homemade Stromboli Recipe
- Prep Time: 10 minutes
- Cook Time: 35 minutes
- Total Time: 45 minutes
- Yield: 4 servings
- Category: Main Course
- Method: Baking
- Cuisine: American
- Diet: Low Fat
Description
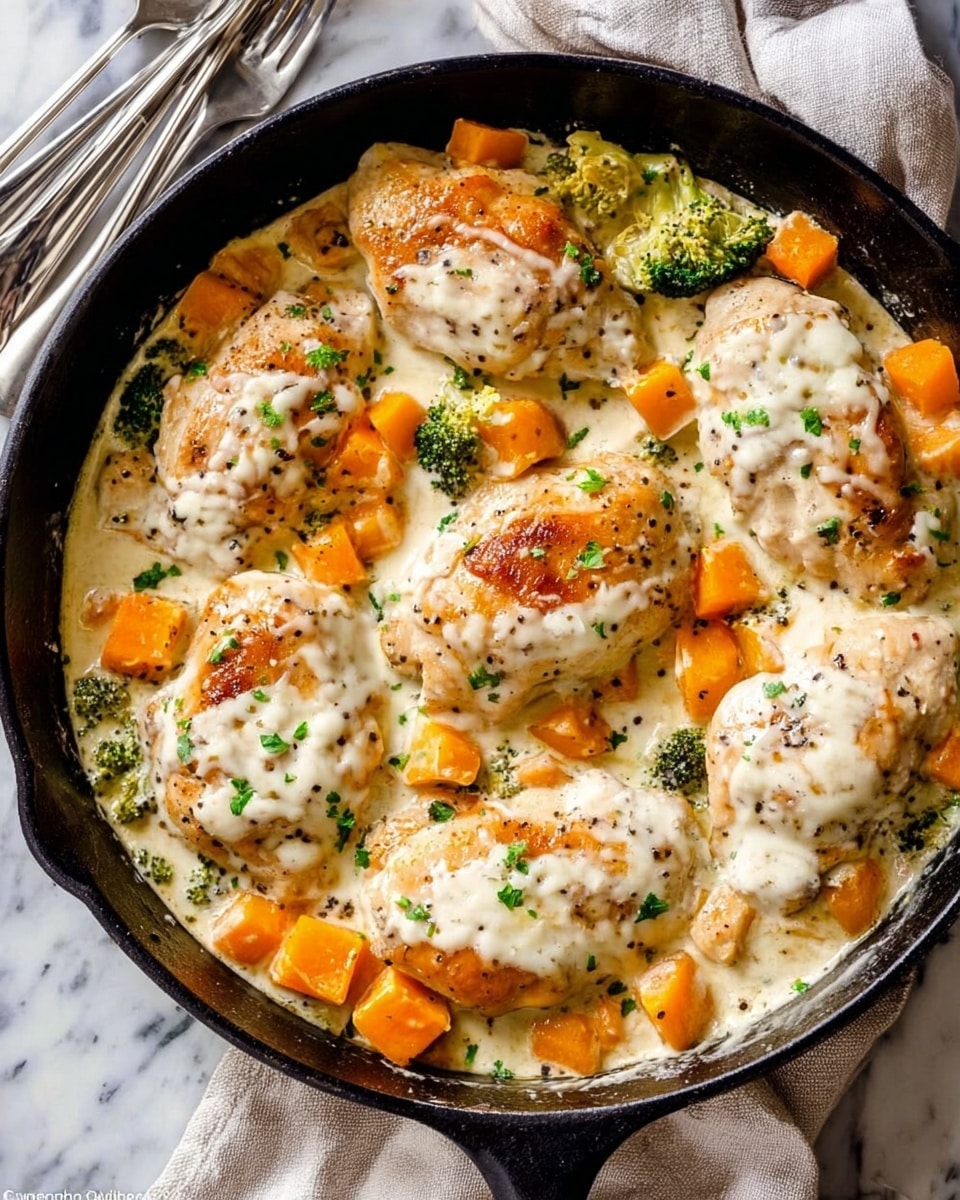
This Creamy Garlic Chicken & Vegetables recipe features tender chicken thighs baked with roasted broccoli and butternut squash, all enveloped in a rich, flavorful garlic cream sauce. Perfect for a comforting weeknight dinner, it combines simple ingredients with a luscious homemade sauce for a hearty, satisfying meal.
Ingredients
Vegetables
- 2 cups (150g) fresh broccoli florets
- 2 cups (300g) cubed butternut squash
Protein & Dairy
- 1.5 pounds (24 ounces/680g) boneless, skinless chicken thighs or breasts
- 1 Tablespoon (14g) unsalted butter
- 3/4 cup (180ml) half-and-half or whole milk
Pan Ingredients & Seasonings
- 2 Tablespoons olive oil, divided
- 1/4 cup (33g) diced onion
- 7–8 garlic cloves, minced
- 2 teaspoons dried parsley
- 1 and 1/4 cups (300ml) chicken broth (low-sodium preferred)
- 1 Tablespoon (8g) cornstarch
- 1/4 teaspoon salt
- 1/4 teaspoon ground black pepper
- Additional salt and pepper for vegetables and chicken
Optional Garnish
- Chopped fresh parsley
Instructions
- Roast the Vegetables: Preheat your oven to 400°F (204°C). Line a large baking sheet with parchment paper and spread out the broccoli florets and cubed butternut squash in a single layer. Drizzle with 1 tablespoon of olive oil and toss to coat evenly. Season with salt and pepper. Bake for 20 minutes until tender and slightly caramelized.
- Brown the Chicken: While the vegetables roast, heat the remaining 1 tablespoon of olive oil in a large 12-inch skillet over medium heat. Place the chicken thighs in the skillet, seasoning them with salt and pepper. Cook for 4 minutes on each side until they are lightly browned but not fully cooked through. Remove the chicken to a plate and loosely cover with foil to keep warm.
- Prepare the Garlic Sauce: Without wiping the skillet, add the butter and swirl it around as it melts. Add salt, pepper, diced onion, minced garlic, and dried parsley to the pan. Pour in the chicken broth, scraping up any browned bits from the bottom with a spoon. Allow the sauce to simmer gently for about 5 minutes, stirring occasionally.
- Thicken the Sauce: In a small bowl or with a fork, whisk together the half-and-half (or whole milk) and cornstarch until smooth. Slowly pour this mixture into the skillet, stirring or whisking continuously to combine. Cook for about 1 minute until the sauce thickens. Taste and adjust seasoning if necessary.
- Combine and Finish Baking: Return the browned chicken and the roasted vegetables to the skillet. Stir gently to coat everything in the creamy garlic sauce. Transfer the skillet to the preheated oven and bake for an additional 5–10 minutes, or until the chicken reaches an internal temperature of 165°F (74°C) and is fully cooked.
- Serve: Remove the skillet from the oven. Garnish with chopped fresh parsley if desired, and serve hot. Leftovers can be stored in the refrigerator for a few days and reheated on the stove or in the microwave.
Notes
- Use chicken thighs for moist, tender meat; breasts can be substituted but may cook faster and be less juicy.
- Roasting vegetables first enhances their natural sweetness and texture.
- Be careful not to overcook the chicken during browning as it finishes cooking in the oven.
- The cornstarch slurry helps thicken the sauce without lumps.
- Low-sodium chicken broth is recommended to control salt levels, but regular broth can be used if preferred.
- Leftovers can be reheated gently on the stovetop or in the microwave to maintain flavor and texture.
Nutrition
- Serving Size: 1 serving (approx. 1/4 of recipe)
- Calories: 410
- Sugar: 4g
- Sodium: 290mg
- Fat: 21g
- Saturated Fat: 6g
- Unsaturated Fat: 13g
- Trans Fat: 0g
- Carbohydrates: 18g
- Fiber: 4g
- Protein: 38g
- Cholesterol: 110mg


