

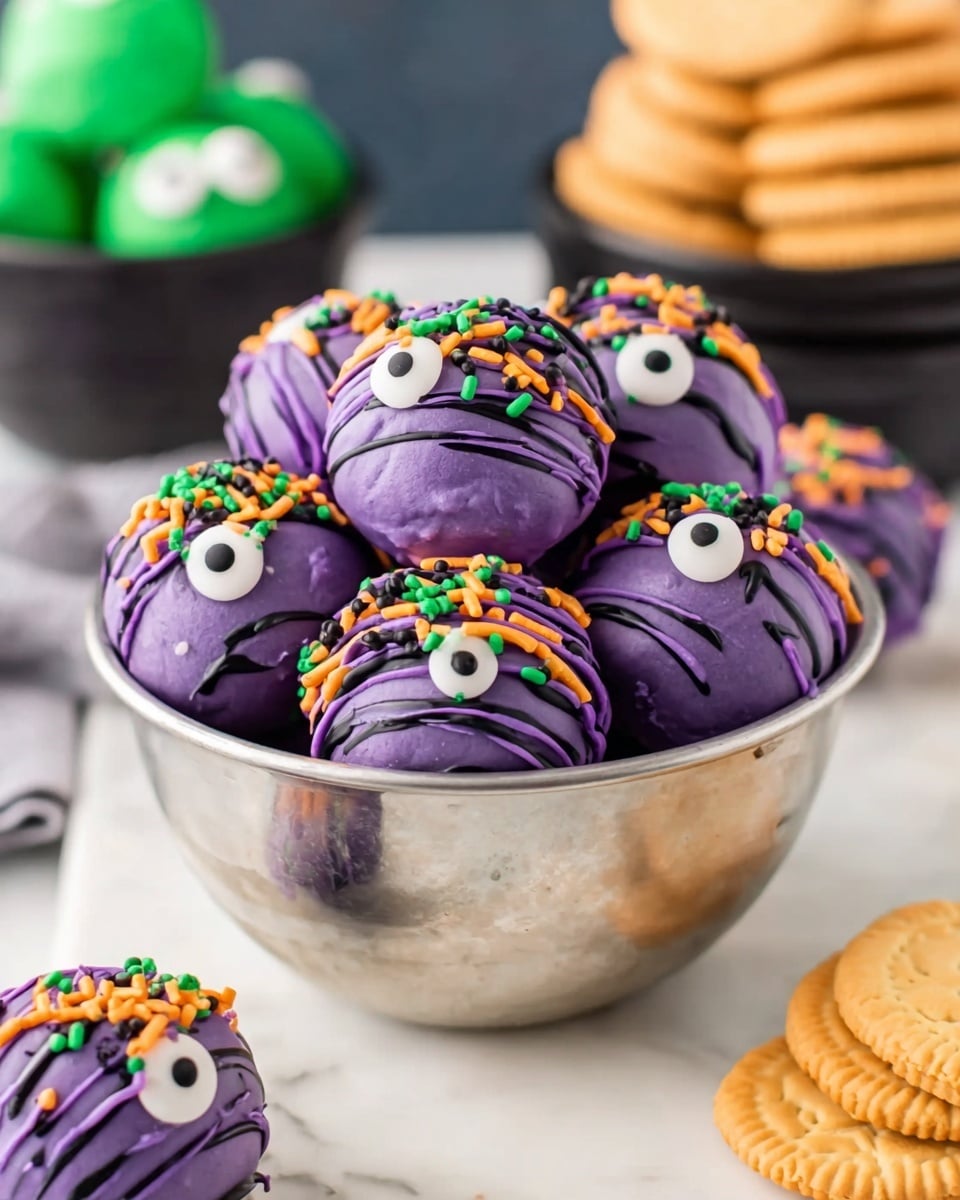
If you’re looking to wow your friends (or maybe just your own sweet tooth) with a seriously fun and festive treat, you’ve got to try my Oreo Eyeball Truffles Recipe. These creepy-cute little monsters are super easy to make and perfect for Halloween parties, themed get-togethers, or anytime you want a playful dessert that tastes just as good as it looks. Trust me, once you dip those golden Oreo truffle balls into colorful candy melts and top them with googly candy eyes, you’ll be hooked – and so will everyone around you!
Why You’ll Love This Recipe
- Simple Ingredients: You just need a handful of things, mostly pantry staples, making this recipe super accessible.
- Fun and Festive: The eyeball decoration is a total crowd-pleaser and adds a playful spooky vibe to your dessert table.
- No Baking Required: Perfect if you want delicious treats but don’t want to turn on the oven, especially during hot weather.
- Customizable: You can easily switch up colors, decorations, or even mix in different candies to make them uniquely yours.

Ingredients You’ll Need
The beauty of the Oreo Eyeball Truffles Recipe is that it uses classic, familiar ingredients that come together to make something extraordinary. Make sure to pick good quality cream cheese and consider mixing up candy melts colors for a creative twist!
- Golden Oreos: The golden ones give a nice vanilla flavor and a light color that pops under your candy coating.
- Cream cheese: I always use full-fat and let it soften to room temperature for a silky smooth truffle mixture.
- Colored candy melts: These help you create the perfect eyeball look – plus, they set quickly and harden beautifully.
- Color-matching sprinkles: They add “hair” and texture; find sprinkles that complement your candy melt color for a seamless finish.
- Large candy eyes: The star of the show! You can also get creative and use smaller eyes or make your own if needed.
Variations
I love how versatile this recipe is! Playing around with colors and decorations makes it feel fresh every time I make it. You can absolutely personalize it to match any party theme or dietary need.
- Chocolate Oreo base: I’ve swapped golden Oreos for classic chocolate Oreos, and it creates a spooky dark eyeball that’s equally delicious.
- Dairy-free option: Use vegan cream cheese and dairy-free candy melts so your friends with allergies can join in on the fun.
- Fruit twist: Top each truffle with a small slice of dried fruit or a flavored sprinkle to add contrast and complexity.
- More monstrous: Experiment with gummy worms or candy corn to add little monster limbs or teeth alongside the eyeballs.
How to Make Oreo Eyeball Truffles Recipe
Step 1: Crush and Combine the Oreos & Cream Cheese
Start by throwing those golden Oreos into a food processor and crushing them to fine crumbs. If you don’t have one, no worries—a Ziploc bag and rolling pin work just as well! Just crush the cookies completely, filling included. Then, add in your softened cream cheese. Pulse or mix until you get a smooth, cohesive dough that’s easy to scoop and roll. I usually scrape the sides a couple of times to make sure everything blends evenly.
Step 2: Scoop and Chill
I like using a 1½-tablespoon cookie scoop here to keep everything uniform—it makes rolling the dough into balls way easier and the truffles look so much better when they’re all about the same size. Place your little truffle balls on a parchment-lined baking sheet, then pop them in the fridge for at least 15 to 30 minutes. Chilling firms them up so they’re easier to coat later. Sometimes I let them chill up to an hour if my schedule allows.
Step 3: Melt Candy and Dip Truffles
When your truffles are firm, it’s time for the colorful fun. Microwave your colored candy melts in a microwave-safe bowl for 45 seconds, give it a good stir, then continue microwaving at 10- or 20-second intervals until your candy melt mixture is smooth and silky. Be patient here—overheating can cause the candy melts to seize. Then work in batches, dipping each chilled truffle until fully coated. Gently shake off excess and set them back on clean parchment. This step is my favorite because the transformation is so satisfying!
Step 4: Add Eyes and Sprinkles, Chill Again
Right after dipping, press one large candy eye onto the “front” of each truffle while the coating is still soft. Then sprinkle color-coordinated sprinkles on the top to create “hair” and personality for each eyeball. Pop the whole tray back in the fridge for at least 30 minutes to let the candy set up completely. Seeing these little monsters come to life here is such a treat.
Pro Tips for Making Oreo Eyeball Truffles Recipe
- Use Room Temperature Cream Cheese: This tricks helps you avoid lumps and get a smooth truffle dough every time.
- Work Quickly with Candy Melts: They set fast, so dip and decorate in small batches to keep everything smooth.
- Customize Eye Placement: I like giving each truffle a slightly different vibe by positioning the candy eyes off-center or at funny angles.
- Avoid Overheating Candy Melts: It can cause the coating to seize or become grainy, so heat gradually and stir often.
How to Serve Oreo Eyeball Truffles Recipe
Garnishes
When I serve my Oreo Eyeball Truffles, I usually scatter a few extra colorful sprinkles around the platter for a festive look. On occasion, I add some mini gummy worms crawling around the eyes—that little touch makes the display irresistible for both kids and adults!
Side Dishes
You’ll find these eyeball truffles paired perfectly with a simple fruit punch or a spooky-themed hot chocolate. For a party, I arrange them alongside classic Halloween cookies and popcorn for a full dessert spread that guests devour.
Creative Ways to Present
For a party, I’ve placed the truffles in mini cupcake liners and arranged them on tiered stands like little eyeball bouquets. Another fun idea is to serve them on black plates or trays sprinkled with edible glitter or colored sugar for extra spooky sparkle—guaranteed to impress your guests!
Make Ahead and Storage
Storing Leftovers
Once your Oreo Eyeball Truffles are fully set, keep them in an airtight container in the fridge. They’ll stay fresh and tasty for up to one week. I like to let them sit at room temperature for about 10 minutes before serving so the cream cheese center is soft and creamy again.
Freezing
These truffles freeze wonderfully. I wrap them individually in plastic wrap before placing them in a freezer-safe container. That way, they don’t stick together. You can freeze for 2-3 months and thaw them in the fridge overnight when you’re ready to enjoy.
Reheating
Since these are meant to be eaten chilled or at room temp, I don’t really recommend heating Oreo Eyeball Truffles. Simply thaw in the fridge and bring them to room temperature before serving. This keeps the texture perfect and the candy coating intact.
FAQs
-
Can I use regular Oreos instead of golden Oreos for this recipe?
Absolutely! Using regular chocolate Oreos will give your truffles a richer, darker flavor. The only difference is the appearance; your eyeballs will be darker, which can add to the spooky factor. Just crush and mix them the same way.
-
What if I can’t find candy eyes?
No worries! You can get creative by making your own candy eyes using white and black candy melts piped onto parchment paper and let them set. Alternatively, use other small candies like mini chocolate chips or colorful sprinkles to mimic eyeballs.
-
Can I make these truffles ahead of time?
Yes! You can prepare the truffles and decorate them a day or two in advance. Just store them in an airtight container in the refrigerator and take them out about 10 minutes before serving for the best texture and flavor.
-
How can I prevent the candy coating from cracking?
Make sure your truffles are fully chilled before dipping, and don’t overheat your candy melts. Also, letting the coated truffles set in the refrigerator gradually helps the candy harden smoothly without cracking.
Final Thoughts
I absolutely love how this Oreo Eyeball Truffles Recipe turns out every time – it’s fun, approachable, and instantly adds charm to any occasion. When I first made these, I was nervous about getting the candy melts just right, but once I did, it was pure magic watching those eyeballs “come alive.” Whether you’re making these with kids or for a spooky party, you’ll enjoy how simple and satisfying they are to make. Give this recipe a try the next time you want a dessert that’s both playful and delicious – your sweet tooth (and your guests) will thank you!
Print
Oreo Eyeball Truffles Recipe
- Prep Time: 30 minutes
- Cook Time: 0 minutes
- Total Time: 1 hour 15 minutes
- Yield: 22 truffles
- Category: Dessert
- Method: No-Cook
- Cuisine: American
Description
Oreo Eyeball Truffles are festive, fun, and spooky treats perfect for Halloween or any monster-themed party. Made by combining crushed golden Oreos with cream cheese, these truffles are coated in colorful candy melts and decorated with large candy eyes and sprinkles to resemble googly-eyed monsters. Easy to make and no-bake, they offer a creamy, crunchy texture and a playful appearance that delights kids and adults alike.
Ingredients
Truffle Base
- 19.1 ounces family-size package of golden Oreos
- ¾ package (8-ounce) cream cheese, room temperature
Coating and Decoration
- 12 ounce bag of colored candy melts
- ½ cup color-matching sprinkles
- 24 large candy eyes
Instructions
- Crush the Oreos: Place the Oreos in a food processor and crush until they are finely crumbled, ensuring an even texture for the truffle base.
- Mix with Cream Cheese: Add the softened cream cheese to the crushed Oreos and pulse the food processor until the mixture is well combined and forms a dough-like consistency.
- Form Truffle Balls: Using a 1½ tablespoon cookie scoop, portion out the dough and roll each scooped portion into smooth balls by hand.
- Chill the Truffles: Arrange the truffle balls on a large cookie sheet lined with parchment paper, then place them in the refrigerator for 15 to 30 minutes, or up to an hour, to firm up before coating.
- Melt Candy Coating: When ready to decorate, melt the candy melts in a microwave-safe medium bowl by heating for 45 seconds and stirring well. Continue heating in 10-20 second increments, stirring after each, until the candy melts are completely smooth.
- Dip Truffles in Candy Melt: Working in batches, dip each chilled truffle into the melted candy coating until fully covered. Set them on a fresh sheet of parchment paper on a hard surface to rest.
- Add Eyes and Sprinkles: While the coating is still wet, press a large candy eye onto the front of each truffle. Sprinkle color-matching sprinkles over the top to mimic hair and add playful texture.
- Set the Coating: Place the decorated truffles back into the refrigerator for at least 30 minutes, or until the candy coating has hardened completely.
- Serve and Enjoy: Once set, your monster eyeball truffles are ready to be enjoyed. Store them appropriately or share them at your next party!
Notes
- Storage: Store your monster eyeball truffles in an airtight container in the refrigerator for up to one week. Allow them to come to room temperature before serving for the best texture and flavor.
- Freezing: You can freeze these truffles in a freezer-safe container for 2-3 months. Thaw them overnight in the refrigerator before serving.
- Cream Cheese: Use full-fat cream cheese for the richest flavor and texture. Reduced-fat options may result in less creamy truffles.
- Crushing Oreos Without a Food Processor: If you don’t have a food processor, place Oreos in a Ziploc bag and crush them using a rolling pin until finely ground, ensuring all filling remains.
- Candy Melt Colors: Feel free to customize the colors of candy melts and sprinkles to create personalized looks. You can also mix colors or use white or dark chocolate melts as alternatives.
- Eye Decorations: If large candy eyes are unavailable, use multiple smaller eyes or create your own by piping white and black candy melts onto parchment and letting them set. Other candy decorations like gummy worms, candy corn, or chocolate chips can be used for varied monster designs.
Nutrition
- Serving Size: 1 truffle
- Calories: 150
- Sugar: 14g
- Sodium: 90mg
- Fat: 9g
- Saturated Fat: 6g
- Unsaturated Fat: 2g
- Trans Fat: 0g
- Carbohydrates: 16g
- Fiber: 0.5g
- Protein: 2g
- Cholesterol: 15mg

