

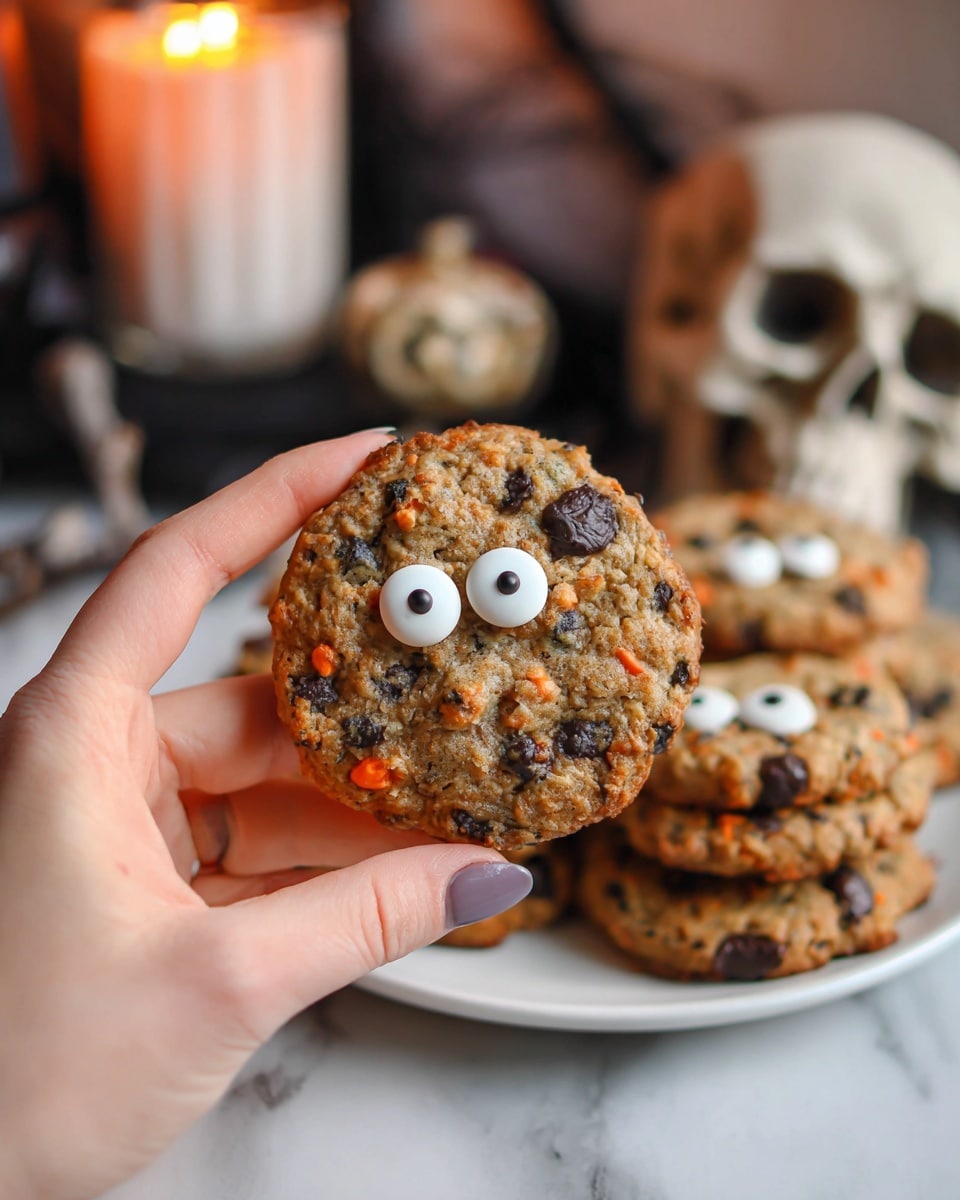
If you’re hunting for a fun, festive treat that captures the spirit of spooky season, you’re going to absolutely adore this Halloween Chocolate Chip Cookies Recipe. They’re not just your average chocolate chip cookies – with the addition of colorful Halloween sprinkles and optional candy eyes, these cookies bring a playful vibe that’s perfect for parties, family gatherings, or simply cozying up with a cup of hot cocoa. I can tell you from experience, once you make these cookies, your family and friends will be begging for them every October!
Why You’ll Love This Recipe
- Perfectly Soft & Chewy: The melted butter approach gives these cookies an irresistible chew that’s just dreamy.
- Festive & Fun: Halloween sprinkles and candy eyes turn simple cookies into a spooky treat that everyone loves.
- Easy to Prep Ahead: Chilling the dough lets you spread out your work – pop them in the fridge or freezer until you’re ready to bake.
- Crowd-Pleaser: Whether you’re baking for kids or adults, these cookies fly off the plate every time.

Ingredients You’ll Need
Each ingredient in this Halloween Chocolate Chip Cookies Recipe plays an important role—whether it’s buttery richness, sweet chewiness, or those colorful festive touches. I always recommend using good-quality chocolate chips and real butter because trust me, you’ll taste the difference!
- Unsalted Butter: Melted for that soft, chewy texture that makes these cookies so addictive.
- Granulated Sugar: Adds just the right touch of sweetness and helps with the cookie’s crisp edges.
- Light Brown Sugar: Keeps the cookies moist and gives a lovely caramel undertone.
- Large Egg: Binds everything together and adds richness.
- Vanilla Extract: Because vanilla boosts all the flavors and brings warmth to the cookie.
- Salt: Balances the sweetness and enhances the chocolate flavor.
- Baking Soda: Gives the cookies a nice lift and tender texture.
- All-Purpose Flour: Use the spoon-and-level method to avoid dense cookies—trust me, it really helps!
- Chocolate Chips: The star of the show – choose semi-sweet for classic flavor or mix in some dark chocolate for a little extra punch.
- Halloween Sprinkles: These give your cookies a festive pop of color and fun. I love using a mix of orange, black, and purple sprinkles.
- Candy Eyes (optional): They add a playful spooky touch that kids (and adults!) adore.
Variations
I love to make this Halloween Chocolate Chip Cookies Recipe my own by swapping out a few ingredients or adding toppings based on what I have on hand. It’s so easy to customize and still get amazing results.
- Gluten-Free Version: I’ve had great luck swapping the all-purpose flour for a gluten-free blend—just make sure it contains xanthan gum for binding.
- Nutty Twist: Sometimes I toss in chopped pecans or walnuts for extra crunch and flavor, which my family totally goes crazy for.
- Darker Chocolate: Switching up chocolate chips for chunks or adding some bittersweet chocolate intensifies the chocolate hit.
- Spooky Season Spice: Adding a pinch of cinnamon and pumpkin pie spice brings in that cozy fall vibe.
How to Make Halloween Chocolate Chip Cookies Recipe
Step 1: Mix Your Sweet, Buttery Base
Start by whisking your melted butter with the brown sugar and granulated sugar until everything is silky smooth. The melted butter makes these cookies wonderfully chewy, so resist the urge to swap it out for softened butter here. Once the sugars and butter are combined nicely, add in the vanilla extract and the egg, mixing until the batter looks uniform. This is the moment when you start smelling that inviting cookie goodness!
Step 2: Fold in the Dry Ingredients Gently
Next up, sprinkle in the flour, salt, and baking soda. I like to mix on low speed at first so you don’t get flour flying everywhere, then crank it up for just about 15-30 seconds until everything looks silky and combined. Remember, the golden rule is to avoid over-mixing here to keep your cookies tender and soft. Don’t forget to scrape down the sides of your bowl to incorporate every last bit of dough evenly.
Step 3: Bring on the Sprinkles and Chocolate Chips
This is the fun part—fold in your Halloween sprinkles and chocolate chips using a spatula or large spoon. I love how the sprinkles add surprise pops of color inside every bite. Be gentle so you don’t crush the sprinkles or smash the chips.
Step 4: Chill the Dough for That Perfect Texture
Using about 2-tablespoon-sized balls of dough (an ice cream scoop works perfectly here for consistency), place them on a parchment-lined sheet. Don’t worry too much about spacing because you’re not baking just yet—we’re going to chill the dough. Cover with plastic wrap and tuck it into the fridge for at least 1.5 to 2 hours, or pop it in for up to 24 if you want to prep ahead.
Step 5: Bake to Golden Perfection
When you’re ready, preheat your oven to 350℉. Arrange your dough balls on a baking sheet lined with parchment paper or a silicone mat, spacing them about 2 inches apart. Bake for 11-13 minutes, keeping a close eye—they’re done when the edges turn golden, but the centers remain soft. While the cookies are still warm, press on candy eyes if you’re using them to make them come alive with character.
Pro Tips for Making Halloween Chocolate Chip Cookies Recipe
- Melt Butter for Chewiness: Melting your butter before mixing helps create that soft, chewy cookie texture I love.
- Don’t Skip Chilling: Chilling the dough not only prevents cookie spread but lets the flavors develop—trust me, it’s worth the wait!
- Measure Flour Carefully: I always fluff the flour, spoon it into my measuring cup, then level it off to avoid dense cookies.
- Add Candy Eyes Right Away: Press candy eyes onto warm cookies for best sticking and maximum spooky effect.
How to Serve Halloween Chocolate Chip Cookies Recipe
Garnishes
I usually keep it simple with this recipe — the Halloween sprinkles and candy eyes do all the decorating work for me. But if you want to get fancy, dust a few cookies lightly with powdered sugar or drizzle with melted white chocolate for a ghostly effect.
Side Dishes
These cookies pair perfectly with classic fall drinks like hot apple cider, pumpkin spice lattes, or even a glass of cold milk to balance the sweetness. I also like to serve them alongside a bowl of roasted pumpkin seeds or caramel popcorn for a full-on Halloween snack spread.
Creative Ways to Present
One Halloween, I arranged these cookies on a large platter surrounded by small fake spider webs and plastic spiders for a spooky display. Another time, I individually wrapped them in cellophane tied with orange and black ribbons—perfect for giveaways or party favors. You can even stack them on a tiered cake stand for a striking presentation.
Make Ahead and Storage
Storing Leftovers
I keep my leftover cookies in an airtight container at room temperature, and I find they stay fresh for about 3 to 5 days—soft and chewy like when they were first baked. If the cookies start feeling a bit stale, just pop one in the microwave for 10 seconds and it revives beautifully.
Freezing
Here’s a little trick: I freeze unbaked cookie dough balls on a sheet pan, then transfer them to a freezer-safe bag. When I’m ready to bake, I just toss the chilled dough balls straight on the baking sheet and add a couple of extra minutes to the baking time. This helps keep me ready for unexpected guests or late-night cookie cravings!
Reheating
When reheating leftover cookies, I prefer to warm them slightly in a preheated oven at 300℉ for 5 minutes or microwave for 10-15 seconds. This revives their softness without drying them out. Just watch closely so you don’t overheat!
FAQs
-
Can I use salted butter instead of unsalted in this recipe?
Yes, but reduce or skip the additional salt called for in the recipe to avoid the cookies tasting too salty. I find unsalted butter gives better control over the final flavor.
-
Why do I need to chill the cookie dough?
Chilling the dough solidifies the butter again, which helps prevent the cookies from spreading too much during baking. It also intensifies the flavors and improves the texture, making your cookies perfectly soft and chewy.
-
Can I use other types of sprinkles?
Absolutely! You can use any sprinkles you like. For Halloween, I recommend using orange, black, purple, or even shaped sprinkles to keep with the spooky theme. Just make sure they’re sturdy enough to hold up in baking.
-
How long will these cookies stay fresh?
Stored in an airtight container at room temperature, these cookies stay fresh and delicious for up to 5 days. For longer storage, freezing is your best bet.
-
Can I double or halve this recipe?
Yes, this Halloween Chocolate Chip Cookies Recipe is very forgiving. Just be sure to maintain the same chilling time for best results, and watch your baking times closely when altering batch sizes.
Final Thoughts
This Halloween Chocolate Chip Cookies Recipe quickly became my go-to for seasonal baking because it’s just so easy, fun, and reliably delicious. Each bite feels like a little celebration of fall – soft, sweet, and packed with chocolatey goodness and festive flair. I love how you can prep the dough days ahead and still serve fresh-baked cookies anytime. Honestly, once you try this, you’ll understand why it’s my family’s holiday favorite, and I can’t wait for you to enjoy it as much as we do!
Print
Halloween Chocolate Chip Cookies Recipe
- Prep Time: 10 minutes
- Cook Time: 13 minutes
- Total Time: 2 hours 25 minutes
- Yield: 18-20 cookies
- Category: Dessert
- Method: Baking
- Cuisine: American
Description
Delight in these festive Halloween Chocolate Chip Cookies, featuring a perfect blend of rich melted butter, brown and granulated sugars, and plenty of chocolate chips, all enhanced with fun Halloween sprinkles and optional candy eyes. These soft, chewy cookies are chilled before baking to maintain their shape and are ideal for spooky celebrations or everyday indulgence.
Ingredients
Wet Ingredients
- 1/2 cup unsalted butter, melted
- 1 large egg
- 1 teaspoon vanilla extract
Sugars
- 1/3 cup granulated sugar (67 g)
- 1/2 cup packed light brown sugar (100 g)
Dry Ingredients
- 1 1/2 cups all-purpose flour, spooned and leveled (186 g)
- 1/2 teaspoon salt
- 1/2 teaspoon baking soda
Add-ins
- 1 1/2 cups chocolate chips
- 1/2 to 3/4 cup Halloween sprinkles
- Candy eyes (optional)
Instructions
- Combine sugars and butter: In a bowl, mix the melted unsalted butter, light brown sugar, and granulated sugar until the mixture is smooth and fully combined, forming a creamy base for your cookie dough.
- Add egg and vanilla: Stir in the vanilla extract and the large egg, mixing thoroughly until the ingredients are well incorporated and the batter is smooth.
- Mix dry ingredients: Add the all-purpose flour, salt, and baking soda to the wet mixture. Mix on low speed just until the ingredients begin to come together. Then increase the speed and mix for an additional 15-30 seconds, scraping down the bowl’s sides to ensure uniformity. Avoid over-mixing to maintain cookie tenderness.
- Fold in chips and sprinkles: Using a spatula or large spoon, gently fold the Halloween sprinkles and chocolate chips into the dough to distribute them evenly without breaking.
- Portion dough and chill: Scoop approximately 2-tablespoon balls of dough onto a baking sheet lined with parchment paper. The spacing isn’t critical as the dough will chill before baking. Cover the sheet tightly with plastic wrap and refrigerate for 1.5 to 2 hours, or up to 24 hours, to firm up the dough for better shape retention.
- Preheat oven: Once chilled, preheat your oven to 350°F (175°C) in preparation for baking.
- Arrange dough for baking: Place the dough balls onto a lined baking sheet about 2 inches apart to allow for spreading during baking.
- Bake the cookies: Bake in the preheated oven for 11-13 minutes, or until the cookie edges turn golden, indicating they’re perfectly baked.
- Add candy eyes (optional): Upon removing the cookies from the oven, immediately press candy eyes onto each cookie if desired, so they adhere while the cookies are still warm.
- Cool and serve: Let the cookies cool completely on the baking sheet before enjoying this festive treat or storing.
Notes
- Use the spoon and swipe method to measure flour accurately: fluff the flour, spoon into the measuring cup, then level with a knife.
- An ice cream scoop or cookie scoop is helpful for getting evenly sized cookies.
- Chill the dough for at least 1.5 to 2 hours to prevent excessive spreading; dough can be chilled up to 24 hours ahead of baking.
- This recipe yields about 18-20 cookies; it can be doubled for larger batches.
- Stored in an airtight container at room temperature, cookies last 3-5 days, or freeze baked or unbaked cookies for 2-3 months.
Nutrition
- Serving Size: 1 cookie
- Calories: 160
- Sugar: 12g
- Sodium: 110mg
- Fat: 8g
- Saturated Fat: 5g
- Unsaturated Fat: 2.5g
- Trans Fat: 0g
- Carbohydrates: 21g
- Fiber: 1g
- Protein: 2g
- Cholesterol: 30mg

