

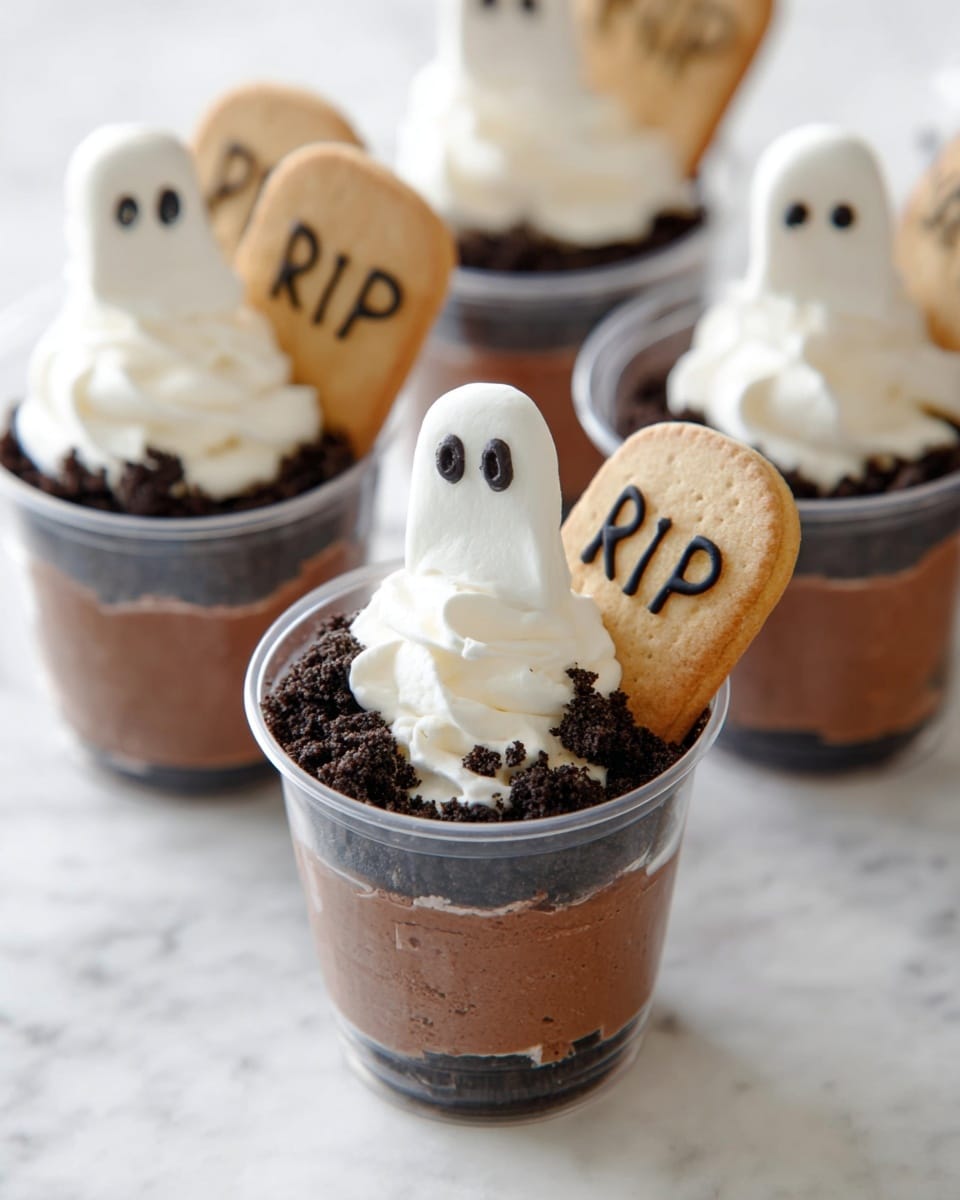
If you’re looking for a spooktacular dessert that’s both easy to make and fun to share, this Ghosts in the Graveyard Chocolate Pudding Cups Recipe is exactly what you need! I absolutely love how these pudding cups bring together creamy chocolate, crunchy cookie “dirt,” and adorable ghostly whipped cream toppers that make Halloween—or any autumn gathering—extra festive. Trust me, once you try this recipe, your family and friends will be begging for it year after year!
Why You’ll Love This Recipe
- Super Simple to Make: The pudding base whips up quickly with instant mix—perfect for busy days or last-minute parties.
- Kid-Friendly and Fun: Decorating with ghosts and “R.I.P.” tombstones turns dessert into an activity the kids love helping with.
- Textures That Delight: Creamy pudding, crunchy Oreo dirt, and fluffy whipped cream ghosts make every bite a treat.
- Make Ahead Magic: You can prep it up to a day in advance and just add the ghosts before serving.

Ingredients You’ll Need
For the perfect balance of creamy, crunchy, and spooky, the ingredients here work beautifully together. I love that you can find everything easily at the store without hunting for anything exotic, which makes this Ghosts in the Graveyard Chocolate Pudding Cups Recipe totally accessible.
- Instant chocolate pudding package: This is the key to getting that rich chocolate flavor in no time.
- Cold water: Keep it cold to help the pudding set nicely and have a smooth texture.
- Sweetened condensed milk: Adds creaminess and a touch of sweetness that makes the pudding so luscious.
- Heavy whipping cream: Divided for folding into the pudding and whipping into ghostly peaks on top.
- Oreo cookies (about 24): Crushed to look like dirt—this is such a fun and familiar texture everyone loves.
- Milano cookies: Perfect as “tombstones” for that spooky graveyard vibe.
- Edible ink marker or melted chocolate: For writing “R.I.P.” on the tombstone cookies—gets the creepy factor just right!
- Powdered sugar: Sweetens the whipped cream ghosts to perfection without making them too heavy.
- Edible candy eyes: These little guys bring the ghosts to life with big, silly eyes.
- Optional candy like gummy worms or candy pumpkins: To add extra Halloween flair if you want to go all out.
- Clear cups for serving: I recommend 6–8 ounce sizes so each serving looks like its own spooky little graveyard.
Variations
I love making this Ghosts in the Graveyard Chocolate Pudding Cups Recipe my own by switching up a few things here and there. Feel free to get creative – it’s all about having fun and making it your signature spooky treat.
- Use different cookie “dirt” bases: I’ve tried crushed graham crackers or chocolate wafer cookies instead of Oreos for a lighter or nuttier twist.
- Dairy-free adaptation: I swapped the heavy cream for coconut cream once, and it still whipped beautifully with a slightly tropical note.
- Fruity surprise: Layer in some fresh raspberries or sliced strawberries for a pop of color and tartness beneath the pudding.
- Extra spooky decorations: Adding gummy worms inside the dirt layers always gets big gasps and laughs from my Halloween guests.
How to Make Ghosts in the Graveyard Chocolate Pudding Cups Recipe
Step 1: Whip Up Your Chocolate Pudding Base
Start by combining the instant chocolate pudding mix, cold water, and sweetened condensed milk in a blender jar. Blend until it’s super smooth—this trick really helps avoid any lumps. After pouring it into a mixing bowl, pop it into the fridge so it can chill while you prep the rest. Pro tip: chilling the pudding first helps it set nicely, making the final texture creamy yet firm.
Step 2: Fold in the First Whipped Cream
In a medium bowl, beat 1 cup of the heavy whipping cream until it holds soft peaks (think fluffy but still a little droopy). Then gently fold this whipped cream into your chilled pudding mixture—folding is key here to keep it light and airy. This step is what gives the pudding its dreamy texture, so be patient and fold carefully!
Step 3: Layer Your Pudding Into Cups
Divide the pudding evenly among your clear cups or jars. I love using clear cups because it shows off the layers and sets the creepy graveyard mood. Place the cups in the fridge to keep everything cold until you’re ready for the next step. This can be done up to 24 hours ahead, which is a lifesaver when you want to prep in advance.
Step 4: Make the “Dirt” and Add Tombstones
Pulse Oreos in a blender to make fine crumbs. If your blender struggles, just do it in batches—it’s worth the little extra effort. Sprinkle this Oreo “dirt” liberally on top of each pudding cup. Then, take your Milano cookies and write “R.I.P.” on each one with the edible ink marker or melted chocolate in a piping bag. Insert one tombstone into the Oreo dirt at a slant so it looks like it’s standing in the graveyard.
Step 5: Whip the Ghostly Toppers
Beat the remaining cup of heavy cream with the powdered sugar until stiff peaks form—this whipped cream needs to hold its shape for those ghost designs. Transfer it to a large Ziploc bag, snip a corner, and swirl the cream on top of each cup like little ghosts rising from the dirt. Add edible candy eyes to give your ghosts playful personalities. It’s such a simple detail that makes the whole dessert pop!
Pro Tips for Making Ghosts in the Graveyard Chocolate Pudding Cups Recipe
- Perfect Pudding Texture: Blend the pudding mix with sweetened condensed milk and water for a luxuriously smooth base every time.
- Fold, Don’t Stir: Folding the whipped cream into the pudding keeps it fluffy—avoid stirring vigorously or you’ll lose that light texture.
- Crafty Decorations: If you don’t have an edible marker, melted chocolate in a small baggie works just as well to write on the tombstones.
- Whip Cream Watch: Stop whipping at stiff peaks—not so far that it becomes butter. It makes the ghost swirls hold beautifully without cracking.
How to Serve Ghosts in the Graveyard Chocolate Pudding Cups Recipe
Garnishes
I usually stick with the edible candy eyes to keep the ghosts cute and goofy, but sometimes I add a few gummy worms peeking out of the Oreo dirt for an extra playful touch. Powdered sugar dusted lightly over the “graveyard” adds a spectral, misty look that I adore—like a little fog rolling through the scene.
Side Dishes
This dessert pairs perfectly with a crisp apple cider or even a warm pumpkin latte for a full fall-themed spread. If you’re serving a Halloween party, I like to put out saltier snacks like popcorn or spiced nuts alongside these pudding cups to balance all the sweetness.
Creative Ways to Present
Try serving these in mini glass jars with little wooden spoons tied with black and orange twine for a rustic, festive vibe. For a party, I’ve even used tall mason jars and layered gummy worms inside to look like they’re crawling through the “dirt.” The more playful, the better!
Make Ahead and Storage
Storing Leftovers
I store any leftover pudding cups in the refrigerator covered tightly with plastic wrap or an airtight lid. They keep beautifully for up to 2 days without losing the creamy texture or freshness. Just don’t add the ghost whipped cream topping until right before serving—otherwise, it can get watery.
Freezing
Freezing these isn’t my favorite because the pudding texture changes a bit once thawed, but if you’re in a pinch, freeze without whipped cream toppings and thaw overnight in the fridge. Add the ghosts fresh after it’s thawed for the best appearance and taste.
Reheating
This dessert is best served chilled, so reheating isn’t really recommended. Instead, pop the cups back in the fridge until cold and fresh again, which usually takes just 30 minutes to an hour.
FAQs
-
Can I make the Ghosts in the Graveyard Chocolate Pudding Cups Recipe dairy-free?
Absolutely! Swap the heavy cream for full-fat coconut cream (chilled and whipped) and use a dairy-free pudding mix or make your own pudding from scratch with non-dairy milk. It won’t be exactly the same texture but still delicious and ghostly!
-
How far in advance can I prepare these pudding cups?
You can prepare the pudding cups and Oreo dirt up to 24 hours ahead. Just wait to pipe on the whipped cream ghosts and add the candy eyes right before serving to keep them fresh and fluffy.
-
What if I can’t find Milano cookies to use as tombstones?
No worries! Use any rectangular or oval cookie that’s sturdy enough to hold up when inserted. Shortbread or even store-bought biscotti works well—and you can still decorate them with edible ink or chocolate.
-
Can I add other decorations to make it more festive?
Definitely! Gummy worms, candy pumpkins, or even edible glitter make for extra fun layers. Just add them carefully so the dessert doesn’t get overloaded, and everyone still gets to see those cute ghost toppers.
Final Thoughts
I honestly can’t recommend this Ghosts in the Graveyard Chocolate Pudding Cups Recipe enough when you want a dessert that feels festive but doesn’t stress you out. It’s fun to make, beautiful to serve, and the crowd-pleasing combination of textures and flavors keeps everyone coming back for seconds. So next time you want to impress without spending hours in the kitchen, give this a try—you’ll be so glad you did!
Print
Ghosts in the Graveyard Chocolate Pudding Cups Recipe
- Prep Time: 30 minutes
- Cook Time: 0 minutes
- Total Time: 30 minutes
- Yield: 8 pudding cups
- Category: Dessert
- Method: No-Cook
- Cuisine: American
Description
Ghosts in the Graveyard Chocolate Pudding Cups are a spooky and delicious dessert perfect for Halloween. This layered treat features creamy chocolate pudding mixed with sweetened condensed milk and whipped cream, topped with Oreo cookie ‘dirt,’ Milano cookie ‘tombstones,’ and whipped cream ghosts decorated with candy eyes. Fun to make and visually appealing, these pudding cups blend simple ingredients into a festive treat that delights kids and adults alike.
Ingredients
Pudding Cups
- 1 3.9-ounce package instant chocolate pudding
- 1 cup cold water
- 1 14-ounce can sweetened condensed milk
- 2 cups heavy whipping cream, divided
- 2 cups Oreo cookies crushed (about 24 Oreos)
- 1 package Milano cookies (any variety)
Decorations
- Edible ink marker or ¼ cup chocolate chips mixed with 1 teaspoon canola oil, melted (used as piping chocolate)
- ¼ cup powdered sugar
- Edible candy eyes (available in cake decorating section)
- Additional candy for decorating, such as gummy worms or candy pumpkins (optional)
- Clear cups for serving (6 – 8 ounce cups recommended)
Instructions
- Make the pudding mixture: In the jar of a blender, combine 1 cup cold water, the 14-ounce sweetened condensed milk, and the instant chocolate pudding mix. Blend until smooth to create a rich chocolate base. Transfer the pudding mixture to a medium mixing bowl and place it in the refrigerator to chill.
- Whip 1 cup heavy cream: In a separate medium mixing bowl, beat 1 cup of the heavy whipping cream with electric beaters until soft peaks form. This whipped cream is folded into the chilled pudding mixture to add lightness and creaminess.
- Combine pudding and whipped cream: Remove the pudding mixture from the refrigerator and gently fold in the whipped cream until completely combined, ensuring a smooth, airy texture.
- Assemble pudding cups: Distribute the pudding mixture evenly into clear individual cups or jars (6–8 ounce size). Place the pudding cups into the refrigerator to chill. This step can be done up to 24 hours ahead of time.
- Prepare Oreo ‘dirt’: Place roughly 20–24 Oreos into the blender jar and pulse until you have fine Oreo crumbs. If your blender struggles, work in 1-cup increments. Evenly sprinkle the Oreo crumbs over each pudding cup to resemble dirt.
- Create tombstones: Using an edible ink marker or the melted chocolate in a piping bag (a Ziploc bag with a tiny corner snipped off), write “R.I.P.” on the surface of each Milano cookie. Insert one decorated Milano cookie vertically into the side of each pudding cup to serve as a tombstone.
- Whip the remaining cream for ghosts: In a large mixing bowl, combine the remaining 1 cup of heavy cream with ¼ cup powdered sugar. Beat until stiff peaks form, ensuring the cream holds its shape but does not turn into butter.
- Pipe whipped cream ghosts: Transfer the stiff whipped cream into a large piping bag (or Ziploc bag with a corner cut). Swirl the whipped cream on top of each pudding cup to create ghost shapes, then carefully add two candy eyes to each ghost for a cute spooky effect.
- Optional decoration: For added fun, layer gummy worms inside the cups before adding the Oreo dirt or tuck gummy worms partially into the pudding. You can also top with candy pumpkins when placing the Milano tombstones.
Notes
- If adding extras like gummy worms or candy pumpkins, layer them within the pudding cups before applying Oreo crumbs or on top when inserting Milano cookies.
- Nutrition information does not include Milano cookies or any optional candy decorations like gummy worms or pumpkins.
- For best whipped cream stability, consider making Stabilized Whipped Cream in advance.
Nutrition
- Serving Size: 1 pudding cup (about 8 ounces)
- Calories: 420 kcal
- Sugar: 38 g
- Sodium: 160 mg
- Fat: 25 g
- Saturated Fat: 15 g
- Unsaturated Fat: 8 g
- Trans Fat: 0 g
- Carbohydrates: 45 g
- Fiber: 2 g
- Protein: 6 g
- Cholesterol: 85 mg


