

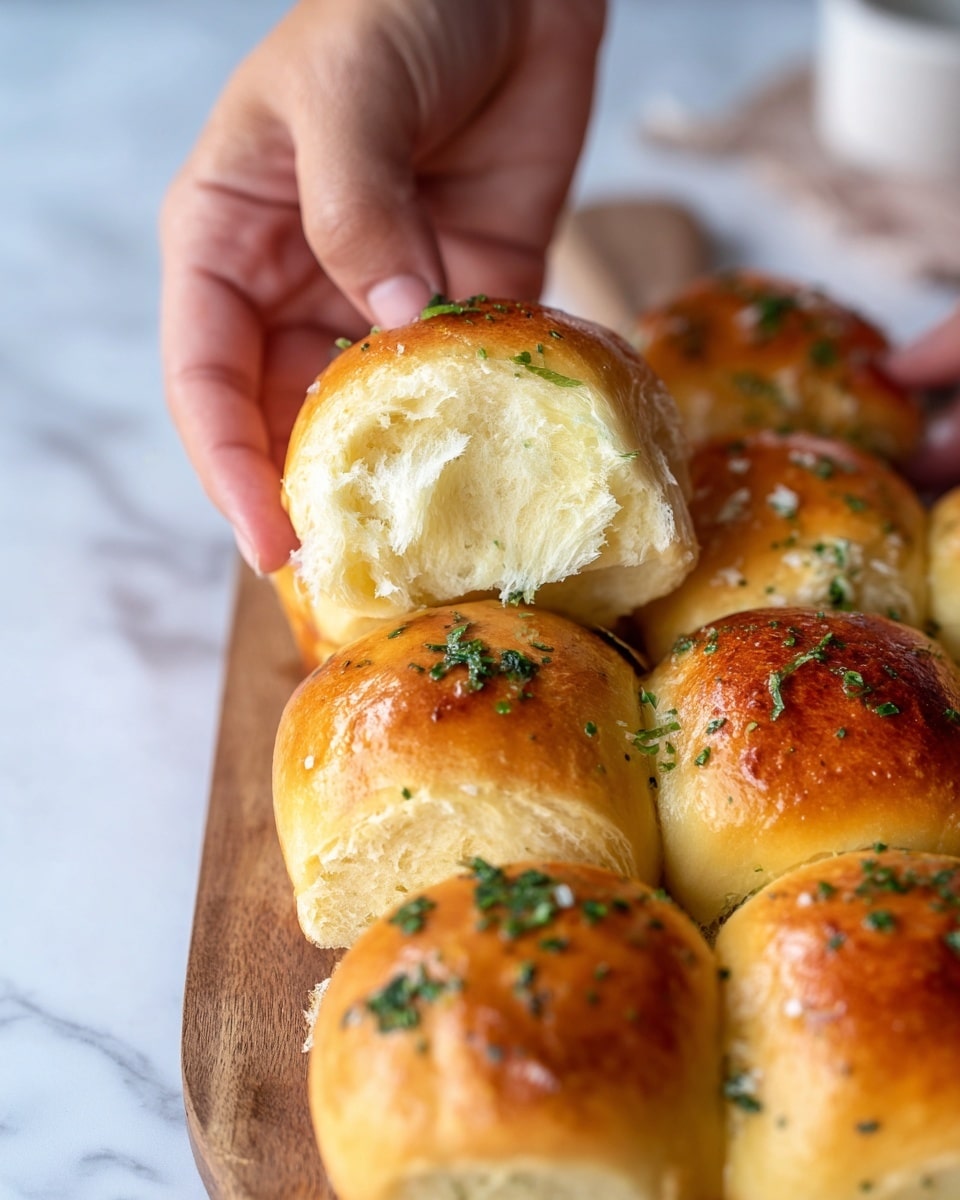
If you’re craving soft, fluffy bread that melts in your mouth and carries the rich flavors of garlic and butter, then you’re going to love this Easy Garlic Butter Dinner Rolls Recipe. I absolutely love how these rolls come out golden, shiny, and bursting with buttery garlic goodness — perfect for family dinners, special occasions, or even just a cozy night in. Trust me, once you try this recipe, you’ll find yourself making these rolls all the time!
Why You’ll Love This Recipe
- Deliciously Soft Texture: The dough kneads into a silky, elastic consistency that makes each roll airy and tender.
- Bursting With Flavor: Fresh garlic melted into butter creates a mouthwatering topping you’ll want to slather on everything.
- Perfect For Any Occasion: These rolls are elegant enough for holiday meals but easy enough for weeknight dinners.
- Beginner-Friendly: I’ve broken down the steps clearly so even first-timers can achieve bakery-quality results at home.

Ingredients You’ll Need
Every ingredient in this Easy Garlic Butter Dinner Rolls Recipe plays a vital role in getting that perfect flavor and fluffy texture. I always keep these essentials stocked because they work so well together, and you don’t need anything fancy.
- Whole milk: Warm it to about 110°F so the yeast activates perfectly without killing it.
- Active dry yeast or instant yeast: I often use instant yeast because it’s quicker to work with, but both yield amazing results.
- Sugar: Just enough sweetness to feed the yeast and balance the buttery garlic flavor.
- All-purpose flour: Use fresh, good-quality flour for the best dough texture.
- Large egg: Adds richness and helps bind everything together.
- Salt: Enhances flavor and controls yeast fermentation.
- Unsalted butter: Softened at room temperature, this enriches the dough and adds tenderness.
- Egg yolk and milk (for egg wash): Gives the rolls a shiny, golden crust that’s super inviting.
- Salted butter (for garlic butter): Using salted butter adds that perfect savory touch to the topping.
- Garlic cloves: Finely chopped fresh garlic brings that authentic, bold flavor.
- Freshly chopped parsley: Adds a pop of color and fresh herbaceous notes to the butter.
Variations
I love to tweak this Easy Garlic Butter Dinner Rolls Recipe depending on the season or what we’re having for dinner. You’ll find lots of fun ways to make it your own, whether you want to add extra herbs or make it a bit healthier.
- Herb Mix Variation: I sometimes swap out parsley for rosemary or thyme, and it gives the garlic butter a lovely twist that pairs perfectly with roasted meats.
- Cheesy Roll Variation: Add shredded mozzarella or cheddar inside the dough balls for a gooey surprise. My kids go crazy for this one!
- Whole Wheat Version: Replace half of the all-purpose flour with whole wheat flour for a nuttier flavor and added fiber without sacrificing softness.
- Vegan Adaptation: Use plant-based milk and vegan butter, and replace the egg with a flax egg — the texture isn’t quite the same, but still tasty!
How to Make Easy Garlic Butter Dinner Rolls Recipe
Step 1: Activate the Yeast and Mix the Dough
Start by stirring your warm milk with the yeast in a large bowl. I love this part because you get that gentle fizz as the yeast comes alive. Let it sit for about 5 minutes until it becomes nice and foamy—that’s your sign the yeast is ready. Then add the sugar, flour, egg, salt, and softened butter right into the same bowl. Use a sturdy spoon or your hands to mix until you get a shaggy dough. It’s okay if it looks rough at this point; it will come together as you knead.
Step 2: Knead Until Smooth and Elastic
This is where the magic happens. Turn your dough out onto a clean surface and knead for at least 15 minutes using a push-pull motion with your palms. The dough will be sticky at first, which made me nervous the first time I tried this, but stick with it—you don’t want to add more flour! Eventually, it becomes silky and stretchy, and you’ll know it’s ready when it passes the “windowpane test.” That means you can stretch a small piece of dough thin enough to see light through it without tearing.
Step 3: First Rise in a Warm Spot
Place your kneaded dough into a lightly oiled bowl, cover it tightly with plastic wrap, and set it somewhere warm and humid. I use my microwave with a small bowl of hot water inside, and it works like a charm. Let it rise until it doubles in size—usually about 90 minutes. This slow rise is what gives the rolls their light texture and makes them so tender.
Step 4: Shape the Rolls
After the dough has risen, punch it down gently (it always feels so satisfying!). Then divide it into 12 equal pieces. To shape each roll, place a piece in one palm and gently twist it with your other palm cupped slightly, rolling it until it’s a smooth, tight ball. This technique helps avoid wrinkles or cracks on the surface, giving you those beautiful domed rolls. Arrange the rolls on a parchment-lined 9×13″ baking sheet, spacing them evenly.
Step 5: Egg Wash and Second Rise
Mix the egg yolk and milk to make the egg wash, then brush it generously over the rolls. This step not only helps with browning but also gives a lovely sheen. Let the rolls rise again in a warm place for about 30-45 minutes, until they puff up noticeably. Meanwhile, preheat your oven to 350°F (conventional).
Step 6: Final Egg Wash and Bake
Right before baking, brush the rolls with another layer of the egg wash to boost the shimmer and help form that golden crust. Bake for 20-22 minutes or until the tops turn a beautiful deep gold. Your kitchen will start smelling amazing, and you’ll be so proud!
Step 7: Make Garlic Butter and Brush While Hot
While the rolls bake, melt salted butter in a saucepan over medium heat. Add finely chopped garlic and sauté for 1-2 minutes until fragrant but not browned—this is key to avoid bitterness. Turn off the heat, stir in fresh parsley, and then brush this garlicky butter all over the hot rolls as soon as they come out of the oven. This finishing touch is what takes these dinner rolls to legendary status.
Pro Tips for Making Easy Garlic Butter Dinner Rolls Recipe
- Warm Milk Temperature: I’ve found that milk warmed too hot kills the yeast, so always aim for around 110°F for the perfect rise.
- Patience on Kneading: Don’t rush the kneading step! Those 15 minutes are essential for the dough’s gluten development, making the rolls fluffy and soft.
- Gentle Second Rise: Give the rolls plenty of time to puff up again to avoid dense insides after baking.
- Garlic Butter Timing: Brush garlic butter immediately after baking — the heat helps it soak into every nook and cranny of the roll.
How to Serve Easy Garlic Butter Dinner Rolls Recipe
Garnishes
I usually sprinkle a little extra fresh parsley or even some finely grated Parmesan cheese on top right after the garlic butter—just for that extra pop of flavor and color. Sometimes a tiny sprinkle of flaky sea salt adds a delightful crunch that I love.
Side Dishes
These rolls pair beautifully with hearty soups, roasted chicken, mashed potatoes, or a big salad. I usually serve them alongside my favorite tomato basil soup for a comforting and balanced meal.
Creative Ways to Present
For holidays or dinner parties, I sometimes arrange the rolls in a wreath shape on a round baking tray and brush the garlic butter over before serving — looks fancy but is super easy. Another fun idea is to serve them warm in a bread basket lined with a bright, cozy napkin that keeps them toasty at the table.
Make Ahead and Storage
Storing Leftovers
I store leftover rolls in an airtight container or tightly wrapped in foil at room temperature. They stay soft for up to two days, but if you notice they’re drying out, just warm them slightly before serving.
Freezing
These rolls freeze beautifully! After they’ve cooled completely, I wrap them individually in plastic wrap and place them in a freezer bag. They keep well for about 2 months, making it easy to enjoy fresh-baked rolls anytime.
Reheating
When reheating, I like to warm the rolls in a 300°F oven for 10 minutes wrapped in foil to retain moisture. If you want to freshen up the garlic butter flavor, brush a little more on top after warming. Microwave is okay for quick reheats, but I prefer the oven method to keep the crust nice.
FAQs
-
Can I use instant yeast instead of active dry yeast in this recipe?
Absolutely! Instant yeast works well and can even be mixed directly into the flour without proofing. Just keep the same amount as active dry yeast. I find it often shortens the rising time slightly, which is handy if you’re in a rush.
-
How do I know when the dough is kneaded enough?
The best test is the windowpane test — take a small piece of dough and gently stretch it. If it’s thin enough to let light through without tearing, you’ve kneaded enough gluten to create soft, chewy rolls. Also, the dough should feel smooth and slightly tacky, not sticky.
-
Can I prepare these rolls in advance?
Yes! You can shape the rolls, cover them tightly, and refrigerate overnight for a slow second rise. Just bring them to room temperature before baking. This method actually develops more flavor and works great if you want to prep ahead for a gathering.
-
What if my rolls don’t brown well in the oven?
Make sure you apply the egg wash generously before baking, and consider baking with the oven rack in the middle position. If they still don’t brown, try increasing the oven temperature by 10-15°F or broiling carefully for the last minute, watching closely to avoid burning.
Final Thoughts
This Easy Garlic Butter Dinner Rolls Recipe has become a favorite in my kitchen — they’re simple enough to make any day but impressive enough to steal the show at dinner parties and holidays. I hope you find as much joy in baking and eating these as I do; they’re truly a comforting and delicious treat that brings people together. So grab your ingredients, roll up your sleeves, and enjoy that warm buttery garlic aroma filling your home!
Print
Easy Garlic Butter Dinner Rolls Recipe
- Prep Time: 20 minutes
- Cook Time: 22 minutes
- Total Time: 3 hours 10 minutes
- Yield: 12 dinner rolls
- Category: Bread
- Method: Baking
- Cuisine: American
Description
These Easy Garlic Butter Dinner Rolls are soft, fluffy, and perfectly golden with a shiny crust, enriched with aromatic garlic butter. Made from scratch using simple ingredients and traditional kneading and proofing, these rolls are ideal as a comforting side for any meal or a delightful snack.
Ingredients
Dinner Rolls
- 1 cup whole milk (240g), warm (around 110°F)
- 3 teaspoons active dry yeast or instant yeast
- 1/3 cup sugar (70g)
- 3 3/4 cups all-purpose flour (490g)
- 1 large egg
- 1.5 teaspoons salt
- 6 tbsp unsalted butter, softened at room temperature (85g)
Egg Wash
- 1 egg yolk
- 1 tbsp milk
Garlic Butter
- 1/4 cup salted butter (57g)
- 2-3 garlic cloves, finely chopped
- 1-2 tbsp freshly chopped parsley
Instructions
- Activate Yeast: In a large bowl, stir together the warm milk with the yeast until dissolved and slightly frothy.
- Mix Ingredients: Add the sugar, all-purpose flour, egg, salt, and softened unsalted butter to the same bowl with yeast mixture. Stir together until a shaggy dough forms.
- Knead Dough: Turn out the dough onto a clean surface and knead using a push-pull motion with your palms for about 15 minutes. The dough will initially be sticky but will become smooth and stretchy. Do not add extra flour. Perform the window-pane test to confirm readiness.
- First Rise: Transfer the kneaded dough to a large clean bowl lightly sprayed with oil. Cover the bowl with cling wrap and place in a warm, humid spot. Allow it to rise until it doubles in size, approximately 90 minutes.
- Divide and Shape: Punch down the risen dough and turn it onto a clean surface. Divide into 12 equal pieces. Roll each piece tightly into a smooth ball, ensuring no wrinkles or cracks remain.
- Prepare Baking Sheet: Line a 9×13-inch baking sheet with parchment paper and arrange the rolls evenly spaced on the sheet.
- Apply Egg Wash and Second Rise: Mix egg yolk and milk to make the egg wash. Brush the rolls generously. Let the rolls rise a second time in a warm spot for 30-45 minutes until puffy.
- Preheat Oven: About 20 minutes before baking, preheat the oven to 350°F (conventional).
- Final Egg Wash: After the second rise, brush the rolls once more with egg wash to enhance shine.
- Bake Rolls: Bake the rolls in the preheated oven for 20-22 minutes until golden brown and shiny on top.
- Prepare Garlic Butter: While the rolls bake, melt salted butter in a saucepan over medium heat. Add finely chopped garlic cloves and sauté for 1-2 minutes until fragrant. Remove from heat and stir in freshly chopped parsley.
- Brush Garlic Butter: Immediately brush the hot baked rolls generously with the garlic butter mixture.
- Serve: Serve the garlic butter dinner rolls warm and enjoy this soft, aromatic treat.
Notes
- Ensure milk is warm but not hot to properly activate yeast without killing it.
- Do not add extra flour during kneading; the dough will become easier to handle with time.
- The window-pane test helps confirm the dough is kneaded enough for good gluten development.
- Allowing the dough to rise in warm, humid conditions helps achieve a soft texture.
- Brush rolls carefully with egg wash for a glossy crust.
- Use fresh garlic and parsley for best flavor in garlic butter.
- Serve rolls warm for optimal taste and texture.
Nutrition
- Serving Size: 1 roll
- Calories: 170
- Sugar: 4.5g
- Sodium: 220mg
- Fat: 7g
- Saturated Fat: 4g
- Unsaturated Fat: 3g
- Trans Fat: 0g
- Carbohydrates: 23g
- Fiber: 1g
- Protein: 4g
- Cholesterol: 40mg


