

If you’re looking for a fun, festive treat that’s sure to delight kids and adults alike, this Halloween Spider Cookies Recipe is an absolute winner. I first tried making these last Halloween, and I was blown away by how easy they are to pull together, plus they look just creepy-cute enough to impress at any party. So, stick around—I’ll share all the tricks and tips I’ve picked up to help your spider cookies come out perfect every time.
Why You’ll Love This Recipe
- Simple Ingredients: Uses common kitchen staples with no fancy extras needed.
- Fun Decoration: The spider look is easy and totally charming—kids especially love helping with this part.
- Soft & Chewy Texture: These cookies are a dream—slightly golden edges with a soft center every single time.
- Make-Ahead Friendly: Bake ahead for parties or freeze dough to save time later.

Ingredients You’ll Need
These ingredients work wonderfully together to create the ideal cookie base—soft, sweet, and sturdy enough to hold the spider decorations. When you shop, try to grab quality butter and fresh eggs for the best flavor.
- Butter: Make sure it’s unsalted and softened; this really impacts the cookie’s texture.
- Brown Sugar: Adds moisture and a subtle caramel note that I just adore.
- White Sugar: Provides sweetness and helps give the cookies a slight crisp edge.
- Egg: Acts as the binder to keep everything together nicely.
- Vanilla Essence: Natural or pure vanilla gives a warm, comforting aroma.
- Plain Flour: The base of your dough—sift it for lightness.
- Salt: Balances the sweetness and enhances flavor depth.
- Baking Soda: Helps the dough rise slightly, so cookies aren’t flat.
- Cornflour: This is my secret for that perfect soft, tender bite in the cookie.
- Maltesers: These form the spider’s body perfectly because of their size and shape.
- Dark Chocolate: Melt this for piping legs—choose good quality for rich flavor.
- White Icing: For creating adorable spider eyes—easy to work with a small tube or piping bag.
Variations
One thing I love about this Halloween Spider Cookies Recipe is how much room there is for you to play around with flavors and decorations. I often swap out certain sweet treats to suit tastes or dietary needs.
- Chocolate Chip Twist: I sometimes add a cup of semi-sweet chocolate chips into the dough for extra melty goodness in every bite.
- Healthy Swap: Replace butter with coconut oil for a dairy-free version that still tastes amazing.
- Spider Variations: Instead of Maltesers, candy eyeballs from specialty stores make your spiders look even creepier and more realistic.
- Spice It Up: Add a pinch of cinnamon or pumpkin pie spice for some autumnal warmth that pairs perfectly with Halloween vibes.
How to Make Halloween Spider Cookies Recipe
Step 1: Prep the Dough
I start by melting the butter in the microwave—about 30 to 50 seconds is perfect. Then, whisk it up with both sugars, the egg, and vanilla until you get a silky smooth mixture. One trick I learned is to sift the dry ingredients right over your wet mix—it makes folding them together so much easier and keeps the dough lighter. Once combined, you’ll have a soft, thick dough. If it’s too warm or sticky, pop it in the fridge or freezer for a bit so it firms up enough to roll into balls.
Step 2: Rolling and Baking
Roll your dough into balls roughly 2 tablespoons or about 30-40 grams each—I use a size 40mm cookie scoop to keep things even. Place them on a lined baking tray, pressing down slightly to flatten just a bit. Bake at 170°C fanbake for 12-15 minutes, until you see golden edges but the centers still feel soft. That contrast is key for that chewy, melt-in-your-mouth texture.
Step 3: Adding Spider Decorations
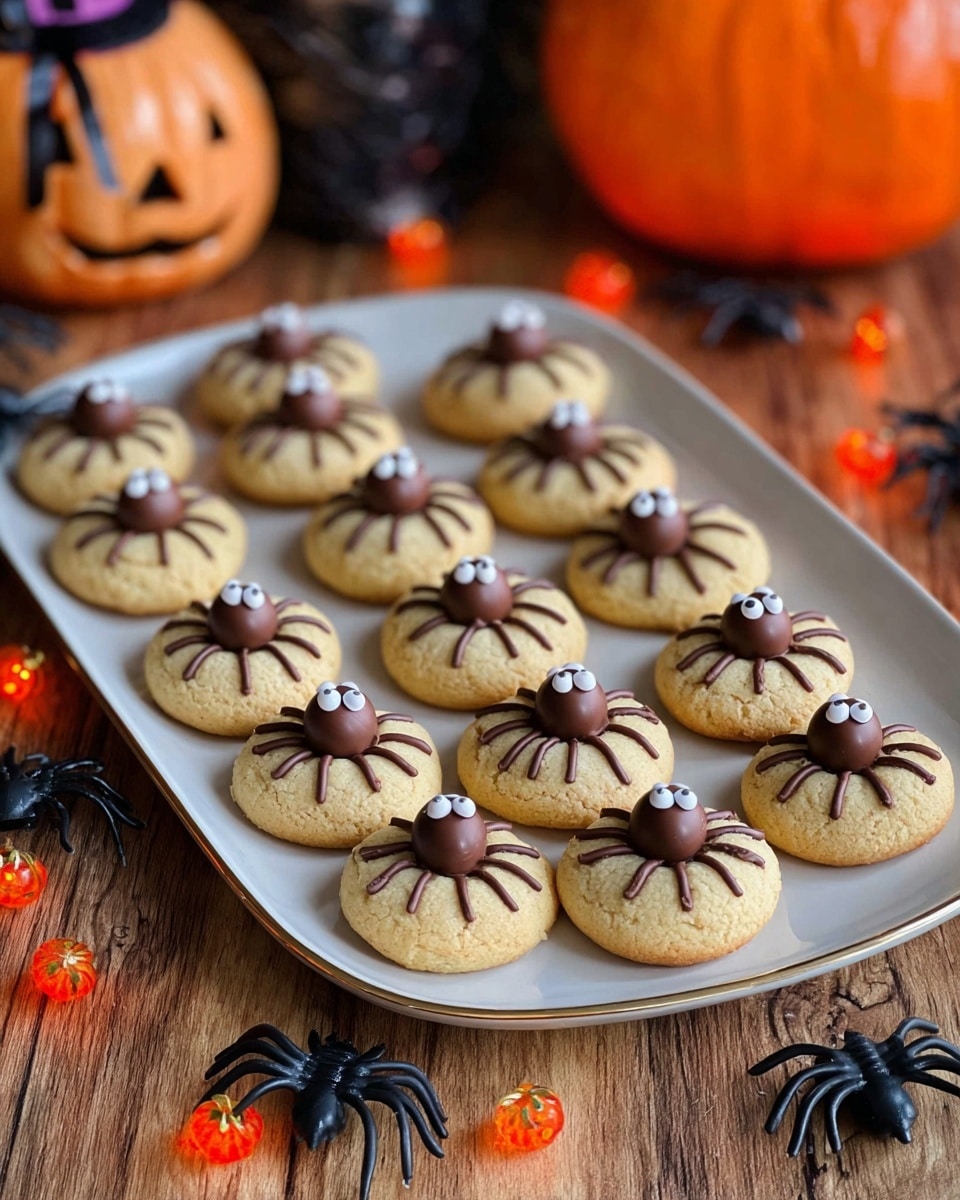
While the cookies are still warm, gently press two Maltesers into each to form the spider bodies. Let the cookies cool for 10 minutes before moving them to a wire rack. Meanwhile, melt your dark chocolate and snip a tiny corner off a small ziplock bag to pipe on eight spider legs per cookie. For the eyes, I carefully pipe small white icing dots, then add a tiny dot of melted chocolate inside each to create eyeballs. I love how cute and spooky this looks!
Pro Tips for Making Halloween Spider Cookies Recipe
- Chill When Needed: If your dough is too soft to handle, chilling helps tremendously so your cookies retain shape.
- Watch Baking Time: Remove cookies right when edges turn golden for perfect softness inside.
- Use a Piping Bag Alternative: A small ziplock bag works just as well and makes clean-up super easy.
- Avoid Overcrowding: Give your cookies room to bake evenly and prevent them from joining together.
How to Serve Halloween Spider Cookies Recipe
Garnishes
I usually keep garnishes simple—those white icing eyes are enough magic by themselves. But sometimes, I sprinkle a pinch of edible glitter or use tiny candy balls to add sparkle and extra creepy-cuteness. It’s a small touch that gets compliments every time!
Side Dishes
For a full Halloween spread, I pair these spider cookies with a batch of pumpkin spice cupcakes or some spooky punch. They work great alongside fruit platters or popcorn for casual get-togethers, too.
Creative Ways to Present
I once set these cookies on a black platter lined with spider webs made of spun sugar—totally impressed my guests! Another fun idea is placing them on top of orange or green cupcake liners to make the spider colors pop. You could even use a themed cookie jar or wrap them individually as party favors.
Make Ahead and Storage
Storing Leftovers
These cookies keep best in an airtight container at room temperature for up to a week. I usually store mine in a single layer to protect the delicate chocolate legs and eyes, plus they taste just as delicious the next day.
Freezing
If you want to freeze them, I recommend freezing the plain baked cookies before decorating. Wrap them tightly in plastic wrap and place inside an airtight container. When you’re ready to serve, thaw fully before piping the decorations.
Reheating
To warm up leftovers (or thawed frozen cookies) gently, pop them in a low-temp oven (around 140°C) for 3-5 minutes. This softens the cookie again without melting the chocolate decorations too much.
FAQs
-
Can I use different candies instead of Maltesers for the spider body?
Absolutely! You can substitute Maltesers with any round candy like chocolate truffles, large chocolate chips, or even candy eyeballs to make your spiders look unique. Just pick something similar in size so it fits well on the cookie.
-
How do I prevent the chocolate spider legs from smudging or breaking?
Let the cookies cool completely on a wire rack before piping the chocolate legs, and pipe them on a stable surface. Also, allow the chocolate to fully harden at room temperature before moving or stacking the cookies for storage.
-
Can I make this Halloween Spider Cookies Recipe vegan or gluten-free?
Yes! For vegan, swap butter for a plant-based alternative and replace the egg with flax or chia seed gel. For gluten-free, use a gluten-free flour blend instead of plain flour. Keep in mind the texture might vary slightly, but you’ll still get delicious results.
-
What’s the best way to keep these cookies fresh for a party?
Store the decorated cookies in a single layer inside an airtight container at room temperature the day before your party. Avoid stacking to keep the decorations intact, and pipe decorations as close to serving time as possible for the freshest look.
Final Thoughts
I absolutely love how this Halloween Spider Cookies Recipe turns out every time—the balance of soft, buttery cookie and rich chocolate spider decoration is unbeatable. Making these with my kids has become a little Halloween tradition for us, filled with laughs, a tiny bit of decorating chaos, and lots of yummy bites. If you want a recipe that’s easy, festive, and guaranteed to impress your Halloween guests, give these a go. You won’t regret it, I promise!
Print
Halloween Spider Cookies Recipe
- Prep Time: 20 minutes
- Cook Time: 12-15 minutes
- Total Time: 32-35 minutes
- Yield: Approximately 20-24 cookies
- Category: Dessert
- Method: Baking
- Cuisine: American
Description
These Halloween Spider Cookies are a fun and festive treat perfect for celebrating the spooky season. Soft, buttery cookies are decorated with Maltesers, melted dark chocolate legs, and white icing eyes to resemble creepy crawly spiders. Easy to make with straightforward ingredients, these cookies combine a tender texture with playful decorations that kids and adults alike will enjoy.
Ingredients
Cookie Dough
- 150g butter
- ½ cup brown sugar (100g)
- ½ cup white sugar (110g)
- 1 egg
- 1 tsp vanilla essence
- 2 cups plain flour (300g)
- ¼ tsp salt
- 1 tsp baking soda
- 2 Tbsp cornflour
Decorations
- 140g bag Maltesers
- 100g dark chocolate, melted
- 1 small tube white icing
Instructions
- Melt Butter: In a large glass bowl, melt the butter in the microwave for 30 to 50 seconds until liquid but not too hot.
- Mix Wet Ingredients: Whisk the melted butter, then add the brown sugar, white sugar, egg, and vanilla essence. Stir thoroughly until the mixture is smooth and free of lumps.
- Combine Dry Ingredients: Sift the plain flour, salt, baking soda, and cornflour over the wet ingredients. Fold gently until just combined into a soft but thick dough. If the dough feels too warm or soft, chill it in the fridge or freezer until firm enough to roll.
- Preheat Oven: Set the oven to 170°C (fan bake) to preheat while preparing the cookies.
- Shape Cookies: Roll the dough into balls about 2 tablespoons (30-40g) each and place them evenly spaced on a lined baking tray. Slightly press them down to flatten.
- Bake Cookies: Bake in the preheated oven for 12-15 minutes until the edges turn golden but the centers remain soft.
- Decorate with Maltesers: While cookies are still warm, gently press two Maltesers onto each cookie to form the spider’s body.
- Cool Cookies: Remove the cookies from the baking tray after 10 minutes and transfer to a wire rack to cool completely.
- Make Spider Legs: Pour melted dark chocolate into a small ziplock bag and cut a tiny hole at one corner. Pipe four chocolate legs on each side of the Maltesers on each cookie.
- Add Eyes: Use white icing to pipe two dots for eyes above the Maltesers, and add small chocolate dots inside the white icing to create spooky eyeballs.
- Set Decorations: Allow the chocolate legs and eyes to harden completely before serving.
- Store: Keep cookies in an airtight container for up to 1 week to maintain freshness.
Notes
- You can use a size 40mm cookie dough scoop for consistent cookie sizes.
- To make chocolate chip cookies instead, add 1 cup of chocolate chips to the dough and mix thoroughly before chilling.
- Candy eyeballs can be used as an alternative to white icing and chocolate dots, available at specialty baking stores.
Nutrition
- Serving Size: 1 cookie (approx. 40g)
- Calories: 160 kcal
- Sugar: 12g
- Sodium: 85mg
- Fat: 8g
- Saturated Fat: 5g
- Unsaturated Fat: 2.5g
- Trans Fat: 0g
- Carbohydrates: 20g
- Fiber: 1g
- Protein: 2g
- Cholesterol: 25mg


