

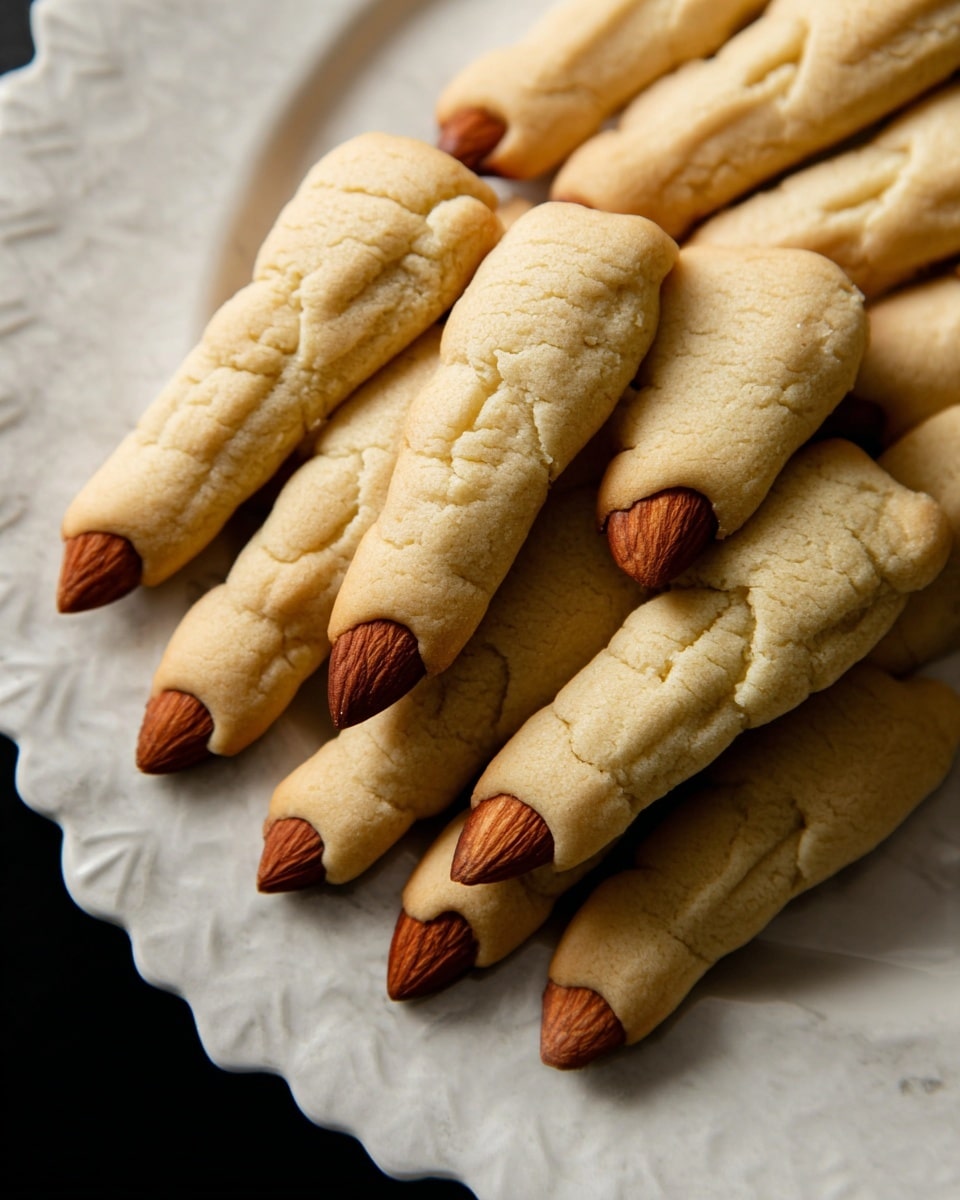
If you’re looking to add a little spooky fun to your cookie game this Halloween season, let me introduce you to my all-time favorite Shortbread Witches Fingers Recipe. These creepy-but-delicious treats have this buttery, crumbly texture with just the right hint of cinnamon that makes them utterly irresistible. Plus, shaping them into “witchy” fingers with slivered almond nails is such a fun ritual—I swear it feels like Halloween magic right in your kitchen. Stick with me because I’m going to walk you through every step to make sure your fingers come out perfectly eerie and tasty!
Why You’ll Love This Recipe
- Easy to Shape: The dough is soft and forgiving, making it a breeze to create those creepy finger shapes even if you’re new to baking.
- Perfect Texture: The classic shortbread crumb combined with just a hint of cinnamon hits that perfect balance of tender and crisp.
- Customizable Fun: You can add food coloring or jam “blood” for extra Halloween flair–I’ll share my favorite tricks!
- Kid-Friendly Activity: Shaping the fingers is a fun project that kids can join in on (and my family goes crazy for the final look!)

Ingredients You’ll Need
The magic of this Shortbread Witches Fingers Recipe is all in simple pantry ingredients that come together beautifully. I find that using real unsalted butter and brown sugar really boosts the flavor, while that pinch of cinnamon adds that warm fall vibe. Here’s what you’ll want on hand before we start:
- All purpose flour: Make sure to spoon and level for accurate measuring so your fingers don’t turn out dry or crumbly.
- Unsalted butter: Room temperature butter creams perfectly with sugar and helps achieve that melt-in-your-mouth texture.
- Brown sugar: I use lightly packed brown sugar to add a subtle molasses note; you can substitute granulated if you prefer a lighter taste.
- Vanilla extract: Adds a lovely sweetness that balances the cinnamon and butter.
- Ground cinnamon: Just a half teaspoon gives the witchy fingers that perfect hint of spice without overpowering.
- Kosher salt: A pinch enhances all the flavors naturally.
- Slivered almonds: These are your witchy fingernails! If you don’t have almonds, any nut sliver works.
Variations
I love how versatile this Shortbread Witches Fingers Recipe is! Whether you want to make them more festive or adapt them for dietary needs, there’s plenty of room to get creative and make these your own.
- Green Witch Fingers: I discovered adding green food coloring during the flour mixing step gives these fingers a fun, eerie witchy vibe without changing the flavor.
- Jam “Bloody” Fingers: Adding a small dab of red jam around the almond fingernail right before serving creates a gruesome effect that’s always a hit at parties.
- Nut-Free Version: If allergies are a concern, you can skip the almonds or substitute with toasted coconut flakes for a similar texture “nail.”
- Vegan Friendly: Swap butter for a plant-based alternative and use brown sugar to keep the sweetness, and you’ll still get great results.
How to Make Shortbread Witches Fingers Recipe
Step 1: Cream the Butter and Sugar
Start by beating together the brown sugar, softened unsalted butter, and vanilla extract until the mixture is smooth and creamy—usually about 1 to 2 minutes. This is the secret for tender shortbread because proper creaming traps air and ensures an even texture.
Step 2: Fold in Your Dry Ingredients
Next, add the cinnamon, flour, and salt to your buttery mixture. Use a gentle folding motion to combine everything until the dough just starts to come together. This tender handling helps keep your shortbread soft rather than tough. Turn your dough out onto a clean surface—don’t overwork it!
Step 3: Roll and Slice the Dough
Press your crumbly dough together to form a cohesive block, then gently roll it into a rectangle about ¼ to ½ inch thick. You can place parchment paper on top or lightly flour your rolling pin so it doesn’t stick. Slice the rectangle first lengthwise, then widthwise into thin finger-sized rectangles, about half an inch wide—this is where your witches’ fingers start to take shape!
Step 4: Shape Those Witchy Fingers
Pinch three times along each finger-shaped piece to mimic knuckles—it’s the tiny details that make these cookies so fun. Then, use a sharp knife to score small lines between the pinches to add extra texture. Don’t forget to push a slivered almond at the tip for that perfect “nail.” Transfer them to a parchment-lined baking sheet.
Step 5: Chill Before Baking
Cover your baking sheet and chill the shaped fingers in the fridge for at least 30 minutes (or up to 3 days). This step is crucial—it firms up the dough, which helps the fingers keep their shape when baking and gives that beautiful shortbread texture we’re after.
Step 6: Bake to Golden Perfection
Preheat your oven to 350°F and take the cookies out of the fridge while the oven warms. Baking chilled dough on a warm pan helps with even cooking. Bake for 9 to 11 minutes, or until the bottoms are just starting to color. Let them cool on the pan for 5 minutes before transferring to a rack to cool completely—they’re fragile when warm, so handle gently.
Pro Tips for Making Shortbread Witches Fingers Recipe
- Keep Butter Soft, Not Melted: Using butter softened to room temp makes creaming easier but keep it from melting into a puddle, which could make dough greasy.
- Don’t Overmix the Dough: Folding gently preserves that tender crumb, so stop mixing as soon as the flour disappears.
- Chill Dough Even if Short on Time: Chilling helps the cookies hold shape and bake evenly—trust me, it’s worth the wait!
- Handle Cookies Gently Before Fully Cooled: They’re delicate right out of the oven, so give them time to firm up before moving too much to avoid breakage.
How to Serve Shortbread Witches Fingers Recipe
Garnishes
I like to keep it simple with just slivered almond nails—they add natural texture and a little elegance. For a creepy twist, I sometimes add a small dab of red jam right where the almond sits so it looks like a bloody fingernail, which always gets a giggle from guests!
Side Dishes
These fingers go so well with a warm cup of spiced apple cider or hot chocolate—perfect for chilly October evenings. I’ve also served them alongside a bowl of fresh fruit or a festive cheese plate for a fun party spread.
Creative Ways to Present
For Halloween parties, I love arranging these witches’ fingers sticking out of a “cauldron” made from a black bowl filled with green-tinted coconut flakes or shredded paper. It’s fun and spooky! You can also bundle a few in cellophane tied with orange and black ribbons as adorable party favors.
Make Ahead and Storage
Storing Leftovers
I store leftover Shortbread Witches Fingers in an airtight container right on the counter, and they stay fresh and crisp for about a week—if they last that long! The simple ingredients and lack of moisture mean they keep beautifully without refrigeration.
Freezing
If you want to prep ahead, these fingers freeze well either before or after baking. I like to freeze the shaped dough on the tray, then transfer to a freezer bag. When ready, bake straight from frozen, just adding a couple extra minutes to the baking time.
Reheating
To warm up leftover cookies, I pop them in a 300°F oven for about 5 minutes to refresh their crispness without drying them out. Just avoid microwaving as that makes them soft and chewy rather than crisp.
FAQs
-
Can I make this Shortbread Witches Fingers Recipe gluten-free?
Absolutely! Substitute the all purpose flour with a gluten-free baking flour blend that includes xanthan gum for structure. Just keep in mind that texture might be slightly different, but the cookie flavor will still shine.
-
What if I don’t have slivered almonds for the nails?
No worries! You can use any nut slivers, small pieces of pretzel sticks, or even little bits of candy to create the fingernail effect. I’ve also seen people use small red candies for a more playful look.
-
Why do I need to chill the shaped dough before baking?
Chilling helps the dough firm up, so the fingers keep their shape and don’t spread too much in the oven. It also helps improve the texture, making the finished cookies tender and crisp.
-
Can I add food coloring to this recipe?
Yes! Add a few drops of gel food coloring during the flour folding step to tint your dough—green is my favorite for those classic witch fingers. Just be sure not to add too much liquid as it can affect the dough consistency.
-
How long will these cookies stay fresh?
Stored in an airtight container at room temperature, these shortbread fingers stay fresh for up to one week. For best flavor and texture, enjoy them within that time!
Final Thoughts
I absolutely love how this Shortbread Witches Fingers Recipe brings out that festive Halloween spirit with a simple, buttery shortbread base and just a touch of spooky fun. When I first tried shaping the dough into creepy fingers, it was such a delightful kitchen experience—kids and adults alike around my house couldn’t stop nibbling! Trust me, once you make these at home, you’ll have an easy, crowd-pleasing Halloween treat you’ll want to bake year after year. So grab your rolling pin and let’s get those witch fingers ready—you won’t regret it!
Print
Shortbread Witches Fingers Recipe
- Prep Time: 25 minutes
- Cook Time: 11 minutes
- Total Time: 1 hour 6 minutes
- Yield: 30 cookies
- Category: Desserts
- Method: Baking
- Cuisine: American
Description
These Shortbread Witches Fingers are spooky, buttery cookies perfect for Halloween. Made with simple ingredients like flour, butter, brown sugar, and cinnamon, they’re shaped to look like creepy witch fingers complete with almond slivers as nails. Chill and bake to crisp perfection, then optionally add red jam for a gruesome effect. A fun and festive treat that’s easy to prepare and delicious to enjoy.
Ingredients
Dry Ingredients
- 6 ounces all purpose flour (1 1/4 cups + 1 tablespoon, spooned and leveled)
- 1/2 teaspoon ground cinnamon
- pinch kosher salt
Wet Ingredients
- 4 ounces unsalted butter (1/2 cup)
- 2 ounces brown sugar (1/4 cup, lightly packed)
- 1 teaspoon vanilla extract
Topping
- 1 tablespoon slivered almonds
Instructions
- Cream the butter mixture: Cream together the brown sugar, unsalted butter, and vanilla extract until smooth and creamy, about 1 to 2 minutes using a mixer or by hand.
- Add dry ingredients: Add in the ground cinnamon, all-purpose flour, and kosher salt and fold gently until the dough just begins to come together. Be careful not to overmix.
- Form dough for rolling: Turn the dough out onto a clean surface. Press it gently together until no more crumbs remain, then press into a square shape.
- Roll out dough: Lay a sheet of parchment paper over the dough or dust a rolling pin with flour. Roll the dough into a rectangle between 1/2 inch and 1/4 inch thick evenly.
- Cut dough into strips: Slice the rectangle in half lengthwise, then cut every 1/2 inch widthwise to create many thin, long rectangles that will become the fingers.
- Shape the fingers: Pinch each rectangle three times along its length to create knuckle bumps – once 1/2 inch from the top, another 1/2 inch down, and a third pinch at the bottom.
- Prepare baking sheet: Transfer the shaped fingers to a parchment-lined baking sheet. Repeat shaping with all the dough rectangles.
- Score knuckles: Slice three small lines horizontally across the bumps formed between each pinch for a realistic knuckle effect.
- Add fingernails: Slide a slivered almond into the tip of each finger to mimic a fingernail.
- Chill dough: Cover the baking sheet and chill the shaped cookies for at least 30 minutes and up to 3 days in the refrigerator. This helps them hold their shape while baking.
- Preheat oven: Preheat the oven to 350°F (175°C). Remove the chilled cookies about 10 minutes before baking to let the pan warm slightly.
- Bake cookies: Bake the fingers for 9 to 11 minutes or until the bottoms just begin to turn golden brown.
- Cool: Let the cookies cool on the baking sheet for 5 minutes, then transfer them to a wire rack to cool completely before serving.
Notes
- You can substitute granulated sugar for the brown sugar if preferred.
- Add food coloring when mixing the flour to create green witch fingers for a festive touch.
- Any nut can be used for the fingernails if you don’t have slivered almonds.
- Store the cookies in an airtight container at room temperature for up to 1 week.
- For a gruesome effect, add red jam to the fingernail and severed end of the cookie. Store these jam-added cookies in the refrigerator.
- Alternatively, add the red jam just before serving to avoid refrigeration.
Nutrition
- Serving Size: 1 cookie
- Calories: 95
- Sugar: 4 g
- Sodium: 30 mg
- Fat: 5 g
- Saturated Fat: 3 g
- Unsaturated Fat: 2 g
- Trans Fat: 0 g
- Carbohydrates: 12 g
- Fiber: 0.5 g
- Protein: 1 g
- Cholesterol: 15 mg
