

If you’re looking for a festive treat that will wow guests and satisfy your sweet tooth, then you’re going to love this Candy-filled Witch Hats Recipe. I absolutely love how these adorable witch hats come together using simple ingredients but deliver a big punch of Halloween fun and flavor. When I first tried this recipe, I was amazed at how easy it was to make them look so professional while keeping all the candy inside perfectly sealed. Keep reading, because I’ll share some tips that helped me nail the chocolate coating and keep these hats looking flawless!
Why You’ll Love This Recipe
- Simple to Make: Using ice cream cones and melting wafers keeps this recipe easy and approachable.
- Fun Presentation: The candy-filled hats are perfect for Halloween parties and delight kids and adults alike.
- Customizable: You can mix and match candies, sprinkles, and decorations to fit your style.
- No-Bake Treat: No oven required—it’s just melts, decorates, and assembles.

Ingredients You’ll Need
All the ingredients in this Candy-filled Witch Hats Recipe come together to create a crunchy, chocolaty base with a punch of sour and sweet candy surprises inside. Here’s what you want to keep an eye out for when shopping to ensure your hats turn out perfectly.
- Waffle ice cream cones: These form the witch hat’s shape—choose sturdy cones without cracks.
- Chocolate melting wafers: They melt smoothly and harden shiny, making it easy to coat cones.
- Chocolate cookies: Used as the brim, pick a firm cookie that won’t crumble when flipped.
- Green sour belts: Add fun color and tartness; they also stick nicely to the chocolate.
- Black cat icing decorations: These cute accents turn your hats from simple to spooky-chic.
- Halloween sprinkles: Bright sprinkles add festive flair on the chocolate coating.
- Candy: Your choice here! I love mini candy pieces that fit nicely inside without breaking the cone.
Variations
I like to switch things up sometimes with the Candy-filled Witch Hats Recipe. It makes each batch feel fresh, especially if you’re making them for a crowd or want to accommodate different tastes.
- Variation: I once swapped the green sour belts for orange fruit leather strips and loved how that added a smooth texture and a bit less tartness for the kids.
- Gluten-free Friendly: Use gluten-free chocolate cookies or crisp rice cereal discs as the brim for those who avoid gluten.
- Vegan Option: Choose dairy-free chocolate melts and vegan-friendly candy to make this a treat everyone can enjoy.
- Extra Spooky: Add edible glitter or use black and purple sprinkles to elevate the Halloween vibe.
How to Make Candy-filled Witch Hats Recipe
Step 1: Melt the Chocolate and Coat the Cones
Start by melting your chocolate wafers according to the package instructions—usually a quick microwave in short bursts or a double boiler method works best. Once melted and silky, dip each waffle cone and use a spatula to spread an even, smooth layer of chocolate all around, making sure to get rid of any drips or overly thick spots. I discovered this trick when I spread the chocolate too thick the first time—the cones became soggy. A thin, even coat is what helps the hats hold together and look shiny when set.
Step 2: Decorate and Add the Sour Belt
While the chocolate is still wet, sprinkle your Halloween sprinkles on and place the cones upright on a parchment-lined baking sheet to set. Then, add a small dab of chocolate on the bottom edge of each cone and carefully attach a green sour belt around it—this creates the signature witch hat band! If you want to get extra fancy, now is the time to gently press a black cat icing decoration onto the front for that cute spooky touch.
Step 3: Fill Hats with Candy
Once your cones are firm and the chocolate is set, it’s time to fill each one with your chosen Halloween candies and a little sprinkle mix for extra fun. You’ll find the filling process is really satisfying because the cones hold a perfect little stash of goodies inside. Just don’t overfill it—otherwise, the cookie top won’t sit flush later on.
Step 4: Seal with Chocolate and Cookie Brim
Use a spoon or small spatula to carefully cover the bottom edge of the cone opening with chocolate, avoiding drips inside the cone to prevent sealing your candy inside the chocolate instead. Quickly press a chocolate cookie onto this coated edge, forming the “brim” of the hat. Flip the whole thing over gently and let the chocolate harden completely before handling or storing. This sealing step is critical; I learned that rushing it or trying to seal too much at once caused chocolate to ooze inside, making a mess.
Pro Tips for Making Candy-filled Witch Hats Recipe
- Use Quality Chocolate Wafers: I found that high-quality melting wafers give a smoother coating and better shine.
- Thin Chocolate Layers: Applying a thin layer helps the cones stay crisp and avoids sogginess.
- Work Quickly but Carefully: Chocolate sets fast, so plan your decorating steps to avoid hardened edges.
- Avoid Overfilling the Cone: Leaving a little space at the top makes sealing with the cookie easier and cleaner.
How to Serve Candy-filled Witch Hats Recipe
Garnishes
I love finishing these witch hats off with a light dusting of edible glitter or a few extra sprinkles for that magical Halloween sparkle. If you’re serving at a party, adding some edible eyes or mini candy bats nearby can amp up the fun factor. The black cat icing decorations also add an extra cute and festive detail.
Side Dishes
These candy-filled witch hats pair wonderfully with simple treats like popcorn tossed with orange and black sugar, or a bowl of caramel apples. For drinks, a fizzy orange punch or warm apple cider complements these sweets beautifully, balancing out all the chocolate and candy flavors.
Creative Ways to Present
One Halloween, I arranged these hats standing upright in a cauldron filled with candy corn for a spooky centerpiece that guests adored. You could also line them up on a tiered tray like a witches’ hat “army” or wrap them individually in cellophane tied with Halloween ribbon for party favors. The options are endless, and each presentation makes the hats feel extra special.
Make Ahead and Storage
Storing Leftovers
When storing leftover candy-filled witch hats, I always place them in an airtight container at room temperature to prevent condensation from melting the chocolate. They stay crisp and perfect for about 3-4 days, making them a great treat to prepare ahead of time.
Freezing
Freezing these hats isn’t ideal because the cones can get soggy from moisture. From my experience, it’s best to make them fresh or at least within a couple days of serving to maintain that satisfying crunch.
Reheating
You don’t need to reheat candy-filled witch hats! They’re delicious at room temperature. But if the chocolate looks dull, a quick 10-second blast in the microwave (watching carefully) can bring back the shine without melting the candy inside.
FAQs
-
Can I use regular chocolate instead of melting wafers for the Candy-filled Witch Hats Recipe?
You can, but regular chocolate may need tempering to harden properly. Melting wafers are designed to melt smoothly and set with a shiny finish without tempering, making them easier for this recipe especially if you’re short on time.
-
What types of candy work best inside the witch hats?
Small, bite-sized candies like mini chocolates, jelly beans, or candy corn work best because they fit easily inside the cone without breaking the cookie brim seal. Avoid overly sticky or large pieces that could be challenging to seal in.
-
How long do the Candy-filled Witch Hats last?
Stored properly in an airtight container at room temperature, they stay fresh and crunchy for about 3-4 days. Beyond that, the cones might start to soften or the chocolate may lose its crispness.
-
Can kids help make this recipe?
Definitely! Kids love decorating the cones with sprinkles and placing candy inside. Just supervise the melting chocolate part for safety, and maybe handle the cookie sealing step yourself if kids are young.
Final Thoughts
This Candy-filled Witch Hats Recipe has become one of those little traditions in my house during Halloween because it’s part craft, part treat—all the fun and no stress. The way the crunchy cones hold all that gooey chocolate and sweet candy inside never fails to bring smiles, especially from the kids (and the big kids, too). I’m confident that once you try it, you’ll want to make these every year. So don’t hesitate—grab your cones and chocolate and start whipping up these charming hats. You’ll be so glad you did!
Print
Candy-filled Witch Hats Recipe
- Prep Time: 15 minutes
- Cook Time: 15 minutes
- Total Time: 30 minutes
- Yield: 12 witch hats
- Category: Dessert
- Method: No-Cook
- Cuisine: American
Description
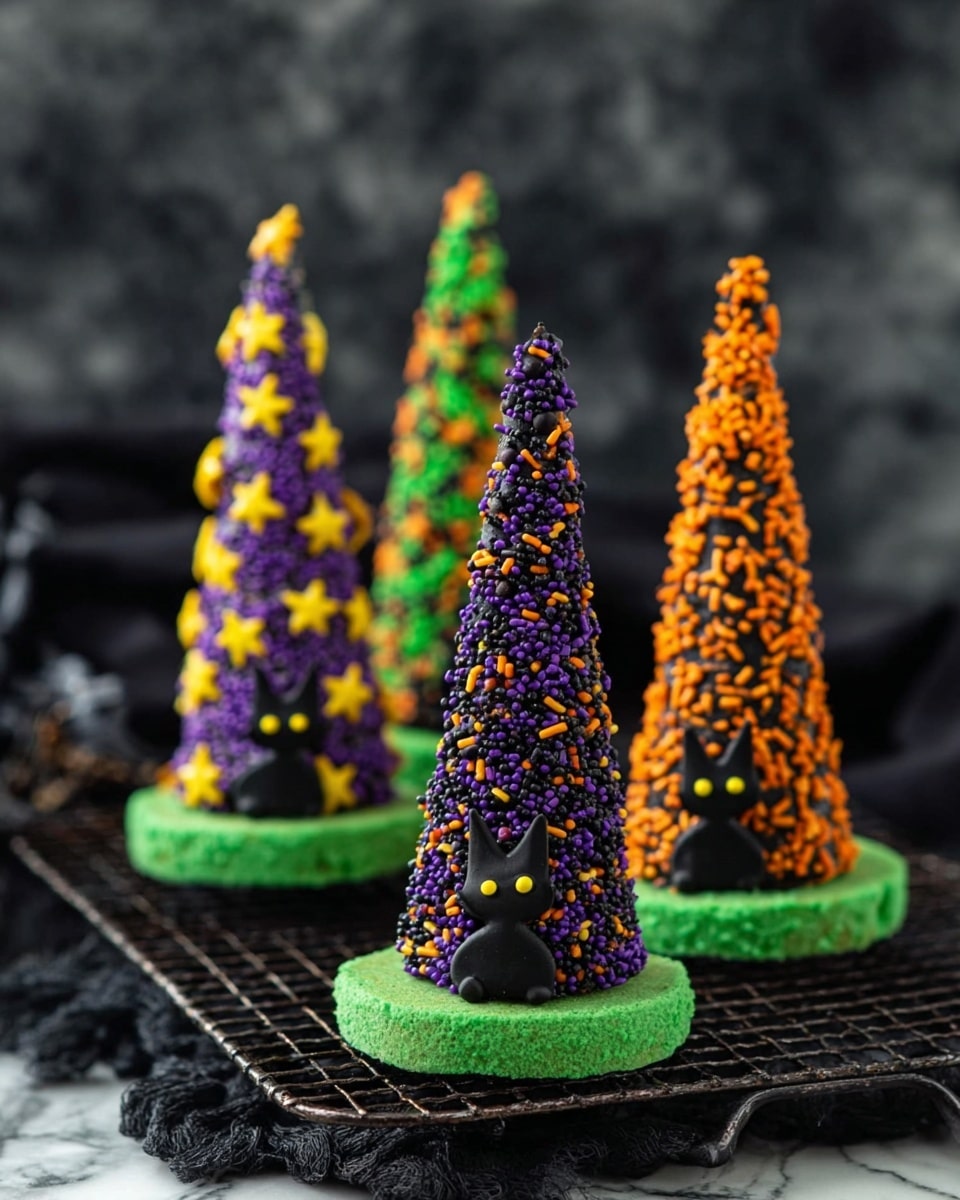
Delightfully spooky and sweet Candy-filled Witch Hats made from waffle ice cream cones dipped in rich chocolate, adorned with colorful Halloween sprinkles, green sour belts, and topped with a crunchy chocolate cookie. Perfect for Halloween parties, these festive treats are filled with your favorite candies and decorated with charming black cat icing for an extra touch of spooky fun.
Ingredients
Cones & Coating
- 12 waffle ice cream cones
- 12 oz chocolate melting wafers
- Halloween sprinkles, as needed
Decorations & Filling
- 12 green sour belts
- 12 chocolate cookies
- 12 black cat icing decorations
- Your choice of assorted candy to fill cones
Instructions
- Melt the Chocolate: Melt the 12 oz of chocolate melting wafers according to the package directions until smooth and glossy. This will be used to coat and seal the cones.
- Coat the Cones: Using a spatula, generously cover the exterior of each waffle ice cream cone with the melted chocolate. Smooth out the chocolate and remove any excess to create an even coating on the cones.
- Decorate the Coated Cones: While the chocolate is still wet, sprinkle Halloween-themed sprinkles all around the coated cones. Place the cones upright on a baking sheet lined with parchment paper to set.
- Add Sour Belt Accents: Take a small amount of melted chocolate and apply it to the bottom edge of each cone. Quickly press a green sour belt around this edge to resemble a hatband. Optionally, affix a black cat icing decoration to the front center of each cone using a dab of melted chocolate as glue.
- Fill the Witch Hats: Fill each cone with your choice of assorted Halloween candy and additional sprinkles for a festive pop of color and texture.
- Seal with Cookies: Carefully dab melted chocolate on the rim or bottom opening of the cone (taking care not to drip chocolate inside the cone). Place a chocolate cookie on top to seal the opening. Flip each cone over so the cookie rests on a flat surface and allow the chocolate to set completely, sealing the candy inside.
- Store and Serve: Once set, transfer the Candy-filled Witch Hats to an airtight container until ready to enjoy. They make for a perfect Halloween party treat or fun festive gift!
Notes
- This recipe features a fun whimsical presentation of candy-filled edible cones coated in chocolate and decorated for Halloween.
- Ensure the melted chocolate is smooth and not overheated to achieve a flawless coating.
- You can customize the candy inside the cones with your favorite bite-sized sweets.
- Use parchment paper to avoid sticking while chocolate sets on the cones.
- These treats are best enjoyed the same day or within a couple of days stored airtight to maintain freshness.
Nutrition
- Serving Size: 1 witch hat
- Calories: 320
- Sugar: 25g
- Sodium: 90mg
- Fat: 18g
- Saturated Fat: 10g
- Unsaturated Fat: 7g
- Trans Fat: 0g
- Carbohydrates: 36g
- Fiber: 2g
- Protein: 3g
- Cholesterol: 5mg


