

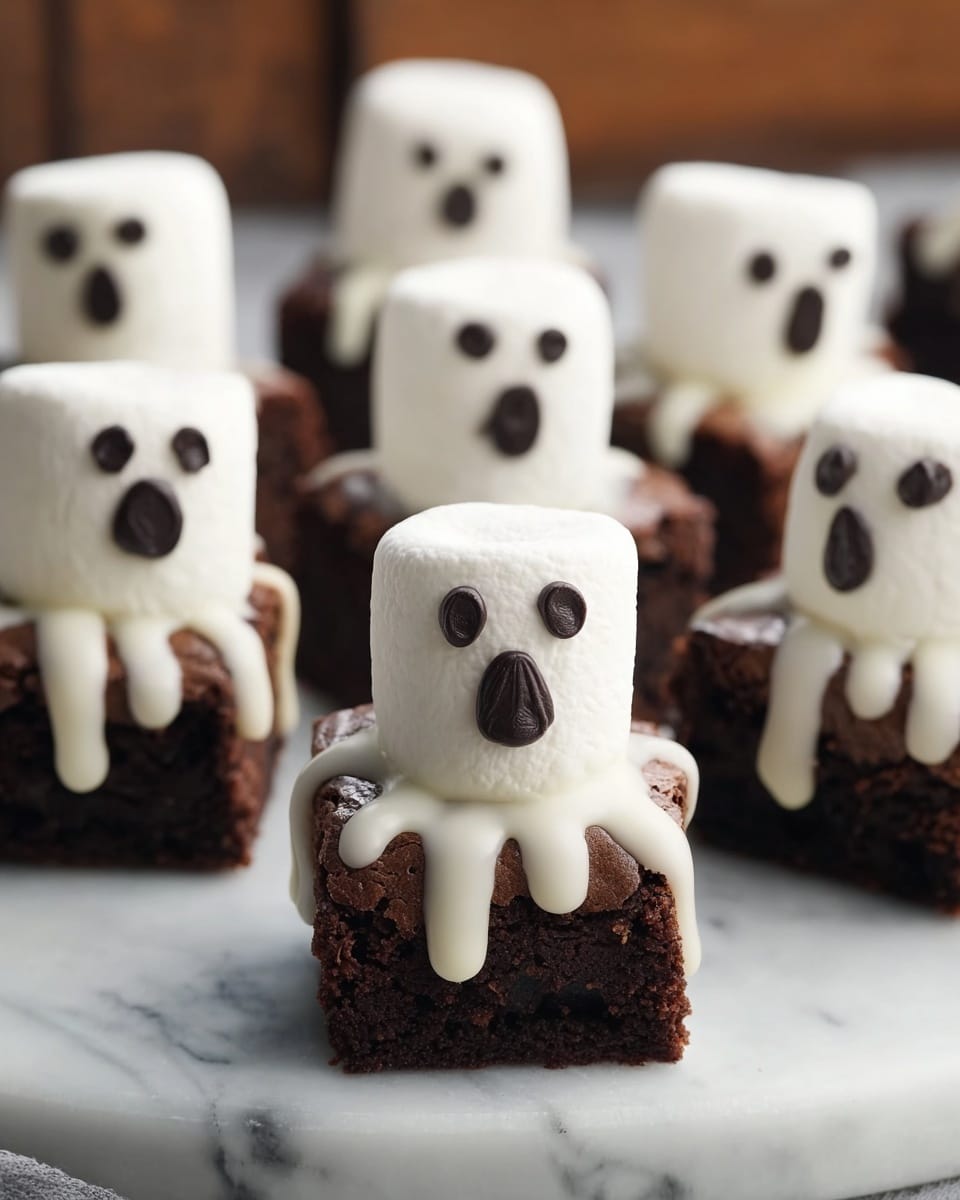
If you’re looking for a fun and festive treat that’s perfect for Halloween parties or just a cozy autumn night in, you’ve got to try this Spooky Boo Brownies Recipe. I absolutely love how these brownies combine that rich, fudgy chocolate base with cute, ghostly marshmallow toppers that you decorate yourself—it’s like crafting edible Halloween magic. Plus, they’re surprisingly easy to whip up, even if baking isn’t usually your thing. Keep reading, and I’ll walk you through everything you need to know to nail this spooky favorite.
Why You’ll Love This Recipe
- Foolproof Brownie Base: Using a trusted brownie mix means you get perfect fudgy brownies every time with minimal effort.
- Fun & Interactive: Decorating your own marshmallow ghosts adds a playful, creative touch that’s great with kids or friends.
- Perfect Halloween Vibe: The spooky decorations come together quickly but look impressively festive and cute.
- Make Ahead Friendly: These brownies handle chilling, freezing, and storing like champs so you can prep early.

Ingredients You’ll Need
These ingredients are all about simple, reliable goodies you might already have or can easily find. The brownie mix is your magic shortcut, and the marshmallows turn these into adorable “boos” with creamy frosting and decorating gel adding just the right spooky flair.
- Betty Crocker™ Delights Supreme Original Brownie Mix: This mix makes baking brownies so easy and consistent—my go-to for fuss-free brownies.
- Water, vegetable oil, and egg: Standard combo called for on the brownie mix box; fresh eggs really help the texture.
- Betty Crocker™ Rich & Creamy White Frosting: I love this because it’s smooth and melts nicely when warmed, perfect for icing the marshmallow ghosts.
- Large marshmallows: Big enough to look like ghostly heads—fresh marshmallows puff up beautifully when warmed.
- Betty Crocker™ black decorating gel: This is key for adding spooky eyes and mouths; it’s easy to work with and dries nicely.
Variations
I like to mix things up with this Spooky Boo Brownies Recipe to keep it fresh and fit different occasions or dietary needs. Don’t be afraid to experiment—it’s surprisingly adaptable and forgiving!
- Variation: Swap the frosting for chocolate or colored frosting to create Halloween theme colors beyond just white ghosts—orange or purple works great and adds fun variety.
- Dairy-Free Option: Use a dairy-free frosting and check the brownie mix ingredients to cater to dairy sensitivities; you’d be amazed how this recipe still holds up beautifully.
- Mini Marshmallows: For bite-sized spooky treats, use mini marshmallows and pipe smaller faces with the decorating gel.
- Adding Sprinkles: Sprinkle a little edible glitter or Halloween-themed sprinkles over the frosting before it sets for that extra festive pop.
How to Make Spooky Boo Brownies Recipe
Step 1: Bake Your Brownies to Perfection
First things first: heat your oven to 350°F (or 325°F if your pan is dark or nonstick). Line an 8- or 9-inch square pan with foil, leaving some overhang on the edges—that foil will be your lifesaver when it comes to lifting the brownies out later. Lightly grease the foil with shortening or cooking spray so nothing sticks. Follow the brownie mix box instructions for mixing up your batter, then pour it into your prepared pan and bake until set. When they come out, cool completely on a wire rack—this will take about an hour and a half. I like to pop mine in the freezer for 15 minutes after cooling; it makes cutting them into neat squares much easier and cleaner.
Step 2: Heat & Prep Your Frosting
While the brownies are chilling, warm up the white frosting in a microwavable bowl for 20 to 30 seconds on high, stirring every 10 seconds until it’s smooth and fluid enough to spoon over marshmallows. If the frosting firms up as you’re decorating, just zap it for an extra 5 seconds and stir—it’s super forgiving, which I love.
Step 3: Assemble Your Spooky Marshmallow Ghosts
Once the brownies are cut into 16 squares, place one large marshmallow on top of each brownie piece. Then, spoon about 1 tablespoon of the warmed frosting over each marshmallow, coating it completely. Let these set at room temperature for about 30 minutes so the frosting firms up and holds the marshmallow in place. This step is a game-changer—I discovered that chilling just the brownies isn’t enough; letting the frosting set makes decorating easier and keeps your ghosts standing tall!
Step 4: Draw Your Boo-tiful Faces
Now the fun part: grab your black decorating gel and create spooky eyes and mouths on each marshmallow ghost. You can go silly, scary, or cute—my family loves mixing different expressions on each brownie. Tip: use the very tip of the gel tube for fine details and work patiently—it dries nicely so your designs won’t smudge.
Pro Tips for Making Spooky Boo Brownies Recipe
- Use Foil Overhang to Your Advantage: Lifting brownies out with the foil keeps edges perfect and saves your fingers from sticking to the pan.
- Chill Before Cutting: Freezing the brownies briefly leads to cleaner cuts and less crumbly pieces—trust me, it’s worth it.
- Warm Frosting in Short Bursts: Heating frosting too long can make it runny; short bursts and stirring keeps it spreadable but structured.
- Decorate Marshmallows at Room Temp: Let frosting set before decorating so your gel lasts and smudges less.
How to Serve Spooky Boo Brownies Recipe
Garnishes
I usually keep it simple with the classic white frosting and black gel—it really makes those ghost faces pop. If I’m feeling fancy, I add a sprinkle of edible glitter or tiny candy eyes for extra fun. I find less is more here since the marshmallow ghosts are already the star.
Side Dishes
These brownies stand out on their own, but I love pairing them with a hot cup of apple cider or a rich pumpkin spice latte when I serve them up. For an extra treat spread, a platter of fresh fruit or salty popcorn balances the sweetness beautifully.
Creative Ways to Present
For Halloween parties, I arrange the brownies on a black platter with some faux cobwebs or mini pumpkins around. Wrapping each brownie square in clear cellophane tied with orange or purple ribbon makes a cute take-home gift too. One year, I even used small Halloween cookie cutters to shape the brownies before adding marshmallows, which got rave reviews!
Make Ahead and Storage
Storing Leftovers
I store leftover brownies in an airtight container at room temperature wrapped in parchment paper to keep them moist but not soggy. They last about 3-4 days this way, but I usually don’t get leftovers that long—they disappear fast!
Freezing
These brownies freeze surprisingly well. I like to arrange them in a single layer on a baking sheet, freeze until solid, then transfer to a freezer-safe bag with parchment between the layers so they don’t stick. They keep for up to 2 months. When defrosting, I unwrap them and leave at room temp for a couple hours—it helps the marshmallow top keep its texture.
Reheating
If I want to warm them up, I lightly microwave a brownie for about 10 seconds. Be careful here—marshmallows melt fast! This just takes the chill off and makes the frosting soft and gooey in the best way. Enjoy immediately for that fresh-from-the-oven vibe.
FAQs
-
Can I use homemade brownies instead of the brownie mix?
Absolutely! While the box mix keeps things simple and consistent, homemade brownies work just fine. Just be sure they’re cooled completely and ideally firm enough to hold up under the marshmallows and frosting without falling apart.
-
What’s the best way to avoid marshmallows sliding off?
The key is letting the frosting set well after spooning it over the marshmallows—about 30 minutes at room temp should do it. The frosting acts like glue once firm, so your ghostly toppers stay put during decorating and serving.
-
Can I decorate the brownies earlier and store them overnight?
Yes, you can! Just keep them covered loosely so the frosting and decorating gel don’t get damaged. Bringing them to room temperature before serving helps the flavors and textures come alive.
-
Is the black decorating gel edible and safe for kids?
Definitely. Betty Crocker’s decorating gels are food-safe and designed for kids and adults to use. Just supervise younger kids to prevent squeezing too much gel at once—and have fun creating spooky faces together!
Final Thoughts
This Spooky Boo Brownies Recipe has become one of my absolute favorites every fall. There’s something so satisfying about combining a classic brownie you know you’ll love with the playful, creative decorating step that anyone can join in on. I remember making these the first year with my nieces—they were giggling and getting messy with the frosting, and we ended up with some hilariously spooky faces! I really hope you give this recipe a try and make it your own—it’s such a fun, easy way to bring smiles (and sweet treats) to your Halloween celebrations or anytime you need a little spooky cheer.
Print
Spooky Boo Brownies Recipe
- Prep Time: 15 min
- Cook Time: 30 min
- Total Time: 3 hr 0 min
- Yield: 16 brownies
- Category: Dessert
- Method: Baking
- Cuisine: American
Description
Delightfully spooky and fun, these Boo Brownies combine rich chocolate brownies topped with creamy white frosting and marshmallows decorated to look like ghostly faces. Perfect for Halloween or any festive occasion, they’re easy to make with a boxed brownie mix and simple decorating techniques.
Ingredients
Brownie Base
- 1 box (16 oz) Betty Crocker™ Delights Supreme Original Brownie Mix
- Water as called for on brownie mix box
- Vegetable oil as called for on brownie mix box
- Egg as called for on brownie mix box
Toppings
- 1 cup from 1 tub (16 oz) Betty Crocker™ Rich & Creamy Creamy White Frosting
- 16 large marshmallows
- Betty Crocker™ black decorating gel (from 0.68-oz tube)
Instructions
- Prepare and bake brownies: Preheat oven to 350°F (325°F for dark or nonstick pan). Line an 8- or 9-inch square pan with foil, letting it hang over the edges. Grease the foil with shortening or cooking spray. Prepare brownie batter according to box instructions and pour into prepared pan. Bake as directed on the box for your pan size. Let cool completely on a cooling rack for about 1.5 hours. Freeze the brownies in the pan for 15 minutes to firm up.
- Cut and remove brownies: Lift brownies out of the pan using the foil overhang and peel the foil away. Cut the brownies into 16 equal pieces, arranged 4 rows by 4 rows.
- Prepare frosting: Place frosting in a microwavable bowl and heat uncovered on high for 20 to 30 seconds, stirring every 10 seconds until smooth and fluid. If it cools too much while decorating, microwave briefly for 5 seconds and stir.
- Decorate brownies: Place one large marshmallow on top of each brownie piece. Spoon about 1 tablespoon of warmed frosting over each marshmallow, fully coating it. Allow frosting to set for about 30 minutes.
- Add spooky faces: Use the black decorating gel to draw eyes and mouths on each frosted marshmallow to create ghostly faces, making your brownies spooky and fun.
Notes
- Use a dark or nonstick pan for best browning results by adjusting temperature to 325°F.
- Cooling the brownies completely before frosting helps prevent melting and mixing of flavors.
- Freezing brownies for 15 minutes helps make cutting cleaner and easier.
- If frosting becomes too thick while decorating, gently reheat to smooth consistency.
- Decorating gel can be found in most baking aisles, perfect for detailed designs.
- Store leftover brownies in an airtight container at room temperature or refrigerated.
Nutrition
- Serving Size: 1 brownie (about 1/16 of recipe)
- Calories: 280
- Sugar: 28g
- Sodium: 180mg
- Fat: 12g
- Saturated Fat: 4g
- Unsaturated Fat: 7g
- Trans Fat: 0g
- Carbohydrates: 40g
- Fiber: 2g
- Protein: 2g
- Cholesterol: 20mg


