

If you’re looking for a spooky and fun treat that’s easy to make yet impresses every time, you’re going to adore this Witch Brownies Recipe. It’s one of those recipes I first tried on a whim for Halloween, and my family went absolutely nuts over how cute and delicious these brownies turned out. They strike the perfect balance of rich chocolatey goodness with festive, colorful decorations that bring a playful witchy vibe to your dessert table. Stick with me, and I’ll walk you through everything—from the ingredients to the best way to frost and decorate these magical brownies.
Why You’ll Love This Recipe
- Super Simple: You’ll love how this recipe uses a boxed mix for brownies, making it quick without sacrificing flavor or texture.
- Fun to Decorate: The green and black icing combined with candy eyeballs and licorice really lets your creativity shine—it’s a kid-friendly decorating party!
- Perfect for Parties: These witches are bite-sized and festive, making them a crowd-pleaser for Halloween, fall gatherings, or anytime you want a little spooky fun.
- Tried and Tested: I’ve made these a dozen times, and every batch has turned out fantastic—no tricky steps here.

Ingredients You’ll Need
The magic of this Witch Brownies Recipe really comes alive with simple pantry staples and some festive decorations—you’ll want to grab the exact green and black cookie icings to get the color and texture just right. I like to keep candy eyeballs on hand in the fall because they instantly add that playful spooky touch without any fuss.
- Betty Crocker™ Fudge Brownie Mix: Using a boxed mix keeps the brownies fudgy and consistent every time, which I absolutely appreciate when I have a busy schedule.
- Water, vegetable oil, and eggs: These are the wet ingredients you’ll need to make the brownie mix; using oil instead of butter keeps the brownies moist and tender.
- Betty Crocker™ Green Cookie Icing: This bright green icing is perfect for the witches’ faces and holds well over the brownies.
- Betty Crocker™ Black Decorating Cookie Icing: The smooth black icing transforms the hats into perfect pitch-black witch hats.
- Candy eyeballs: These little eyes add an adorable and slightly spooky personality to each witch—totally elevates the fun factor.
- Black licorice twists: Cut into small pieces, these make the ideal hat brims between the face and hat icing—plus licorice is a classic nostalgic candy I love including.
Variations
One of the things I love most about this Witch Brownies Recipe is how easy it is to customize for your tastes or dietary needs. Don’t be shy about making it your own—add a little flair or swap out decorations to suit your vibe!
- Gluten-Free Variation: I’ve used a gluten-free brownie mix when baking for friends with allergies, and it turned out wonderfully fudgy.
- Spiced Up: Adding a teaspoon of cinnamon or pumpkin spice to the brownie batter works like a charm for a more autumnal flavor.
- Vegan Swap: You can replace eggs with flax eggs and use vegetable oil to keep these treats plant-based without losing that indulgent texture.
- Extra Crunch: Sprinkle some chopped nuts or crushed pretzels on top of the green icing for a little surprise texture I adore.
How to Make Witch Brownies Recipe
Step 1: Prep Your Pan Like a Pro
Start by heating the oven to 350°F and lining a 13×9-inch pan with foil, letting some edges hang over to make life easier when you remove the brownies later. Don’t skip greasing the foil—it helps the brownies lift cleanly from the pan. I learned that the hard way the first time when my brownies stuck like glue!
Step 2: Mix and Bake the Brownies
Follow the instructions on your brownie mix box—typically, that means combining the mix with water, oil, and eggs. I like using vegetable oil because it keeps the brownies moist and dense, which is perfect for decorating later. Bake the brownies and then let them cool completely on a wire rack; this is key because if they’re warm, your icings will melt and slide off.
Step 3: Cut Into Witches’ Hats
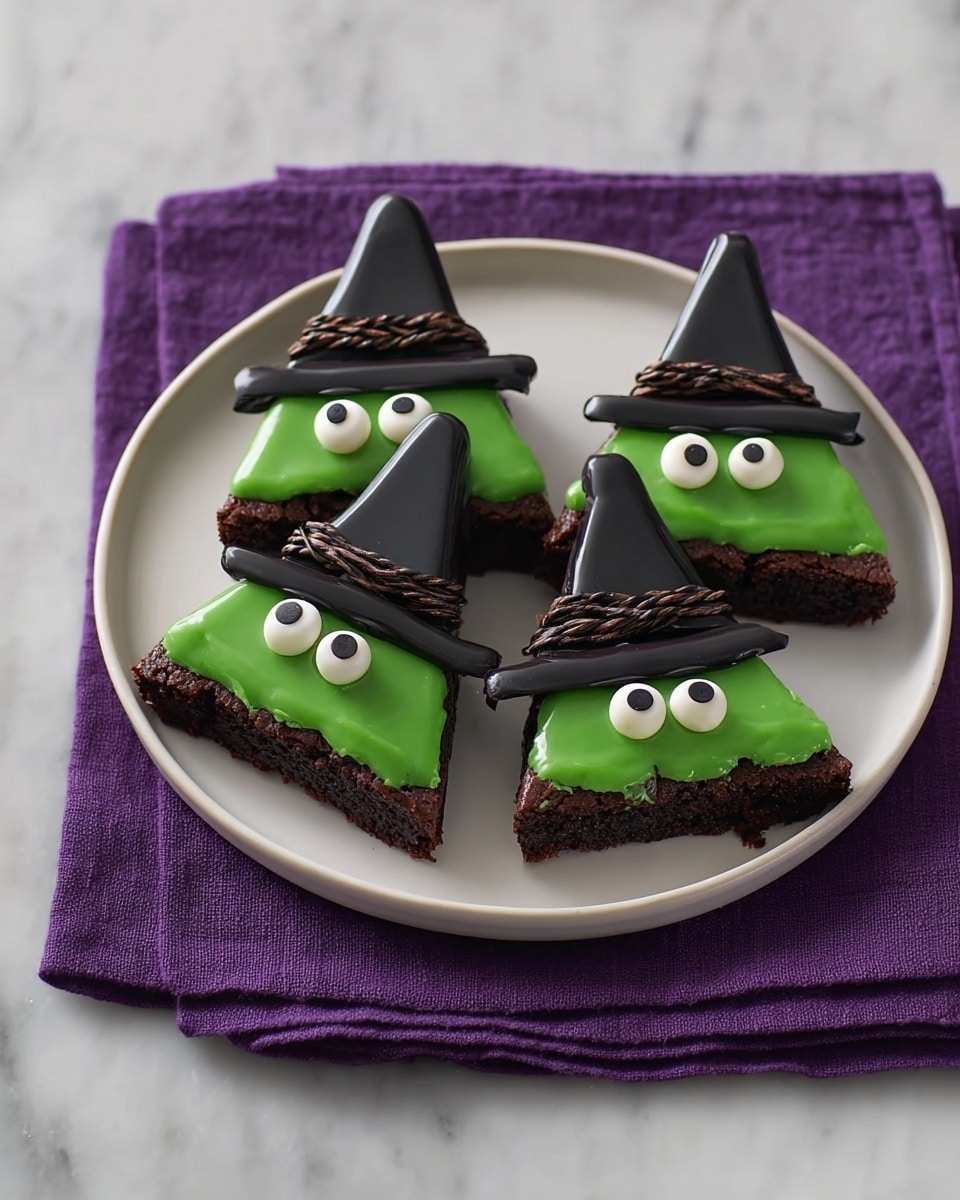
Once cool, use the foil overhang to carefully lift the entire slab out of the pan. Peel away the foil and cut the brownies into 24 triangles by slicing 3 horizontal rows, then cutting each row into 8 triangles so every piece has a 2-inch base. I’ve included a diagram link in the recipe card to make this easier to visualize, but trust me: triangles look just like witches’ hats and faces!
Step 4: Decorate the Witches
Now comes the fun part. Squeeze the green icing over the lower third of each triangle—this is your witch’s face. Then, pipe black icing over the top portion to create the hat. Between the green face and black hat, place a small piece of black licorice as the hat brim. Garnish each face with two candy eyeballs, and voila—instant witch brownie magic. I love how the eyeballs instantly bring these little treats to life.
Pro Tips for Making Witch Brownies Recipe
- Cool Completely Before Decorating: I can’t stress enough how important it is to have your brownies fully cooled; otherwise, the icing melts and won’t hold that perfect shape.
- Use a Piping Bag for Precision: I use a small piping bag or a zip-top bag with a tiny corner snipped to pipe both the green and black icing – it gives you clean edges and great control.
- Cut Licorice Into Uniform Pieces: Cutting your licorice twists into thirds before assembling helps everything look neat and consistent.
- Store in a Single Layer: To keep icings from smudging, store your finished witches in a single layer at room temperature until serving.
How to Serve Witch Brownies Recipe
Garnishes
I usually keep it simple with just the green and black icings, candy eyeballs, and licorice because I think they really capture that witchy look so well. But on occasion, I’ve added sprinkles or edible glitter over the hats for a little extra sparkle – it’s perfect if you’re serving to kids or at a Halloween party.
Side Dishes
These brownies pair surprisingly well with a dollop of whipped cream or a scoop of vanilla ice cream to balance the rich chocolate. I also like serving them alongside a bright berry salad for a fresh, tart contrast that cuts through the sweetness.
Creative Ways to Present
One of my favorite ways to showcase these witch brownies is to arrange them on a platter surrounded by edible fake spider webs and little plastic spiders for a spooky centerpiece. I also once stacked them on a tiered dessert stand with mini pumpkins and fall leaves for a harvest party—it was a hit!
Make Ahead and Storage
Storing Leftovers
I store leftover witch brownies in an airtight container in a single layer at room temperature. This keeps the icings from becoming sticky or melting, and honestly, they stay delicious for about 3-4 days—if they last that long!
Freezing
Freezing finished, decorated brownies can be tricky because the icing might crack or the candy eyes could shift. Instead, I recommend freezing the plain baked brownies before cutting and decorating. When you’re ready, thaw them fully before slicing and decorating fresh.
Reheating
Since these brownies are served decorated, I don’t heat them up. But if you want a warm brownie experience, try microwaving a plain piece without icing separately and enjoy alongside a decorated one for that warm-cool combo.
FAQs
-
Can I make these witch brownies gluten-free?
Yes! Swap out the standard brownie mix for a gluten-free version. Just make sure your icings and candy decorations are also gluten-free (most Betty Crocker toppings are, but it’s good to double-check the labels).
-
What if I don’t have green and black icing?
You can make your own icing using powdered sugar, a bit of milk or water, and food coloring—green for the face and black for the hat. Alternatively, you can use colored frosting tubes from the store, which work just as well.
-
How long do Witch Brownies last?
When stored properly at room temperature in a single layer, they last 3-4 days. The icings keep their color and texture best at room temp, not refrigerated.
-
Can I decorate the brownies ahead of time?
Absolutely! Just make sure to store them in a single layer so the decorations don’t get smooshed. If you’re prepping more than a day ahead, the candy eyes might shift slightly, so I recommend adding those the day you plan to serve.
Final Thoughts
This Witch Brownies Recipe holds a special place in my heart because it’s a fun, fuss-free treat that always gets people smiling (and asking for seconds). Baking and decorating these witches feels like a cozy ritual that kicks off fall and Halloween festivities perfectly. I hope you try it out and enjoy making your own little coven of chocolate witches that taste as good as they look. Trust me, once you’ve had these, you’ll be whipping them up every spooky season!
Print
Witch Brownies Recipe
- Prep Time: 40 min
- Cook Time: 30 min
- Total Time: 2 hr 10 min
- Yield: 24 servings
- Category: Dessert
- Method: Baking
- Cuisine: American
Description
Witch Brownies are a festive and fun treat perfect for Halloween parties. These fudgy brownies are topped with colorful green and black icing to resemble witch faces and hats, decorated with candy eyeballs and licorice for a playful, spooky effect. Easy to make using a boxed brownie mix, they offer a perfect balance of rich chocolate flavor and creative decoration that kids and adults will love.
Ingredients
Brownies
- 1 box Betty Crocker™ Fudge Brownie Mix
- Water, vegetable oil, and eggs as called for on brownie mix box
Decorations
- 1 pouch Betty Crocker™ Green Cookie Icing
- 1 pouch (7 oz) Betty Crocker™ Decorating Cookie Icing black icing
- 48 candy eyeballs from 1 package (0.88 oz) Betty Crocker™ Dessert Decorations Candy Eyeballs
- 8 (8-inch) black licorice twists, each piece cut into thirds
Instructions
- Prepare Pan: Heat oven to 350°F (175°C). Line a 13×9-inch pan with foil, leaving some foil overhang to lift brownies easily after baking. Grease the bottom and sides of the foil with shortening or cooking spray to prevent sticking.
- Make and Bake Brownies: Prepare the brownie batter according to the instructions on the box using the required water, vegetable oil, and eggs. Pour the batter into the prepared pan and bake as directed. Once baked, cool the brownies completely on a cooling rack for about 1 hour.
- Cut Brownies: Using the foil overhang, lift brownies from the pan and peel away the foil. Cut the brownies into 24 triangular pieces by first slicing 3 horizontal rows, then cutting each row into 8 triangles. Each triangle should have about a 2-inch wide base. Set aside the end pieces for snacking.
- Decorate Brownies: Squeeze green cookie icing on the bottom third of each brownie triangle to create the witch’s face. Pipe black icing on the remaining unfrosted top portion to form the witch’s hat. Place a cut piece of licorice between the green and black icing layers to form the hat brim. Add two candy eyeballs on the green icing to give the witches their eyes.
- Storage: Store the decorated brownies covered in a single layer at room temperature to keep them fresh and maintain decoration integrity.
Notes
- Allow brownies to cool completely before decorating to prevent icing from melting.
- Use foil with overhang for easy removal of brownies from pan.
- Cut brownies carefully to maintain the triangular shape and avoid crumbling.
- These brownies are best served fresh but can be stored at room temperature for a day or two.
- Licorice pieces act as a fun and edible decoration—feel free to substitute with other candy if preferred.
Nutrition
- Serving Size: 1 brownie (approx. 1/24th of batch)
- Calories: 180
- Sugar: 22g
- Sodium: 110mg
- Fat: 8g
- Saturated Fat: 2.5g
- Unsaturated Fat: 4.5g
- Trans Fat: 0g
- Carbohydrates: 27g
- Fiber: 1g
- Protein: 2g
- Cholesterol: 20mg


