

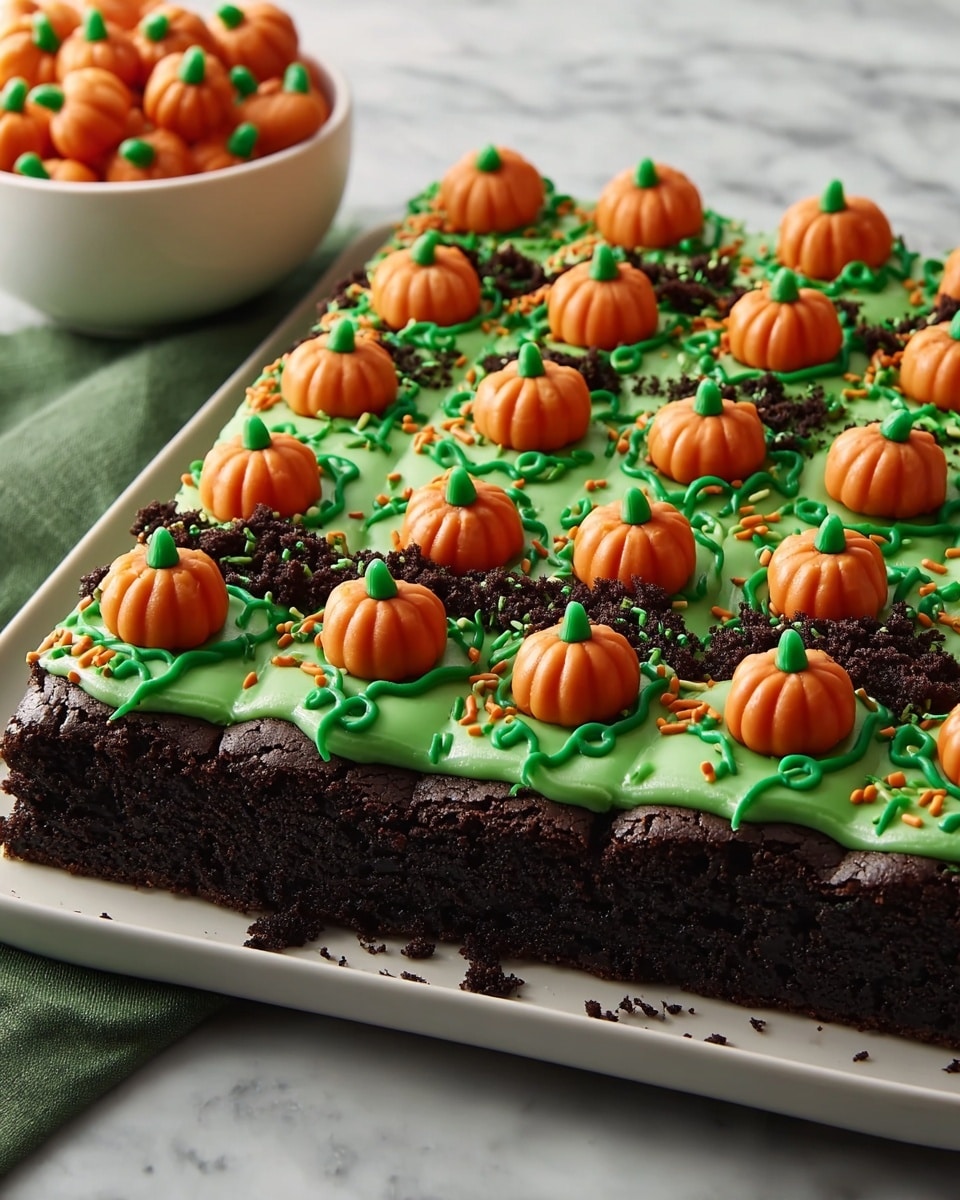
If you’re searching for a festive treat that’s equal parts fun and absolutely delicious, I’ve got you covered with my favorite fall-inspired dessert: the Pumpkin Patch Brownies Recipe. This isn’t just any brownie—it’s like a little Halloween party on your plate, loaded with rich chocolate, creamy frosting, and adorable candy pumpkins. I promise, once you try this, you’ll want to make it your go-to for every autumn gathering or cozy night in.
Why You’ll Love This Recipe
- Festively Fun Design: The candy pumpkins and piped vines make these brownies a charming centerpiece that delights kids and adults alike.
- Simple Ingredients: Using a boxed brownie mix and store-bought frosting means you can whip these up quickly without sacrificing taste.
- Perfectly Balanced Flavors: The rich chocolate base contrasts beautifully with the sweet vanilla frosting and crunchy Oreos for a textural treat.
- Great for Gifting or Parties: I always find these brownies make a hit whether on a dessert table or wrapped up as a thoughtful homemade gift.

Ingredients You’ll Need
I’ve kept this Pumpkin Patch Brownies Recipe approachable by combining a few pantry staples with unique decorating touches that really bring it to life. Shopping for everything is a breeze, especially if your local store stocks Betty Crocker products.
- Brownie Mix: I use Betty Crocker™ Delights Supreme Original Brownie Mix because it bakes up fudgy and rich every time.
- Water, Vegetable Oil, Egg: These are standard brownie mix ingredients; swapping any may affect texture, so I stick with what’s recommended.
- Vanilla Frosting: Betty Crocker™ Rich & Creamy Vanilla Frosting adds that creamy sweetness and acts as the perfect canvas for decorating.
- Green Gel Food Color: A little goes a long way to tint the frosting and make those pumpkin vines pop.
- Oreo Cookies: Finely crushed Oreos add a little crunch and chocolate contrast, and I like using four cookies to get just the right amount.
- Brownie Decors Pumpkin Vine: These pre-made decorations are a big time-saver and give the brownies a professional touch.
- Candy Pumpkins: The star of the show, these pumpkins sit on top and bring the “pumpkin patch” theme alive in every bite.
Variations
One of my favorite things about this Pumpkin Patch Brownies Recipe is how easy it is to put your own spin on it. Whether you want to adjust for dietary needs or just add more flavors, there’s lots of room to play.
- Gluten-Free Version: I’ve swapped the brownie mix for a gluten-free alternative and still got fudgy, delicious results.
- Spiced Up: Sometimes I sprinkle a bit of cinnamon or pumpkin pie spice into the brownie batter for an extra autumn kick.
- Vegan Twist: Using a vegan brownie mix and vegan frosting lets you enjoy this treat without compromise.
- Extra Crunch: I’ve added chopped pecans or walnuts mixed into the batter for a nutty surprise your family adores.
How to Make Pumpkin Patch Brownies Recipe
Step 1: Prep and Bake Your Brownies
First things first—preheat your oven to 350°F (or 325°F if you’re using a dark/nonstick pan, which I usually do). I line a 9-inch square pan with foil, leaving plenty of overhang. It makes lifting the brownies out a total breeze after baking. Don’t forget to spray the foil with cooking spray so your brownies don’t stick. Then, mix up your brownie batter following the box instructions exactly—it’s the trusty base that never lets me down. Spread the batter evenly in the pan and pop it in the oven. You’re aiming for about 28-31 minutes, but the real test is a toothpick inserted about 2 inches from the pan’s edge coming out almost clean. Let the brownies cool completely on a rack—this can take about an hour and a half, so I usually make these a day ahead.
Step 2: Color and Spread Your Frosting
Once your brownies have cooled, use the foil edges to gently lift them out of the pan and peel off the foil. In a small bowl, stir the vanilla frosting with green gel food color until you get a lovely, even shade of green—that reminds me of real pumpkin vines! Reserve about a tablespoon of this frosting by spooning it into a small, resealable plastic bag, and cut a tiny hole in one corner for piping later. Then go ahead and spread the remaining green frosting evenly over the entire top of the brownies using an offset spatula for the smoothest finish.
Step 3: Decorate Your Pumpkin Patch
Sprinkle the crushed Oreo cookies in four neat rows right over the frosting to add texture and that extra chocolatey crunch. Next, scatter the pumpkin vine brownie decors over the top—these pre-made decorations are so fun and make your brownies look like a real patch in no time. Now for the fun part: arrange the candy pumpkins in rows—four by four is what I do—so every square brownie gets its very own pumpkin. Finally, use the frosting-filled piping bag to draw small green lines for the vines weaving around the pumpkins. I find taking my time here really makes the difference in presentation.
Step 4: Slice and Serve
Cut your brownie patch into 16 squares—four rows by four rows—making sure each piece has a candy pumpkin right in the center. These brownies store beautifully in an airtight container at room temperature for a couple of days, though I rarely have leftovers!
Pro Tips for Making Pumpkin Patch Brownies Recipe
- Even Cooling: Don’t rush slicing—make sure brownies are completely cool to keep the frosting intact and prevent crumbling.
- Color Mixing: Add green gel food color gradually to avoid an overly dark shade; it’s easier to deepen the color than lighten it.
- Piping Precision: A small cut on your bag’s corner gives you better control for drawing vines; practice on parchment before decorating.
- Oreo Texture: Crushing the Oreos finely but not to dust creates the perfect crunchy topping without overpowering the brownie.
How to Serve Pumpkin Patch Brownies Recipe
Garnishes
I usually keep the garnishes simple since the candy pumpkins and vines steal the show, but I like adding a light dusting of powdered sugar for a bit of “frost.” For a richer touch, a small dollop of whipped cream on the side pairs insanely well with the chocolate and cream cheese notes in the frosting.
Side Dishes
Serve these pumpkin patch brownies alongside a cozy cup of hot apple cider or your favorite spiced latte, and you’ll create a perfect autumn duo. I also love pairing them with vanilla ice cream for a decadent dessert experience.
Creative Ways to Present
For Halloween parties, I’ve placed these brownies on a rustic wooden board surrounded by mini hay bales and faux autumn leaves—such a cute setup! You can also wrap individual squares in clear treat bags tied with orange and green ribbons if you want to give them as gifts.
Make Ahead and Storage
Storing Leftovers
My experience is that storing these brownies in an airtight container at room temperature keeps them fresh for about 3 days. The frosting holds up well without sweating or melting, especially if you keep them out of direct sunlight or heat.
Freezing
I sometimes freeze leftover brownies before decorating. Just wrap them tightly in plastic wrap, then foil, and freeze for up to 2 months. When you’re ready to serve, let them thaw fully before frosting and decorating to keep everything looking fresh.
Reheating
If you want your brownies warm, I recommend reheating just a single square in the microwave for about 10-15 seconds before adding frosting and decorations. I’ve found reheating after frosting can make it melt, so doing it beforehand keeps the look and texture spot on.
FAQs
-
Can I make this pumpkin patch brownies recipe from scratch?
Absolutely! While this recipe uses a boxed brownie mix for convenience, you can substitute your favorite homemade brownie batter without issue. Just be sure your batter is dense and fudgy for the best texture to support the toppings.
-
What if I can’t find the Brownie Decors Pumpkin Vine?
No worries! You can skip these or replace them with chocolate sprinkles, edible leaves, or piped green frosting vines. The key is the candy pumpkins for that pumpkin patch feel.
- How do I keep the frosting from melting?
Make sure the brownies are fully cooled before frosting. Also, storing them in a cool, dry place avoids heat exposure that melts frosting. If your home is warm, a refrigerator is best, but let brownies come to room temperature before eating.
-
Can I use a different color food gel?
Definitely! While green perfectly mimics pumpkin vines, feel free to experiment with other colors for a unique look—just start with small amounts so you don’t overpower the frosting flavor.
Final Thoughts
I absolutely love how this Pumpkin Patch Brownies Recipe turns out every time—it’s one of those desserts that’s as much fun to make as it is to eat. Whether you’re baking them for a family treat, school party, or fall gathering, they never fail to bring smiles. I hope you find as much joy sharing these festive brownies with your loved ones as I do. So grab that brownie mix, get creative with the decorations, and make your own sweet little pumpkin patch memories!
Print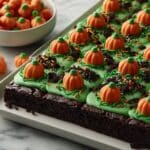
Pumpkin Patch Brownies Recipe
- Prep Time: 20 minutes
- Cook Time: 31 minutes
- Total Time: 2 hours 25 minutes
- Yield: 16 servings
- Category: Dessert
- Method: Baking
- Cuisine: American
Description
Delight in these festive Pumpkin Patch Brownies, featuring a rich and fudgy brownie base topped with creamy vanilla frosting tinted green, crunchy Oreo cookie rows, decorative pumpkin-shaped candies, and piped pumpkin vine details. Perfect for autumn gatherings and Halloween celebrations, these brownies combine indulgent flavors with playful seasonal decor.
Ingredients
Brownie Base
- 1 box (16 oz) Betty Crocker™ Delights Supreme Original Brownie Mix
- Water, vegetable oil, and egg called for on brownie mix box
Frosting and Decorations
- 1 cup from 1 tub (16 oz) Betty Crocker™ Rich & Creamy Vanilla Frosting
- 1 teaspoon Betty Crocker™ green gel food color
- 4 Oreo chocolate sandwich cookies, finely crushed (about 1/3 cup)
- 2 teaspoons Betty Crocker™ Brownie Decors Pumpkin Vine (from 2.9-oz container)
- 16 candy pumpkins
Instructions
- Prepare Brownie Batter: Preheat your oven to 350°F (or 325°F if using a dark or nonstick pan). Line a 9-inch square pan with foil, leaving a 2-inch overhang on the sides, and spray the foil with cooking spray to prevent sticking. Follow the directions on the brownie mix box to prepare the batter, then spread it evenly in the prepared pan.
- Bake Brownies: Place the pan in the oven and bake the brownies for 28 to 31 minutes. Test doneness by inserting a toothpick about 2 inches from the side of the pan; it should come out almost clean. Once baked, transfer the pan to a cooling rack and let the brownies cool completely for about 1 hour and 30 minutes.
- Prepare Frosting and Piping Bag: Use the foil overhang to lift the cooled brownies out of the pan and peel the foil away. In a small bowl, mix the vanilla frosting with green gel food coloring until the color is uniform. Remove 1 tablespoon of the colored frosting and place it into a small resealable plastic bag. Seal the bag partially and snip off a tiny corner to create a piping bag for decorating.
- Decorate Brownies: Spread the remaining green frosting evenly over the top of the brownies. Arrange the crushed Oreo cookies in four rows across the frosting, using about a generous tablespoon per row. Sprinkle the Betty Crocker Brownie Decors Pumpkin Vine across the top for added decorative effect. Then, place the candy pumpkins in a grid pattern, four rows by four rows. Use the prepared piping bag to pipe small green lines connecting the candy pumpkins, mimicking pumpkin vines based on the photo guide.
- Slice and Store: Cut the decorated brownies into 16 equal pieces (4 rows by 4 rows), ensuring each piece has a candy pumpkin in the center. Store the brownies in an airtight container to keep them fresh until serving.
Notes
- For best results, allow brownies to cool completely before frosting to prevent melting.
- If you don’t have Betty Crocker Brownie Decors, you can substitute with other Halloween-themed sprinkles.
- Using dark or nonstick pans requires reducing oven temperature to 325°F to avoid overbaking.
- Crushing Oreo cookies finely gives a nice crunchy texture contrast on top of the smooth frosting.
- The green gel food color can be adjusted for a more vibrant or subtle green color depending on preference.
Nutrition
- Serving Size: 1 piece (1/16 of batch)
- Calories: 250
- Sugar: 22g
- Sodium: 150mg
- Fat: 12g
- Saturated Fat: 4g
- Unsaturated Fat: 6g
- Trans Fat: 0g
- Carbohydrates: 34g
- Fiber: 1g
- Protein: 2g
- Cholesterol: 20mg
