

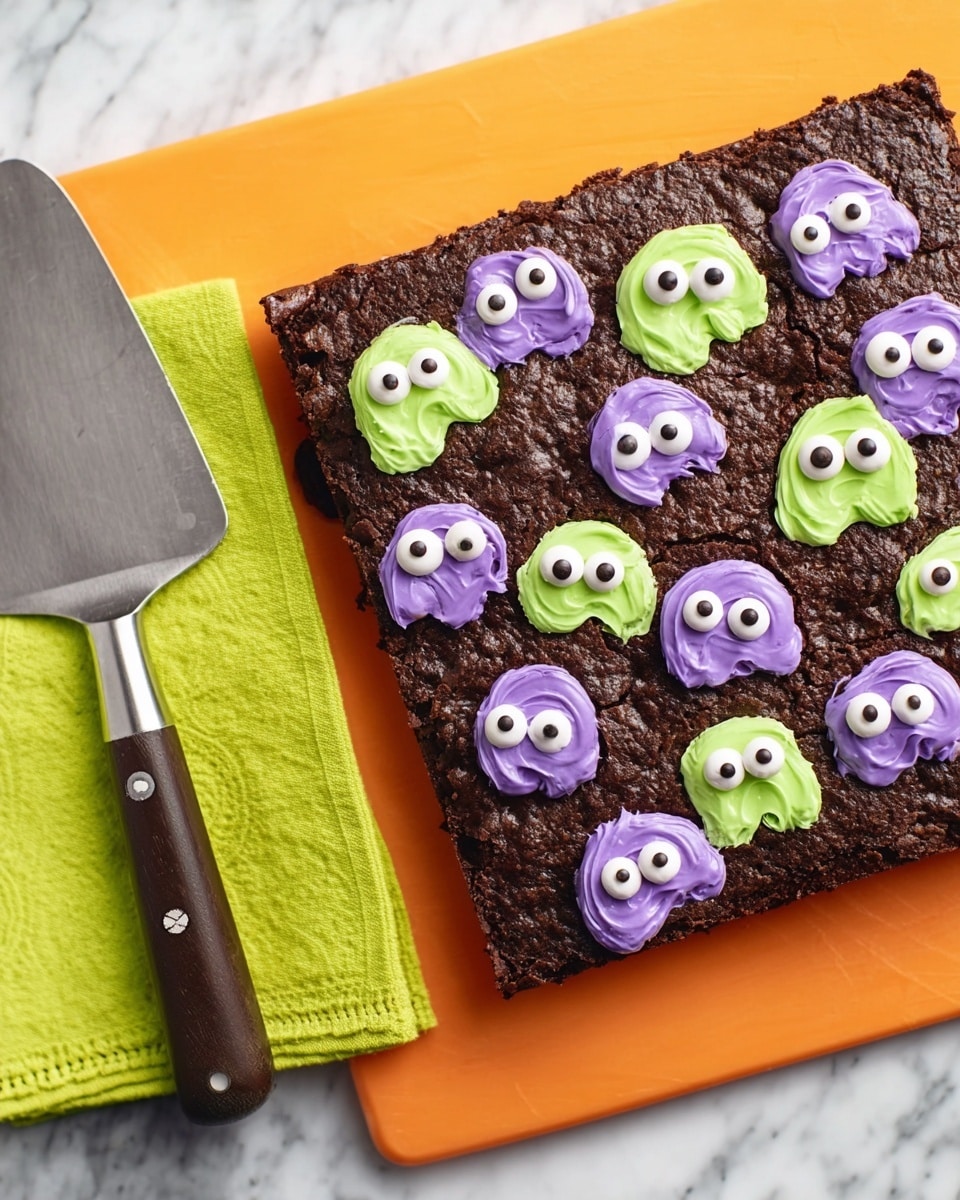
If you’re on the hunt for a fun and festive treat this fall, you’ve got to try this Spooky Halloween Brownies Recipe. It’s one of those crowd-pleasers that’s as easy as it is adorable — rich, fudgy brownies topped with colorful neon frosting and creepy candy eyeballs. When I first tried this recipe, I was amazed at how simple it was to make something that looks so impressive without a lot of fuss. Whether you’re baking for a classroom party, a neighborhood get-together, or just a cozy night in with the family, these brownies bring the perfect spooky vibe with zero stress.
Why You’ll Love This Recipe
- Simplicity Meets Fun: This recipe uses easy-to-find ingredients and simple steps, so even if you’re short on time, you can still wow your crowd.
- Deliciously Moist and Fudgy: The brownie base is super rich and perfectly moist — not dry or crumbly — which I always appreciate when making treats for kids.
- Eye-Catching Presentation: Those vibrant neon frosting colors with candy eyeballs turn ordinary brownies into a Halloween spectacular, making your dessert table instantly festive.

Ingredients You’ll Need
What I love about this Spooky Halloween Brownies Recipe is how it blends classic brownie goodness with a fun twist in decoration using just a handful of ingredients. Each one is straightforward and easy to shop for, which makes pulling this together a breeze.
- Brownie Mix: I usually go with Betty Crocker™ Delights Supreme Triple Chunk — it adds extra chocolate chunks that make the brownies even better.
- Water, Vegetable Oil, and Egg: These are just basics you’ll mix in with the brownie mix as per the box directions.
- Vanilla Frosting: Betty Crocker™ Rich & Creamy Vanilla Frosting works wonderfully because it’s smooth and not too sweet, which complements the brownies perfectly.
- Green and Purple Neon Gel Food Colors: Gel colors are my favorite for frosting because they’re super vibrant without watering down the texture.
- Candy Eyeballs: Betty Crocker™ Dessert Decorations candy eyeballs add that perfect spooky touch and are safe and fun for kids to help decorate.
Variations
I love to personalize this Spooky Halloween Brownies Recipe depending on who I’m serving and what I have on hand. Don’t be afraid to tweak the colors or candies to make it your own. It’s all about having fun in the kitchen!
- Frosting Colors: Sometimes I mix in a little orange gel to get classic Halloween vibes alongside the purple and green.
- Nut Add-In: If you like a little crunch, sprinkle chopped walnuts or pecans in the brownie batter before baking.
- Gluten-Free Option: Use a gluten-free brownie mix and check your decorations to keep this recipe allergy-friendly.
- Spicy Twist: Add a pinch of cayenne pepper or cinnamon to your brownie mix for a subtle kick that surprises your taste buds.
How to Make Spooky Halloween Brownies Recipe
Step 1: Bake the Perfect Brownie Base
First things first, preheat your oven to 350°F (or 325°F if you’re using a dark or nonstick pan). Line your 9-inch square pan with foil, leaving some overhang to help you lift the brownies out later — trust me, this makes cleanup and transferring way easier. Spray the foil lightly with cooking spray so your brownies don’t stick. Then, mix up your brownie batter according to the box instructions. I always give it a good stir but try not to overmix, so you keep those fudgy pockets. Bake as directed and let cool completely — this usually takes about 1 hour and 30 minutes. Patience here pays off because warm brownies won’t frost well.
Step 2: Prep the Frosting Colors
While your brownies are cooling, divide your vanilla frosting evenly into two small bowls. Add your green neon gel food coloring to one bowl and purple to the other, mixing until you get the perfect spooky shades. I like to start with a little gel and add more gradually — it’s easier to add color than to dilute if it gets too dark. Then spoon each colored frosting into separate small plastic bags and seal them partway. Cut about a 1/4-inch corner off each bag for piping your frosting mounds.
Step 3: Decorate Like a Pro
Carefully lift the cooled brownies out of the pan using the foil overhang and peel away the foil. Place brownies on a serving platter or cutting board. Now for the fun part! Squeeze little mounds of frosting in alternating green and purple blobs all over the brownie top — varying the size makes them look extra spooky and playful. Then, press candy eyeballs into each frosting mound. My kids love helping with this step; it’s a super fun decorating activity.
Step 4: Cut and Store
Use a sharp knife to cut into 4 rows by 4 rows, giving you 16 perfectly sized spooky brownie bites. Store these loosely covered at room temperature so the frosting doesn’t get too hard but the brownies stay fresh. They’re best enjoyed within a day or two — although, if I’m being honest, they rarely last that long in my house!
Pro Tips for Making Spooky Halloween Brownies Recipe
- Use Foil Liner Trick: Lining the pan with foil overhang is a game-changer — lifting out the brownies cleanly saves you so much hassle when decorating.
- Gel Food Coloring is Your Friend: It gives vibrant colors without thinning your frosting, so those neon greens and purples stay bold and bright.
- Cool Completely Before Frosting: I’ve learned the hard way that warm brownies make frosting melt and slide off — so set a timer and be patient!
- Cut with a Warm Knife: Run your knife under hot water, dry it, then slice the brownies cleanly to keep edges neat and prevent frosting smears.
How to Serve Spooky Halloween Brownies Recipe
Garnishes
I usually keep the garnishes simple since the candy eyeballs steal the spotlight. But if I want to get creative, I sprinkle a tiny bit of edible glitter or a few thin chocolate drizzles over the frosting mounds. It adds some sparkle and contrast without overwhelming the spooky theme.
Side Dishes
These brownies pair wonderfully with a tall glass of cold milk or a warm mug of spiced apple cider — both bring out the rich chocolate flavor. For a party, I’ve served them alongside pumpkin cookies or a simple caramel popcorn mix for a festive touch.
Creative Ways to Present
For Halloween parties, I’ve arranged these brownies on black platters and scattered little plastic spiders or fake cobwebs around for effect. Another fun idea I tried was to serve them on mini gravestone-shaped plates and adding name tags like “Witch’s Favorite Bite.” It’s always a hit and makes the dessert table look so festive!
Make Ahead and Storage
Storing Leftovers
I usually keep leftover spooky brownies loosely covered in an airtight container at room temperature. This keeps the frosting soft and the brownies moist for 2 to 3 days. If the room is warm, I store them in the fridge for a bit longer, but the frosting gets a bit firm then.
Freezing
Freezing the brownies is totally doable! I wrap individual pieces in plastic wrap and then place them in a freezer-safe bag. They freeze well for up to 2 months. When I want to enjoy one, I thaw it at room temperature for a couple hours — the frosting softens back nicely and the brownie texture stays great.
Reheating
If you want to warm up a brownie, I pop it in the microwave for about 10-15 seconds — just enough to make it soft without melting the frosting into a puddle. This always revives the fudgy texture beautifully for an almost “fresh-baked” experience.
FAQs
-
Can I make these brownies from scratch instead of a mix?
Absolutely! While this recipe is designed around a boxed brownie mix for convenience, you can use your favorite scratch brownie recipe. Just keep in mind that the baking time and texture may vary, so watch them closely to avoid overbaking. The decoration instructions remain the same and work equally well.
-
What if I don’t have candy eyeballs?
No worries! You can get creative by using mini chocolate chips, colored sprinkles, or even drawing eyes with edible markers on white frosting blobs. The key is making spooky “eye-like” decorations that add character, so feel free to improvise based on what you have at home.
-
How do I prevent the frosting from melting on the brownies?
Make sure your brownies are completely cooled before you start decorating. Warm brownies will cause the frosting to melt and slide off. Also, piping smaller mounds and chilling the finished brownies briefly before serving can help the frosting set nicely.
-
Can I make these vegan or egg-free?
It’s possible if you swap the brownie mix for a vegan or egg-free version and use dairy-free frosting. Just make sure the candy eyeballs and food colors you use are also free of animal products. Expect slight differences in texture but still delicious results!
Final Thoughts
This Spooky Halloween Brownies Recipe has become one of my top go-to desserts for October because it nails the balance between spooky and sweet without any complicated steps. I love how it brings a smile (and sometimes a playful shiver!) to everyone who tries it. If you want an easy, festive dessert that impresses but doesn’t stress, give this recipe a whirl — I promise, you’ll be thrilled with how it turns out. Now, go grab your sprinkles and let’s make this Halloween deliciously spooky!
Print
Spooky Halloween Brownies Recipe
- Prep Time: 20 minutes
- Cook Time: 35 minutes
- Total Time: 2 hours 25 minutes
- Yield: 16 servings
- Category: Dessert
- Method: Baking
- Cuisine: American
Description
Celebrate Halloween with these spooky and colorful brownies topped with vibrant neon frosting and candy eyeballs. Made from a rich triple chunk brownie mix and decorated with fun, eerie details, these brownies are perfect for a festive party treat or a Halloween gathering.
Ingredients
Brownie Mix
- 1 box (17.8 oz) Betty Crocker™ Delights Supreme Triple Chunk Brownie Mix
- Water, vegetable oil, and egg as called for on brownie mix box
Frosting and Decoration
- 2/3 cup from 1 tub (16 oz) Betty Crocker™ Rich & Creamy Vanilla Frosting
- Betty Crocker™ Green Neon Gel Food Color
- Betty Crocker™ Purple Neon Gel Food Color
- 50 Betty Crocker™ Dessert Decorations Candy Eyeballs (from 0.88-oz package)
Instructions
- Prepare and Bake Brownies: Heat your oven to 350°F (325°F if using a dark or nonstick pan). Line a 9-inch square pan with foil, leaving some overhang for easy removal. Spray the foil with cooking spray. Prepare the brownie mix as directed on the box using water, vegetable oil, and eggs. Pour batter into the prepared pan and bake. Allow brownies to cool completely for about 1 hour and 30 minutes.
- Remove Brownies from Pan: Use the foil overhang to lift the brownies out of the pan carefully. Peel away the foil, then transfer the brownies onto a serving platter or cutting board.
- Color and Pipe Frosting: Divide 2/3 cup of vanilla frosting into two small bowls. Add green gel food color to one bowl and purple gel food color to the other, mixing until you achieve the desired shades. Spoon each colored frosting into separate small resealable plastic bags. Seal partially and cut off about a 1/4-inch corner from each bag to use as a piping bag. Squeeze the frosting in mounds over the brownie surface, alternating colors and varying the size of the mounds.
- Decorate and Serve: Place candy eyeballs onto the frosting mounds to create a spooky effect. Once decorated, cut the brownies into 4 rows by 4 rows, yielding 16 pieces. Store the brownies loosely covered at room temperature until ready to serve.
Notes
- For best results, ensure brownies are completely cooled before frosting to prevent melting.
- Adjust the amount of gel food coloring to achieve vivid neon colors.
- Use foil with overhang to make removing brownies from pan easier without breaking.
- Store brownies loosely covered at room temperature to maintain freshness and frosting texture.
- Cut frosting bag corners small to control the size of frosting mounds for better decoration precision.
Nutrition
- Serving Size: 1 brownie (1/16 of recipe)
- Calories: 250
- Sugar: 21g
- Sodium: 160mg
- Fat: 12g
- Saturated Fat: 4g
- Unsaturated Fat: 6g
- Trans Fat: 0g
- Carbohydrates: 34g
- Fiber: 1g
- Protein: 2g
- Cholesterol: 20mg

