

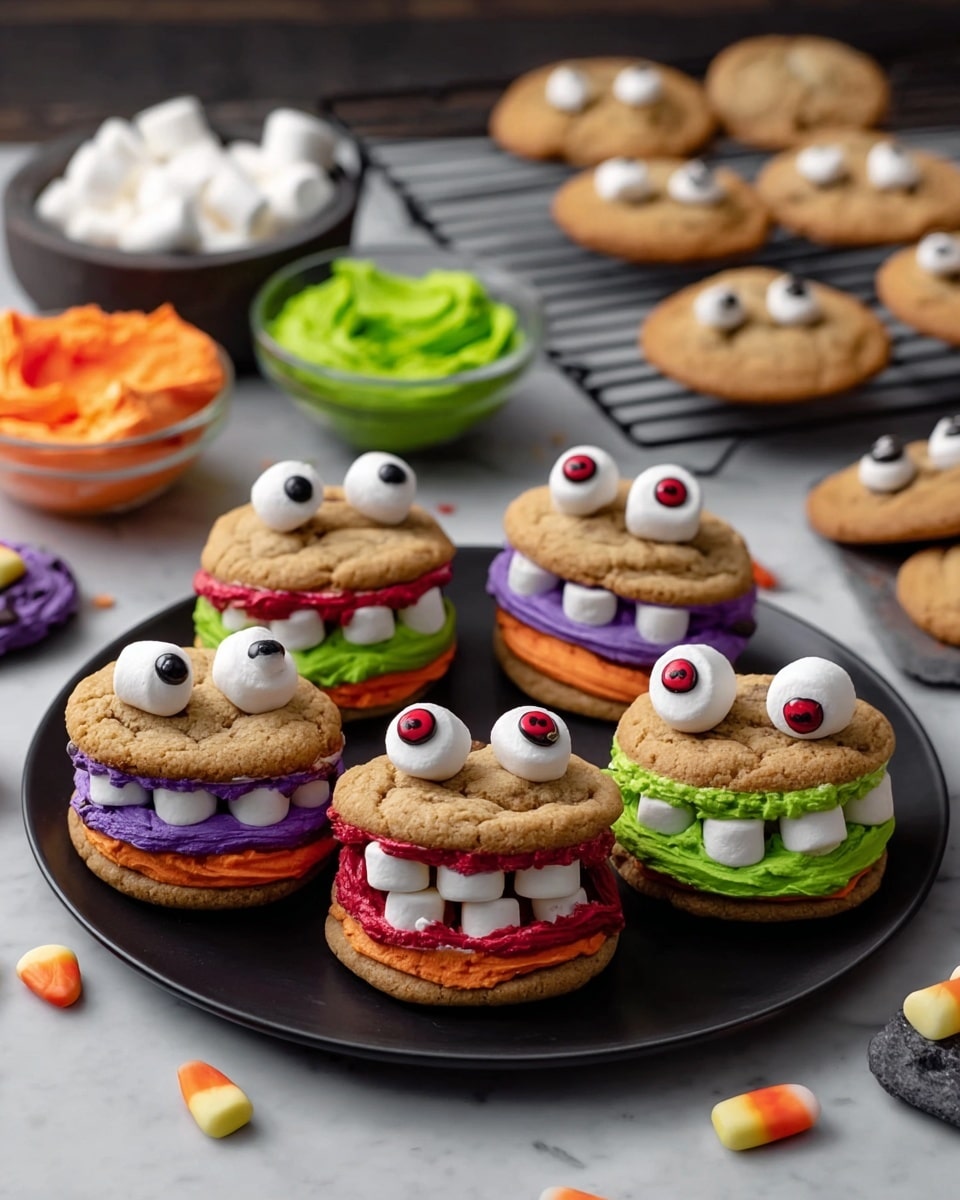
If you’re looking for a cookie that’s not only delicious but also a blast to make and eat, you’re going to adore this Munching Monster Cookies Recipe. I absolutely love how these little monsters come to life with gooey frosting, marshmallow teeth, and goofy gummy eyeballs—it’s like Halloween fun all year round. Trust me, once you try this, you’ll want to make them again and again for parties, school snacks, or just a cheerful treat on any day.
Why You’ll Love This Recipe
- Fun & Festive: These cookies turn simple ingredients into a fun, eye-catching treat everyone will talk about.
- Easy to Customize: You can play with colors, candy eyes, and marshmallows to fit any occasion or mood.
- Kid-Friendly Activity: I’ve made this with kids who loved decorating and assembling their own monsters—it’s a win-win.
- Made with Trusted Ingredients: Using Betty Crocker’s cookie mix and frosting means consistent, delicious results every time.

Ingredients You’ll Need
The magic of this Munching Monster Cookies Recipe lies in combining trusty baking staples with bright candy touches. You’ll find the Betty Crocker mix and frosting give you a perfect base to let the colorful monster magic shine through. I usually pick neon gel colors for that punchy, fun vibe, and don’t skip the gummy eyeballs—they complete the look!
- Betty Crocker™ Chocolate Chip Cookie Mix: A reliable mix that bakes into soft, chewy cookies—the perfect monster body.
- Butter and egg: Use as directed on the cookie mix pouch for that perfect dough texture.
- Betty Crocker™ Rich & Creamy Vanilla Frosting: Smooth and sweet frosting that’s perfect for “gluing” your monsters together and adding vibrant colors.
- Neon gel food colors (purple, green, orange): These bright gels bring your monsters to life—feel free to mix your own shades.
- Miniature marshmallows: These become the monster’s sharp teeth and cute noses; I love how they add chewy texture.
- Dallies™ gummy eyeballs: Absolutely essential for that perfect creepy-cute monster expression!
Variations
One of the best parts about this Munching Monster Cookies Recipe is how easy it is to make it your own. I’ve experimented with different colors, add-ins, and even frosting flavors to keep the monsters fresh and fun. I encourage you to mix and match to find your perfect monster vibe!
- Different Color Themes: I once made a spooky Halloween batch with black and red food colors—my family went crazy for those scarier monsters!
- Frosting Flavors: Try swapping vanilla for chocolate or strawberry frosting to give your monsters a new flavor profile.
- Mix-In Variations: Adding mini chocolate chips or colored sprinkles under the frosting adds a fun surprise with every bite.
- Dietary Tweaks: If you need gluten-free, try a gluten-free cookie mix and frosting alternatives; you can still make these monsters shine!
How to Make Munching Monster Cookies Recipe
Step 1: Bake Those Cookie Bases
First things first: preheat your oven to 375°F. Then, prepare the cookies exactly as the Betty Crocker™ Chocolate Chip Cookie Mix directs—this gives you the perfect chewy base for your monsters. Make regular-sized cookies, not mini or large; this size works perfectly for sandwich monsters. Once baked, let them cool completely—about 15 minutes—before you move on. Trust me, frosting warm cookies is a sticky mess you won’t want to clean up.
Step 2: Color Your Frosting
While your cookies cool, divide your vanilla frosting into three separate bowls—about 3/4 cup in each. Then, add 1/4 teaspoon of neon gel food color to each bowl to create three vibrant frosting colors. I love using purple, green, and orange; they just scream monster fun! Stir well until you have smooth, even colors. If you want stronger colors, a tiny bit more gel will do the trick.
Step 3: Assemble The Monster Mouths
Grab two cookies and frost the bottom side of both using the same colored frosting—this helps the sandwich stay together. On one frosted cookie, place about six mini marshmallows along the edge to act as sharp monster teeth. Then, press the second cookie on top, frosting side down, to make the sandwich. This step is the heart of your monster’s munching mouth, so take your time to line up the marshmallows neatly.
Step 4: Decorate Your Monsters
Next, spread another color of frosting on the top cookie’s flat surface. This is your monster’s face, so have fun with it! Stick gummy eyeballs wherever you want—two eyes are classic, but you can get creative—and add a single miniature marshmallow for the nose. Repeat this process for all your cookies. I found using a small offset spatula for spreading frosting makes it cleaner and easier.
Pro Tips for Making Munching Monster Cookies Recipe
- Cool the Cookies Completely: I used to rush this step, but frosting warm cookies causes melting and sliding—definitely avoid that!
- Use Gel Food Colors: Liquid colors make frosting runnier; gels keep the frosting thick and perfect for sticking on decorations.
- Mini Marshmallow Teeth Are Key: They add texture and the iconic monster bite—don’t skip ’em, and space them evenly for the best effect.
- Frost Both Cookies Before Sandwiching: This ensures the sandwich sticks well and not fall apart in your hand.
How to Serve Munching Monster Cookies Recipe
Garnishes
When I serve these munching monsters, I sometimes add extra eyelash sprinkles or edible glitter dust around their “faces” for extra personality—especially fun for kids’ parties. Fresh mint leaves nearby can add a pop of green contrast, but honestly, these monsters shine best on their own colorful frosting and goofy eyes.
Side Dishes
This recipe pairs beautifully with a cold glass of milk (classic combo) or a fun hot chocolate if you’re serving on a chilly day. For a party, I like to put them on a dessert platter alongside fresh fruit slices and simple vanilla cupcakes—it keeps the vibe cheerful and varied.
Creative Ways to Present
For Halloween, I’ve arranged these cookies on a platter to look like crawling monsters by stacking carefully—it’s a hit every time! Another time, I wrapped each cookie individually in clear cellophane tied with colorful ribbons for “monster favors” at a birthday party. You could even serve them on a spooky-themed cake stand or scatter candy “slime” (green gel) around the platter for extra fun.
Make Ahead and Storage
Storing Leftovers
I store leftover Munching Monster Cookies in an airtight container at room temperature for up to three days. I learned the hard way that refrigeration makes the marshmallows tough, so skip the fridge unless you’re in a very warm climate. The cookies stay soft and the frosting retains its shape nicely this way.
Freezing
If you want to freeze these, I recommend freezing the plain baked cookies first (before frosting) in a single layer on a baking sheet, then transferring them to a freezer bag. When ready to enjoy, thaw completely and decorate with frosting and candies fresh. Frosted and decorated cookies don’t freeze well because the marshmallows and gummy eyes can get damaged or sticky.
Reheating
When you want to freshen up the cookies, just bring them to room temperature if chilled, and enjoy cold or at room temp. I don’t recommend microwaving because the frosting can melt and the marshmallows lose their shape, but if you want them a bit warmed, a 5-second zap in the microwave is all you need—just watch closely!
FAQs
-
Can I make Munching Monster Cookies Recipe gluten-free?
Absolutely! Just swap the Betty Crocker cookie mix for a gluten-free one and use gluten-free frosting and candy. The assembly stays exactly the same and you’ll still get those fun, chewy monsters everyone will love.
-
How long do these cookies last?
At room temperature in an airtight container, they’re best eaten within 3 days. Avoid refrigerating to keep marshmallows soft and frosting firm.
-
Can I use other candies besides gummy eyeballs?
Definitely! You can use chocolate chips, candy eyes from other brands, or even small round candies like M&Ms to customize your monster faces.
-
Is this recipe good for kids to make?
Yes! It’s a wonderful hands-on activity for kids, as they can help decorate and assemble the monsters without needing to handle the oven.
Final Thoughts
This Munching Monster Cookies Recipe holds a special place in my kitchen—it’s a guaranteed crowd-pleaser that brings smiles, laughter, and a little bit of silly monster fun to any gathering. I love how simple ingredients transform into these playful treats, and how it invites creativity and joy. I really hope you’ll give these monsters a try and enjoy making (and munching) them as much as I do!
Print
Munching Monster Cookies Recipe
- Prep Time: 20 minutes
- Cook Time: 15 minutes
- Total Time: 60 minutes
- Yield: 18 sandwich cookies
- Category: Dessert
- Method: Baking
- Cuisine: American
Description
Munching Monster Cookies are fun and colorful sandwich cookies perfect for Halloween or any playful occasion. Made from Betty Crocker Chocolate Chip Cookie Mix, these cookies are baked to golden perfection, then creatively decorated with vibrant neon frostings, gummy eyeballs, and miniature marshmallows to resemble quirky monster faces. This recipe combines classic baking with easy decorating steps to delight kids and adults alike.
Ingredients
Cookies
- 1 pouch (17.5 oz) Betty Crocker™ Chocolate Chip Cookie Mix
- Butter and egg called for on cookie mix pouch
Frosting and Decorations
- 2 1/2 cups from 2 tubs (16 oz each) Betty Crocker™ Rich & Creamy Vanilla Frosting
- Betty Crocker™ neon gel food colors (purple, green, and orange), about 1/4 teaspoon each
- 1 1/3 cups miniature marshmallows
- 6 packages (0.71 oz each) Dallies™ gummy eyeballs (36 eyeballs total)
Instructions
- Prepare and Bake Cookies: Heat oven to 375°F. Prepare the cookie dough following the directions on the cookie mix pouch using the specified butter and egg. Drop dough to make regular-size cookies and bake as directed. Once baked, allow the cookies to cool completely, about 15 minutes, to ensure frosting does not melt during decorating.
- Divide and Color Frosting: While the cookies cool, divide the 2 1/2 cups of vanilla frosting equally into 3 bowls, approximately 3/4 cup in each. Stir about 1/4 teaspoon of each neon gel food color (purple, green, and orange) into separate bowls to create three vibrant frosting colors.
- Assemble Cookie Sandwiches: Take two cookies and frost the bottoms of both with the same colored frosting. On the frosting of one cookie, place about 6 miniature marshmallows close together to simulate ‘teeth.’ Top this cookie with the second one, placing the frosted sides together to form a sandwich cookie with marshmallow teeth inside.
- Decorate Monster Faces: Spread a different colored frosting on top of the cookie sandwich to act as the monster’s face. Attach 2 gummy eyeballs to the frosting and add a miniature marshmallow in the center below the eyes as the nose. Repeat these steps for the remaining cookies, using varied colors and placement for fun, unique monsters.
Notes
- Make sure cookies are completely cooled before frosting to prevent melting and sliding.
- Use gel food colors sparingly as a little goes a long way and prevents frosting from becoming too runny.
- You can substitute gummy eyeballs with other small candy pieces if desired.
- Store finished cookies in an airtight container at room temperature for up to 2 days for best freshness.
Nutrition
- Serving Size: 1 sandwich cookie
- Calories: 210 kcal
- Sugar: 18 g
- Sodium: 110 mg
- Fat: 10 g
- Saturated Fat: 6 g
- Unsaturated Fat: 3 g
- Trans Fat: 0 g
- Carbohydrates: 27 g
- Fiber: 1 g
- Protein: 2 g
- Cholesterol: 15 mg

