

If you’re someone who loves a dessert that’s sweet, comforting, and has that little extra touch of cozy warmth, this Maple Syrup Pie Recipe is exactly what you need in your life. I absolutely love how this pie captures the rich, naturally sweet flavor of real maple syrup in a smooth, luscious filling, all tucked into a perfectly flaky crust. Trust me, once you try this, it’ll become a favorite to pull out for family gatherings or when you just want to treat yourself to something special. Let’s dig in and make some magic happen!
Why You’ll Love This Recipe
- Pure Maple Flavor: This pie uses real maple syrup, giving it that rich, authentic sweetness you just can’t fake.
- Simple Ingredients: You probably have everything you need in your pantry—nothing complicated here.
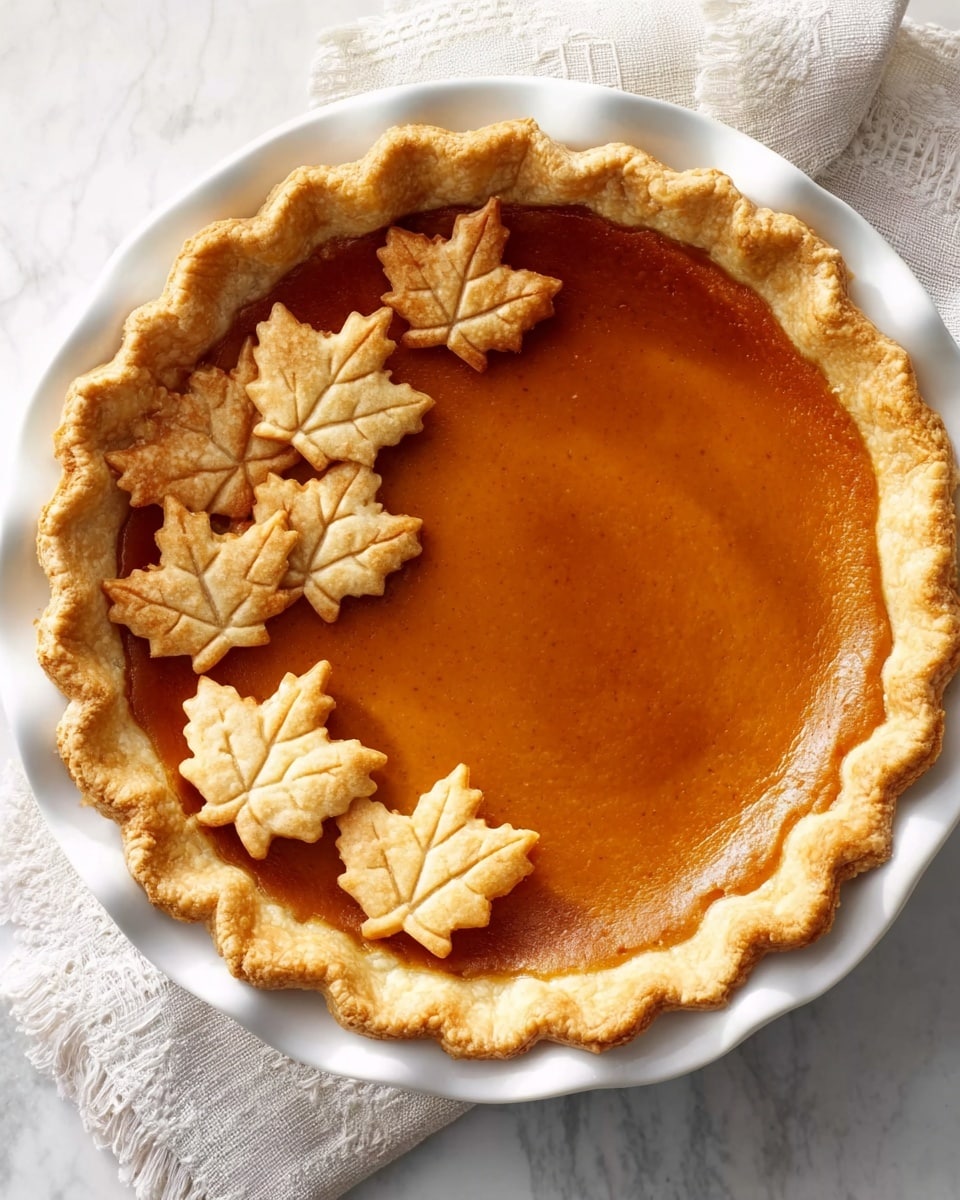
- Beautiful Presentation: Those little maple leaf cutouts on top add a festive, charming touch.
- Easy to Make: Even if you don’t bake often, the step-by-step process will guide you to perfect results.

Ingredients You’ll Need
This Maple Syrup Pie Recipe comes together with just a handful of ingredients that balance perfectly—the thickening power of cornstarch, sweetness from maple syrup, and richness from butter all wrapped in a classic double pie crust. Make sure to pick up the best pure maple syrup you can find—trust me, it makes a world of difference!
- Cornstarch: This is your thickening hero, it ensures that smooth, pudding-like filling.
- Water: Helps dissolve the cornstarch and balance the syrup’s richness.
- Real Maple Syrup: Use pure maple syrup for that authentic flavor—avoid “pancake syrup” or artificial substitutes.
- Butter: Adds richness and a silky texture to the filling when stirred in at the end.
- Pastry for Double-Crust Pie: Either homemade or store-bought pie crust works great; just roll it out to the right thickness.
Variations
I love how versatile this Maple Syrup Pie Recipe can be—you can keep it classic or tweak it a bit to fit your tastes and occasions. I’ve played around with it myself, and it always turns out beautifully with small tweaks.
- Adding Nuts: I once sprinkled chopped toasted pecans into the filling for some crunch, which was a delightful twist!
- Vegan Version: Swap the butter for a plant-based alternative and use a vegan pie crust; the flavor stays just as rich.
- Spiced Maple: Sometimes I add a pinch of cinnamon or nutmeg for a touch of fall warmth.
- Mini Pies: Making individual tarts instead of one big pie is great for parties and brings a cute vibe.
How to Make Maple Syrup Pie Recipe
Step 1: Make the Maple Filling
Start by whisking the cornstarch and water in a large saucepan until smooth—that avoids lumps and gets you a silky filling. Then add your maple syrup and bring the mixture to a boil over medium heat. Keep stirring—this is key!—and cook for about 4 minutes until the filling thickens nicely. When you remove it from heat, stir in the butter until it melts completely. I like to let the filling cool a bit here so it thickens more and is easier to handle when filling the crust.
Step 2: Prepare Your Pie Crust
On a lightly floured surface, roll out the dough for the bottom crust to about 1/8 inch thick and transfer it into your 9-inch pie plate. I like to trim the edges to about 1/2 inch beyond the rim and then flute the edges for that classic look. Pop the crust into the fridge for 30 minutes to chill—it helps prevent shrinking while baking.
Step 3: Create the Maple Leaf Cutouts
While your bottom crust chills, roll out the remaining dough a little thicker—about 1/4 inch—so the leaf cutouts hold their shape. Use maple leaf-shaped cookie cutters in various sizes (between 1.5 and 2.5 inches) and place the cutouts on a baking sheet to chill as well. These will bake separately and add that charming touch on top.
Step 4: Bake the Pie
Pour the maple filling into the chilled bottom crust. Bake the pie initially at 400°F on a lower rack for about 10 minutes—this jumpstart helps the crust set. Then reduce the oven temp to 350°F and bake for 35-40 minutes until the crust is golden and the filling is bubbly. At the same time, bake those lovely leaf cutouts separately for 8-10 minutes until golden brown. Once the pie is done, let it cool completely on a wire rack—this cooling step is crucial for slicing cleanly and letting the filling set fully.
Step 5: Decorate and Serve
Arrange your baked maple leaf cutouts delicately on top of the cooled pie to impress your guests. I love how this not only tastes amazing but looks like a labor of love. You’re going to get so many compliments!
Pro Tips for Making Maple Syrup Pie Recipe
- Prevent a Soggy Crust: Chilling the crust and pre-baking it at a high temp helps keep it crisp and flaky under that rich filling.
- Stir Constantly: When thickening the filling, keep stirring to avoid lumps or burning on the bottom of the pan.
- Use Pure Maple Syrup: It’s worth splurging on real maple syrup for that deep, authentic flavor that can’t be mimicked.
- Cool Completely: Let the pie cool fully before slicing to avoid a runny filling and get perfect wedges.
How to Serve Maple Syrup Pie Recipe
Garnishes
I love keeping it simple with a dusting of powdered sugar or a light drizzle of warm maple syrup on top. The maple leaf cutouts are my favorite garnish—they’re not just pretty but give extra crisp bites with every slice. Sometimes, I’ll add a dollop of whipped cream or a scoop of vanilla ice cream for that extra indulgence.
Side Dishes
To keep the focus on the pie, I usually serve it alongside a cup of strong black coffee or an herbal tea. For brunch gatherings, fresh fruit like sliced pears or apples on the side complements the maple sweetness beautifully. Sometimes, my family enjoys it with a scoop of Greek yogurt to balance the richness.
Creative Ways to Present
One fun idea I tried was serving mini maple syrup pies in ramekins topped with the little leaf cutouts for a party—they were the hit of the table! For holiday dinners, arranging the whole pie on a wooden board surrounded by fresh autumn leaves really amps up the seasonal vibe.
Make Ahead and Storage
Storing Leftovers
I wrap leftover slices tightly in plastic wrap or store the whole pie covered in the fridge. It keeps well for about 3-4 days, and honestly, the flavors deepen as it sits, which I don’t mind at all.
Freezing
I’ve frozen this pie a couple of times wrapped in foil and tightly sealed in a freezer bag. It thaws well in the fridge overnight and tastes almost as fresh as when first baked. Just be cautious with the delicate leaf cutouts—they’re best made fresh or served separately rather than frozen.
Reheating
To warm up leftovers, I prefer reheating in a low oven (about 300°F) for 10-15 minutes to bring back that flaky crust texture without drying out the filling. Microwave works in a pinch but can make the crust soggy, so I use it only if I’m really in a hurry.
FAQs
-
Can I use pancake syrup instead of real maple syrup in this pie?
It’s possible, but I don’t recommend it if you want that true maple flavor. Pancake syrup is usually made from corn syrup with flavoring and lacks the depth of real maple syrup. Using real maple truly elevates the pie and gives it that characteristic richness and aroma.
-
Is it okay to use a store-bought pie crust for this recipe?
Absolutely! Store-bought pie crusts work great and save a lot of time. Just make sure to roll them out nicely and chill before baking to get a good, flaky crust. If you have time, homemade crust adds a personal touch, but both options taste delicious here.
-
Why does the filling need to cool before baking the pie?
Letting the maple filling cool a bit before pouring it into the crust helps it set up and thickens further, preventing the crust from getting soggy. It also reduces the risk of the crust shrinking or breaking due to hot filling.
-
How long should I chill the pie crust before baking?
Chilling the crust for at least 30 minutes is ideal. This firms up the dough, which helps maintain the shape during baking and keeps the crust tender and flaky.
-
Can I make the maple leaf cutouts ahead of time?
You can cut and chill the dough for the cutouts in advance, but I recommend baking them fresh right before serving to keep their crispiness. If baked too early, they might lose their texture when stored.
Final Thoughts
Honestly, this Maple Syrup Pie Recipe holds a special place in my heart—it’s a simple yet deeply satisfying dessert that captures the essence of cozy moments and sweet traditions. Whether you’re an experienced baker or just starting out, you’ll find this pie rewarding to make and absolutely delightful to eat. So grab a pitcher of real maple syrup, roll out that dough, and let this pie bring a little extra warmth and sweetness to your table. I can’t wait for you to try it and hear how your family goes crazy for this one!
Print
Maple Syrup Pie Recipe
- Prep Time: 30 minutes
- Cook Time: 45 minutes
- Total Time: 1 hour 15 minutes
- Yield: 8 servings
- Category: Dessert
- Method: Baking
- Cuisine: American
Description
This classic Maple Syrup Pie is a rich, sweet treat featuring a luscious maple-flavored filling thickened with cornstarch and topped with festive maple leaf-shaped crust cutouts. Baked to golden perfection, it offers a warm, comforting dessert perfect for fall and special occasions.
Ingredients
Filling
- 3 tablespoons cornstarch
- 2/3 cup water
- 1-1/2 cups real maple syrup
- 2 tablespoons butter
Crust
- Pastry for double-crust pie
Instructions
- Prepare the Filling: In a large saucepan, whisk together the cornstarch and water until smooth to ensure there are no lumps. Gradually whisk in the maple syrup. Bring the mixture to a boil over medium heat, stirring constantly, and cook until it thickens, about 4 minutes. Remove from heat, then stir in the butter until fully melted and incorporated. Set aside to cool.
- Roll Bottom Crust: On a lightly floured surface, roll out one half of the pastry dough into a 1/8-inch-thick circle. Transfer this dough to a 9-inch pie plate. Trim the crust so it extends about 1/2 inch beyond the rim of the plate, then flute the edges for decoration. Chill the crust in the refrigerator for 30 minutes to help it set.
- Prepare Leaf Cutouts: Meanwhile, roll out the remaining pastry dough to about 1/4 inch thickness. Using maple leaf-shaped cookie cutters ranging from 1-1/2 to 2-1/2 inches, cut out decorative shapes. Arrange the leaf cutouts on a baking sheet and chill them in the refrigerator until ready to bake.
- Assemble and Bake Initial Pie: Pour the cooled maple filling into the prepared pie crust. Place the pie on a lower oven rack and bake at 400°F for 10 minutes. This initial high heat helps set the filling.
- Reduce Heat and Continue Baking: Lower the oven temperature to 350°F and continue baking the pie for an additional 35 to 40 minutes, or until the crust is golden brown and the filling is bubbly. Remove the pie from the oven and transfer to a wire rack to cool completely.
- Bake Leaf Cutouts: While the pie cools, bake the chilled leaf cutouts at 350°F for 8 to 10 minutes until they turn golden brown.
- Decorate and Serve: Once the pie has cooled completely, arrange the baked maple leaf cutouts on top of the pie to create a beautiful, seasonal garnish before serving.
Notes
- Use real maple syrup for authentic flavor; pancake syrup or flavored syrups will not provide the same taste.
- Chilling the dough helps maintain flaky crust during baking.
- Ensure the filling cools slightly before pouring into the crust to avoid sogginess.
- The decorative leaf cutouts add visual appeal and a festive touch but can be omitted if desired.
- Store leftovers covered in the refrigerator to maintain freshness.
Nutrition
- Serving Size: 1 slice (1/8 of pie)
- Calories: 320
- Sugar: 30g
- Sodium: 130mg
- Fat: 12g
- Saturated Fat: 7g
- Unsaturated Fat: 4g
- Trans Fat: 0g
- Carbohydrates: 48g
- Fiber: 1g
- Protein: 2g
- Cholesterol: 30mg

