

If you’ve ever been on the hunt for the ultimate roast turkey that’s bursting with flavor and stays perfectly juicy, this Juicy Roast Turkey with Herb Butter and Classic Gravy Recipe is the one to bookmark. I absolutely love how this turkey comes out tender, deeply savory, and with that golden, crispy skin that makes every holiday dinner a showstopper. Stick around—I’ll walk you through every step to make sure your turkey ends up being the star of your feast.
Why You’ll Love This Recipe
- Deeply Flavorful: The dry brine with herbs and paprika gives the turkey amazing depth without overpowering its natural taste.
- Perfectly Juicy: Brining for 48 hours and basting generously with herb butter locks in moisture for tender slices every time.
- Classic Comfort: The homemade gravy made from pan drippings ties everything together with rich, savory goodness.
- Beginner Friendly: Clear, step-by-step instructions mean even if you’ve never roasted a turkey before, you’ll succeed with ease.

Ingredients You’ll Need
These ingredients work in harmony to build layers of flavor and moisture without complicating the process. I find using fresh herbs and good quality butter makes all the difference, while the dry brine is a game-changer for juiciness.
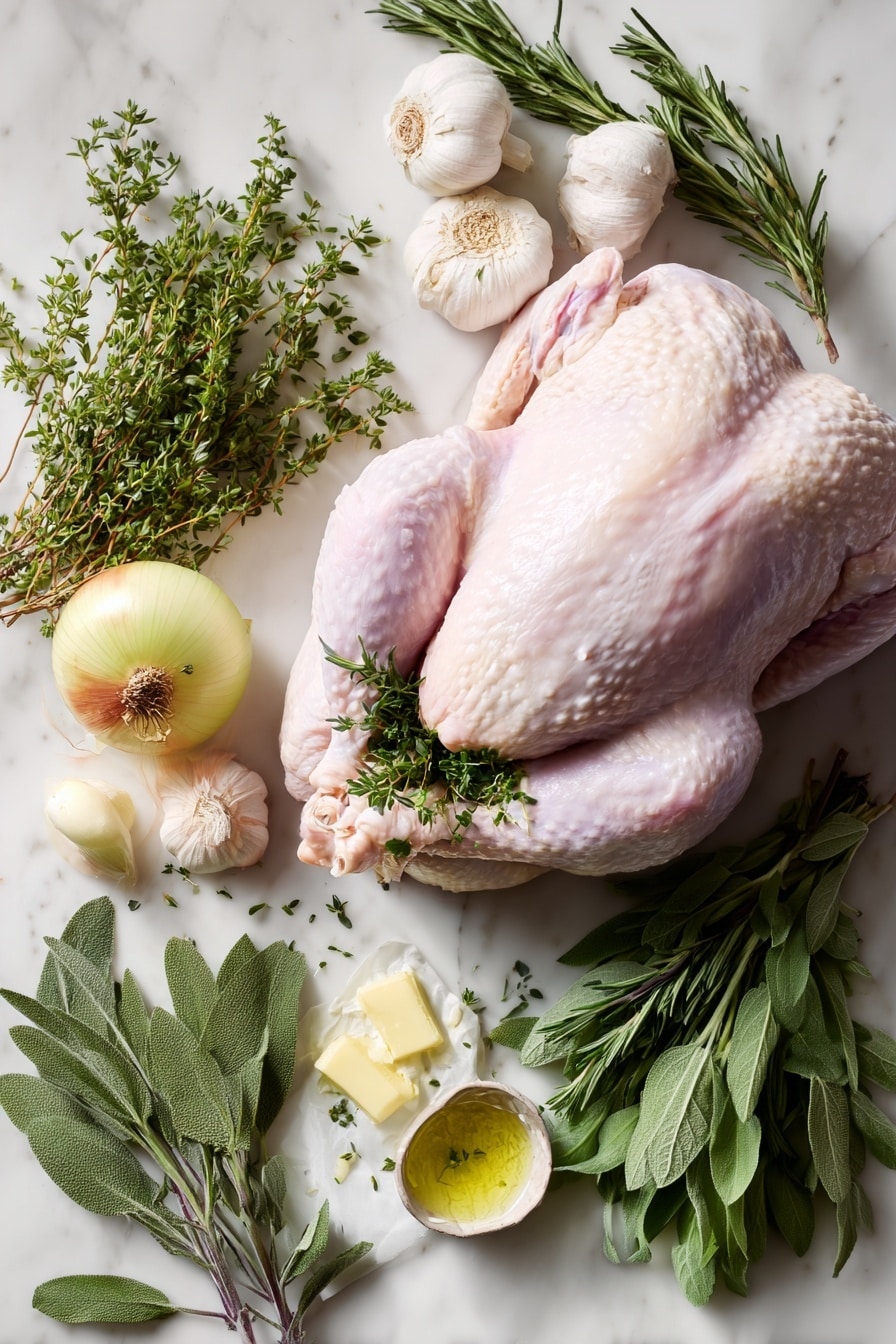
- Whole turkey: Make sure it’s fully thawed – a fresh or plain frozen turkey works best; avoid pre-brined or self-basting ones.
- Kosher salt: Essential for the dry brine to draw out moisture and then help it reabsorb, creating tender meat.
- Dried thyme: Provides that earthy herbal note; you can substitute with your favorite dried herb.
- Paprika: Adds a subtle sweetness and helps the skin develop a gorgeous color when roasting.
- Garlic powder: Optional but I love the extra savory punch it gives to the rub.
- Black pepper: Freshly ground works best to add mild heat and aroma.
- Heads of garlic: Roasting these alongside the turkey infuses the pan with incredible flavor that the gravy soaks up.
- Onion: Adds sweetness and depth to roasting pan drippings.
- Mixed fresh herbs: Sage, rosemary, thyme, parsley – use fresh if you have them for stuffing and basting.
- Unsalted butter: Melted and mixed with herbs, it bastes the turkey to perfect golden skin and juicy meat.
- White wine or water: A splash in the roasting pan keeps the drippings moist and adds subtle flavor.
- Chicken broth: For the gravy base, low sodium keeps you in control of seasoning.
- Flour: Plain/all-purpose for thickening that luscious gravy.
Variations
I like to keep this Juicy Roast Turkey with Herb Butter and Classic Gravy Recipe pretty classic, but I’ve definitely experimented over the years, and hope you’ll make it your own. Whether you swap out herbs or adjust the brining time, these tweaks can personalize the dish perfectly.
- Herb swaps: I once made this with fresh tarragon and marjoram when the usual herbs weren’t available—gave it a uniquely fragrant twist that my family loved!
- Brining time adjustments: If you’re short on time, even an overnight brine improves juiciness noticeably, but two full days is where the magic really shows.
- Dairy-free version: Use olive oil instead of butter for basting, and a gluten-free flour blend for gravy to accommodate dietary needs without sacrifice.
- Spiced version: Add a pinch of cayenne or smoked paprika to the rub if you want a bit more warmth and complexity in the flavor.
How to Make Juicy Roast Turkey with Herb Butter and Classic Gravy Recipe
Step 1: Prepare and Dry Brine the Turkey
The first step to that unforgettable juiciness starts here. Pat your thawed turkey completely dry—inside and out—with paper towels to help the skin crisp up later. Remove the giblets; trust me, they’ll come in handy for the gravy. Now mix your salt rub ingredients—kosher salt, thyme, paprika, garlic powder, and pepper.
Rub about a teaspoon of this mixture inside the turkey cavity, spreading it by hand, then flip the bird upside down and rub a teaspoon on the underside. Turn it upright again and cover with the remaining rub, focusing on the breast and even slipping some under the skin where you can. Wrap the turkey tightly in cling wrap—I’ve found that “mummy-like” wrap keeps the brine close to the skin better than bags, which is key.
Pop the turkey upside down in a baking pan and into the fridge for at least 48 hours. Flip it to right side up after 24 hours. This slow dry brine makes a world of difference—I used to slap on seasoning minutes before roasting, but the results can’t compare. Your patience will pay off, I promise.
Step 2: Prepare for Roasting
When you’re ready to cook, take the turkey out and leave it at room temperature for about 30 minutes. Preheat your oven to a sizzling 220°C (425°F) – this blast of heat is what gets the skin crispy.
Place halved onions and garlic in your roasting pan. If you don’t have a rack, no worries—you can fashion one from crumpled foil to keep the turkey elevated. Stuff the turkey with a bunch of herbs, two garlic halves, and 3 tablespoons of butter. For a tidy finish and even cooking, tie the drumsticks together with kitchen twine if you have it. Set the turkey upside down on the rack, twist the wings so they lie on top, and brush the skin lightly with melted butter and a sprinkle of salt and pepper. Pour your white wine or water into the pan.
Step 3: Roast, Flip, and Baste
Roast the turkey upside down for 30 minutes. This lets the juices flow directly into the breast, keeping it moist. After half an hour, carefully flip the bird so the breast side is up—use a tea towel for a safe grip—and brush with more melted butter plus a pinch of salt and pepper.
Lower the oven to 165°C (325°F) and roast for 45 minutes. Then mix the remaining butter with minced garlic and finely chopped herbs for the aromatic herb butter. Brush this over the turkey thoroughly, then roast another 30 minutes or until your thermometer reads 165°F (75°C) in the thickest part of the breast near the leg. Don’t worry if you don’t have a thermometer—the juices should run clear when pierced.
If the skin is browning too fast, tent loosely with foil to prevent burning. When done, transfer the turkey to a warm plate and loosely cover with foil to rest for 30 minutes. This resting time lets the juices redistribute, so when you carve, every bite stays juicy.
Step 4: Make the Classic Gravy
Take the roasting pan with those beautiful garlic, onion, and herb bits and place it over medium-high heat on your stovetop. Sprinkle in the flour and stir to cook it out for about 2 minutes—this forms the base of your gravy. Add the chicken broth and use a potato masher to crush the onions and garlic, releasing all their flavor into the sauce. Scrape any browned bits off the pan’s bottom with a wooden spoon, then simmer for 3 to 5 minutes until thickened.
Strain the gravy into a bowl, pressing down on the solids to extract every drop of flavor, then transfer to a gravy boat to serve. It’s the perfect, rich complement to your juicy turkey.
Pro Tips for Making Juicy Roast Turkey with Herb Butter and Classic Gravy Recipe
- Dry Brine Timing: Two full days in the refrigerator is my sweet spot—for a turkey that’s evenly seasoned and juicy without being salty.
- Butter Baste Secret: Basting halfway with a garlic-herb butter locks in moisture and develops that golden, flavorful crust everybody loves.
- Use a Thermometer: Trust me, buying even an inexpensive instant-read thermometer takes the guesswork away and ensures perfectly cooked turkey every time.
- Resting Time is Crucial: Don’t skip resting! I’ve learned the hard way that it makes a massive difference in juicy, tender slices that don’t dry out.
How to Serve Juicy Roast Turkey with Herb Butter and Classic Gravy Recipe
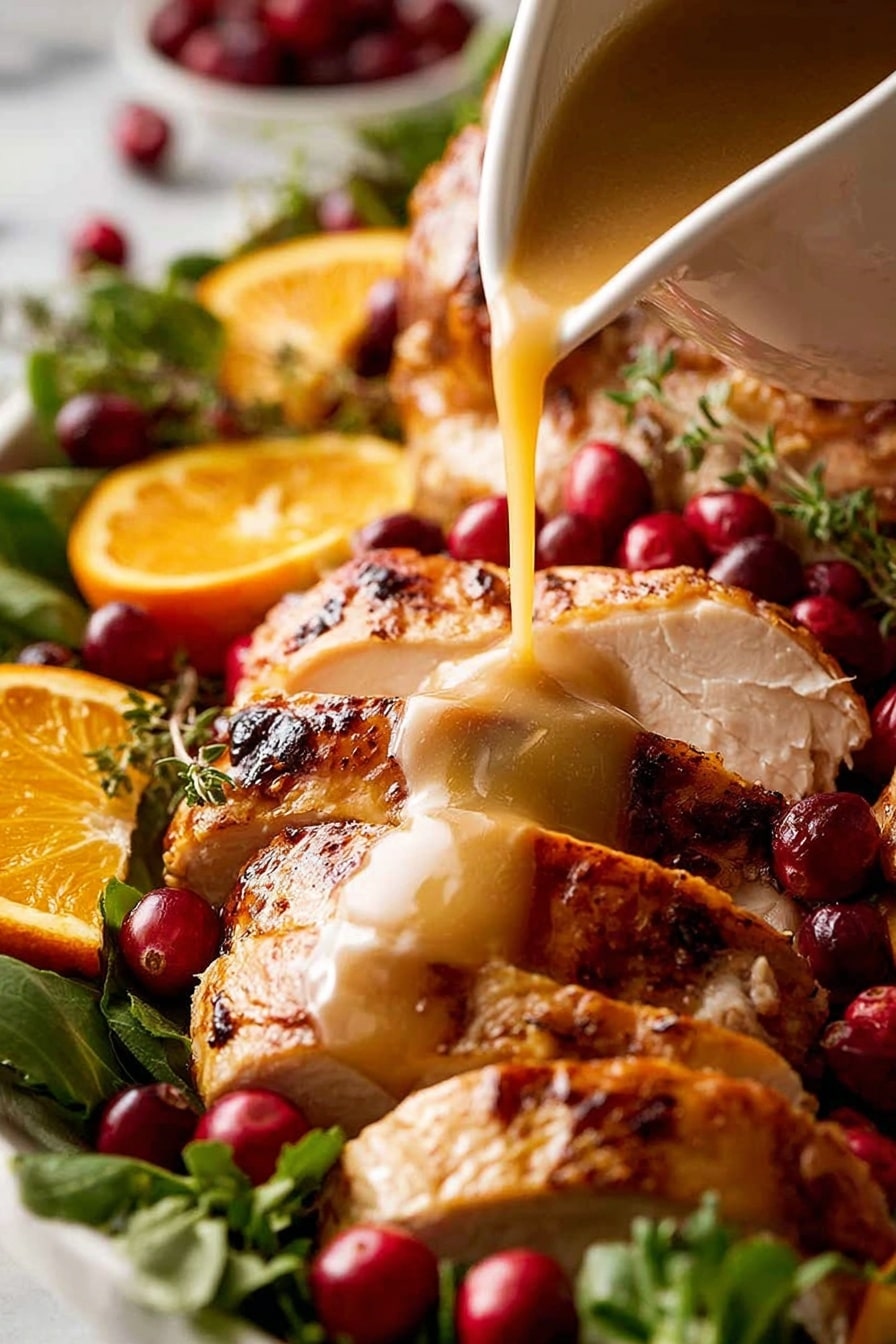
Garnishes
I personally love to garnish the carved turkey with fresh herb sprigs – rosemary and thyme look fantastic and add fresh aroma right at the table. A few roasted garlic cloves scattered around are a nice touch, plus thin orange or lemon slices brighten things up visually and flavor-wise. These simple touches make the presentation feel extra special with minimal effort.
Side Dishes
The classic sides I always reach for alongside this Juicy Roast Turkey with Herb Butter and Classic Gravy Recipe: buttery mashed potatoes (a must for soaking up gravy), honey-glazed carrots, green bean almondine for a crunch contrast, and tangy cranberry sauce. If you’re feeling adventurous, a creamy wild rice pilaf or roasted Brussels sprouts with balsamic glaze add terrific flavors and textures too.
Creative Ways to Present
For holiday dinners, I’ve arranged the turkey on a large wooden carving board surrounded by grilled lemon halves, sprigs of fresh herbs, and a scattering of pomegranate seeds for a festive pop of color. Using a deep dish filled with gravy next to the platter makes it easy for guests to serve themselves. Wrapping the drumsticks with shiny foil keeps them looking neat and helps them hold heat longer. Personal touches like these make serving the turkey feel even more celebratory.
Make Ahead and Storage
Storing Leftovers
I slice and store leftover turkey in airtight containers in the fridge—separating breast meat from dark meat if possible for versatile use later in sandwiches or salads. Leftovers usually keep well for 3 to 4 days. To keep them moist, I sprinkle just a bit of broth over slices before reheating.
Freezing
For longer storage, I freeze leftover turkey in portion-sized freezer bags with a splash of broth to prevent drying out. I’ve found wrapping tightly and removing as much air as possible before freezing preserves flavor and texture best. I label and date the bags so I know to use them within 2 to 3 months.
Reheating
The best way I’ve found to reheat leftover turkey without drying it out is to place slices in a covered baking dish with a splash of broth or gravy, cover with foil, and warm at 325°F (160°C) for about 15 minutes. This gentle heat restores moisture and tenderness without overcooking.
FAQs
-
Can I use a frozen turkey for this Juicy Roast Turkey with Herb Butter and Classic Gravy Recipe?
Yes, but it must be fully thawed before starting. Plan ahead to thaw the turkey in the fridge—allow about 24 hours for every 3-4 pounds (1.5 to 2 kg). You can also do a faster thaw by submerging the turkey in a waterproof bag in cold water, changing the water every 30 minutes. Proper thawing ensures even brining and roasting.
-
What if I don’t have fresh herbs for the herb butter?
No worries! Dried herbs work well too. Use about 2 teaspoons total of dried sage, rosemary, and thyme mixed into the butter. You just want a subtle burst of herbaceous flavor, so no need to overdo it. I often have dried herbs on hand year-round and it tastes great.
-
How do I know when the turkey is fully cooked?
The best method is using a meat thermometer inserted between the breast and thigh—the internal temperature should reach 165°F (75°C). If you don’t have one, check by piercing the thickest part and making sure the juices run clear, not pink. Because the turkey is brined, it’s a bit forgiving, but accuracy is always best for food safety.
-
Can I skip the 48-hour brine if I’m short on time?
While the dry brine is key to juicy, well-seasoned turkey, even an overnight brine helps significantly compared to no brine at all. If you must skip, season generously and baste frequently, but expect the results to be a bit less juicy and flavorful.
Final Thoughts
This Juicy Roast Turkey with Herb Butter and Classic Gravy Recipe has become my go-to for holiday meals because it really delivers on all fronts: flavor, juiciness, and that golden crispy skin that makes everyone’s mouth water. I hope when you try it, you’ll find it as rewarding as I do—there’s something special about gathering around the table with that perfect turkey taking center stage. Don’t be intimidated by the steps; with a bit of planning and the tips I’ve shared, you’ll nail it and get plenty of compliments. Trust me, your feast will never be the same.
Print
Juicy Roast Turkey with Herb Butter and Classic Gravy Recipe
- Prep Time: 20 minutes
- Cook Time: 2 hours
- Total Time: 2 days 2 hours 20 minutes
- Yield: Serves 8-10 people
- Category: Main Course
- Method: Roasting
- Cuisine: American
Description
This Juicy Roast Turkey recipe features a flavorful dry brine salt rub to ensure moist, tender meat with perfectly crispy skin. The turkey is brined for 2 to 3 days in the fridge, then roasted in two stages — first upside down at a high heat to crisp the skin, then flipped and basted with garlic herb butter to finish cooking at a lower temperature. A rich homemade turkey gravy made with the pan juices and broth completes this classic, aromatic roast perfect for holiday feasts.
Ingredients
Turkey and Dry Brine Salt Rub
- 10 lb / 5kg whole turkey, thawed (plain, not pre-brined)
- 2 1/2 tbsp kosher salt / cooking salt
- 2 tsp dried thyme or other dried herb of choice
- 1 tsp paprika (sweet or ordinary)
- 1 tsp garlic powder (optional)
- 1/2 tsp black pepper
For Roasting
- 2 heads garlic, halved horizontally (4 halves)
- 1 onion, halved (brown, yellow or white, skin on is fine)
- 2 small bunches mixed herbs (sage, rosemary, thyme, parsley) – optional
- 10 tbsp (150g) unsalted butter, melted
- 1 tbsp sage, rosemary and thyme mixed finely chopped (equal parts)
- 3 garlic cloves, minced
- 1 1/2 cups dry white wine or water
- Salt and pepper, to taste
For Gravy (~4 cups / 1L)
- 4 cups low sodium chicken broth or stock
- 5 tbsp all-purpose flour
- Salt and pepper, to taste
Instructions
- Prepare Salt Rub: Mix kosher salt, dried thyme, paprika, garlic powder, and black pepper together to create the dry brine salt rub.
- Prep Turkey: Pat the turkey thoroughly dry inside and out with paper towels. Remove giblets from inside the cavity.
- Apply Salt Rub: Sprinkle 1 teaspoon of the salt rub inside the turkey cavity and spread using your hand. Flip the turkey upside down and rub 1 teaspoon of the salt rub on the underside. Turn upright and rub the remaining salt rub all over the turkey, concentrating on the breast and some under the skin if possible.
- Wrap and Refrigerate: Wrap the turkey tightly mummy-style with cling wrap or place in a large sealable plastic bag. Place upside down in a baking pan and refrigerate for 48 hours, flipping to right side up after 24 hours.
- Preheat Oven and Prep Aromatics: When ready to roast, remove turkey from fridge, pat dry if skin feels wet, and let it sit out for 30 minutes. Preheat the oven to 220°C/425°F (200°C fan). Place onion halves and garlic halves in a roasting pan and set a roasting rack on top. If no rack is available, use a foil rope circle to elevate the turkey.
- Stuff and Prepare Turkey: Stuff the turkey cavity with a bunch of herbs, 2 garlic halves, and 3 tbsp (45g) butter. Tie drumsticks together if desired. Place the turkey upside down on the rack, twist wings on top, brush with some melted butter, and season lightly with salt and pepper. Pour wine or water into the roasting pan.
- Initial Roasting: Roast the turkey upside down for 30 minutes at 220°C/425°F (200°C fan).
- Flip and Lower Heat: Using a tea towel for grip, carefully flip the turkey so it is right side up. Brush with melted butter and season lightly. Reduce oven temperature to 165°C/325°F (150°C fan).
- Continue Roasting: Roast for 45 minutes at the lower temperature.
- Baste with Garlic Herb Butter: Mix remaining melted butter with minced garlic and chopped herbs. Brush the turkey generously with this garlic herb butter.
- Finish Roasting: Roast for an additional 30 minutes or until the internal temperature reads 165°F/75°C between breast and leg or until the built-in thermometer pops up. Cover loosely with foil if the skin browns too quickly.
- Rest the Turkey: Remove the turkey from oven, transfer to a serving plate, cover loosely with foil, and rest for 30 minutes before carving.
- Make Gravy: Place the roasting pan with onion, garlic, and pan juices on the stove over medium-high heat. Sprinkle flour and cook for 2 minutes while stirring. Add chicken broth, mash the onion and garlic into the liquid with a potato masher, scraping the pan bottom to loosen browned bits. Cook for 3-5 minutes until thickened. Strain the gravy into a bowl, pressing solids to extract flavor. Serve with the turkey.
Notes
- Ensure the turkey is fully thawed before starting (allow 24 hours per 1.5–2 kg in fridge or use cold water thawing method)
- Use kosher or cooking salt for dry brining; adjust if using fine table salt to avoid over-salting.
- The herbs used for stuffing and basting can be fresh or dried; avoid putting herbs on the skin until basting to prevent burning.
- White wine used should be dry and not overly sweet or oaky; sauvignon blanc or pinot gris are good options.
- Do not rinse the turkey after brining to preserve the flavor and moisture; just pat dry if wet.
- If no roasting rack is available, create a foil rope ring to elevate the turkey off the pan bottom.
- The total roasting time is approximately 12 minutes per 500g (1 lb) of turkey weight.
- Internal temperature for doneness is 165°F/75°C between breast and leg; juices should run clear when pierced.
- Leftover turkey can be repurposed into soups, pot pies, or sandwiches like muffulettas.
Nutrition
- Serving Size: 1 slice (approx. 150g) turkey with skin
- Calories: 320 kcal
- Sugar: 0.5 g
- Sodium: 450 mg
- Fat: 18 g
- Saturated Fat: 8 g
- Unsaturated Fat: 8 g
- Trans Fat: 0 g
- Carbohydrates: 2 g
- Fiber: 0 g
- Protein: 35 g
- Cholesterol: 115 mg

