

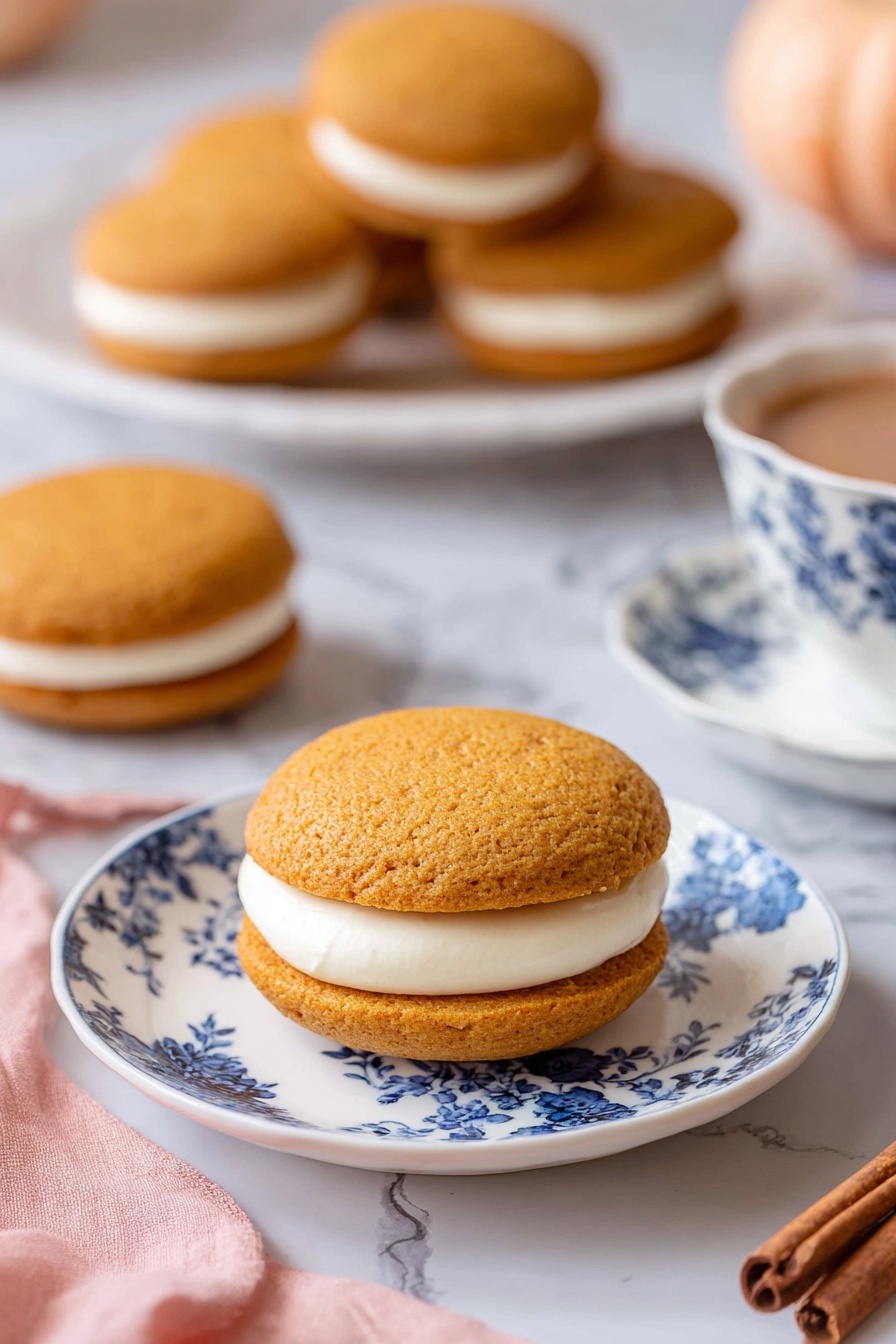
If you’re a fan of cozy fall flavors and soft, pillowy treats, you’re going to absolutely adore this Pumpkin Whoopie Pies Recipe. I discovered this gem a few years ago, and since then, it has become a seasonal must-bake in my kitchen. These whoopie pies combine the warm spices of pumpkin with a luscious cream cheese filling that’s just the right amount of sweet and tangy. Stick around—I’ll walk you through everything to make sure your whoopie pies turn out perfectly every single time.
Why You’ll Love This Recipe
- Perfect Fall Flavor: The blend of pumpkin and warming spices hits just the right cozy note every time.
- Soft, Moist Cookies: These aren’t your average cookies—they’re pillowy and tender, making them an irresistible sandwich base.
- Creamy Filling: The cream cheese frosting is fluffy and slightly tangy, pairing beautifully with the pumpkin spice.
- Make-Ahead Friendly: You can prep the cookies and filling ahead to make your holiday baking stress-free.

Ingredients You’ll Need
For this Pumpkin Whoopie Pies Recipe, the ingredients work together to create a perfectly balanced flavor and texture. You’ll want to grab quality pumpkin puree and fresh spices for that true warm pumpkin spice vibe—and I’ll share some tips to get you going smoothly.
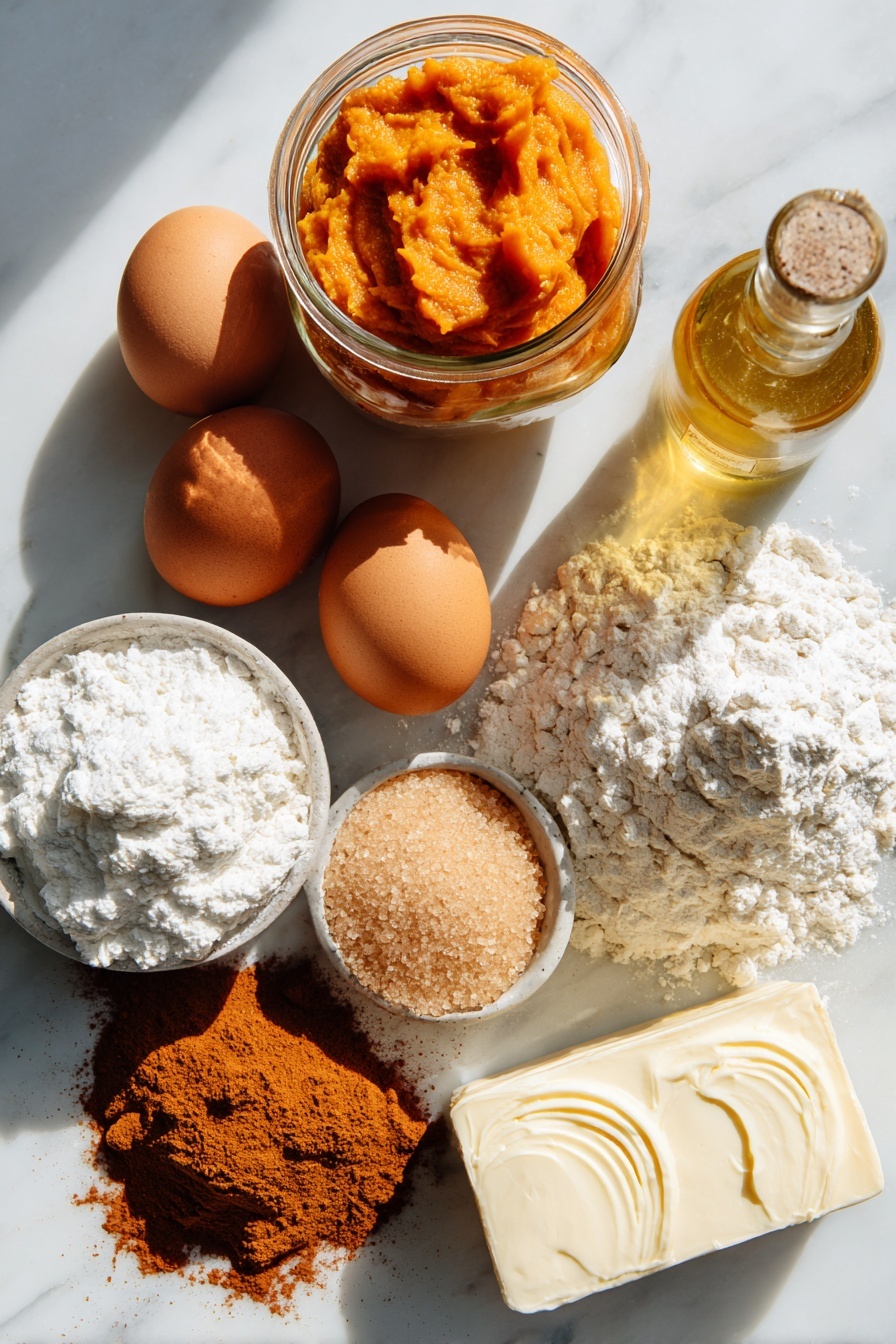
- All-purpose flour: The base of your cookies—make sure to measure it accurately to keep your cookies soft and tender.
- Baking soda and baking powder: These help the cookies rise and get that lovely cakey texture.
- Salt: It brings out the flavors and balances sweetness.
- Ground ginger, cinnamon, cloves: The classic pumpkin spice trio that makes these cookies sing with autumn vibes.
- Pumpkin puree: I always use canned pumpkin puree for convenience—and Libby’s is my go-to brand for consistency and taste.
- Light brown sugar: Adds moisture and light caramel notes—keep yours soft for best results.
- Vegetable oil: Keeps the cookies moist—don’t swap for butter here, as oil adds tenderness.
- Eggs: Bring them to room temperature so they mix evenly into the batter.
- Vanilla extract: The secret ingredient that deepens the flavor in both the cookies and filling.
- Unsalted butter: For the creamy filling—softened, not melted.
- Cream cheese: Softened at room temperature for the perfect smooth filling.
- Confectioners’ sugar: For the frosting sweetness and silky texture.
Variations
I like to play around a bit with this Pumpkin Whoopie Pies Recipe depending on the occasion or what’s in my pantry. Feel free to customize the spices or the filling to suit your taste buds—it’s all about making it your own!
- Spice it up: I sometimes add a pinch of nutmeg or swap out cloves for allspice to tweak the spice profile—it’s subtle but adds warmth.
- Dairy-free filling: If you need a dairy-free option, try swapping the butter and cream cheese for a vegan cream cheese and coconut oil blend—I’ve done this for a friend’s dairy allergy and they couldn’t tell the difference!
- Mini whoopie pies: For parties, I like making smaller versions using a teaspoon scoop—the bake time shortens and they’re perfect as bite-sized treats.
- Chocolate twist: Add a tablespoon of cocoa powder to the cookie dough for a chocolate-pumpkin combo that my family goes crazy for.
How to Make Pumpkin Whoopie Pies Recipe
Step 1: Prepare the Batter
Start by preheating your oven to 350°F (175°C) and lining two baking sheets with parchment paper—that way, nobody worries about sticking! In a large bowl, whisk together all your dry ingredients: flour, baking soda, baking powder, salt, and spices. In a separate bowl, mix the pumpkin puree, light brown sugar, vegetable oil, eggs, and vanilla extract until everything’s smooth and well blended. Then, gradually stir the wet mixture into the dry ingredients until you have a thick, uniform batter with no streaks. Resist the urge to overmix—it’s tempting, but overmixing can lead to tough cookies.
Step 2: Scoop and Bake
I love using a small ice cream scoop (about 2 tablespoons) for perfect, even-sized cookies. Drop the scoops onto your parchment-lined trays, spacing them about an inch apart—they’ll spread just a bit but stay nicely round. Bake one sheet at a time in the oven for 12 to 15 minutes. You’re looking for centers that appear dry and a toothpick that comes out clean. When done, let the trays cool for 5 minutes on the counter, then transfer the cookies to wire racks to cool completely. Cooling is key here—warm cookies will make your filling melt, and nobody wants a messy kitchen!
Step 3: Whip up the Filling
While the cookies cool, it’s time for the frosting. Use softened unsalted butter, cream cheese, and a splash of vanilla extract. Beat them on medium-low speed until smooth—about a minute or so. Then, on low speed, gradually add the confectioners’ sugar. When it’s fully combined, scrape down the bowl and turn the mixer to medium for 30 seconds to get that light, fluffy texture. You can spoon this filling onto your cookies, or for a bit of fun and neatness, use a piping bag for even swirls.
Step 4: Assemble and Chill
Match your whoopie pie halves by size and pipe or spread the frostings onto the flat side of half the cookies. Gently press the matching halves on top to create sandwiches. If you’re not serving right away, pop them in the fridge for at least 30 minutes to let everything set. I’ve found this step makes them easier to handle and less messy. Store the finished pies covered in the fridge— they’ll stay fresh and delicious for up to a week, sometimes longer if they don’t disappear first!
Pro Tips for Making Pumpkin Whoopie Pies Recipe
- Room Temperature Eggs: Bringing eggs to room temp helps everything blend smoothly and prevents dense cookies—don’t skip this step!
- Don’t Rush Cooling: Assembling while warm leads to melted filling and a sticky mess—patience here makes your pies picture-perfect.
- Soft Brown Sugar: Use fresh, moist brown sugar to keep the cookies tender; if yours hardened, re-hydrate it before baking.
- Accurate Flour Measurement: I learned the hard way that too much flour ruins the texture—fluff, spoon, and level or weigh for best results.
How to Serve Pumpkin Whoopie Pies Recipe
Garnishes
I often sprinkle a bit of extra cinnamon or pumpkin pie spice on top of the filling just before sandwiching, adding a touch of flair and aroma. For festive occasions, a light dusting of powdered sugar or even a drizzle of melted white chocolate can make these little treats pop visually. I’ve even added tiny roasted pecans inside the filling for a delightful crunch—highly recommend it!
Side Dishes
These whoopie pies shine most as a dessert or snack, but pairing them with a hot beverage like spiced apple cider, pumpkin latte, or chai tea really elevates the experience. For a cozy autumn gathering, I love serving them alongside a small cheese platter or even vanilla ice cream for a sweet contrast.
Creative Ways to Present
For holiday parties, I’ve arranged these Pumpkin Whoopie Pies Recipe on a tiered dessert stand decorated with fresh autumn leaves, cinnamon sticks, and mini pumpkins. They also look adorable wrapped individually in parchment paper tied with twine—perfect for gifting or party favors. You could even sandwich the filling with a dollop of caramel sauce for an extra luscious touch.
Make Ahead and Storage
Storing Leftovers
If you end up with leftovers (which I hope you do!), store your Pumpkin Whoopie Pies in an airtight container in the refrigerator. I usually layer parchment paper between to keep the frosting from sticking and squishing the cookies. They stay deliciously fresh for up to a week this way.
Freezing
I like to freeze the whoopie pies assembled for quick treats later. Wrap each individually in plastic wrap and place them all in a freezer-safe container. When I’m ready to enjoy, I thaw them overnight in the fridge. Freezing doesn’t diminish the flavors or texture much, so they’re a great make-ahead option.
Reheating
I usually eat these cold from the fridge, but if you want them a bit softer, pop them in the microwave for 10–15 seconds. Just be gentle—you don’t want to melt the filling entirely. This trick brings out that freshly baked vibe without losing the creamy frosting.
FAQs
-
Can I use fresh pumpkin instead of canned for this Pumpkin Whoopie Pies Recipe?
You can, but fresh pumpkin needs to be cooked and pureed to match the texture and moisture content of canned pumpkin puree. I recommend roasting the pumpkin until soft, then pureeing it and straining any excess liquid. Keep in mind this might slightly affect the texture and flavor, as canned pumpkin tends to be thicker and richer.
-
What’s the difference between whoopie pies and regular cookies?
Great question! Whoopie pies are more like soft, cakey cookie sandwiches filled with creamy frosting. Regular cookies tend to be firmer or crispier. The cakey texture combined with the rich filling makes whoopie pies uniquely indulgent.
-
How do I prevent my filling from melting when assembling?
Always make sure the cookies are completely cooled before you apply the cream cheese filling. If the cookies are even slightly warm, the frosting will soften and get messy. For best results, chill the filling briefly if it’s too soft, and assemble the whoopie pies in a cool environment.
-
Can I make this recipe gluten-free?
Yes! You can swap the all-purpose flour for a good-quality gluten-free flour blend that includes xanthan gum. Keep in mind that texture might be a bit different, but the flavors will still shine. I recommend testing with your preferred gluten-free flour to perfect it for your taste.
-
How long do Pumpkin Whoopie Pies last?
Stored properly in the fridge in an airtight container, they stay delicious for about one week. Beyond that, the cookies may dry out slightly, and the filling can change texture. Freezing is a good option to extend their shelf life to a couple of months.
Final Thoughts
I honestly can’t get enough of this Pumpkin Whoopie Pies Recipe. It’s become my go-to treat whenever I want something that feels like a warm hug in dessert form. The balance of soft, spiced cookies and tangy cream cheese filling is pure magic. Whether you’re baking for a holiday, a party, or just because, I know you’ll love how these come together and how happy they make everyone who tries them. Give this recipe a go—you’re going to nail it, and your kitchen will smell incredible while you do!
Print
Pumpkin Whoopie Pies Recipe
- Prep Time: 10 minutes
- Cook Time: 12 minutes
- Total Time: 52 minutes
- Yield: 18 servings
- Category: Dessert
- Method: Baking
- Cuisine: American
Description
Delight in these soft and spiced Pumpkin Whoopie Pies featuring tender pumpkin cookies sandwiched with a luscious cream cheese frosting. Perfect for fall gatherings, these treats balance autumnal flavors and creamy sweetness in every bite.
Ingredients
For the Cookies:
- 3 cups all-purpose flour (360g)
- 1 teaspoon baking soda
- 1 teaspoon baking powder
- 1 teaspoon salt
- 2 teaspoons ground ginger
- 1½ teaspoons ground cinnamon
- ¼ teaspoon ground cloves
- 1 (15-ounce/425g) can pumpkin puree (about 2 cups)
- 2 cups packed light brown sugar (440g)
- ⅔ cup vegetable oil (160ml)
- 2 large eggs
- 1 tablespoon vanilla extract
For the Filling:
- ½ cup unsalted butter, softened (113g)
- 4 ounces cream cheese, room temperature (113g)
- ½ teaspoon vanilla extract
- 3 cups confectioners’ sugar (360g)
Instructions
- Preheat Oven and Prepare Pans: Preheat your oven to 350°F (175°C) and line two baking sheets with parchment paper to prevent sticking and ensure even baking.
- Mix Dry Ingredients: In a large bowl, whisk together the flour, baking soda, baking powder, salt, ground ginger, cinnamon, and cloves until well combined to evenly distribute the spices and leavening agents.
- Combine Wet Ingredients: In another bowl, whisk together the pumpkin puree, light brown sugar, vegetable oil, eggs, and vanilla extract until smooth and thoroughly combined.
- Create the Cookie Dough: Pour the wet mixture into the dry ingredients and stir gently until no dry streaks remain, taking care not to overmix to keep the cookies tender.
- Scoop Dough onto Baking Sheets: Using a small ice cream scoop (about 2 tablespoons), drop rounded scoops of dough onto the prepared baking sheets about 1 inch apart to allow spreading.
- Bake the Cookies: Bake one sheet at a time for 12 to 15 minutes, or until the centers look dry and a toothpick inserted into the middle comes out clean. This ensures the cookies are fully cooked yet soft.
- Cool the Cookies: Remove the baking sheet from the oven and let the cookies cool on the sheet for 5 minutes before transferring them to a wire rack to cool completely, preventing soggy bottoms.
- Prepare the Filling: In a mixing bowl or stand mixer fitted with a paddle attachment, beat the softened butter, cream cheese, and vanilla on medium-low speed until smooth, about 1 minute.
- Add Confectioners’ Sugar: Gradually add the confectioners’ sugar while mixing on low speed until fully incorporated, then increase speed to medium and beat for an additional 30 seconds until fluffy.
- Assemble the Whoopie Pies: Pipe or spread the frosting onto the flat side of half the cooled cookies, then press the remaining cookies on top to form sandwiches. Chill the whoopie pies in the refrigerator for 30 minutes to set the filling.
- Store Properly: Keep the assembled whoopie pies covered and refrigerated for up to one week, ensuring freshness and flavor.
Notes
- Make and store cookies and filling separately if preparing ahead; assemble just before serving to avoid squished filling.
- Ensure cookies are completely cool before assembling to prevent the cream cheese frosting from melting and becoming messy.
- If you don’t have a cookie scoop, portion the dough evenly so cookies pair up nicely for sandwiching.
- Bake times may vary if you adjust the size of the cookies; watch carefully to avoid overbaking.
- Use a thick and rich pumpkin puree like Libby’s for the best flavor and texture.
- Soft and moist light brown sugar yields the best cookie texture; hard brown sugar should be softened before use.
- Measure flour correctly using a scale or by fluffing and leveling with a knife to avoid dense cookies.
- Bring eggs to room temperature before mixing for even incorporation.
- Avoid overmixing dough to prevent tough cookies.
Nutrition
- Serving Size: 1 whoopie pie
- Calories: 320
- Sugar: 30g
- Sodium: 220mg
- Fat: 14g
- Saturated Fat: 6g
- Unsaturated Fat: 7g
- Trans Fat: 0g
- Carbohydrates: 45g
- Fiber: 2g
- Protein: 3g
- Cholesterol: 40mg


