
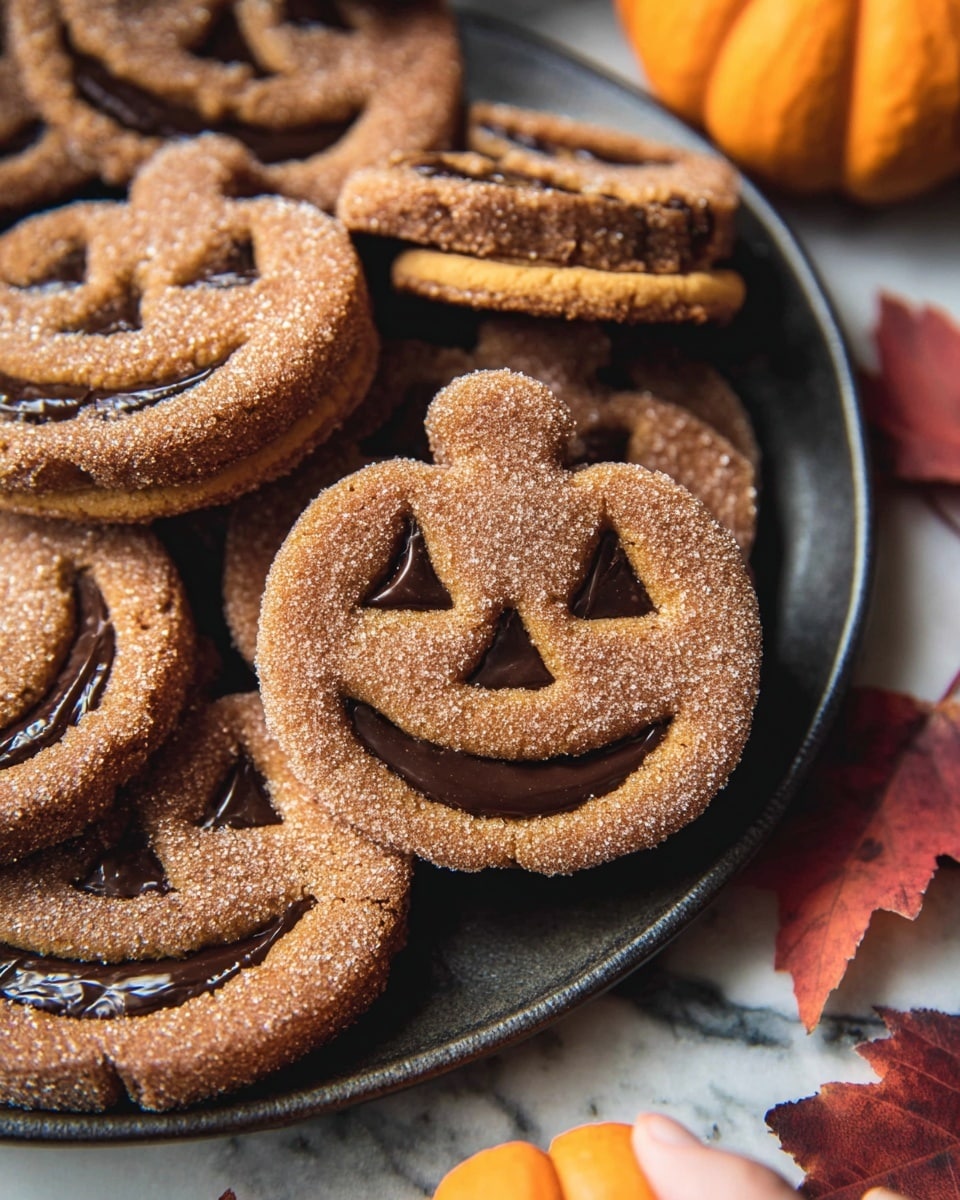
I absolutely love how these Milk Chocolate Stuffed Jack-O’-Lantern Cookies turn out—there’s just something magical about biting into a soft, warmly spiced cookie with a gooey milk chocolate center. They’re perfect for celebrating the spooky season or anytime you want a festive treat that’s as fun to make as it is to eat. Whenever I bring these out, my family immediately goes crazy for the combination of cinnamon, ginger, and nutmeg paired with the luscious milk chocolate surprise inside.
If you’re someone who enjoys Halloween baking but wants a recipe that’s straightforward and yields impressive results, this Milk Chocolate Stuffed Jack-O’-Lantern Cookies Recipe is exactly what you need. It strikes the perfect balance between cozy spices and melty sweetness, plus making the jack-o’-lantern faces adds a playful touch that everyone appreciates. Trust me, once you try this recipe, it’ll become a holiday favorite you look forward to every year!
Why You’ll Love This Recipe
- Delectable Melted Center: The milk chocolate stuffing makes every bite gooey and irresistible.
- Perfect Seasonal Flavors: A cozy combo of cinnamon, ginger, nutmeg, and vanilla that screams fall.
- Fun & Festive Decor: Carving jack-o’-lantern faces adds a playful and charming Halloween vibe.
- Easy to Make at Home: Despite looking fancy, it’s beginner-friendly and fun to bake with family or friends.

Ingredients You’ll Need
Each ingredient in this Milk Chocolate Stuffed Jack-O’-Lantern Cookies Recipe works together to create a spice-laden, tender cookie that melts in your mouth. Be sure to have good-quality butter and milk chocolate on hand, as they really elevate the flavor and texture in this recipe.
- Salted butter: Using salted butter adds a subtle depth to the dough, plus helps balance the sweetness.
- Light brown sugar: Its molasses content brings moisture and a gentle caramel undertone to the cookies.
- Pure vanilla extract: It brightens all the warm spices and gives that comforting familiar flavor.
- Eggs: Make sure they’re at room temperature for better mixing and structure in the dough.
- All-purpose flour: This is the base for tender yet sturdy cookies that hold their shape while baking and freezing.
- Baking soda: Helps with a slight rise and tender crumb texture.
- Cinnamon, ginger, nutmeg: The trio that creates the quintessential fall spiced aroma and taste everyone loves.
- Salt: Amplifies all those sweet and spicy flavors perfectly.
- Milk chocolate: Melted smooth, it fills the middle with creamy goodness that makes these cookies unforgettable.
- Cinnamon sugar: Sprinkled on top after brushing with browned butter for that extra crunch and flavor blast.
Variations
I love to experiment with these cookies depending on my mood or the occasion—feel free to make this recipe your own and don’t hesitate to get creative with the stuffing or spices. It’s pretty forgiving and lends itself well to fun tweaks.
- Dark chocolate filling: Swap milk chocolate for dark chocolate if you prefer a richer, less sweet flavor—I’ve tried this and it gives the cookies a more sophisticated edge.
- Spicy twist: Add a pinch of cayenne or chili powder to the dough for a little warmth that surprises your taste buds.
- Gluten-free option: Substitute the all-purpose flour with a 1-to-1 gluten-free baking blend; just keep an eye on dough consistency since some blends can be drier.
- Decor flair: Instead of just carving faces, try icing details with colored royal icing once the cookies are cooled for a festive look kids will adore.
How to Make Milk Chocolate Stuffed Jack-O’-Lantern Cookies Recipe
Step 1: Cream Butter, Sugar, and Vanilla until Fluffy
Start by beating together the softened butter, light brown sugar, and vanilla extract for about 3 to 5 minutes until the mixture is light, fluffy, and smooth. This step is key to ensuring your cookies turn out tender and nicely risen. I always use a stand mixer for this, but a hand mixer works just as well—just don’t rush it!
Step 2: Incorporate Eggs and Dry Ingredients
Add the eggs one at a time, mixing well after each addition to keep the dough even and well combined. Then gradually add the flour, baking soda, spices, and salt, beating until a dough ball forms. Don’t overmix here or your cookies might get tough—just enough to combine.
Step 3: Roll Out and Cut Jack-O’-Lantern Shapes
Flour your work surface generously and divide the dough in half. Roll each half to about 1/4 inch thick, making sure to flour your rolling pin too to prevent sticking. Use a pumpkin-shaped cookie cutter to cut out your cookies. For half of them, carefully carve out eyes and a mouth with a paring knife—this is where the fun starts! If you don’t have a pumpkin cutter, circles work great too, and you can carve faces freehand.
Step 4: Freeze the Cut Cookies Before Baking
This step might seem like a hassle, but freezing the cookies for 15-20 minutes after cutting helps them hold their shape while baking. It’s a trick I discovered after some misshapen cookies, and it’s truly worth the wait. While these chill, you can re-roll scraps and cut more shapes to maximize your dough.
Step 5: Bake Until Lightly Golden, Then Cool
Preheat your oven to 350°F (175°C) and bake the cookies on the middle rack for 8-12 minutes—aim for just lightly golden edges to keep them soft. I usually check at 8 minutes and keep a close eye after that. Once baked, cool the cookies on the baking sheet for five minutes before transferring them to a wire rack to cool completely. Patience here is key to avoid breakage when assembling.
Step 6: Add Burnt Butter and Cinnamon Sugar Coating
In a medium pot, melt the butter over medium heat and let it brown slightly until it gives off a gorgeous toasted nutty aroma—this usually takes 2-3 minutes. Stir often and be careful not to burn it. Remove from heat, cool for 5 minutes, then brush the top halves of your cookies with this browned butter and sprinkle generously with cinnamon sugar. This little detail seriously ups the flavor game.
Step 7: Spread Milk Chocolate and Assemble
Spread a smooth layer of melted milk chocolate over the plain cookie halves. Then gently place the carved pumpkin faces on top, pressing lightly to sandwich the chocolate filling. You can serve these immediately with that warm gooey center or let the chocolate set for a bit before storing them. Both ways are delightful, and it really depends on your preference for ooze versus firm chocolate.
Pro Tips for Making Milk Chocolate Stuffed Jack-O’-Lantern Cookies Recipe
- Don’t Skip Freezing: Freezing the cut cookies before baking ensures your jack-o’-lantern faces don’t distort in the oven.
- Use Room Temperature Eggs: This helps the batter emulsify better, making your dough silky and easy to work with.
- Brush with Browned Butter: It adds a nutty, rich flavor that perfectly complements the spices and chocolate.
- Avoid Overbaking: Take the cookies out when edges are just turning color to keep them tender and soft, not crunchy.
How to Serve Milk Chocolate Stuffed Jack-O’-Lantern Cookies Recipe
Garnishes
I love dusting a little extra cinnamon sugar on top just before serving for a sparkling touch that adds crunch and flavor. Sometimes, I also add tiny edible gold or orange sprinkles to give these cookies that festive Halloween shimmer—kids adore this little trick.
Side Dishes
These cookies go wonderfully with a warm cup of chai tea or hot apple cider. The spices in the drink amplify the cozy fall vibes of the cookies, making an unbeatable combo for a chilly afternoon snack or Halloween party treat.
Creative Ways to Present
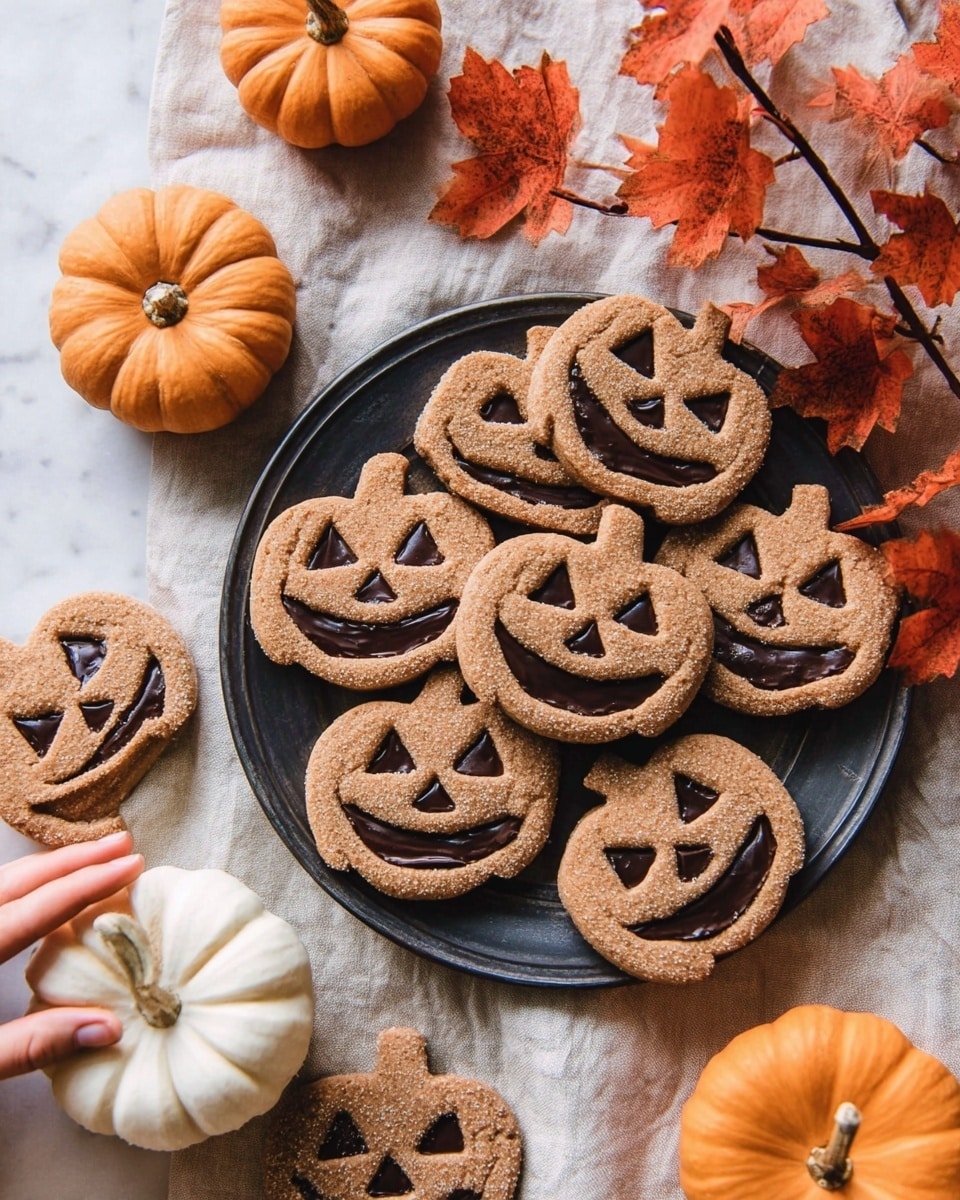
One fun idea I tried was arranging these cookies on a platter with little “pumpkin patch” props like mini hay bales and autumn leaves. You could also stack them tiered like a spooky cookie tower or place them in a clear jar with a Halloween-themed ribbon for gifting. They always make a charming centerpiece!
Make Ahead and Storage
Storing Leftovers
I keep leftover Milk Chocolate Stuffed Jack-O’-Lantern Cookies in an airtight container at room temperature for up to 3 days. The cookies stay soft but the chocolate firm enough to maintain the filling’s delicious melty texture. I recommend layering them between parchment paper if stacking to avoid sticking.
Freezing
These cookies freeze beautifully, which is a lifesaver around the holidays! Just freeze them in a single layer on a baking sheet first, then transfer to a sealed freezer bag or container. They’ll keep well for up to 2 months. Thaw them overnight in the refrigerator before serving.
Reheating
When reheating, I pop a cookie or two in the microwave for about 10-15 seconds to gently warm the chocolate without melting the entire cookie. This way, you get that perfect melty center again without losing the shape and texture that took time to perfect.
FAQs
-
Can I use dark or white chocolate instead of milk chocolate?
Absolutely! While milk chocolate gives a classic creamy sweetness that balances the spices perfectly, using dark chocolate will add a rich, slightly bitter note, and white chocolate will bring extra sweetness. Just melt whichever chocolate you prefer and use the same way in the recipe.
-
What if I don’t have a pumpkin cookie cutter?
No worries! I sometimes just cut out 3-inch circles and carve the jack-o’-lantern faces with a sharp paring knife. It’s actually fun to design your own faces, and it gives the cookies a homemade charm that’s just as festive.
-
Can I make this recipe ahead of time?
You sure can! I often prepare and freeze the cut and carved dough in advance, then bake as needed. Assembled cookies can also be stored in an airtight container for up to 3 days, making this recipe convenient for holiday parties or gifts.
-
How do I keep the cookie edges from spreading too much?
Freezing the cut cookies before baking is my go-to trick to prevent spreading and preserve those jack-o’-lantern faces. Also, avoid over-softening your butter—soft but not melted is best for maintaining shape.
Final Thoughts
This Milk Chocolate Stuffed Jack-O’-Lantern Cookies Recipe has become one of my favorite ways to inject some fun and flavor into the Halloween season. It’s a treat that feels festive, tastes incredible, and always draws smiles—plus, it’s a sweet activity to do together with kids or friends. I hope you’ll love making and sharing these as much as I do; they’re truly a memorable twist on classic fall baking that you’ll want to revisit year after year!
Print
Milk Chocolate Stuffed Jack-O’-Lantern Cookies Recipe
- Prep Time: 30 minutes
- Cook Time: 15 minutes
- Total Time: 45 minutes
- Yield: 30 cookies
- Category: Dessert
- Method: Baking
- Cuisine: American
Description
These Milk Chocolate Stuffed Jack-O’-Lantern Cookies are delightful autumn treats perfect for Halloween. Soft, spiced pumpkin-shaped cookies are filled with rich melted milk chocolate and topped with a buttery cinnamon sugar coating, creating a festive and delicious snack everyone will love.
Ingredients
Cookie Dough
- 3 sticks (1 1/2 cups) salted butter, softened
- 1 1/4 cups light brown sugar, packed
- 1 tablespoon pure vanilla extract
- 2 eggs, at room temperature
- 4 1/2 cups all-purpose flour
- 1 teaspoon baking soda
- 1 teaspoon cinnamon
- 1/2 teaspoon ginger
- 1/4 teaspoon nutmeg
- 1/2 teaspoon salt
Filling
- 12 ounces milk chocolate, melted
Cinnamon Sugar Coating
- 2 tablespoons salted butter
- 3 tablespoons cinnamon sugar
Instructions
- Prepare the Dough: In a large mixing bowl, cream together the softened butter, light brown sugar, and vanilla extract until the mixture is light and fluffy, about 3-5 minutes. Add the eggs one at a time, mixing thoroughly after each addition. In a separate bowl, whisk together the flour, baking soda, cinnamon, ginger, nutmeg, and salt. Gradually add the dry ingredients to the wet, beating until a smooth dough forms a ball.
- Roll and Cut Cookies: Generously flour your work surface to prevent sticking. Divide the dough into two halves and flatten each into a disk. Roll out one disk at a time to 1/4 inch thickness. Cut out pumpkin shapes using a pumpkin cookie cutter. Carefully transfer the cookies to a baking sheet lined with parchment paper. Using a paring knife or smaller cutters, carve eyes and mouths into half of the pumpkin cookies to create Jack-O’-Lantern faces. Cover the baking sheet with plastic wrap and freeze the cookies until firm, about 15-20 minutes. Re-roll and cut any leftover dough scraps.
- Bake the Cookies: Preheat the oven to 350°F (175°C). Place the baking sheet on the middle rack and bake the cookies for 8-12 minutes, or until just lightly golden brown, ensuring the cookies remain soft. Remove from the oven and let cool on the baking sheet for five minutes before transferring to a wire rack to cool completely.
- Prepare Cinnamon Sugar Coating: In a medium saucepan, melt the 2 tablespoons of salted butter over medium heat. Allow it to brown slightly until it emits a toasted aroma, about 2-3 minutes, stirring frequently to prevent burning. Remove from heat and let cool for 5 minutes. Brush the browned butter over the top half (the pumpkin-faced ones) of the cooled cookies, then sprinkle with 3 tablespoons of cinnamon sugar.
- Assemble the Cookies: Spread the melted milk chocolate evenly over the plain half of the cookies (those without faces). Gently place the cinnamon sugar coated pumpkin-faced cookies on top, pressing lightly to adhere the two halves together. Serve immediately or allow the chocolate to set before storing in an airtight container for up to 3 days.
Notes
- If you don’t have a pumpkin cookie cutter, cut out 3-inch circles instead and use a sharp paring knife to carve the eyes and mouth.
- Make sure to freeze the cookies before baking to help them maintain their shape and prevent spreading.
- Use high-quality milk chocolate for a richer flavor.
- Store cookies in an airtight container at room temperature to keep them fresh.
Nutrition
- Serving Size: 1 cookie
- Calories: 180
- Sugar: 12g
- Sodium: 95mg
- Fat: 9g
- Saturated Fat: 5g
- Unsaturated Fat: 3g
- Trans Fat: 0.2g
- Carbohydrates: 22g
- Fiber: 1g
- Protein: 2g
- Cholesterol: 30mg


