
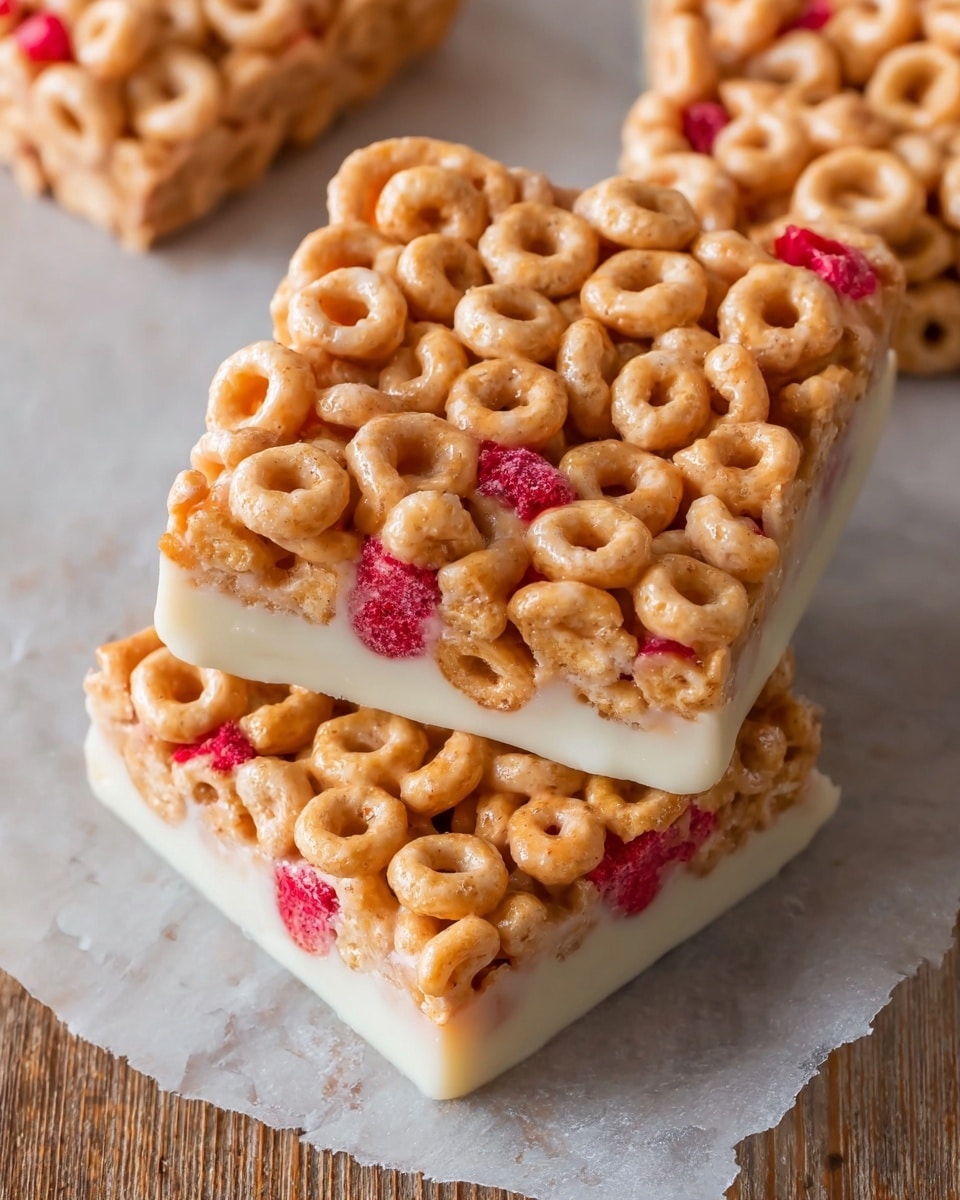
I absolutely love how this Cereal Bars Recipe turns out every single time—it’s such a simple, no-bake treat that feels homemade yet holds up beautifully for snacks on the go. Whether you’re packing lunches, need an afternoon pick-me-up, or want a wholesome sweet fix, these bars step up big time. Plus, you get to customize them with your favorite cereal and nut butter, making it a versatile recipe that I keep coming back to.
When I first tried this combination of crunchy cereal and sticky peanut butter, I was amazed at how easy it was to whip together, and my family goes crazy for the chewy texture and natural sweetness. You’ll find that this Cereal Bars Recipe is a lifesaver on busy days when you want something nutritious but fuss-free. Trust me, once you make these, they’ll quickly become a staple in your kitchen too!
Why You’ll Love This Recipe
- Super Simple: Only a few ingredients and no baking required, perfect for busy days or last-minute snacks.
- Customizable: You can mix and match cereals, nut butters, and sweeteners to suit your taste and dietary needs.
- Kid-Friendly: My kids adore helping me make these, and they’re great for lunchboxes or after-school treats.
- Keeps Well: Store them in the fridge or freezer and they stay fresh and chewy for days.

Ingredients You’ll Need
Each ingredient in this Cereal Bars Recipe plays a key role in texture and flavor — from the crunch of your chosen cereal to the sticky goodness of nut butter and the natural sweetness of syrup. I always recommend picking a cereal you enjoy munching on because it really shines through!
- Cereal of choice: Choose a sturdy cereal like rice puffs, corn flakes, or granola; avoid powdery cereals that won’t hold together.
- Peanut butter or nut butter of choice: I personally use creamy peanut butter, but almond or cashew butter work great too; warming it slightly makes mixing easier.
- Agave, honey, or brown rice syrup: Your preferred liquid sweetener binds everything together; honey gives a richer flavor, agave is milder, and brown rice syrup is perfect if you avoid honey.
- Salt (optional): A pinch of salt brightens flavors and balances the sweetness, especially if your nut butter is unsalted.
- Protein powder (optional): Great for adding an extra nutrition boost, especially if these bars are post-workout snacks.
Variations
I love to shake things up with this cereal bars recipe depending on what I have on hand or the season. It’s so easy to personalize, and you can make it your own with just a few tweaks.
- Nut-Free Version: Swap peanut butter for sunflower seed butter or tahini to make these safe for kids’ school snacks.
- Chocolate Lover’s Delight: Add mini chocolate chips or drizzle melted dark chocolate on top for an indulgent twist.
- Loaded with Extras: Mix in dried fruit, seeds, or even a handful of mini marshmallows to add texture and flavor.
- Protein Boost: I often stir in 3 tablespoons of my favorite protein powder to make these perfect for post-gym fuel.
How to Make Cereal Bars Recipe
Step 1: Prep and Mix Your Ingredients
Start by lining an 8-inch pan with parchment or wax paper—this makes cutting and lifting out your bars a breeze. If your nut butter is hard or stiff, give it a gentle warm-up in the microwave for about 20 seconds so it stirs easily. Then, grab a large bowl and combine your cereal, nut butter, sweetener, and any optional add-ins like salt or protein powder. Stir everything together until the cereal is evenly coated—this step is key to ensuring your bars stick together well.
Step 2: Press and Chill Firmly
Pour the mixture into your prepared pan, then place a second sheet of parchment on top. Now, this is where pressing firm really pays off: use your hands or the flat bottom of a glass to press down very firmly. This compacts the mixture so your bars hold their shape and don’t crumble. Pop the pan into the freezer for about 30 minutes or until the bars are firm enough to slice cleanly.
Step 3: Slice and Store
Remove your bars from the pan by lifting the parchment paper. Use a sharp knife to cut into squares or rectangles—9 bars usually works well for this recipe. Store any extras in an airtight container in the fridge, freezer, or a cool, dry place depending on how soon you plan to eat them. I find that storing them in the fridge keeps them chewy and fresh for up to a week.
Pro Tips for Making Cereal Bars Recipe
- Warm Your Nut Butter: Warming helps it mix better with the sweetener so your bars hold together perfectly.
- Press Extra Firm: I learned this trick after a few crumbly batches—press down hard before chilling to get bars that don’t fall apart.
- Choose the Right Cereal: Crunchy and sturdy cereals work best; delicate or powdery ones turn soggy and don’t bind well.
- Cut with a Sharp Knife: Clean cuts prevent crumbling—warm your knife under hot water and wipe dry before slicing.
How to Serve Cereal Bars Recipe
Garnishes
I usually keep it simple and sprinkle a bit of flaky sea salt on top before chilling to add a nice contrast to the sweetness. Sometimes, I drizzle a little melted chocolate or sprinkle toasted coconut flakes for a festive touch—these little extras make the bars feel special, especially when sharing with friends.
Side Dishes
These bars pair wonderfully with a cup of tea or a glass of cold milk, making them a perfect snack or light breakfast. I also like serving them alongside fresh fruit or yogurt for a balanced, satisfying bite.
Creative Ways to Present
For special occasions, I’ve wrapped individual bars in parchment paper tied with twine for gift giving or party favors. You can also stack them on a pretty platter and sprinkle edible flowers on top for a beautiful and inviting snack display.
Make Ahead and Storage
Storing Leftovers
I store leftover cereal bars in an airtight container in the fridge where they stay perfectly chewy for several days. If your kitchen tends to be warm, the fridge is definitely the best bet to prevent the bars from becoming too soft or sticky.
Freezing
Freezing works like a charm—just wrap individual bars tightly in plastic wrap or parchment, then place them in a freezer bag. When I do this, the bars last for months and thaw quickly at room temperature, making them ideal for prepping snacks ahead of time.
Reheating
Since these bars are best enjoyed cool or at room temperature, I don’t really reheat them. Instead, I let frozen bars thaw on the counter for 10-15 minutes to regain their chewy texture without getting mushy or oily.
FAQs
-
Can I use gluten-free cereal for this recipe?
Absolutely! Just be sure your cereal is sturdy enough to hold its shape when mixed with nut butter and sweetener. Many gluten-free cereals like puffed rice or corn flakes work great for this cereal bars recipe.
-
What’s the best way to prevent the bars from falling apart?
Pressing the mixture very firmly into the pan before freezing is key. Also, warming your nut butter slightly and stirring well ensures everything binds together nicely, giving you bars that slice cleanly and hold their shape.
-
Can I substitute other nut butters or sweeteners?
Yes! Feel free to swap peanut butter for almond, cashew, or sunflower seed butter, and try honey, agave, or brown rice syrup depending on your flavor preference and dietary needs.
-
How long do homemade cereal bars last?
Stored properly in an airtight container in the fridge, cereal bars can last about a week. Freezing extends their shelf life significantly, keeping them fresh for a few months.
-
Is there a way to make these bars less sticky?
You can try reducing the amount of sweetener slightly or choosing a less sticky nut butter. Pressing the bars firmly and chilling them well helps reduce stickiness by firming up the texture.
Final Thoughts
This cereal bars recipe holds a special place in my kitchen because it’s one of those effortless recipes that always delivers—every batch reminds me of cozy mornings and quick snacks for hectic afternoons. I encourage you to give it a try and make it yours by swapping in your favorite cereals and flavors. Whether you’re feeding kids or just need a sweet pick-me-up, these bars are a simple, satisfying answer you’ll reach for again and again.
Print
Cereal Bars Recipe
- Prep Time: 5 minutes
- Cook Time: 0 minutes
- Total Time: 5 minutes
- Yield: 9 cereal bars
- Category: Snack
- Method: No-Cook
- Cuisine: American
- Diet: Vegetarian
Description
Delicious and easy-to-make cereal bars combining your favorite cereal with nut butter and a natural sweetener. These no-bake bars are perfect for a quick snack or on-the-go breakfast and can be customized with protein powder and salt for added flavor and nutrition.
Ingredients
Main Ingredients
- 3 cups cereal of choice
- 2/3 cup peanut butter or nut butter of choice
- 1/2 cup agave, honey, or brown rice syrup
- Optional: 1/2 tsp salt
- Optional: 3 tbsp protein powder
Instructions
- Prepare the pan: Line an 8-inch pan with wax or parchment paper to prevent sticking. For larger batches, double the recipe and use a 9×13-inch pan.
- Warm the nut butter: Gently warm the nut butter if needed until it is easily stirrable, ensuring smooth mixing with the other ingredients.
- Mix ingredients: In a large bowl, combine the cereal, nut butter, sweetener (agave, honey, or brown rice syrup), and optional salt and protein powder. Stir thoroughly to evenly coat the cereal.
- Press mixture into pan: Pour the combined cereal mixture into the prepared pan. Place a second sheet of parchment paper on top and press down very firmly to compact the mixture, which helps the bars hold together after cutting.
- Freeze to set: Place the pan in the freezer for about 30 minutes or until the mixture is firm enough to slice into bars.
- Slice and store: Once firm, remove from the freezer, cut into 9 bars. Keep leftovers covered and store in the refrigerator, freezer, or a cool, dry place to maintain freshness.
Notes
- You can customize these bars by using your favorite cereal and nut butter combinations.
- Adding protein powder makes these bars more filling and nutritious.
- Pressing the bars firmly before freezing is key to prevent crumbling.
- Store bars in a cool place to keep them from becoming too soft or sticky.
Nutrition
- Serving Size: 1 bar (approx. 1/9 of batch)
- Calories: 180
- Sugar: 8g
- Sodium: 75mg
- Fat: 9g
- Saturated Fat: 1.5g
- Unsaturated Fat: 7g
- Trans Fat: 0g
- Carbohydrates: 22g
- Fiber: 3g
- Protein: 5g
- Cholesterol: 0mg


