
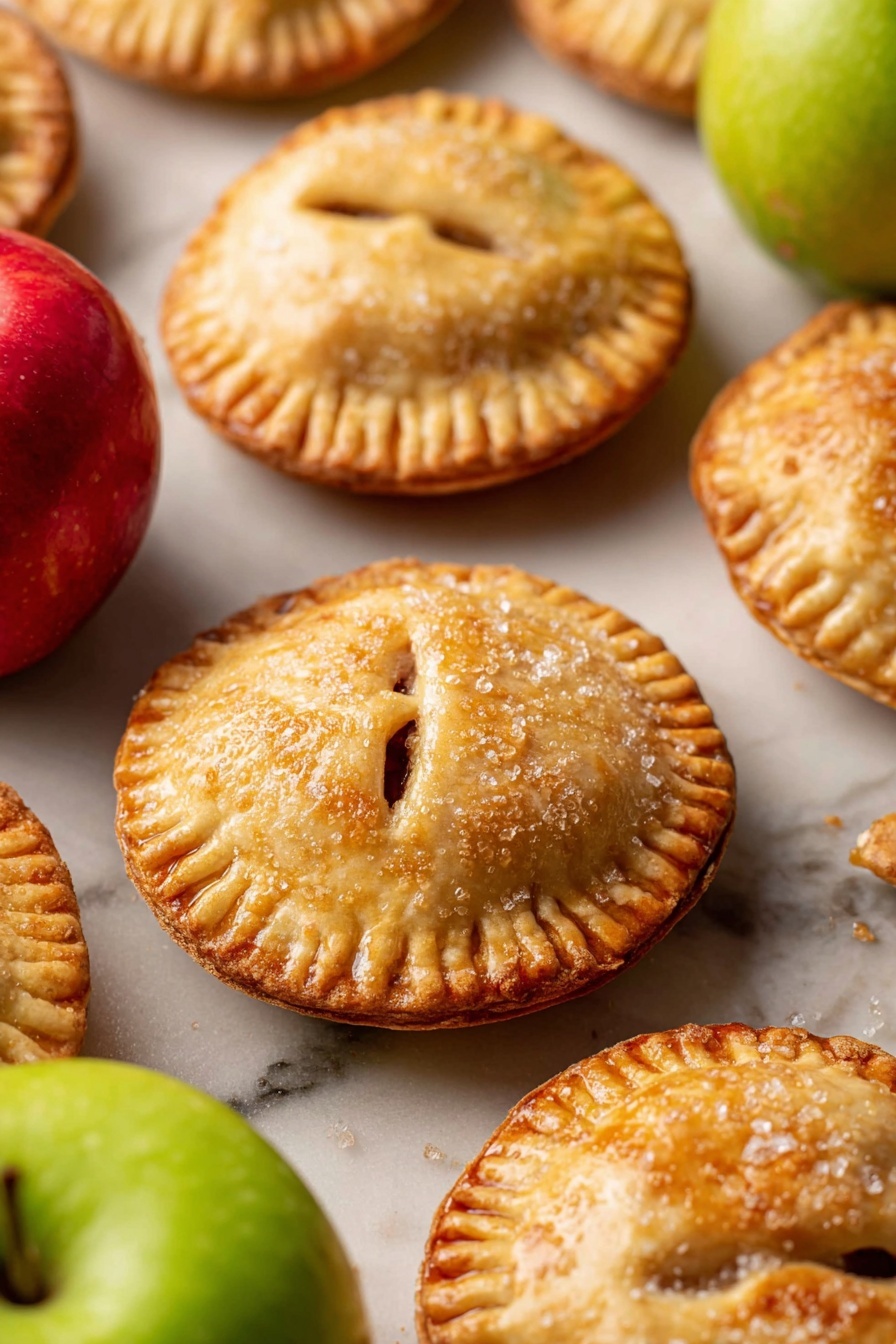
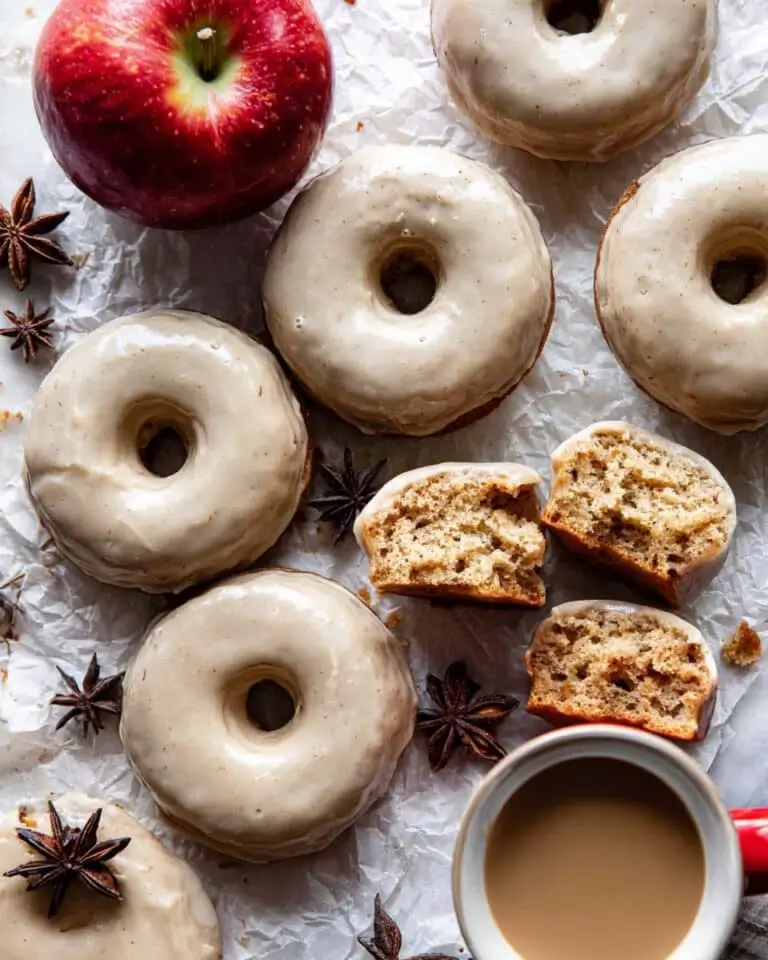
If you’re on the hunt for a delicious, cozy treat that’s perfect any time of year, you absolutely have to try this Apple Hand Pies Recipe. I love how these little pies turn out flaky, bursting with warm cinnamon-spiced apple filling, and perfectly portable. Whether you’re baking for a crowd or just craving a sweet snack, these hand pies are incredibly satisfying and surprisingly easy to whip up. Stick around because I’ll share all my best tips to make sure your pies come out perfect every time.
Why You’ll Love This Recipe
- Perfectly Flaky Crust: Using either store-bought or homemade dough, you’ll get tender, flaky pies every time without a fuss.
- Balanced Sweetness: The cinnamon-spiced apple filling is just sweet enough, making these pies a nostalgic treat you can enjoy any day.
- Great for Any Occasion: They’re portable and hand-held, perfect for picnics, lunchboxes, or even holiday gatherings.
- Easy to Customize: You can adjust spices or swap apples for other fruits—making this recipe truly your own.

Ingredients You’ll Need
These ingredients come together to create that delicious blend of flaky crust and warm, fragrant filling. When I shop for this recipe, I always go for crisp apples—Granny Smith or Honeycrisp work beautifully—and pie crust that’s pliable but holds its shape well.
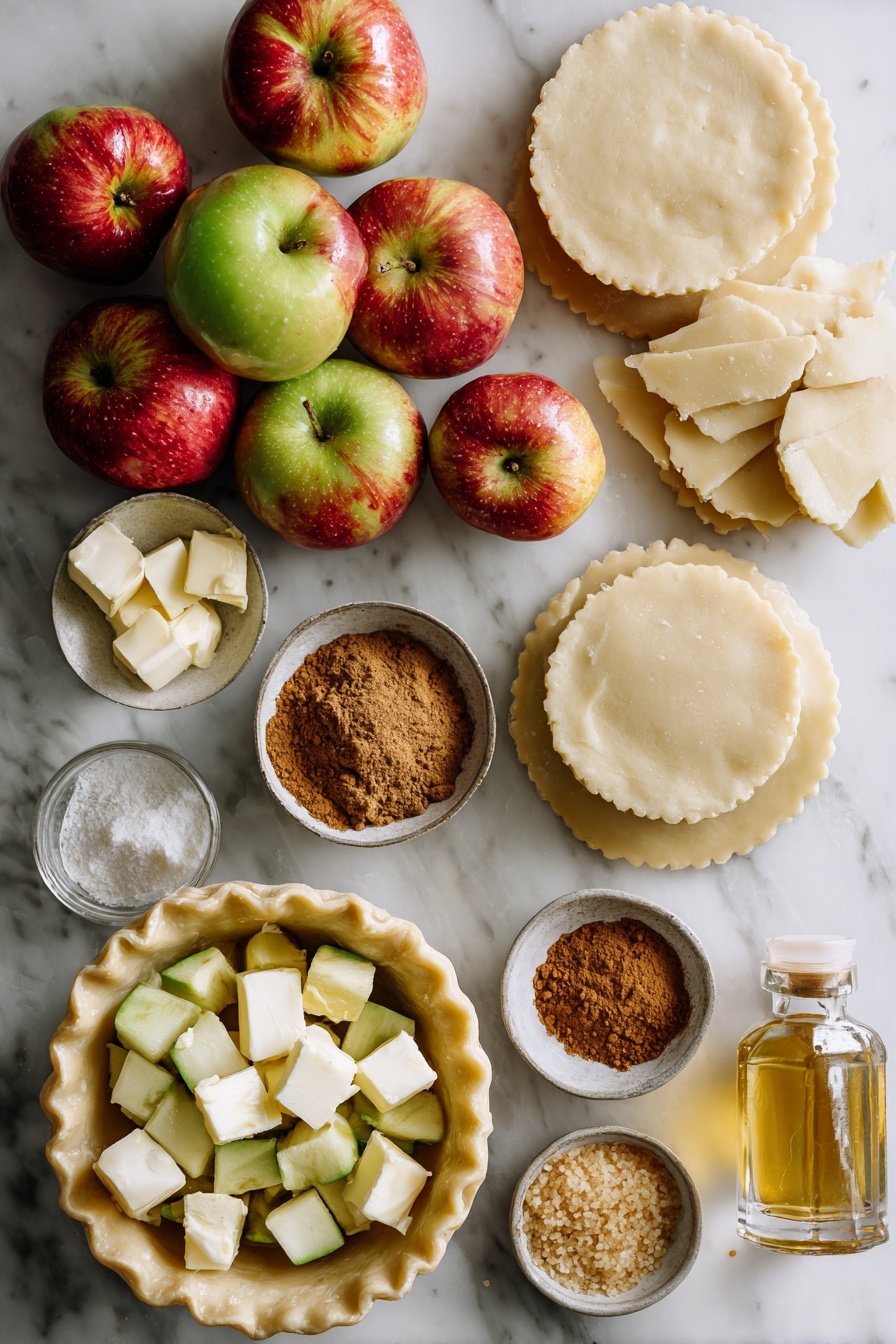
- Pie crusts: Whether you roll your own or grab some from the freezer aisle, make sure they’re well-chilled to get a flaky texture.
- Chopped apples: Firm, tart varieties hold up better and balance the sweetness perfectly.
- Granulated sugar: Just enough to sweeten the filling without overpowering the natural apple flavor.
- All-purpose flour: Helps thicken the filling so it won’t leak out while baking.
- Pure vanilla extract: Adds a subtle sweetness that complements the spices.
- Ground cinnamon: The star spice here—I usually add closer to 1 teaspoon for extra warmth.
- Ground nutmeg: Just a pinch adds depth and complexity.
- Large egg: For the egg wash, which gives your pies that gorgeous golden color.
- Milk: Mixed with the egg wash to help with browning.
- Butter: Small cubes melted atop the filling make the pies extra rich and luscious—totally optional but worth it.
- Coarse sugar: Sprinkled on top for a pretty, crunchy finish.
Variations
One of the things I love most about this Apple Hand Pies Recipe is how easy it is to personalize. Play around with spices or fillings, and you can make it your signature go-to dessert!
- Spiced Up: I once added a dash of ground cloves and cardamom for a festive twist that my family couldn’t stop talking about.
- Fruit Swap: Pears or even peaches make a lovely summer alternative if you want to experiment.
- Gluten-Free: You can swap the pie crust for a gluten-free version—just keep it well-chilled and handle gently.
- Vegan Version: Use a plant-based pie crust and swap the egg wash for almond milk mixed with maple syrup for a glossy finish.
How to Make Apple Hand Pies Recipe
Step 1: Chill Your Pie Crust Circles
Start by preheating your oven to 400°F (204°C) and lining your baking sheets with parchment paper. Roll out your pie crusts on a lightly floured surface until they’re about 1/8-inch thick. Using a 3.5-inch cookie cutter or a drinking glass, cut out circles—aim for 18 to 20 in total. Here’s a tip: don’t toss out your scraps; just reroll them gently. Place the circles on your baking sheets and pop them in the fridge to chill while you prepare your filling. Chilling helps the dough keep its shape and prevents shrinkage during baking.
Step 2: Mix the Apple Filling
In a bowl, combine your chopped apples with sugar, flour, vanilla, cinnamon, and a pinch of nutmeg. I like to toss everything until those apple pieces are evenly coated—that way every bite has that perfect balance of spice and sweetness. Feel free to taste a tiny bit and adjust the cinnamon to your liking. It’s a small step but makes a big difference!
Step 3: Assemble Your Pies
Remove your pie dough circles from the fridge. Spoon the apple filling evenly onto half of the circles, leaving about 1/4 inch border all around—this helps seal the pies. If you want that extra luscious bite, add a couple of small butter cubes on top of the filling. Then, gently place the remaining dough circles on top. Use a little water or some of the egg wash to dampen the edges, then press and crimp with a fork to seal everything tightly. This sealing step is key to avoid any juicy leaks while baking!
Step 4: Egg Wash and Bake
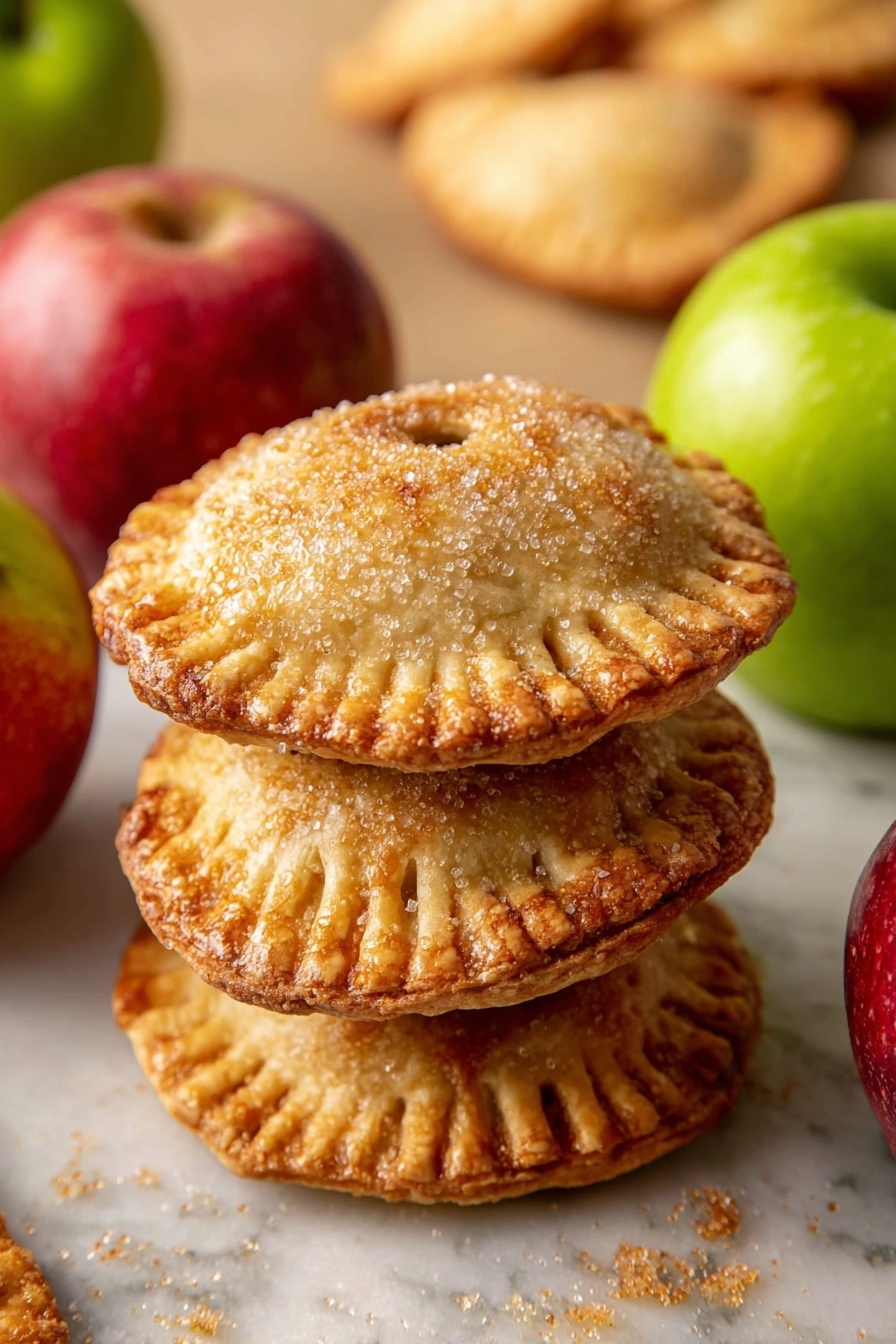
Whisk your egg and milk together and brush generously over the top of each pie. For a lovely sparkle and crunch, sprinkle coarse sugar over each pie before you bake. Use a small sharp knife to cut 2 to 3 slits in each pie top—trust me, it keeps the steam from building and the pies looking beautiful. Bake for around 18 to 22 minutes until golden brown and bubbling. Let them cool a bit before digging in; I know it’s hard to wait, but it helps the filling set up nicely so it won’t drip all over.
Pro Tips for Making Apple Hand Pies Recipe
- Keep Dough Cold: Cold dough prevents shrinkage and makes for flakier crusts—don’t skip chilling the circles before filling.
- Don’t Overfill: Leaving a border around the edges helps avoid filling oozing out and keeps your pies neat.
- Use Butter Cubes: Adding butter tops the filling with richness and helps create a wonderful texture inside.
- Seal Properly: Crimp edges firmly and use egg wash as glue—this keeps those pies from bursting open in the oven.
How to Serve Apple Hand Pies Recipe
Garnishes
I usually keep garnishes simple: a dusting of powdered sugar or a drizzle of warm caramel sauce really complements that cinnamon-apple flavor. Sometimes, I sprinkle a little extra coarse sugar on top right after baking for an extra crunch that my kids absolutely love.
Side Dishes
These hand pies are fantastic on their own, but when we have them for dessert, I like to serve them with a scoop of vanilla ice cream or a dollop of whipped cream. For a more breakfast-y vibe, a cup of hot coffee or spiced chai tea pairs beautifully.
Creative Ways to Present
For holiday parties, I like to use small leaf-shaped cookie cutters instead of circles—makes the pies festive and fun. Wrapping each pie in a pretty napkin or placing them in individual paper cupcake liners adds a charming touch when serving guests.
Make Ahead and Storage
Storing Leftovers
Once completely cooled, I store leftover apple hand pies in an airtight container at room temperature for up to 2 days or in the fridge for up to 4 days. I’ve found refrigeration keeps the filling nicely set, but the crust will soften a bit—reheating to crisp it back up helps a lot.
Freezing
I love making a batch ahead of time and freezing them. After baking and cooling, freeze pies on a baking sheet until solid (a couple of hours), then wrap each tightly in plastic wrap and store in a freezer-safe bag. That way, you can pop them in the oven anytime and have fresh-tasting hand pies for weeks.
Reheating
To reheat, I preheat the oven to 350°F (175°C) and bake the pies on a baking sheet for about 10-12 minutes, or until warm and the crust feels crisp again. Avoid the microwave if you want to keep that flaky crust texture.
FAQs
-
Can I make the apple filling ahead of time?
Absolutely! You can prepare the filling a day ahead and keep it refrigerated until you’re ready to assemble the pies. Just make sure to drain any excess liquid before adding the filling to the crust to avoid soggy pies.
-
What kind of apples work best for this recipe?
Firm, tart apples like Granny Smith, Honeycrisp, or Braeburn hold their shape well and balance the sweetness beautifully. Avoid overly soft or mealy apples since they can turn mushy when baked.
-
Can I use puff pastry instead of pie crust?
Yes, puff pastry works wonderfully for these hand pies if you want a lighter, flakier crust that puffs up brilliantly. Just keep an eye on baking time, as puff pastry can brown quicker.
-
How do I prevent the filling from leaking out?
Make sure not to overfill your pies and leave about a 1/4-inch border around the edges. Using a bit of water or egg wash to seal the edges and crimping firmly with a fork creates a secure seal to keep that filling inside.
-
How long do apple hand pies last?
At room temperature in an airtight container, they last 2 to 3 days. Refrigerated, they keep for up to 4 days. For longer storage, freeze as described above and enjoy within three months.
Final Thoughts
This Apple Hand Pies Recipe holds a dear spot in my kitchen rotation because it’s just so comforting and versatile. Every time I make them, I’m reminded of cozy afternoons and smiling faces around the table. I truly hope you give these a try and discover how simple it is to create something that feels so special—because baking should be joyful, not stressful. Grab some apples, get your dough ready, and enjoy these flaky, warm hand pies that your whole family will go crazy for.
Print
Apple Hand Pies Recipe
- Prep Time: 45 minutes
- Cook Time: 20 minutes
- Total Time: 1 hour 5 minutes
- Yield: 10 hand pies
- Category: Dessert
- Method: Baking
- Cuisine: American
- Diet: Vegetarian
Description
These classic Apple Hand Pies are a delightful handheld pastry filled with a cinnamon-spiced apple mixture baked until golden and bubbly. Perfect as a comforting dessert or snack, they feature flaky pie crusts encasing a sweet and warmly spiced apple filling, topped with a crunchy sugar sprinkle.
Ingredients
Pie Crust
- 2 pie crusts (homemade or store-bought)
Filling
- 2 cups chopped apples (240 grams)
- ¼ cup granulated sugar (50 grams)
- 2 tablespoons all-purpose flour (15 grams)
- ½ teaspoon pure vanilla extract
- ½ to 1 teaspoon ground cinnamon (adjust to your personal preference)
- ⅛ teaspoon ground nutmeg
Binding and Topping
- 1 large egg lightly beaten
- 1 tablespoon milk (15 ml)
- 1 tablespoon butter (15 grams), cubed into small pieces (optional)
- Coarse sugar for sprinkling on top (optional)
Instructions
- Preheat Oven: Preheat your oven to 400°F (204°C) and line one or two large baking sheets with parchment paper or silicone baking mats. Set aside for use later.
- Prepare Pie Crust Circles: On a lightly floured surface, roll out the pie crusts to about 1/8-inch thickness. Use a 3.5-inch cookie cutter or cup to cut out 18 to 20 circles. Reroll scraps as needed. Place these circles on the baking sheets and refrigerate to chill while you prepare the filling.
- Make the Apple Filling: In a mixing bowl, combine the chopped apples, sugar, flour, vanilla extract, ground cinnamon, and ground nutmeg. Stir thoroughly to coat all the apples evenly with the mixture.
- Mix Egg Wash: In a separate small bowl, whisk together the egg and milk until fully blended. Set this mixture aside; it will be used for sealing and brushing the pies.
- Assemble the Pies: Remove the chilled pie crust circles from the refrigerator. Spoon the apple filling evenly onto half of the circles, leaving edges clear. Place 1 to 2 small cubes of butter on each filled circle if using. Moisten edges with water or egg wash as needed, then cover with the remaining pie crust circles. Crimp the edges firmly with a fork to seal the pies.
- Finish and Vent: Brush the tops of each pie with the egg wash to give a golden sheen after baking. Sprinkle coarse sugar on top for a crunchy finish. Use a sharp knife to cut 2 to 3 slits into the top crust of each pie to allow steam to escape during baking.
- Bake: Bake the assembled pies in the preheated oven for 18 to 22 minutes or until the crusts are golden brown and the filling is bubbling through the vents.
- Cool and Serve: Remove from the oven and allow the pies to cool slightly before serving to enjoy warm, flaky hand pies.
Notes
- Store pies in an airtight container at room temperature or refrigerate for up to 3 to 4 days.
- Freezing Instructions: After cooling, freeze pies on a lined baking sheet until solid (2 to 3 hours). Then wrap tightly with plastic wrap and store in freezer bags or containers for up to 3 months. Thaw at room temperature before serving.
- Adjust the amount of ground cinnamon according to your taste preference; 1 teaspoon enhances the warm cinnamon flavor beautifully.
Nutrition
- Serving Size: 1 hand pie
- Calories: 290 kcal
- Sugar: 14 g
- Sodium: 150 mg
- Fat: 14 g
- Saturated Fat: 6 g
- Unsaturated Fat: 7 g
- Trans Fat: 0 g
- Carbohydrates: 35 g
- Fiber: 3 g
- Protein: 3 g
- Cholesterol: 45 mg


