

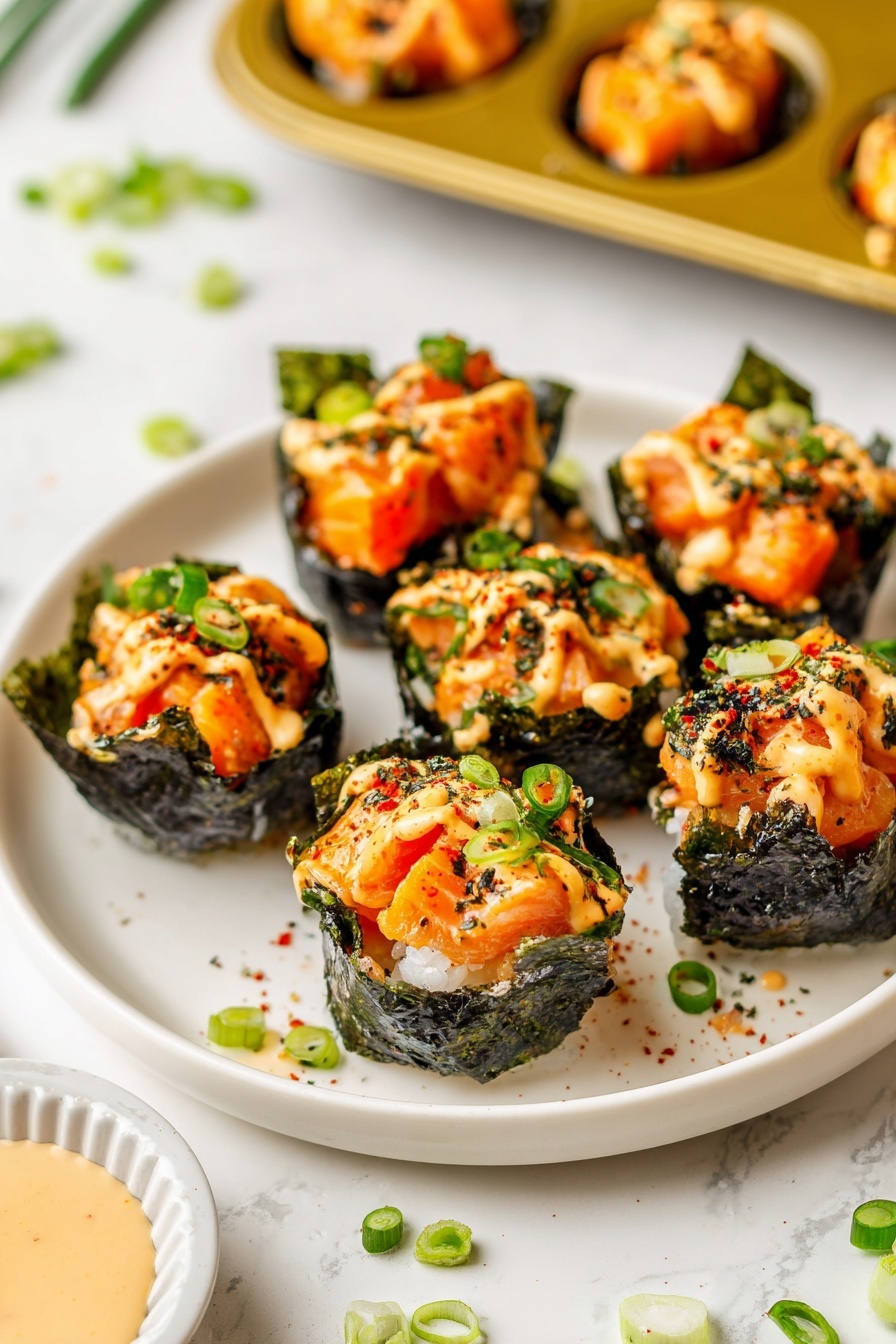
If you’re anything like me and adore sushi but don’t always want to fuss with rolling mats and tricky rice shaping, this Baked Salmon Sushi Cups Recipe is going to be your new best friend. These little sushi cups are packed with flavor, easy to assemble, and bake up perfectly tender salmon inside crispy nori “cups” filled with sushi rice. Trust me, once you try this, you’ll wonder why you ever thought sushi had to be complicated!
Why You’ll Love This Recipe
- Super Easy to Make: No rolling mats or sushi skills required—just assemble and bake.
- Flavor-Packed: The salmon mixture is creamy, spicy, and savory all in one bite.
- Perfect for Parties: These sushi cups are bite-sized and fun to serve for guests.
- Customizable: Easily tweak the spice level or add extra toppings to make it your own.

Ingredients You’ll Need
Each ingredient in this Baked Salmon Sushi Cups Recipe plays a critical role in getting that authentic sushi vibe, without the fuss. Here’s what to look for when shopping so you get the best results at home.

- Salmon: Fresh, sashimi-grade is ideal if you can find it, but regular fresh salmon works beautifully after baking.
- Light Soy Sauce: A mild soy adds saltiness without overpowering the salmon’s sweetness.
- Kewpie Mayo: This Japanese mayo is creamier and tangier than regular mayo; it’s a game-changer for flavor.
- Sriracha: For that perfect kick—adjust to taste if you prefer mild or extra spicy.
- Sesame Oil: Just a dash adds a toasty depth that’s unmistakably Asian.
- Sushi Rice: Proper sticky rice is crucial; rinse it well before cooking to avoid mushiness.
- Rice Vinegar & Sugar: These balance the rice perfectly with that classic sushi tang and slight sweetness.
- Nori Sheets: Look for shiny, dark sheets with a crisp feel—they give structure and umami.
- Furikake: This Japanese seasoning sprinkled on top adds extra flavor and texture.
- Green Onion: For freshness and a mild bite as garnish.
- Cooking Spray: Helps the nori hold in muffin tins and prevents sticking.
Variations
One of the fun parts of this Baked Salmon Sushi Cups Recipe is how adaptable it is. Over time, I’ve loved mixing things up based on what’s in season or who I’m serving it to—feel free to make it your own!
- Spice Level: I sometimes add a little extra sriracha or swap it out for a mild chili paste for more or less heat.
- Fish Options: If salmon isn’t your thing, try diced cooked shrimp or even tofu for a vegetarian version.
- Extra Crunch: Adding toasted sesame seeds or thin cucumber slices on top gives a delightful texture contrast.
- Gluten-Free: Just swap the soy sauce for tamari, and you’re good to go.
How to Make Baked Salmon Sushi Cups Recipe
Step 1: Prepare the Sushi Rice
You’ll want to start by cooking the sushi rice according to the package instructions. For me, rinsing the rice thoroughly before cooking is a must—it helps get rid of excess starch and stops the rice from becoming gummy. After it’s cooked, microwave the rice vinegar and sugar until the sugar dissolves, then fold this mixture gently into the rice while it’s still warm. This step gives you that signature sushi rice flavor that makes the cups so special. Set the rice aside to cool slightly but don’t let it get too cold or it’ll be tricky to press later on.
Step 2: Mix the Salmon Filling
While the rice cooks, whisk together your cubed salmon, light soy sauce, Kewpie mayo, sriracha, and sesame oil in a bowl. The mayo brings a creamy richness while the sriracha adds a playful heat. I like to taste-test the mixture here and adjust the spice or saltiness so it’s just right before baking. Don’t worry — the oven will help marry these flavors beautifully.
Step 3: Assemble the Sushi Cups
Preheat your oven to 400°F and lightly grease a muffin tin with cooking spray. Cut your nori sheets into rectangles or squares that easily fit into the muffin wells. Press each nori piece gently into a tin to form a cup shape. Then spoon a generous amount of that vinegared sushi rice into each nori-lined cup, pressing lightly to fill but not smashing it down hard. Add a layer of your salmon mixture on top, smoothing it out evenly. This assembly step is just half the fun—you’ll love how neat and cute these little cups look before baking!
Step 4: Bake to Perfection
Pop the tray into your preheated oven and bake for about 15 minutes. I like to peek at the 12-minute mark to spot-check—the salmon should be cooked through and starting to turn golden on top. Baking infuses the salmon’s creaminess right into the rice and crisps the edges of the nori just enough, which is absolutely dreamy.
Step 5: Garnish and Serve
Once out of the oven, let the sushi cups cool for a few minutes so they hold their shape. I love drizzling a little extra sriracha or spicy mayo on top for a final flavor pop. Then sprinkle with furikake and chopped green onions for color, texture, and that authentic Japanese touch. Serve immediately—you’ll find they disappear fast once plated!
Pro Tips for Making Baked Salmon Sushi Cups Recipe
- Use a Light Touch When Pressing Rice: Press just enough to fill the cups without compacting the rice too tightly, so it stays tender and fluffy.
- Don’t Overbake Your Salmon: Check the cups a little early to avoid drying out the fish—salmon cooks quickly and stays juicy best when pulled from the oven right away.
- Warm the Vinegar Mixture: Dissolving the sugar fully keeps the sushi rice smooth and prevents gritty bites. Warm it just enough, don’t boil!
- Prep Your Muffin Tin Well: Greasing the tin means the nori cups release easily once baked, so you keep that pretty shape without tearing.
How to Serve Baked Salmon Sushi Cups Recipe
Garnishes
For garnishes, I always go classic: furikake for that umami-packed crunch and a handful of finely chopped green onions for freshness and color contrast. Sometimes, I add a light sprinkle of toasted sesame seeds or a tiny drizzle of extra spicy mayo to up the flavor ante. These finishing touches really bring the dish to life.
Side Dishes
I like to pair these sushi cups with a simple seaweed salad or miso soup for an easy, well-rounded meal. Pickled ginger on the side is also a great palate cleanser that fits right into the sushi vibe. If I’m serving guests, a refreshing cucumber sunomono (vinegared cucumber salad) always gets rave reviews.
Creative Ways to Present
For parties or special occasions, I like to serve the baked salmon sushi cups on a wooden sushi board surrounded by small bowls of dipping sauces—such as soy sauce, ponzu, and spicy mayo—for a fun DIY experience. You can also top some with edible flowers or microgreens for a fancy twist that’s super impressive yet totally doable at home.
Make Ahead and Storage
Storing Leftovers
I typically store leftover baked salmon sushi cups in an airtight container in the refrigerator. They keep well for about 1 to 2 days. Just be aware that the nori might soften over time, so these are best enjoyed as fresh as possible.
Freezing
Freezing these sushi cups isn’t my favorite method because the texture of the rice and nori changes—plus the salmon can dry out. If you must freeze, wrap each cup tightly and thaw overnight in the fridge, but freshly made is definitely tastier and more enjoyable.
Reheating
When reheating leftovers, I use a low oven temperature or toaster oven to keep the nori a bit crispy without drying out the salmon. Microwave tends to make the nori soggy, so I try to avoid it. Just 5-7 minutes at 300°F usually warms it perfectly.
FAQs
-
Can I use a different type of fish for the Baked Salmon Sushi Cups Recipe?
Absolutely! While salmon is delicious and cooks well in this recipe, you can swap it for diced cooked shrimp, crab meat, or even tofu for a vegetarian twist. Just ensure whatever you choose holds up well when baked and mixes nicely with the creamy spicy mayo.
-
Is it necessary to use Kewpie mayonnaise?
Not 100%, but I highly recommend it. Kewpie mayo has a richer, slightly sweeter flavor than regular store-bought mayo, which pairs perfectly with the spicy sriracha and salmon. If you can’t find it, Japanese-style mayo or even a good-quality regular mayo will work in a pinch.
-
How do I prevent the nori cups from getting soggy?
Using high-quality, crisp nori sheets and baking the cups at a relatively high temperature helps crisp the edges. Also, don’t overfill the cups with too much rice or salmon mixture, which can weigh the nori down. Serving them shortly after baking ensures the best texture.
-
Can I make these sushi cups ahead of time?
You can prep the rice and salmon mixture ahead and assemble shortly before baking for freshest results. Fully baked cups are best served the same day, but you can refrigerate leftovers and gently reheat as needed (see my reheating tips above).
Final Thoughts
I absolutely love how this Baked Salmon Sushi Cups Recipe has become one of my go-to easy sushi alternatives. It’s approachable, delicious, and always a crowd-pleaser—my family literally goes crazy for these! Honestly, it’s helped me overcome the intimidation I once felt about making sushi at home. If you want to wow yourself and your loved ones without stress, give this a try. I promise you’ll feel proud, and the happy faces around your table will say it all.
Print
Baked Salmon Sushi Cups Recipe
- Prep Time: 15 minutes
- Cook Time: 15 minutes
- Total Time: 30 minutes
- Yield: 12 sushi cups
- Category: Appetizer
- Method: Baking
- Cuisine: Japanese
- Diet: Halal
Description
These Easy Baked Salmon Sushi Cups are a creative and delicious twist on traditional sushi, featuring sushi rice and a spicy salmon mixture baked in nori cups. Perfect as a party appetizer or a fun meal, they combine tender salmon with creamy, spicy mayo and savory soy flavors, all baked to golden perfection for a crispy finish.
Ingredients
Salmon Mixture
- 1 lb salmon, cubed
- 1 tbsp light soy sauce
- 1 tbsp Kewpie Mayo
- 1 tbsp Sriracha
- 1 tsp sesame oil
Sushi Rice
- 1 1/2 cup uncooked sushi rice
- 1 tablespoon rice vinegar
- 2 teaspoon white sugar
Other Ingredients
- 3 large nori sheets
- Furikake, for garnish
- 1 green onion, for garnish
- Cooking spray
Instructions
- Cook Sushi Rice: Prepare the sushi rice according to the package instructions until fully cooked and tender.
- Season the Rice: In a microwave-safe bowl, mix the rice vinegar with white sugar and microwave for about 30 seconds until the sugar dissolves. Pour this mixture over the cooked rice and stir well to combine. Set aside.
- Preheat Oven: Set your oven to 400℉ (204℃) so it’s ready for baking the sushi cups.
- Prepare Salmon Mixture: In a bowl, combine the cubed salmon with light soy sauce, Kewpie mayo, Sriracha, and sesame oil. Mix thoroughly until evenly blended and set aside.
- Cut Nori Sheets: Slice the nori sheets into 4 rectangles or squares large enough to line each muffin tin cup.
- Assemble Sushi Cups: Lightly grease the muffin tin with cooking spray. Place each nori square into the muffin cups. Add a spoonful of sushi rice into each nori cup and press it down gently. Then top each rice layer with the salmon mixture evenly.
- Bake: Place the muffin tin in the preheated oven and bake the sushi cups for 15 minutes, or until the salmon is cooked through and the tops have a slight golden color.
- Garnish and Serve: Remove from oven and allow to cool for a few minutes. Drizzle with additional Sriracha or spicy mayo if desired and garnish with furikake and chopped green onions. Serve immediately and enjoy!
Notes
- Ensure the salmon is fresh and sushi-grade for safety and best flavor.
- You can adjust the amount of Sriracha according to your desired spice level.
- Use a non-stick muffin tin or generously grease the tin to prevent sticking.
- Leftovers can be stored in the refrigerator for up to 2 days but are best eaten fresh for optimal texture.
- To make it gluten-free, use gluten-free soy sauce.
Nutrition
- Serving Size: 1 sushi cup
- Calories: 120
- Sugar: 2g
- Sodium: 300mg
- Fat: 5g
- Saturated Fat: 1g
- Unsaturated Fat: 3g
- Trans Fat: 0g
- Carbohydrates: 12g
- Fiber: 1g
- Protein: 8g
- Cholesterol: 35mg


