
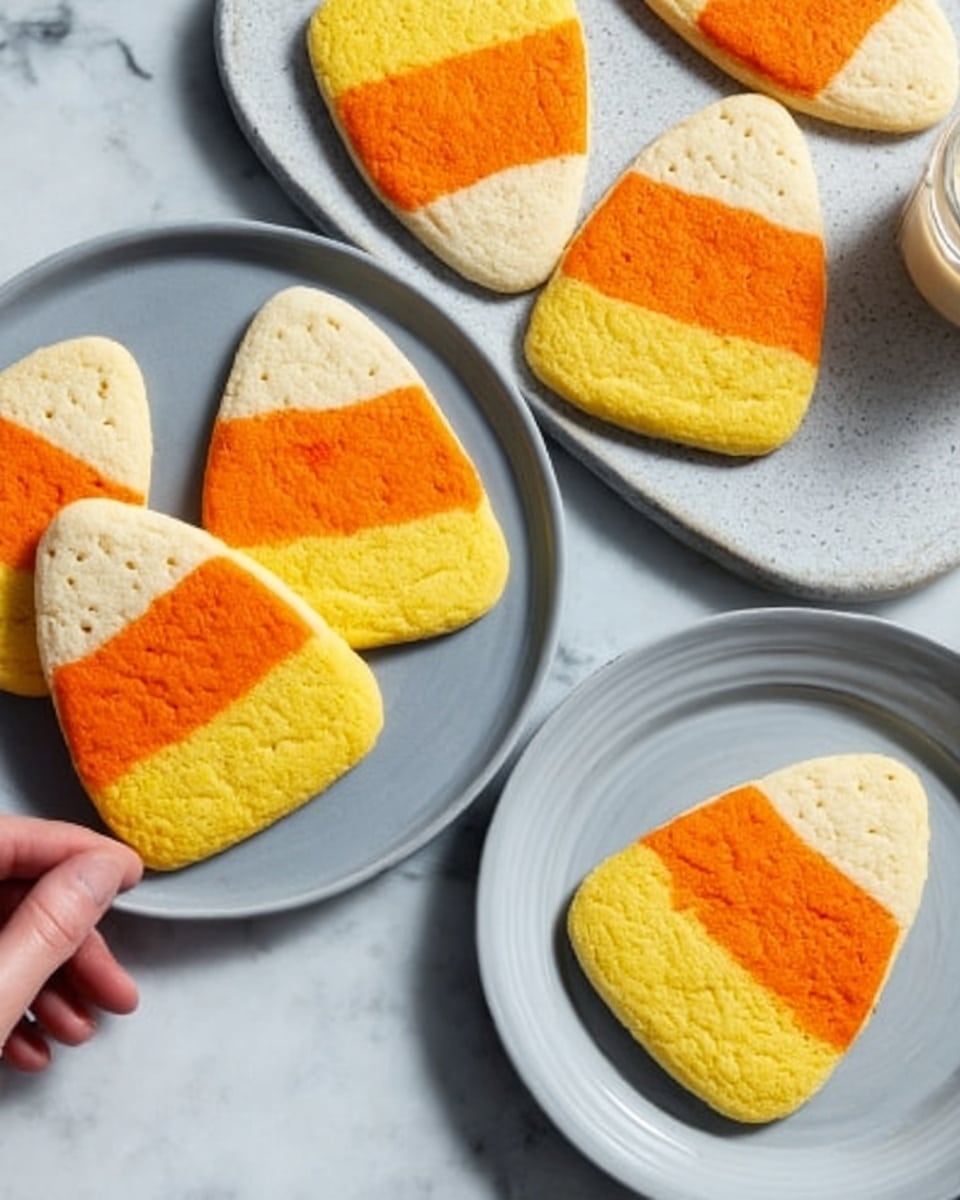
If you’re looking for a festive twist to your cookie game, you’re going to adore this Candy Corn Cookies Recipe. Trust me, these treats bring all the nostalgic Halloween vibes right to your kitchen with their bright colors and deliciously buttery flavor. I absolutely love how these cookies turn out—soft, buttery, and with that playful candy corn look that’s just perfect for fall parties or cozy afternoons with a cup of tea. Keep reading, and I’ll walk you through every step so you can nail these colorful cookies on your first try!
Why You’ll Love This Recipe
- Festive & Fun: These cookies instantly brighten up any autumn gathering with their candy corn colors that everyone recognizes and loves.
- Simple Ingredients: You probably have everything in your pantry already, which makes whipping up a batch super easy.
- Perfect Texture: Soft but sturdy enough to hold their shape, giving the cookies a beautiful layered look every time.
- Make-Ahead Friendly: The dough chills well, so you can prep in advance and slice fresh-baked cookies whenever you want.

Ingredients You’ll Need
These ingredients come together to create a classic buttery cookie base that’s easy to color and shape. The trick is using paste food coloring for bright, vibrant candy corn hues that don’t mess with the dough’s texture.
- Butter: Use softened unsalted butter for the best creamy texture and flavor control.
- Sugar: Regular granulated sugar works perfectly to give subtle sweetness and a lovely crumb.
- Vanilla extract: Adds warmth and depth, rounding out the cookie’s flavor.
- All-purpose flour: The foundation of the cookies—you’ll want to measure carefully to avoid dryness or spread.
- Baking soda: A little leavening agent that helps the cookies rise just right without losing their shape.
- Salt: Enhances all the flavors and balances the sweetness.
- Yellow and orange paste food coloring: Go for paste instead of liquid for clear, vibrant candy corn colors that won’t thin the dough.
Variations
I love how this Candy Corn Cookies Recipe invites creativity. Once you’ve got the basic dough down, you can easily swap around colors, add mini chocolate chips, or experiment with flavors that work best for your family’s tastes.
- Chocolate Twist: Add a layer of mini chocolate chips or a drizzle of melted chocolate after baking—I tried this once and my family went crazy for the chocolate-candy corn combo.
- Gluten-Free: Substitute the all-purpose flour with a 1-to-1 gluten-free blend and add an extra tablespoon of flour if the dough feels too soft when coloring.
- Seasonal Colors: Instead of traditional candy corn colors, try pastel shades for spring or red-green-white for the holidays—perfect if you want to use this dough year-round.
- Spiced Variation: Adding a pinch of cinnamon or pumpkin pie spice to the dough can give a cozy fall twist that I’m absolutely smitten with.
How to Make Candy Corn Cookies Recipe
Step 1: Cream the Butter and Sugar
Start by creaming the butter and sugar together until the mixture is light and fluffy—this usually takes about 5 to 7 minutes with a hand or stand mixer. This step is where the magic happens for the cookie’s texture, so don’t rush it! I noticed the first time I did this too quickly, my cookies turned out flatter, so be patient here.
Step 2: Mix Your Dry Ingredients
In a separate bowl, whisk together the all-purpose flour, baking soda, and salt. This ensures that your rising agent and salt are evenly distributed so your cookies bake consistently all the way through.
Step 3: Combine the Dry and Wet
Gradually add the flour mixture into the creamed butter and sugar. Beat just until combined; over-mixing here can lead to tough cookies, and none of us want that! When I learned this the hard way, my cookies became dense instead of soft, so keep it gentle.
Step 4: Divide and Color the Dough
Divide the dough in half. Tint one half with yellow paste food coloring. Then divide the remaining half into two portions—one two-thirds tinted with orange, and one left plain. Using paste colors is a gamechanger here; the dough stays just right in texture without getting sticky.
Step 5: Shape the Logs Layered Like Candy Corn
Shape each colored portion into 8-inch logs, flattening the tops a bit and angling the sides so they fit snugly. Layer the orange logs on top of the yellow ones, then the plain logs on top of everything, creating that iconic candy corn layered look. This part might feel a little tricky at first, but I promise once you’ve done it once, it gets easier every time.
Step 6: Chill and Slice
Wrap the layered logs tightly with plastic wrap and refrigerate for at least 4 hours, or until firm. This step is crucial because it makes slicing easier and helps the cookies hold their shape in the oven. I usually pop the dough into the fridge overnight if I’m prepping ahead—it’s so convenient!
Step 7: Bake to Perfection
Preheat your oven to 350°F (175°C). Slice the chilled dough into 1/4-inch thick pieces and place them about 2 inches apart on ungreased baking sheets. Bake for 10-12 minutes until set but not browned. As soon as I see the edges firm up nicely, I pull them out—this keeps them nice and soft inside.
Step 8: Cool and Enjoy
Transfer the cookies to wire racks to cool completely before indulging. I find that this also helps the candy corn colors pop more once firm. Plus, you’ll avoid the crumbly mess if you try to eat them warm too soon!
Pro Tips for Making Candy Corn Cookies Recipe
- Use Paste Food Coloring: It gives vibrant colors without messing with the dough consistency like liquid colors might.
- Chill the Dough Well: Don’t skip the refrigeration—it helps with clean slices and prevents cookies from spreading too much.
- Don’t Overmix: Mix dry into wet ingredients just until combined to keep cookies soft and tender.
- Slice Evenly: Use a sharp knife and steady pressure, wiping it clean between cuts if dough sticks, for the best candy corn stripe effect.
How to Serve Candy Corn Cookies Recipe

Garnishes
I usually serve these cookies plain because the candy corn look is so eye-catching already. But if you want to dress them up a bit, a simple dusting of powdered sugar or a drizzle of white chocolate works beautifully. I tried sprinkling a bit of edible glitter once for a party, which made them extra festive and fun!
Side Dishes
These cookies are perfect with a cozy cup of hot apple cider, pumpkin spice latte, or even a simple glass of cold milk. They also pair well with a scoop of vanilla ice cream if you want to fancy things up for dessert.
Creative Ways to Present
For a Halloween party, I’ve arranged these cookies in a giant candy corn shape on a platter—that wowed all the kids! You could also package them in cute cellophane bags tied with orange and yellow ribbons as charming homemade gifts.
Make Ahead and Storage
Storing Leftovers
Store your cooled Candy Corn Cookies in an airtight container at room temperature for up to a week. My family usually doesn’t keep them that long because they disappear fast, but if you find yourself with extras, they stay soft and delicious.
Freezing
I’ve frozen both the dough logs and the baked cookies. For dough, wrap tightly and freeze for up to 2 months; just thaw overnight in the fridge before slicing and baking. For baked cookies, freeze in a sealed container with parchment layers—you can easily pull out a few for a sweet treat anytime.
Reheating
To refresh frozen or stored cookies, I pop them in a warm (not hot) oven at 300°F for about 5 minutes. It helps regain that fresh-baked softness and aroma—like they just came out of the oven.
FAQs
-
Can I use regular liquid food coloring instead of paste?
You can, but I found that liquid food coloring can make the dough too soft and sticky, making it harder to shape and slice. Paste food coloring is concentrated and won’t alter the dough’s texture, giving you those vibrant candy corn colors with ease.
-
How do I keep the stripes looking neat?
Chilling the dough solidly before slicing is key. Also, use a sharp, clean knife to slice evenly and wipe the blade between cuts to prevent dough from sticking and smearing the colors.
-
Can I make these cookies vegan?
Substituting the butter with vegan margarine or coconut oil and using a flax egg can work, but you might need to experiment with the dough’s firmness. Keep in mind the texture may vary slightly, but the colors and festive fun remain!
-
How long do these cookies stay fresh?
Stored in an airtight container at room temperature, they stay fresh for about a week. After that, they might start to dry out, so freezing extras is your best bet.
-
Is this recipe suitable for kids to help with?
Absolutely! Kids love helping with coloring the dough and shaping the logs. Just watch closely when using the knife for slicing, or handle that step yourself to keep things safe.
Final Thoughts
This Candy Corn Cookies Recipe has become one of my favorite fall traditions. There’s something so joyful about creating food that’s as delightful to look at as it is to eat—especially when it brings smiles to your family and friends. I encourage you to give it a try and make it your own, whether you stick to classic candy corn colors or add your own spin. Baking these cookies feels like a cozy little celebration every time, and I’m confident you’ll love them as much as I do!
Print
Candy Corn Cookies Recipe
- Prep Time: 35 minutes
- Cook Time: 10 minutes
- Total Time: 45 minutes plus 4 hours chilling
- Yield: 5 dozen cookies
- Category: Dessert
- Method: Baking
- Cuisine: American
Description
Candy Corn Cookies are festive, colorful treats perfect for Halloween or any autumn celebration. These soft and buttery cookies feature layers of yellow, orange, and plain dough that mimic the iconic candy corn colors. Easy to prepare and fun to slice, they bring a delightful burst of color and sweetness to your cookie platter.
Ingredients
Cookie Dough
- 1-1/2 cups butter, softened
- 1-1/2 cups sugar
- 1/2 teaspoon vanilla extract
- 3 cups all-purpose flour
- 1 teaspoon baking soda
- 1/2 teaspoon salt
- Yellow paste food coloring
- Orange paste food coloring
Instructions
- Cream Butter and Sugar: In a large bowl, cream the softened butter and sugar together until the mixture is light and fluffy, about 5 to 7 minutes. This step ensures a smooth, airy cookie texture.
- Add Vanilla Extract: Beat in the vanilla extract thoroughly to combine and infuse flavor.
- Mix Dry Ingredients: In a separate bowl, whisk together the all-purpose flour, baking soda, and salt to evenly distribute the leavening and seasoning.
- Combine Wet and Dry Mixtures: Gradually add the dry ingredients to the creamed butter and sugar mixture, beating until fully incorporated and forming a dough.
- Divide and Tint Dough: Separate the dough into halves. Tint one half yellow using yellow paste food coloring. Then, divide the other half into two portions (two-thirds and one-third). Tint the larger orange with orange paste food coloring and leave the smaller portion plain.
- Shape Dough Logs: Shape each portion into two 8-inch logs. Flatten the top surfaces slightly and press the sides in at a subtle angle to prepare for layering.
- Assemble Dough Layers: Place the orange logs atop the yellow logs, pushing their sides in at a slight angle to fit. Finally, top with the plain dough logs, forming a gently rounded top layer. This layering recreates the candy corn look.
- Chill Dough: Wrap the assembled logs tightly and refrigerate until firm, about 4 hours, which makes slicing easier and maintains shape during baking.
- Preheat Oven: Preheat your oven to 350°F (175°C) to get ready for baking.
- Slice and Bake: Unwrap the chilled dough logs and cut into 1/4-inch thick slices. Place slices 2 inches apart on ungreased baking sheets to allow spreading.
- Bake Cookies: Bake in the preheated oven for 10 to 12 minutes or until the cookies are set and edges are lightly golden.
- Cool: Remove the cookies from the oven and transfer them to wire racks to cool completely before serving.
Notes
- Use paste food coloring for rich, vibrant colors without altering the dough consistency.
- Ensure the dough is well chilled before slicing to maintain defined layers and prevent colors from blending.
- Store cookies in an airtight container at room temperature for up to one week.
- For a festive touch, drizzle with a white or dark chocolate glaze after cooling.
Nutrition
- Serving Size: 1 cookie
- Calories: 110
- Sugar: 7g
- Sodium: 75mg
- Fat: 6g
- Saturated Fat: 3.5g
- Unsaturated Fat: 2.2g
- Trans Fat: 0.1g
- Carbohydrates: 14g
- Fiber: 0.3g
- Protein: 1.2g
- Cholesterol: 20mg


