
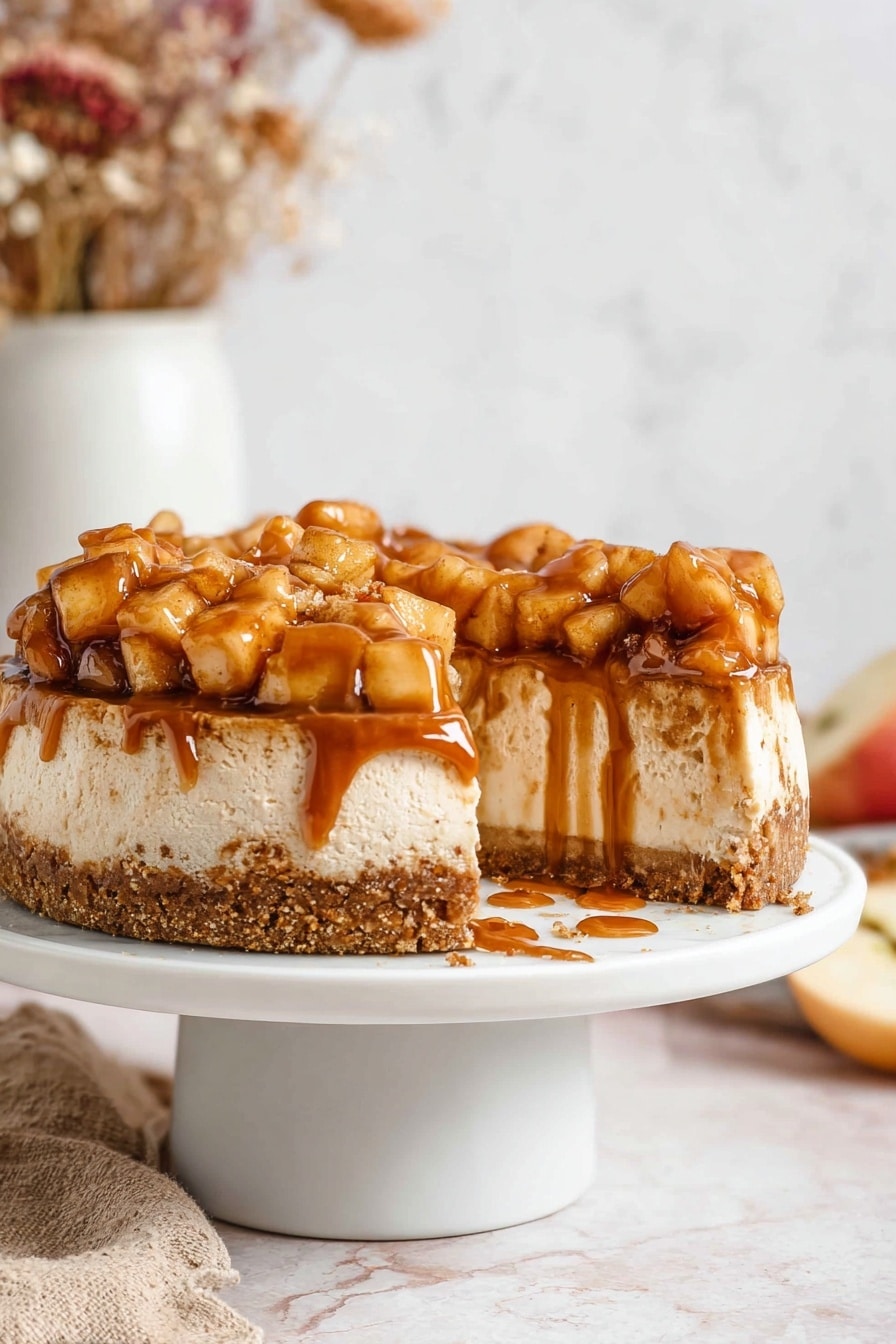
If you’re anything like me and love that perfect combo of sweet, tart, and creamy, then this Caramel Apple Cheesecake Recipe is about to become your new obsession. I absolutely love how the rich, velvety cheesecake filling works alongside tender cinnamon-spiced apples and luscious homemade caramel sauce. It’s a guaranteed crowd-pleaser that never fails to get compliments — and I’m excited to walk you through exactly how to make it shine in your kitchen.
Why You’ll Love This Recipe
- Balanced Flavors: The blend of cinnamon-spiced apples and buttery caramel perfectly complements the creamy cheesecake.
- Homemade Touch: Making your own caramel sauce elevates the flavor far beyond store-bought versions.
- Texture Contrast: The crisp vanilla wafer crust adds a delightful crunch against the smooth filling.
- Showstopper Dessert: It looks gorgeous with that glossy caramel and tender apples piled on top, perfect for any special occasion.

Ingredients You’ll Need
Gathering the right ingredients is half the fun because this recipe relies on classic flavors that blend beautifully. Make sure your dairy components are at room temperature to get the smoothest cheesecake filling — that little detail really makes a difference when baking.
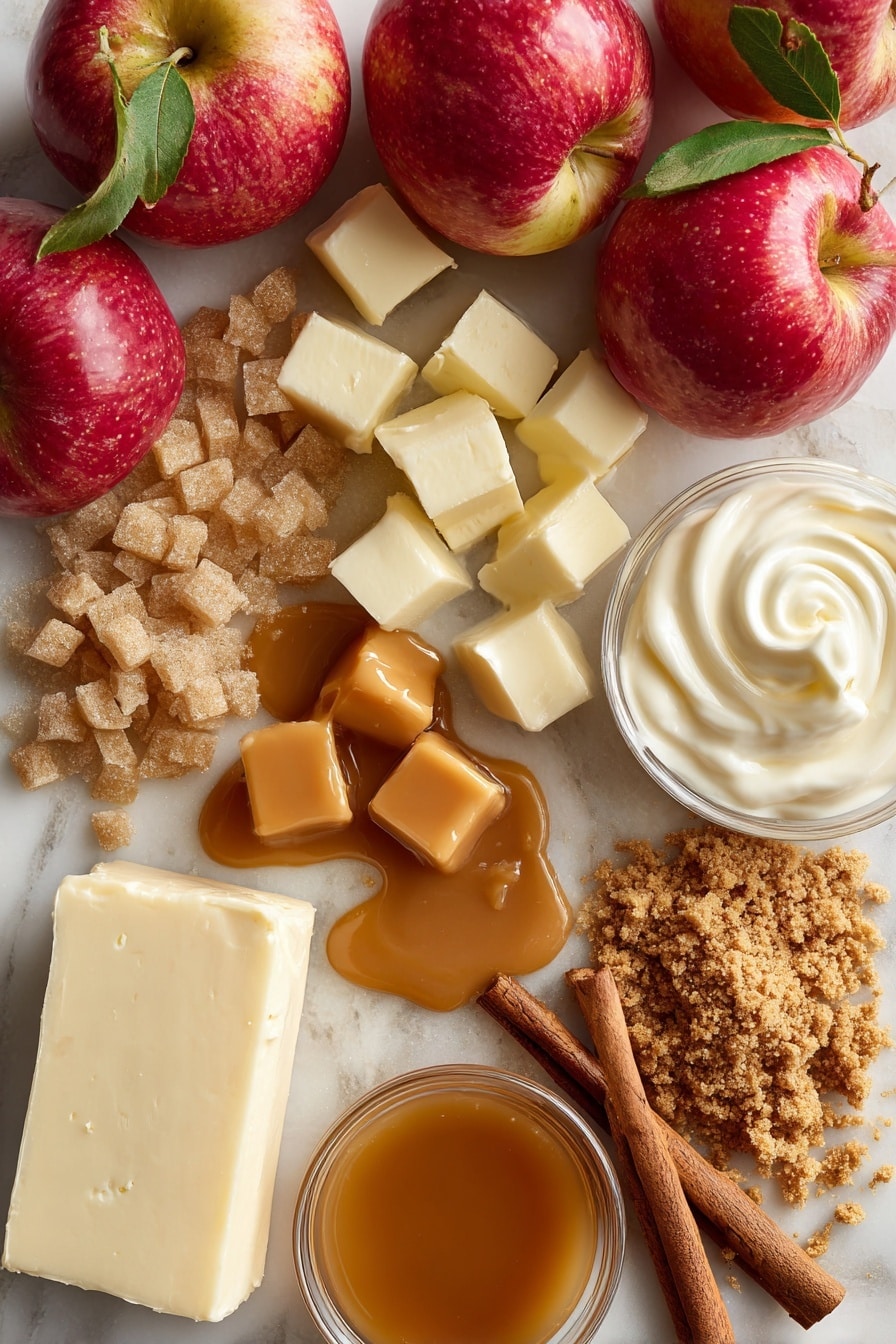
- Sugar: Plain granulated sugar works perfectly for caramelizing and gives that authentic homemade caramel flavor.
- Salted Butter: Make sure it’s cubed and at room temperature for smooth caramel without graininess.
- Heavy Whipping Cream: Room temp cream is essential to avoid seizing the caramel when mixing.
- Vanilla Wafers: Crush these finely for a buttery, subtly flavored crust that’s just right.
- Light Brown Sugar: I love how it adds a slight molasses note, especially in the crust and apples.
- Cream Cheese: Use full-fat cream cheese and bring it to room temperature for a silky cheesecake base.
- Flour: Helps stabilize the cheesecake and prevent cracking.
- Ground Cinnamon: The star spice for that cozy apple-cinnamon vibe.
- Sour Cream and Applesauce: These keep the cheesecake moist with tang and a little fruitiness.
- Eggs: Added slowly so the batter stays smooth without bubbles.
- Apples: Any firm variety will work — I usually use a mix of Granny Smith and Gala for tartness and sweetness balance.
- Lemon Juice: Keeps the apples bright and prevents browning while cooking.
Variations
I love making this Caramel Apple Cheesecake Recipe as written but sometimes it’s fun to shake things up a bit depending on the season or what I have in the pantry. You’ll find it’s easy to customize!
- Spiced Up: I sometimes add nutmeg and a pinch of cloves for a warm, spiced twist I adore during the holidays.
- Diet-Friendly: Swap out some of the sugar for maple syrup or use a light cream cheese to lighten it up if you’re watching calories.
- Nut Topping: Toasted pecans or walnuts sprinkled on top add a lovely crunch and earthy flavor that my family goes crazy for.
- Fruit Swap: Pears or even sautéed peaches can stand in for apples if you want a different fruit note.
How to Make Caramel Apple Cheesecake Recipe
Step 1: Make the Perfect Salted Caramel Sauce
Start with the caramel sauce — this is your flavor powerhouse. I discovered that whisking the sugar constantly at the start helps it melt evenly without burning. It will clump up first but trust me, keep whisking and before you know it, it transforms into a golden amber liquid. When adding the butter and cream, make sure they’re warm or room temp to keep the caramel smooth instead of seizing up. This step took me a few tries to perfect, but the richer homemade sauce is SO worth the effort.
Step 2: Prepare and Bake the Vanilla Wafer Crust
This crust is easy but tasty — just mix up the crushed vanilla wafers, melted butter, and brown sugar, then press evenly into a greased springform pan. Pre-baking it for 10 minutes ensures a nice firm base that won’t get soggy when you pour in the cheesecake batter. Don’t forget to line the bottom with parchment paper. I learned the hard way that it helps when releasing the cheesecake later.
Step 3: Whip Up the Cheesecake Filling
Using a stand mixer set on low is crucial. The first time I whipped this, I accidentally beat it too fast and ended up with cracks on my cheesecake. So, go slow and steady blending cream cheese, brown sugar, flour, and cinnamon. Then fold in the sour cream, heavy cream, applesauce, and some of that luscious caramel. Finally, add the eggs one by one, mixing gently. Scrape the bowl often so everything blends without overworking the batter. Pour it into the cooled crust and you’re ready for the water bath.
Step 4: Bake in a Water Bath for Creamy Perfection
Wrapping the springform pan in foil and placing it in a larger pan with warm water halfway up the sides keeps the cheesecake moist and prevents cracking. After 45 minutes baking, leaving the cheesecake in the turned-off oven with the door closed (and later slightly ajar) is an old baker’s trick I learned to help it set gently without collapsing. Patience here is key — resist the urge to open the door until it’s time.
Step 5: Cook the Cinnamon Apples and Assemble
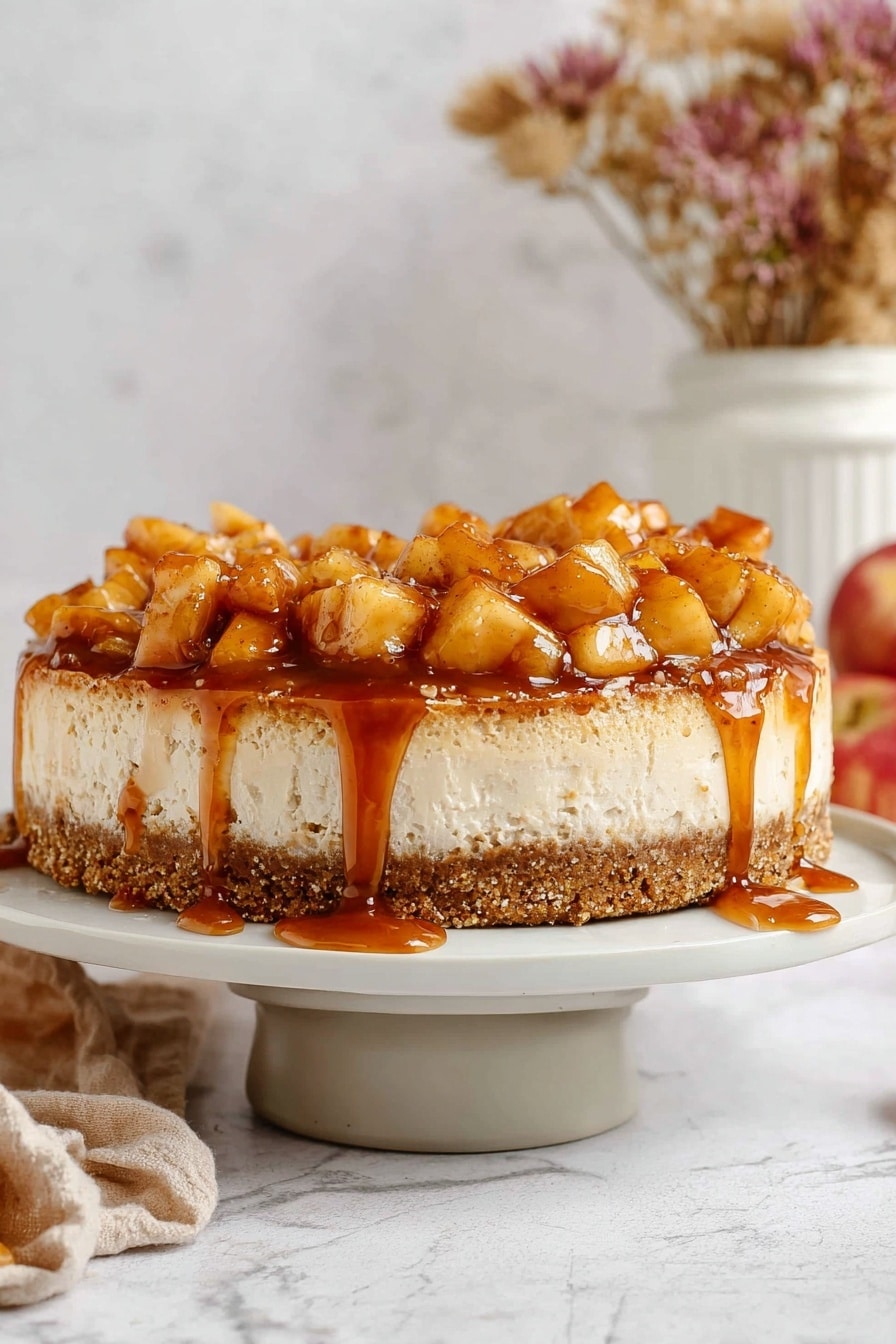
Sauté chopped apples with brown sugar, cinnamon, lemon juice, and butter until tender and sweetly spiced. Once the cheesecake has fully chilled (usually overnight), spread extra caramel sauce over the top, then mound the cinnamon apples right in the center. If you want to get fancy, drizzle a bit more caramel around the edges. This is the part that really wows your guests — that glossy caramel, soft apples, and creamy cheesecake combo makes for an irresistible slice.
Pro Tips for Making Caramel Apple Cheesecake Recipe
- Room Temperature Ingredients: Always bring cream cheese, eggs, butter, and cream to room temp before mixing to ensure a smooth, crack-free filling.
- Gentle Mixing: Use low speed and mix slowly — less air means a denser cheesecake that won’t crack as it bakes.
- Water Bath Wrap: Wrapping the springform pan tightly in foil prevents water from seeping in and ruining the crust.
- Patience on Cooling: Let the cheesecake chill fully overnight before removing the springform ring or adding toppings for the best texture and clean slices.
How to Serve Caramel Apple Cheesecake Recipe
Garnishes
I usually garnish this cheesecake with a sprinkle of finely chopped toasted pecans and a few extra drizzles of caramel on each slice. Sometimes a dusting of cinnamon sugar adds a pretty finishing touch that echoes the apple topping perfectly. It’s all about balancing flavors and textures while keeping it visually inviting.
Side Dishes
This dessert pairs beautifully with a simple cup of spiced chai or a scoop of vanilla bean ice cream for an extra indulgent treat. A light dollop of whipped cream brightens the richness and makes the whole experience feel a little more festive and special.
Creative Ways to Present
For holidays or dinner parties, I love serving this cheesecake on a wooden board with fresh apple slices arranged in a fan nearby, plus small bowls of extra caramel sauce and cinnamon sugar for guests to customize their slice. It invites everyone to savor not just the flavors but the interactive celebration of fall-inspired comforts.
Make Ahead and Storage
Storing Leftovers
I keep leftover cheesecake in the fridge right in its springform pan with the sides still on for support. Loosely covering with plastic wrap works well, but I always insert a few toothpicks on top so the wrap doesn’t stick to the apples — such a simple trick to keep the topping intact and fresh. It’s best enjoyed within 2 to 3 days but holds up nicely for up to 5.
Freezing
Freezing this cheesecake is totally doable! I either freeze the whole cake after wrapping it tightly with plastic wrap and foil, or I slice it first and freeze individual portions on a parchment-lined tray before wrapping them up. Just be sure it’s sealed well to avoid freezer burn or absorbing weird odors. Frozen slices thaw beautifully in the fridge overnight.
Reheating
To enjoy leftovers warm, take your slice out of the fridge and let it come to room temp before a quick 10-second zap in the microwave. This gently softens the caramel and cream cheese without melting away the texture. I don’t recommend heating the entire cheesecake, as it’s best eaten chilled for creams and structural integrity.
FAQs
-
Can I use store-bought caramel sauce instead of making my own?
Absolutely, you can! While homemade caramel sauce adds a rich depth of flavor and creamy texture, a good-quality store-bought caramel will work in a pinch. Just keep in mind that homemade sauce tends to be fresher and can be tailored for saltiness and sweetness to suit your taste.
-
What’s the best type of apple for the topping?
I like a mix of sweeter apples like Gala or Fuji combined with tarter ones like Granny Smith. This balances the topping’s sweetness and adds some brightness. You want apples that hold their shape well when cooked so you get tender but still distinct chunks.
-
How do I prevent cracks in my cheesecake?
Mix ingredients slowly on low speed to avoid incorporating air bubbles, bake in a water bath to maintain even moisture, and make sure to let the cheesecake cool gradually in the oven before chilling. These steps together greatly reduce cracking risk.
-
Can I make this cheesecake ahead of time?
Yes, this cheesecake actually improves in flavor after resting overnight in the fridge. I recommend making it a day ahead, chilling fully, and adding the apple topping right before serving for the freshest presentation.
-
Is it okay to use a glass or metal springform pan?
Both work fine, but I prefer metal because it conducts heat better, helping the cheesecake bake evenly. Just be sure to wrap it well with foil for the water bath to avoid leaks.
Final Thoughts
This Caramel Apple Cheesecake Recipe holds a special place on my dessert menu — it brings warmth and comfort like no other treat. Every bite feels like fall wrapped up in creamy indulgence, and I love sharing it with friends who always ask for seconds (and the recipe!). I’m confident you’ll enjoy making it as much as I do — trust me, once you try it, it might just become your go-to for special celebrations or cozy nights in.
Print
Caramel Apple Cheesecake Recipe
- Prep Time: 1 hour
- Cook Time: 2 hours
- Total Time: 3 hours
- Yield: 12 servings
- Category: Dessert
- Method: Baking
- Cuisine: American
Description
Indulge in this luscious Caramel Apple Cheesecake that perfectly combines a crunchy vanilla wafer crust, rich and creamy cinnamon-infused cheesecake filling, and a sweet caramel apple topping. The homemade salted caramel sauce elevates this dessert to a new level of decadence, making it an ideal treat for special occasions or cozy gatherings.
Ingredients
Salted Caramel Sauce
- 1 cup sugar
- 6 tablespoons salted butter, cubed and room temperature
- ½ cup heavy whipping cream, room temperature
Crust
- 2 cups vanilla wafer crumbs (about ½ to ¾ of an 11 ounce box)
- ½ cup salted butter, melted
- ¼ cup light brown sugar, loosely packed
Cheesecake Filling
- 24 ounces cream cheese, room temperature
- 1 cup packed light brown sugar
- 3 tablespoons all-purpose flour
- 1 teaspoon ground cinnamon
- ¼ cup sour cream, room temperature
- ¼ cup heavy whipping cream, room temperature
- ½ cup applesauce
- ¼ cup caramel sauce (prepared)
- 4 large eggs, room temperature
Cinnamon Apples
- 2 ½ cups chopped apples (any variety, about 2-3 apples)
- 3 tablespoons light brown sugar, loosely packed
- 2 teaspoons lemon juice
- 1 teaspoon ground cinnamon
- 1 tablespoon salted butter
- Additional caramel sauce for topping
Instructions
- Make the Caramel Sauce: Pour the sugar in an even layer in a large saucepan and heat over medium-high heat, whisking continuously until it melts. The sugar will clump initially but will fully melt after about 10-15 minutes. Once melted, stop whisking and allow it to cook until it turns a dark amber color with a nutty aroma—be careful not to burn it. Remove from heat but keep the pan on the stove.
- Slowly whisk in the room temperature butter; the mixture will bubble but continue whisking until fully combined. Then slowly add the room temperature heavy whipping cream, whisking constantly to incorporate. Set aside to cool.
- Prepare the Crust: Preheat the oven to 325°F. Line the bottom of a 9-inch springform pan with parchment paper and grease the sides. Mix vanilla wafer crumbs, melted butter, and brown sugar until combined. Press this mixture firmly into the bottom and up the sides of the pan. Bake for 10 minutes, then cool. Wrap the outside with foil to prevent water from the water bath seeping in. Reduce oven temperature to 300°F and set aside.
- Mix the Cheesecake Filling: In a stand mixer bowl, beat cream cheese, brown sugar, flour, and cinnamon on low speed until smooth and well combined, avoiding excess air. Scrape down the bowl, add sour cream, heavy cream, applesauce, and caramel sauce, mixing until smooth. Add eggs one at a time, mixing slowly after each addition. Scrape the sides as needed to ensure thorough mixing. Pour the filling into the prepared crust.
- Bake in a Water Bath: Place the springform pan into a larger roasting pan. Fill the roasting pan with warm water halfway up the sides of the springform pan, being careful not to let water get above the foil. Bake for 45 minutes at 300°F.
- Cool Gradually: Turn off the oven and leave the cheesecake inside with the door closed for 15 minutes—do not open the door. Then, crack the door open slightly and leave it in the oven for another 30 minutes. Remove the cheesecake and let it sit at room temperature for 15 minutes before removing it from the water bath and foil. Wrap with plastic wrap and refrigerate until fully set, 6-7 hours or overnight.
- Prepare Cinnamon Apples: In a large saucepan, combine chopped apples, brown sugar, lemon juice, cinnamon, and butter. Cook over medium heat until apples are tender, about 10-15 minutes.
- Assemble and Serve: Spread additional caramel sauce over the top of the chilled cheesecake. Spoon the cooked cinnamon apples onto the center of the cheesecake and drizzle more caramel sauce down the sides if desired. Refrigerate until ready to serve. Best enjoyed within 2-3 days.
Notes
- Storage – Refrigerator: Keep the cheesecake in the springform pan base for support to prevent slipping. Loosely cover with plastic wrap or use an airtight container. Insert toothpicks in the top to prevent plastic wrap from sticking to the apples. Ideal to consume within 2-3 days, but good for up to 5 days.
- Storage – Freezer: Freeze the entire cheesecake or slice it first. Wrap tightly in plastic wrap then foil to avoid freezer burn and odors. For slices, freeze individually on a parchment-lined tray before wrapping and storing.
Nutrition
- Serving Size: 1 slice (1/12 of cheesecake)
- Calories: 480
- Sugar: 35g
- Sodium: 250mg
- Fat: 32g
- Saturated Fat: 19g
- Unsaturated Fat: 10g
- Trans Fat: 0.5g
- Carbohydrates: 38g
- Fiber: 2g
- Protein: 6g
- Cholesterol: 110mg


