
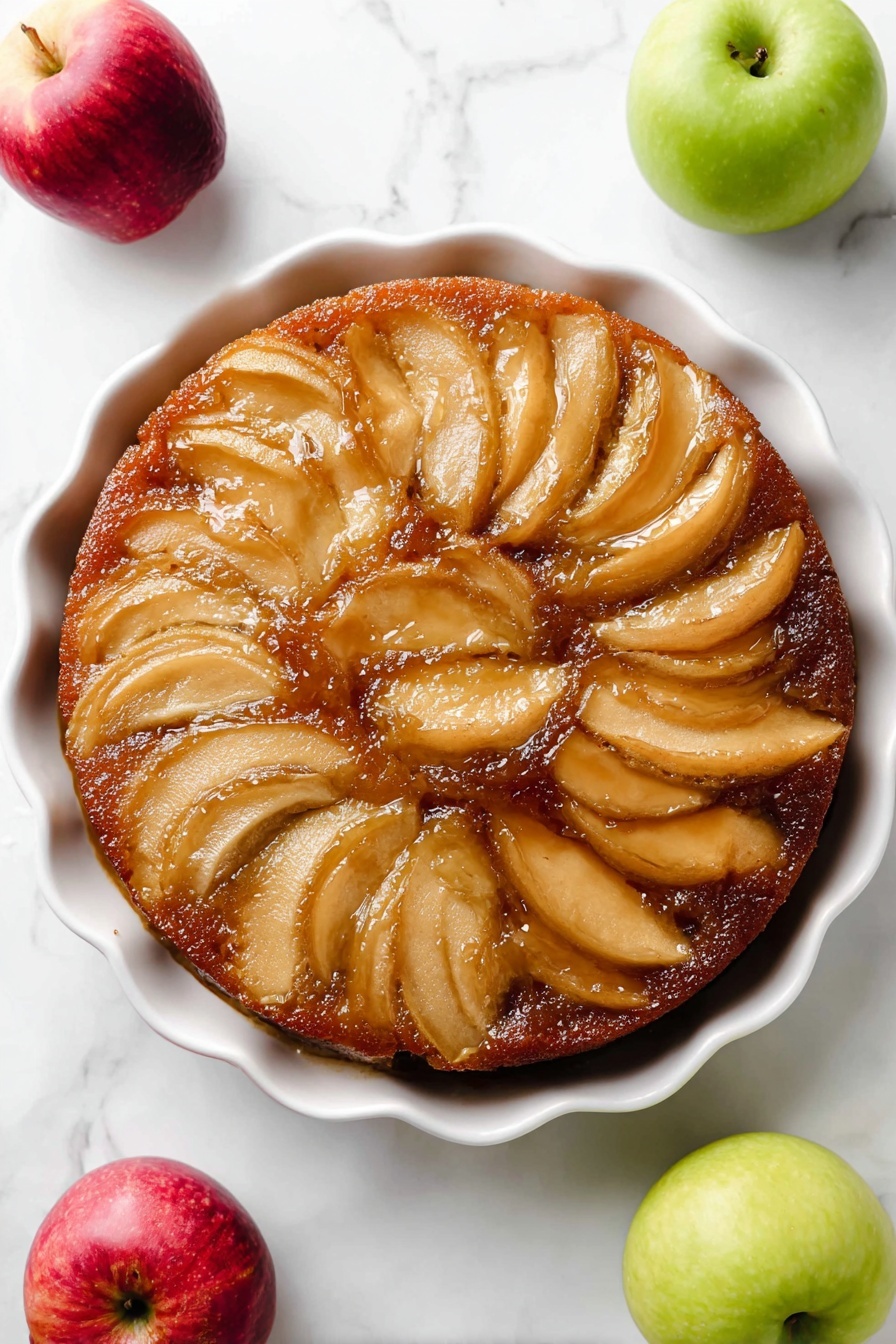
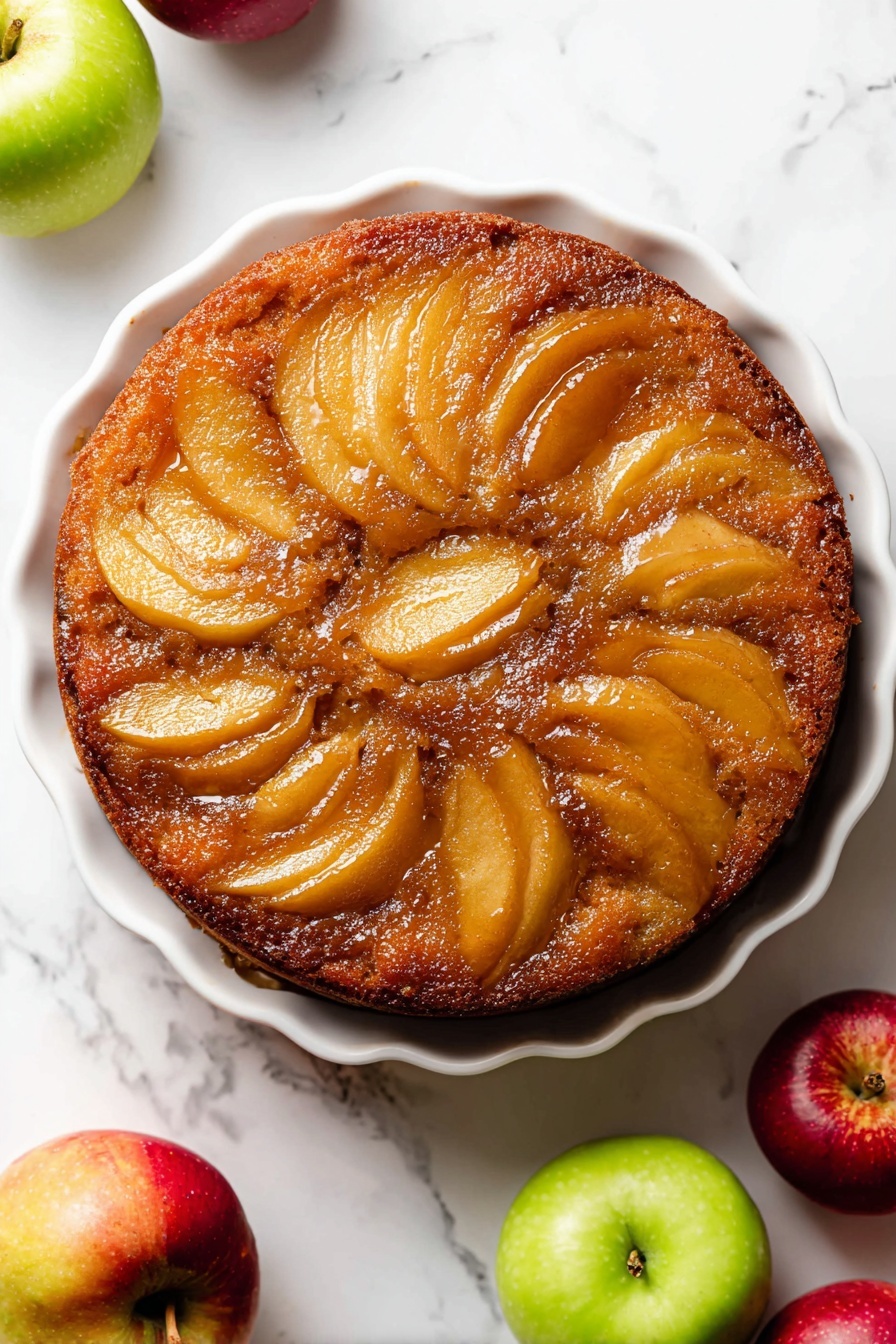
If you’re craving a comforting dessert that brings together the cozy flavors of fall with a delightful twist, you’re in for a treat. My Caramel Apple Upside Down Cake Recipe is one of those dishes that instantly feels like a warm hug on a plate. Imagine tender apple slices caramelized in butter and brown sugar, all nestled under a spiced, fluffy cake—flipped out onto a plate to reveal a glossy, inviting topping. I absolutely love how this turns out every single time, and once you try it, I think you’ll feel the same way. Keep reading, and I’ll walk you through exactly how to make this fan-freaking-tastic dessert.
Why You’ll Love This Recipe
- Perfect Fall Flavors: The blend of caramel, cinnamon, and nutmeg with fresh apples hits that cozy comfort food spot every time.
- Showstopper Presentation: Flipping the cake upside down reveals a beautifully caramelized apple topping that impresses guests and family alike.
- Moist, Tender Cake: Thanks to melted butter and milk, the cake stays soft and fluffy without drying out.
- Simple Ingredients & Steps: You won’t need any fancy tools or rare ingredients, and the recipe is straightforward enough to make after a busy day.

Ingredients You’ll Need
For this yummy Caramel Apple Upside Down Cake Recipe, you’ll gather a few key ingredients that really harmonize together. Fresh apples are the star of the show, so I like to pick firmer varieties that hold their shape well. The spices add warmth, and the mixture of sugars gives you that luscious caramel depth.
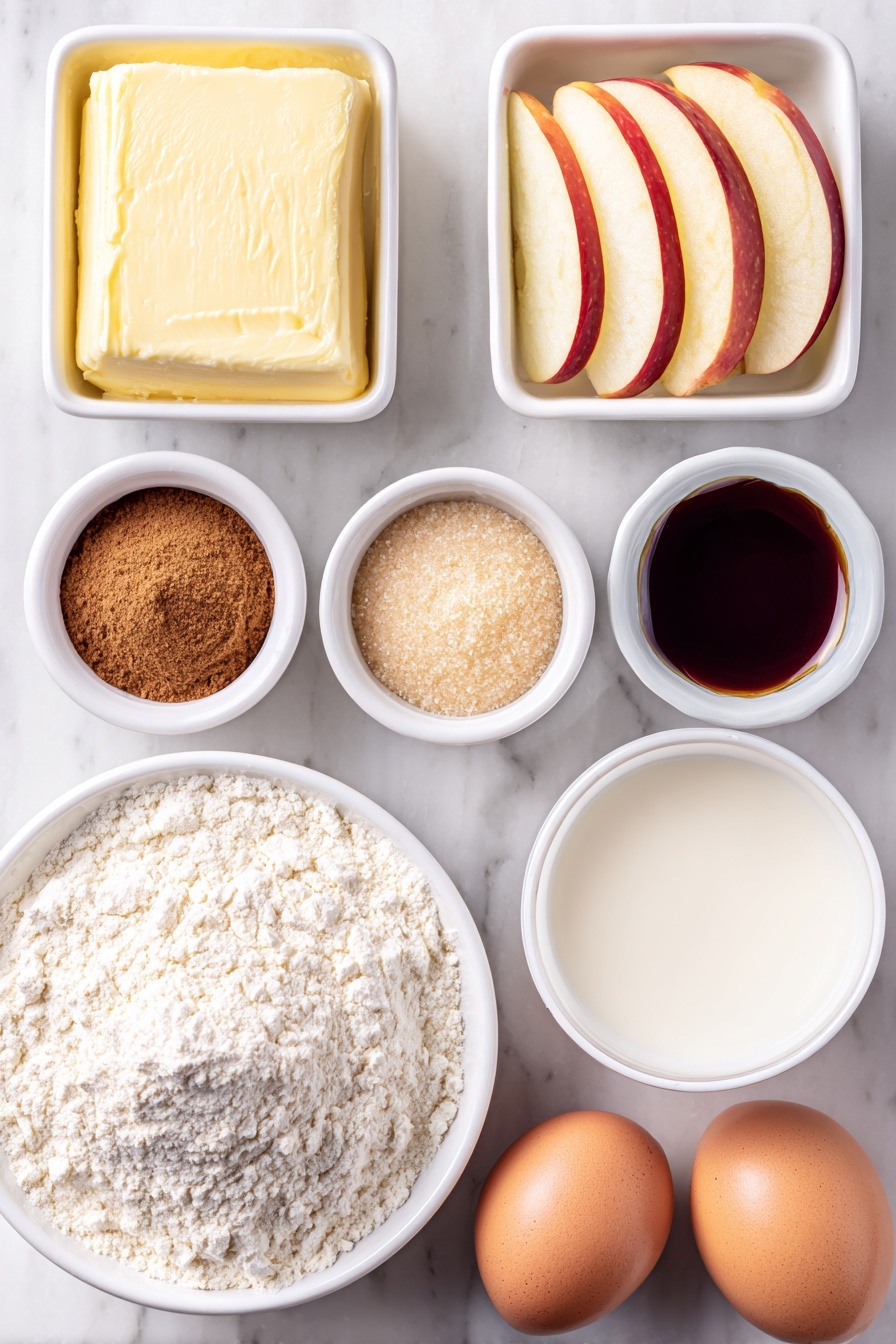
- Unsalted butter: Using unsalted butter lets you control the saltiness, plus it browns beautifully in the topping and cake batter.
- Brown sugar (light or dark): Packed brown sugar adds moisture and rich caramel flavor that’s essential here.
- Ground cinnamon: You want good quality cinnamon to bring out those warm notes in both the apples and the cake.
- Pure vanilla extract: Vanilla deepens the flavor without being overpowering.
- Apples (medium): I prefer slightly tart apples like Granny Smith or Honeycrisp, peeled and sliced thin for even caramelization.
- All-purpose flour: Spoon and level it for consistency; this keeps your cake light but structured.
- Baking powder: Essential for that nice rise and fluffiness.
- Ground nutmeg: Just a pinch adds a lovely earthy warmth, complementing the cinnamon.
- Salt: Enhances all the flavors in the cake.
- Granulated sugar: Helps balance the sweetness and texture in the cake batter.
- Large eggs: Room temperature eggs help the cake batter come together smoothly.
- Whole milk: The milk adds moisture and richness to the cake, pulling the whole texture together.
Variations
Over time, I’ve loved experimenting with this Caramel Apple Upside Down Cake Recipe — it’s surprisingly versatile, so feel free to make it your own! Whether you want to switch up the fruit or adjust for dietary needs, it always responds well.
- Pear version: One fall, I swapped in ripe pears for apples, and the cake was just as delightful—pear’s softness creates a melt-in-your-mouth topping.
- Gluten-Free: I’ve had great success using a gluten-free all-purpose blend; just be sure it includes xanthan gum for structure.
- Sugar swap: For a deeper caramel flavor, try using dark brown sugar exclusively in the topping and cake.
- Spice it up: Adding a pinch of ground cloves or ginger can add lovely warmth for holiday occasions.
How to Make Caramel Apple Upside Down Cake Recipe
Step 1: Craft the Caramel Apple Topping
Start by melting butter and brown sugar together over medium heat. I like to whisk constantly as the mixture thickens—this helps it become glossy and prevents burning. After about a minute, remove from heat and stir in cinnamon and vanilla for that signature warm, fragrant flavor. Pour this mixture into your ungreased 9-inch deep dish. Now comes the fun part: carefully arrange your peeled and sliced apples on top, overlapping them neatly in rings or a pattern you like. Pop the pan into the fridge while you prep the batter—this little chill helps keep the apples in place when you pour the cake batter over.
Step 2: Prepare the Spiced Cake Batter
Whisk the dry ingredients—flour, baking powder, cinnamon, nutmeg, and salt—together and set aside. Then, using a mixer, beat softened butter until creamy, about one minute. Add both sugars and keep beating until fluffy, scraping down the bowl as needed. Next, add the eggs and vanilla, beating until fully combined. Slowly add the dry ingredients, alternating with milk, mixing on low speed just until everything is combined. Be careful not to over-mix here; a few lumps are okay and better than a tough cake. The batter will be a bit thick, which is exactly what you want.
Step 3: Assemble and Bake Your Cake
Take the topping out from the refrigerator and pour the cake batter evenly over the apple layer. Gently spread it to cover all the apples without disturbing the arrangement. Bake at 350°F for 40 to 46 minutes. About halfway through baking, tent a piece of foil loosely over the cake to prevent the top from over-browning while the center finishes cooking. Don’t be alarmed if the cake rises and touches the foil—that’s totally normal with upside-down cakes. To test doneness, insert a toothpick into the center; if it comes out mostly clean with just a couple of moist crumbs, you’re golden.
Step 4: Cool and Flip for the Big Reveal
Once out of the oven, cool the cake on a wire rack for about 15 minutes. This step is crucial—too hot, and the topping runs everywhere; too cool, and the pattern sticks to the pan. Then carefully invert the cake onto your serving plate or cake stand. You’ll see some luscious caramel juices spilling out, and that’s a good thing. I find the cake slices easier to serve and less messy once the whole cake has cooled completely to room temperature, so if you have the patience, wait for that. Resist the urge to refrigerate it to speed cooling—that tends to make the cake dense, and that’s not the vibe you want here!
Pro Tips for Making Caramel Apple Upside Down Cake Recipe
- Chilling the Topping: Putting the pan in the fridge solidifies the caramel, which keeps your apple slices neatly in place and prevents mixing when pouring the batter.
- Watch the Bake Time Closely: Ovens vary a lot—check around 40 minutes and tent foil as soon as the top starts browning to avoid burning before the middle cooks through.
- Use Room Temperature Ingredients: This helps your batter come together smoothly and traps air for a nice rise.
- Patience with Cooling: Resist the urge to unmold too soon or refrigerate to speed cooling; this simple step makes slicing so much cleaner and keeps the cake tender.
How to Serve Caramel Apple Upside Down Cake Recipe
Garnishes
I love serving this with a scoop of vanilla bean ice cream or a dollop of freshly whipped cream—both add a cool, creamy contrast to the warm caramel apples. Sometimes I sprinkle a few toasted chopped pecans or walnuts on top for a little crunch and nuttiness that plays so well with the soft cake. A light dusting of powdered sugar adds a pretty finishing touch if I’m serving it for guests.
Side Dishes
This cake is a perfect dessert after a hearty meal. I like pairing it with a warm chai latte or a cup of strong coffee. For something extra special, serve alongside cinnamon-spiced roasted nuts or a simple cheese plate featuring soft cheeses like Brie or Camembert, which balance the sweetness beautifully.
Creative Ways to Present
For birthdays or festive occasions, I’ve served this cake on a rustic wooden slab to highlight its autumn vibes. Another time, I cut it into mini squares, placed each on a small plate, and drizzled with caramel sauce and a sprig of fresh thyme—simple but elegant. You can even layer thick slices between parchment paper in a box for gifting to friends; it travels surprisingly well!
Make Ahead and Storage
Storing Leftovers
Once the cake has cooled completely, I cover leftover slices tightly with plastic wrap or place them in an airtight container and store them in the fridge. It’s best enjoyed within 3 days because the flavors are freshest and the cake keeps a tender crumb. I’ve found that the topping juices soak back into the cake overnight, making slices even more luscious.
Freezing
If you want to freeze the cake, slice it first and wrap each piece tightly in plastic wrap and then foil. I don’t recommend freezing the whole cake because the pretty apple arrangement tends to get soggy and messy once thawed. Slices freeze well for up to 3 months and are great to pull out for a quick, indulgent treat.
Reheating
I gently reheat slices in the microwave for about 20–30 seconds or pop them in a low oven (around 300°F) wrapped loosely in foil for 10 minutes. This refreshes the flavors and texture without drying out the cake. I like to add a touch of whipped cream on top right after warming to keep it extra moist and delicious.
FAQs
-
Can I use other types of apples for this cake?
Absolutely! While I prefer Granny Smith or Honeycrisp for their balance of tartness and firmness, you can use Fuji, Gala, or Pink Lady apples. Just be sure to choose apples that hold their shape well during baking so the topping stays visually appealing and doesn’t turn mushy.
-
What kind of pan should I use for this upside down cake?
A 9-inch round cake pan or pie dish that’s at least 2 inches deep works best. Using an ungreased pan helps the caramel and apples stick properly before you invert it. I’ve had great success with a pie dish just under 2 inches deep without any overflow issues.
-
Can I make this cake gluten-free?
Yes! Substituting your favorite gluten-free all-purpose flour blend works well, ideally one that contains xanthan gum to give the cake structure. Keep an eye on baking times since gluten-free flours can behave differently, and test doneness with a toothpick.
-
Is it okay if the cake doesn’t come out perfectly smooth on top?
Totally normal, especially with upside down cakes. The beauty is in the flip! The “top” you see in the pan becomes the bottom once inverted, showcasing those lovely caramelized apples. Any small imperfections get hidden and add character.
-
How long will the cake keep after baking?
Stored properly in the refrigerator, the cake stays fresh and delicious for up to 3 days. Just cover it tightly with plastic wrap or keep in an airtight container. The flavor actually deepens overnight, but after three days, texture may decline.
Final Thoughts
When I first tried making this Caramel Apple Upside Down Cake Recipe, I was surprised at how stunning it looked with such simple ingredients and steps. Now it’s one of those special recipes I turn to when I want to impress but keep things comforting and easy. My family goes crazy for it, especially when it’s served warm with vanilla ice cream melting on top. I really hope you give this a try—the caramelized apple topping combined with the tender spice cake is a match made in dessert heaven. It’s the kind of recipe that becomes a beloved favorite, so grab those apples and get baking!
Print
Caramel Apple Upside Down Cake Recipe
- Prep Time: 25 minutes
- Cook Time: 45 minutes
- Total Time: 1 hour, 10 minutes
- Yield: Serves 8-10
- Category: Dessert
- Method: Baking
- Cuisine: American
Description
A deliciously moist Caramel Apple Upside Down Cake featuring a rich caramel topping with tender spiced apple slices baked beneath a cinnamon and nutmeg infused cake. Perfect for fall or any cozy occasion, this cake combines buttery caramelized apples with a soft, flavorful batter for a show-stopping dessert.
Ingredients
Topping
- 6 Tablespoons (85g) unsalted butter
- 1/2 cup (100g) packed light or dark brown sugar
- 1/4 teaspoon ground cinnamon
- 1/4 teaspoon pure vanilla extract
- 2 medium apples, peeled and sliced into 1/4-inch slices (1.5–2 cups, or 188–250g)
Cake
- 1 and 1/2 cups (188g) all-purpose flour (spooned & leveled)
- 1 and 1/2 teaspoons baking powder
- 1 and 1/2 teaspoons ground cinnamon
- 1/4 teaspoon ground nutmeg
- 1/2 teaspoon salt
- 1/2 cup (8 Tbsp; 113g) unsalted butter, softened to room temperature
- 1/2 cup (100g) granulated sugar
- 1/2 cup (100g) packed light or dark brown sugar
- 2 large eggs, at room temperature
- 1 teaspoon pure vanilla extract
- 6 Tablespoons (90ml) whole milk, at room temperature
Instructions
- Prepare the Topping: In a small saucepan over medium heat, combine 6 tablespoons of unsalted butter and 1/2 cup packed brown sugar. Whisk occasionally until the butter melts, then whisk constantly for 1 minute as the mixture thickens. Remove from heat, then whisk in 1/4 teaspoon ground cinnamon and 1/4 teaspoon vanilla extract. Pour this caramel mixture into an ungreased 9×2 inch pie dish or round cake pan, spreading evenly. Arrange the peeled and sliced apples neatly over the topping, overlapping as needed. Refrigerate the pan for a few minutes to set the topping arrangement.
- Mix Dry Ingredients: In a bowl, whisk together 1 and 1/2 cups all-purpose flour, 1 and 1/2 teaspoons baking powder, 1 and 1/2 teaspoons ground cinnamon, 1/4 teaspoon ground nutmeg, and 1/2 teaspoon salt. Set aside.
- Cream Butter and Sugars: Using a handheld or stand mixer fitted with a paddle or whisk attachment, beat the 1/2 cup softened unsalted butter on high speed until smooth and creamy, about 1 minute. Add 1/2 cup granulated sugar and 1/2 cup packed brown sugar and beat on high speed until fully creamed together, about 1 minute. Scrape down the sides and bottom of the bowl as needed.
- Add Eggs and Vanilla: Beat in 2 large eggs and 1 teaspoon pure vanilla extract on high speed until combined, scraping down bowl as necessary to ensure even mixing.
- Combine Dry and Wet Ingredients: With the mixer on low speed, gradually add the dry ingredient mixture to the wet ingredients. Slowly pour in 6 tablespoons whole milk while mixing on low, beating just until all ingredients are combined. Avoid over-mixing to keep the batter slightly thick and smooth. Use a whisk by hand if needed to remove lumps.
- Assemble Cake: Remove the topping pan from the refrigerator. Pour and spread the cake batter evenly over the arranged apple topping.
- Bake: Bake the cake in a preheated 350°F (177°C) oven for 40 to 46 minutes. Halfway through baking, tent a sheet of foil over the cake to prevent the top from over-browning. The cake is done when a toothpick inserted in the center comes out mostly clean with a few moist crumbs.
- Cool and Invert: Remove cake from oven and cool on a wire rack for 15 minutes. Carefully invert the cake onto a serving plate or cake stand. Juices may seep over the edges, which is normal. Allow the cake to cool completely at room temperature before slicing for best results.
- Storage: Cover leftover slices and store in the refrigerator for up to 3 days or freeze individual slices for up to 3 months. Thaw at room temperature before serving. Avoid refrigerating the whole cake for cooling as it may become dense, and the topping arrangement does not freeze well when whole.
Notes
- Use a 9×2 inch or similarly deep cake pan to prevent overflow of topping during baking.
- Allow the cake to cool completely before slicing for cleaner slices; serving warm will yield messy slices.
- Do not refrigerate the cake to speed cooling as it may cause a dense texture.
- The topping arrangement sets better with refrigeration before adding the batter.
- This cake can be frozen only as individual slices, not as a whole cake, due to the topping texture.
Nutrition
- Serving Size: 1 slice (based on 10 servings)
- Calories: 320
- Sugar: 28g
- Sodium: 210mg
- Fat: 14g
- Saturated Fat: 8g
- Unsaturated Fat: 5g
- Trans Fat: 0.3g
- Carbohydrates: 44g
- Fiber: 2g
- Protein: 3g
- Cholesterol: 65mg


