
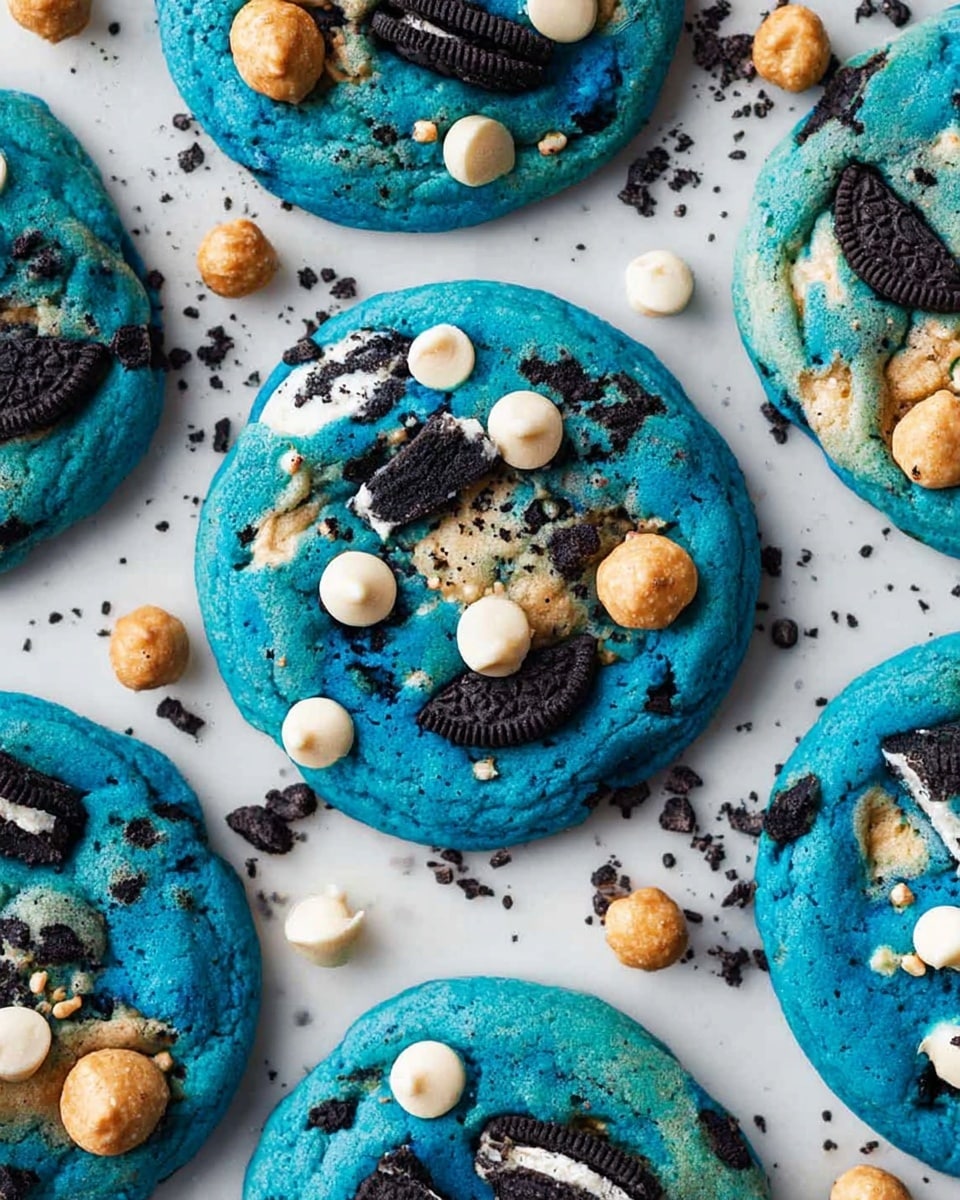
If you’re on the hunt for a cookie recipe that’s as fun to make as it is to eat, you’re in for a treat. This Cookie Monster Cookies Recipe is one of my absolute favorites because it brings together everything you love about cookies — melty chocolate chips, crunchy mini cookies, and a gooey Oreo surprise inside each one. Trust me, once you try these, your kitchen will be filled with happy, cookie-craving smiles!
Why You’ll Love This Recipe
- Unexpected Texture: Each cookie is a delightful mix of soft dough, crunchy mini cookies, and that melted chocolate chip magic.
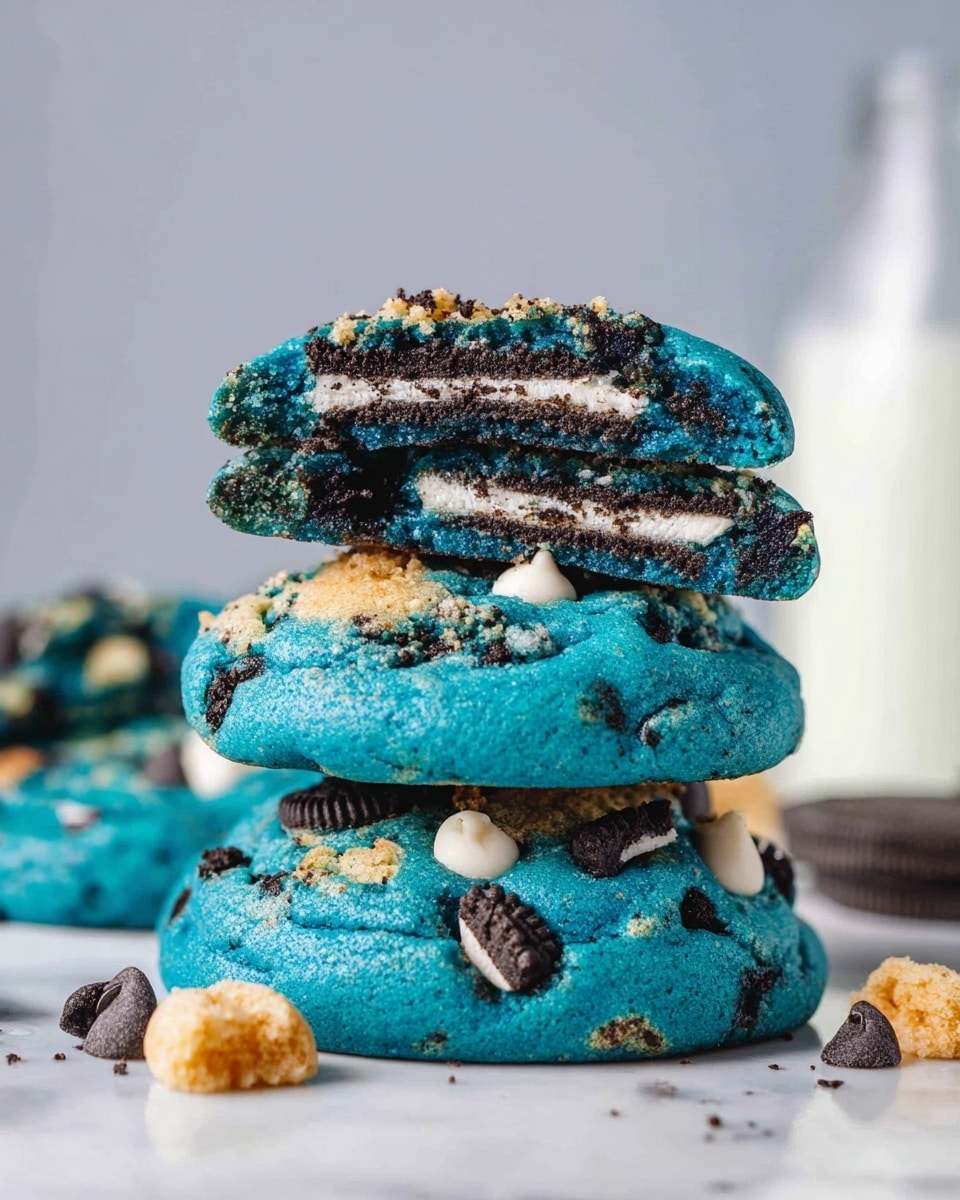
- Fun Surprise Inside: The hidden whole Oreo cookie in the center makes every bite a fun little discovery.
- Beautiful Blue Hue: Thanks to blue gel food coloring, these cookies look just like the Cookie Monster himself—perfect for kids and adults alike.
- Perfect for Parties: They’re impressive enough to wow guests but easy enough that you can whip them up on a whim.

Ingredients You’ll Need
I always tell my friends that a great cookie starts with quality ingredients, and this Cookie Monster Cookies Recipe is no exception. Each element plays its part—from creamy butter to the magic of crushed cookies tucked inside.
- Butter: Use unsalted and softened butter for smooth mixing and control over the salt in your dough.
- Granulated Sugar: Adds sweetness and helps give those crispy edges we all love.
- Light Brown Sugar: Brings moisture and that subtle caramel flavor for chewiness.
- Egg: Room temperature eggs incorporate better for a uniform texture.
- Vanilla Extract: A splash of vanilla adds warmth to the blue-hued dough.
- Blue Gel Food Coloring: Use gel, not liquid—gel gives you that vibrant color without changing the dough texture.
- All-Purpose Flour: The backbone of your cookie structure; make sure to sift it for airiness.
- Salt: Just a pinch to balance the sweetness and enhance flavors.
- Baking Powder & Baking Soda: Both work together to give the cookies a perfect rise and soft center.
- Dark Chocolate Chips: Adds rich cocoa notes.
- White Chocolate Chips: Provides creamy contrast and sweetness.
- Crushed Mini Cookies: For extra crunch and nostalgic cookie flavor throughout.
- Oreo Cookies (chopped): Mix these into the dough for little chunks of chocolaty goodness.
- Whole Oreo Cookies: The star surprise inside each larger cookie, giving a double cookie delight.
Variations
One of my favorite parts about making this Cookie Monster Cookies Recipe is how easy it is to tweak it to your taste or dietary needs. Don’t be afraid to get creative—you might just find a new family favorite.
- Gluten-Free Version: I swapped in a gluten-free flour blend once and the cookies came out just as delicious—just make sure your mini cookies and Oreos are gluten-free too.
- Nutty Twist: Adding chopped walnuts or pecans adds a lovely crunch and flavor kick that my family goes crazy for.
- Dairy-Free Approach: Try coconut oil instead of butter and dairy-free chocolate chips to accommodate lactose intolerance without losing the cookie’s soul.
- Extra Blue Intensity: For themed parties, I’ve doubled the blue food coloring with no fuss to make these pop even more.
How to Make Cookie Monster Cookies Recipe
Step 1: Cream Your Butter and Sugars
This step sets the stage for soft, chewy cookies. Beat the softened butter together with granulated sugar and brown sugar for a full 2 minutes until you get a creamy, fluffy mixture. I’ve found that taking the time here really helps the sugars dissolve and fluffy up the dough, which makes a huge difference in texture later.
Step 2: Add Your Egg, Vanilla, and Blue Gel Color
Pop in that room temperature egg, splash in your vanilla, and then add in the blue gel food coloring. Mix again for about a minute on medium speed until everything is combined and your dough has that beautiful blue hue—the fun part where the cookie starts getting character!
Step 3: Fold in Dry Ingredients
Gently but thoroughly fold in the sifted flour, salt, baking powder, and baking soda. You want to avoid overmixing here so your cookies stay tender and soft, so grab a spatula and fold just until that dough comes together in a uniform color and texture.
Step 4: Add Cookies and Chocolate Chips
Add the chopped Oreos, crushed mini cookies, white and dark chocolate chips, and gently mix again. This brings in extra texture and bursts of flavor that define the cookie monster experience—each bite is different and delightful.
Step 5: Chill Your Dough
Wrap your dough well in plastic wrap and chill for 30 minutes to 1 hour. I discovered this trick really makes the flavors meld and helps the cookies keep their shape when baking, so don’t rush it!
Step 6: Shape and Stuff the Cookies
Once chilled, take small portions of dough and flatten them into discs. Place a whole Oreo cookie in the center, then fold the dough over, sealing it completely around the Oreo. This is my favorite part—the anticipation builds as you shape these cookie monsters into their final form.
Step 7: Chill Again Before Baking
Place shaped cookies on parchment-lined baking sheets and refrigerate for about 30 minutes, or pop them into the freezer for 15 minutes if you’re short on time. This extra chill helps keep the cookies thick and prevents spreading, which means you get that satisfying chunky cookie shape.
Step 8: Bake to Golden Perfection
Preheat your oven to 180°C (350°F). Bake the cookies for 12-15 minutes. You’re aiming for golden edges but still soft centers—they’ll firm up as they cool. I like to keep a close eye towards the end so they don’t overbake and lose their chewy magic.
Step 9: Cool Slightly and Enjoy!
Let the cookies cool just enough to handle without breaking apart, then transfer to a wire rack or plate. These are best enjoyed fresh and slightly warm when the inside Oreo and chocolate chips are melty. I promise you, they don’t last long in my house!
Pro Tips for Making Cookie Monster Cookies Recipe
- Softened Butter Is Key: I learned the hard way that cold butter makes it tough to cream properly; always soften it beforehand for the creamiest dough.
- Don’t Overmix After Adding Flour: Overworking the dough develops gluten which can make cookies tough—fold gently and stop as soon as it’s combined.
- Chill Twice: The two chilling stages are magic—don’t skip them unless you want flatter cookies that spread too much.
- Use Gel Coloring Wisely: A little goes a long way, so start with less and add if you want a deeper blue without affecting taste or texture.
How to Serve Cookie Monster Cookies Recipe
Garnishes
For me, a simple dusting of powdered sugar or a drizzle of white chocolate over the cooled cookies adds a lovely touch without overpowering the vibrant blue and chocolate mix inside. If you’re feeling playful, I’ve also sprinkled edible googly eyes on top for a true Cookie Monster vibe when serving to kids!
Side Dishes
These cookies pair amazingly with a cold glass of milk (of course!) or a scoop of vanilla ice cream for an indulgent treat. I sometimes serve them alongside warm cocoa or a creamy coffee to balance out the sweetness.
Creative Ways to Present
I’ve found that arranging these cookies on a colorful platter with a few whole Oreos and mini cookie crumbs sprinkled around creates a fun centerpiece for parties. For birthdays, packaging them individually in clear bags tied with blue ribbon makes a perfect edible favor.
Make Ahead and Storage
Storing Leftovers
Store your Cookie Monster Cookies in an airtight container at room temperature, and they’ll stay fresh and chewy for about a week. I always recommend a layer of parchment paper between cookies to keep them from sticking.
Freezing
If you want to make these ahead, you can freeze unbaked cookie dough balls wrapped in plastic wrap and stored in a freezer bag for up to 3 months. When you’re ready, just thaw in the fridge and bake as usual. I love this trick for last-minute dessert emergencies!
Reheating
To warm up leftover cookies, pop them in a 300°F oven for 5 minutes or microwave for about 15 seconds. This brings back that freshly baked gooey center and melty chocolate without drying them out.
FAQs
-
Can I use regular food coloring instead of gel?
You can, but gel food coloring is best for this Cookie Monster Cookies Recipe because it provides a vibrant color without thinning the dough. Liquid coloring can affect the texture, so if you use it, add less liquid elsewhere.
-
Is it necessary to chill the dough twice?
Yes, chilling the dough twice helps control spreading and allows the ingredients to meld for better flavor and thicker cookies. Skipping the second chill might result in flat cookies.
-
Can I substitute the Oreos with another cookie?
Absolutely! While Oreos give the classic chocolate and cream surprise, you can use other sandwich cookies or even chunky chocolate chip cookies for a different twist. Just make sure they fit well inside the dough balls.
-
How do I know when the cookies are done?
Look for slightly golden edges but soft centers. The cookies will continue to firm as they cool, so pulling them from the oven when edges are golden but centers are still soft ensures a chewy, tender bite.
-
Can I make these dairy-free?
Yes! Swap the butter for coconut oil or a dairy-free margarine and use dairy-free chocolate chips. The texture might be slightly different, but the Cookie Monster Cookies Recipe still delivers on flavor.
Final Thoughts
I absolutely love how this Cookie Monster Cookies Recipe turns out every single time. There’s just something magical about that blue color paired with the double chocolate chips and the Oreo hidden inside—it’s like biting into a little party. When I first tried making these, I was amazed by how easy they came together and how much joy they brought to my family. So, whether you’re baking with kids, prepping for a party, or just treating yourself, I really hope you give this recipe a try. You’ll have a house full of smiles and a plate of the best cookies you’ve made in a while—promise!
Print
Cookie Monster Cookies Recipe
- Prep Time: 10 minutes
- Cook Time: 15 minutes
- Total Time: 25 minutes
- Yield: 12 cookies
- Category: Dessert
- Method: Baking
- Cuisine: American
Description
These Cookie Monster Cookies are a fun and colorful twist on classic chocolate chip cookies, featuring a vibrant blue dough filled with white and dark chocolate chips, mini cookie pieces, and a whole Oreo surprise center. Perfectly soft and slightly golden at the edges, these cookies are sure to delight both kids and adults alike with their eye-catching appearance and deliciously rich flavor.
Ingredients
Wet Ingredients
- 120 g (½ cup) unsalted butter, softened
- 1 egg, at room temperature
- 1 tsp vanilla extract
- Blue gel food coloring (to desired intensity)
Dry Ingredients
- 230 g (1 ¾ cups) all-purpose flour
- A pinch of salt
- 1 tsp baking powder
- ½ tsp baking soda
Mix-ins
- 100 g (½ cup) granulated white sugar
- 50 g (¼ cup) light brown sugar
- 40 g (¼ cup) dark chocolate chips
- 40 g (¼ cup) white chocolate chips
- 30 g (¼ cup) crushed mini cookies
- 3 Oreo cookies, chopped
- 12 Oreo cookies, whole (for stuffing)
Instructions
- Mix the Butter and Sugars: In a large mixing bowl, beat the softened butter with granulated sugar and light brown sugar for 2 minutes until creamy and well combined.
- Add Egg, Vanilla, and Coloring: Incorporate the egg, vanilla extract, and blue gel food coloring, mixing with an electric mixer for 1 minute until the batter is smooth with a vibrant blue color.
- Fold in Dry Ingredients: Sift together the flour, salt, baking powder, and baking soda. Gently fold the dry ingredients into the wet mixture using a spatula until just combined, avoiding overmixing.
- Add Cookie and Chocolate Mix-ins: Quickly blend in the chopped Oreos, crushed mini cookies, white and dark chocolate chips to evenly distribute throughout the dough.
- Chill the Dough: Cover the dough with plastic wrap and refrigerate for 30 minutes to 1 hour to firm up for easier handling.
- Shape Cookies with Oreo Center: Take small portions of dough and flatten into discs in your hands. Place a whole Oreo cookie in the center and fold the dough around it, sealing completely.
- Rest Cookies Before Baking: Arrange the shaped cookies on a baking sheet lined with parchment paper. Chill again for about 30 minutes in the refrigerator or 15 minutes in the freezer to help maintain shape while baking.
- Bake: Preheat the oven to 180°C (350°F). Bake the cookies for 12-15 minutes or until edges are slightly golden but centers remain soft.
- Cool and Serve: Let the cookies cool briefly on the baking sheet before transferring to a cooling rack or plate. Enjoy your Cookie Monster Cookies fresh!
Notes
- Storage: Store cookies in an airtight container for up to 1 week or freeze for up to 3 months.
- Substitutions: If you don’t have baking soda, use a full packet of baking powder as a substitute.
- Shaping Tip: Use a large round cookie cutter immediately after baking to get perfectly round cookies.
- Flavor Tip: Chill the dough for at least 1 hour or overnight to enhance flavor and produce thicker cookies.
- Measurement Tip: For best accuracy and consistent results, weigh ingredients using a digital scale when possible.
Nutrition
- Serving Size: 1 cookie
- Calories: 280 kcal
- Sugar: 18 g
- Sodium: 120 mg
- Fat: 14 g
- Saturated Fat: 8 g
- Unsaturated Fat: 5 g
- Trans Fat: 0 g
- Carbohydrates: 35 g
- Fiber: 1 g
- Protein: 3 g
- Cholesterol: 40 mg


