

If you love sushi but usually find it intimidating to make at home, I’ve got a treat for you. This Cream Cheese and Salmon Sushi Rolls Recipe is a fan-freaking-tastic way to bring restaurant-quality sushi right into your kitchen without the fuss. I absolutely love how this combination of smoky salmon and creamy cheese comes together with crisp cucumber and perfectly seasoned rice—it’s simple, fresh, and endlessly satisfying. Stick with me and I’ll walk you through it step-by-step so your rolls come out perfect every time!
Why You’ll Love This Recipe
- Simple Ingredients: Easily found at most grocery stores and combined for a delicious flavor burst.
- No Sushi Experience Needed: I’ll share tips so even beginners can roll like pros.
- Customizable: Swap ingredients or add your twists to make it perfectly yours.
- Perfect for Entertaining: These rolls are a colorful, crowd-pleasing appetizer or light meal.

Ingredients You’ll Need
These ingredients might seem simple, but when combined, they create a sushi roll that’s rich, creamy, fresh, and just a little bit indulgent. I always make sure to use good quality smoked salmon and fresh cucumber for that perfect crunch.
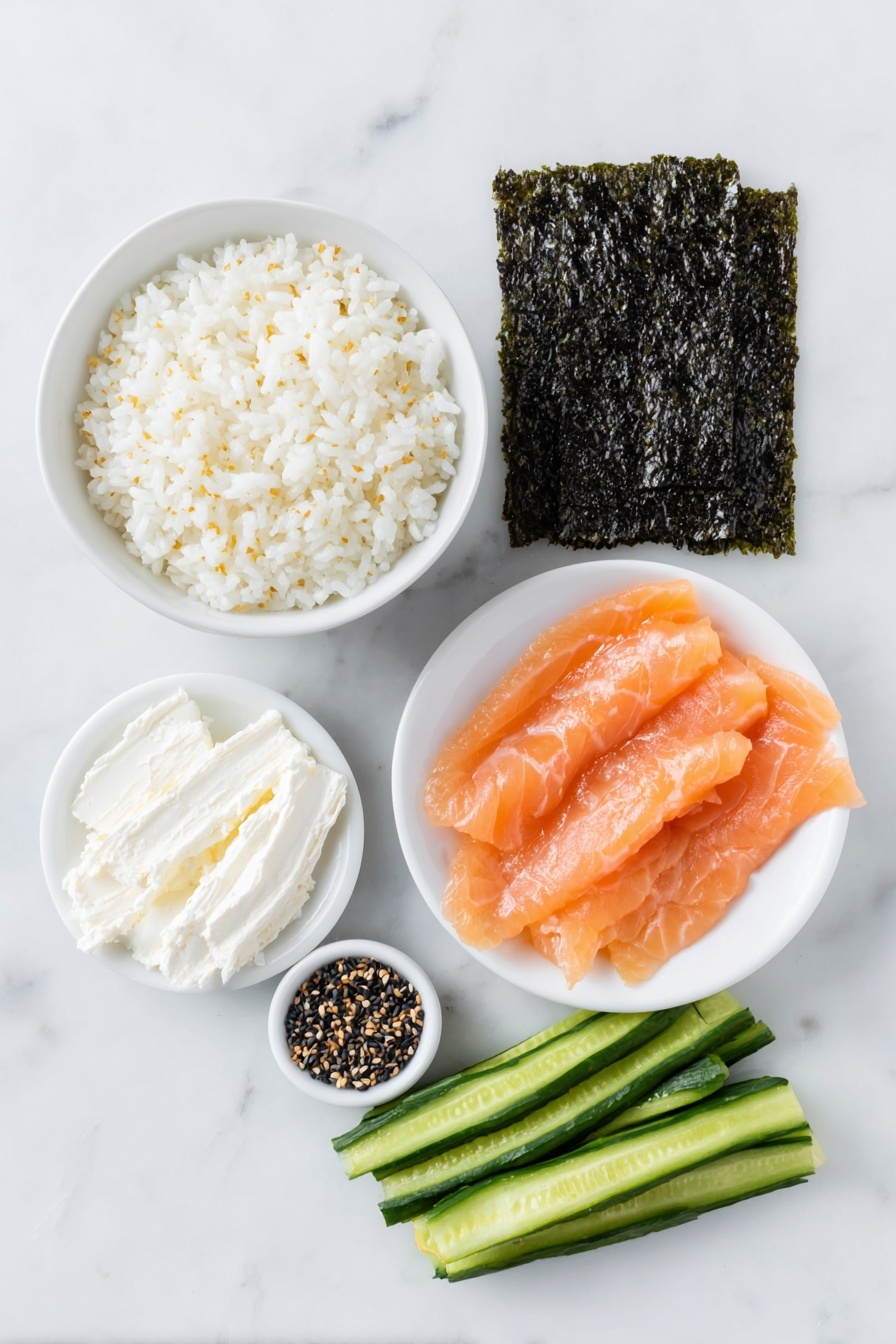
- Seasoned sushi rice: The foundation of your roll—stick with sushi-specific rice for that perfect texture.
- Cream cheese: Cut into strips for easy rolling; the creamy tang complements the salmon beautifully.
- Smoked salmon: Thinly sliced works best, balancing smoky and silky flavors.
- Cucumber: Julienned for crunch and freshness; peel it if you want a softer bite.
- Nori sheets: Roasted seaweed sheets act as the perfect sushi wrapper.
- Toasted black sesame seeds (optional): Adds a nutty aroma and visual contrast that I can’t get enough of.
Variations
One of the things I love about the Cream Cheese and Salmon Sushi Rolls Recipe is how customizable it is. Feel free to make it your own by adding or swapping ingredients—I’ll share what I like to tweak.
- Substitute smoked salmon with fresh sushi-grade salmon: I tried this once and the fresh, buttery texture really elevated the roll for special occasions.
- Add avocado slices: My family goes crazy for the extra creaminess avocado brings—pairs amazingly with the cream cheese.
- Spicy twist: Mix a little sriracha into the cream cheese before rolling for a gentle heat that livens up every bite.
- Vegetarian option: Skip the salmon and add strips of bell pepper or roasted sweet potato to still get great texture and flavor.
How to Make Cream Cheese and Salmon Sushi Rolls Recipe
Step 1: Prepare Your Ingredients Like a Pro
Before you start rolling, it’s so important to have everything ready: the sushi rice should be cooked and seasoned, cream cheese sliced into long, thin strips, salmon thinly sliced (ideally by your fishmonger), and cucumber julienned. I discovered this prep step keeps everything smooth once you start building your rolls—no rushing and no uneven rolling.
Step 2: Spread the Rice on the Nori Sheet
Lay your nori on a bamboo sushi mat, rough side up. Add about 1 cup of the seasoned sushi rice onto the nori and spread it evenly using wet fingertips to keep the rice from sticking. Wetting your hands is a game-changer—I learned that from a sushi chef friend, and it instantly makes spreading easier and cleaner. Be sure to spread the rice all the way to the edges, but don’t press too hard; light and even is the key.
Step 3: Add the Fillings Nicely Arranged
Sprinkle some toasted black sesame seeds over the rice if you like (I adore the flavor they add). Then, place 2-3 strips of cream cheese, an ounce of smoked salmon, and a few julienned pieces of cucumber off-center on the side nearest to you. Keeping the filling a bit off to the edge helps when you start rolling so everything stays tucked in tight.
Step 4: Roll It Up Without a Hitch
Here’s where that bamboo mat really shines. Place a piece of plastic wrap over the rice, flip the whole sheet onto the mat so the rice is facing down, then peel off the plastic. Start rolling from the edge nearest you, slowly lifting the mat and pressing the roll tight as you go. I learned to watch for the plastic wrap to make sure it doesn’t roll up inside your sushi—it can be a slippery little trick! Keep rolling gently until you have a tight, neat roll. Repeat this with your other nori sheets and fillings.
Step 5: Cut Your Rolls Like a Sushi Pro
The easiest way I found is to keep the plastic wrap on while cutting—it helps keep the roll together. Use a sharp knife and dip it in cold water before slicing to prevent sticking. Cut the roll into about 8-10 pieces with smooth, decisive strokes. Remove the plastic wrap before serving, then sprinkle a little more sesame seeds on top if you want. Serve with wasabi, pickled ginger, and soy sauce for that authentic sushi experience.
Pro Tips for Making Cream Cheese and Salmon Sushi Rolls Recipe
- Wet Your Hands: Always keep a bowl of water nearby to wet your fingers when handling sushi rice—it stops the rice from sticking all over and makes spreading easier.
- Rice Temperature: Let your sushi rice cool to room temperature before rolling; warm rice can make rolling a sticky mess.
- Sharp Knife for Cutting: Use a wet, sharp knife to slice clean pieces. Wipe between cuts to keep the edges neat.
- Don’t Overfill: I learned the hard way—too much filling will make your roll fall apart or hard to close tightly.
How to Serve Cream Cheese and Salmon Sushi Rolls Recipe
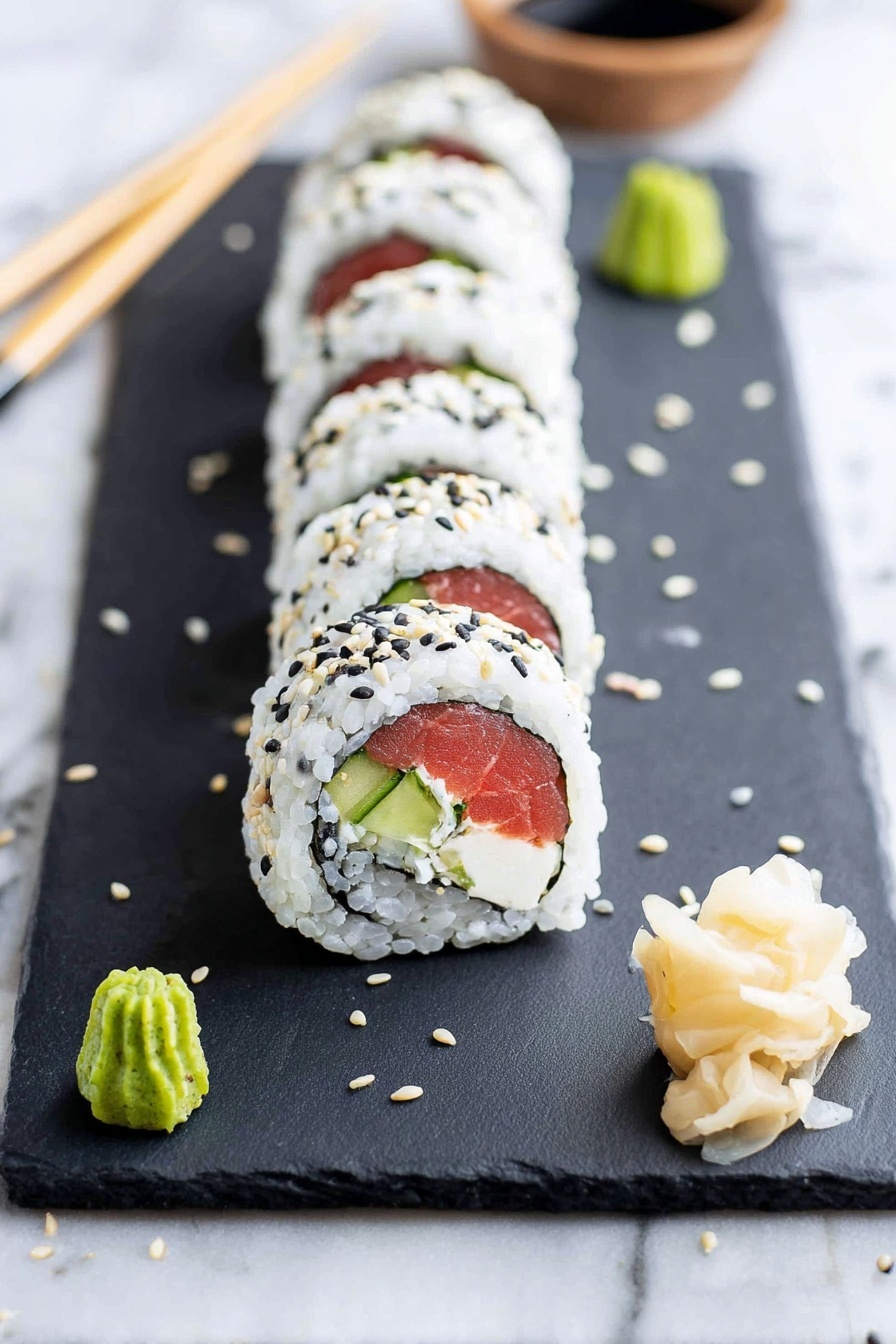
Garnishes
I usually keep it classic with a sprinkle of toasted black sesame seeds—that nutty crunch pairs perfectly. For extra flair, you can add thinly sliced green onions, tobiko (fish roe), or even a drizzle of spicy mayo for a little kick. I find that these add a nice pop of color and flavor that impresses guests every time.
Side Dishes
My go-to sides are miso soup and a simple seaweed salad. You could also pair these rolls with edamame sprinkled with sea salt or pickled ginger to cleanse the palate between bites—trust me, it makes the meal feel complete.
Creative Ways to Present
For parties, I like to arrange the sushi pieces on a long wooden platter with carved cucumber ribbons and edible flowers for a stunning centerpiece. Another fun idea is to serve deconstructed sushi with small dipping bowls of cream cheese, salmon, and cucumber strips alongside sushi rice—great if some guests want to customize their rolls.
Make Ahead and Storage
Storing Leftovers
Homemade sushi is best enjoyed fresh within a few hours, but if you have leftovers, keep the uncut rolls tightly wrapped in plastic wrap in the fridge. That prevents the rice from drying out. I’ve found they’re still tasty the next day, but the rice gets a bit harder, so I don’t usually store them beyond 2 days.
Freezing
I recommend against freezing cream cheese and salmon sushi rolls because the texture of the rice and cream cheese changes when thawed. I’ve tried it, and it just isn’t the same—better to make fresh!
Reheating
Since sushi is typically served cold or at room temperature, I usually just let leftovers sit out for a bit before eating. Reheating isn’t necessary and can make the rice hard and unpleasant. If you want a warm snack, consider making a heated salmon and cream cheese appetizer on toast instead.
FAQs
-
Can I use fresh salmon instead of smoked salmon in this recipe?
Yes, you can use fresh sushi-grade salmon if you prefer. Just make sure it’s very fresh and sliced thinly. Keep in mind that this changes the flavor profile—fresh salmon is milder and less smoky, so you might want to add a touch of soy sauce or wasabi for more punch.
-
Do I need a bamboo sushi mat to make these rolls?
While a bamboo sushi mat makes rolling easier and neater, it’s not mandatory. You can use a clean dish towel or even a flat cutting board to help shape the rolls. I recommend investing in a mat if you plan to make sushi regularly—it’s inexpensive and makes life simpler.
-
How do I prevent the rice from sticking to my hands?
Keep a small bowl of water nearby and wet your hands frequently while working with the sushi rice. The water creates a thin barrier that stops sticking and lets you spread and handle the rice smoothly. It’s a small trick that changed my sushi-making game!
-
Can I prepare the sushi rice in advance?
Yes, you can cook and season the sushi rice ahead of time, but make sure it cools completely to room temperature before attempting to roll the sushi. Warm rice is too sticky and tricky to work with. I usually make the rice a few hours ahead and keep it covered with a damp cloth until ready.
Final Thoughts
This Cream Cheese and Salmon Sushi Rolls Recipe has become one of my go-to dishes whenever I crave restaurant-quality sushi without the hassle or price tag. What I love most is how approachable it is—you don’t need fancy tools or experience to get great results. I hope you enjoy making it as much as I do, and don’t hesitate to get creative with the fillings. Honestly, once you nail this recipe, you’ll want to share it with everyone you know!
Print
Cream Cheese and Salmon Sushi Rolls Recipe
- Prep Time: 15 minutes
- Cook Time: 30 minutes
- Total Time: 45 minutes
- Yield: 4 rolls
- Category: Main Course
- Method: No-Cook
- Cuisine: Japanese
- Diet: Low Fat
Description
The Philadelphia Roll is a delicious and easy-to-make sushi roll featuring seasoned sushi rice, cream cheese, smoked salmon, and fresh cucumber. This sushi roll combines creamy, smoky, and crunchy textures in every bite, making it a popular choice for sushi lovers who want to recreate a classic at home. Perfect for sushi nights or casual gatherings, this recipe guides you through assembling and rolling the sushi with simple ingredients and straightforward steps.
Ingredients
Sushi Rice and Nori
- 4 cups seasoned sushi rice, cooked and cooled to room temperature
- 4 sheets roasted nori
Fillings
- 4-6 ounces cream cheese, cut into 8-10 strips
- 4 ounces smoked salmon, thinly sliced
- 1 small cucumber, julienned
Optional Toppings and Accompaniments
- Toasted black sesame seeds (optional)
- Wasabi, sushi ginger, and soy sauce (for serving)
Instructions
- Prepare Ingredients: Cook and season your sushi rice ahead of time, ensuring it has reached room temperature for easier handling. Cut the cream cheese into strips, slice the smoked salmon thinly, and julienne the cucumber into thin matchstick pieces.
- Lay Out Nori Sheet: Place a sheet of roasted nori on a bamboo sushi rolling mat with the rough side facing up. This texture helps the rice adhere properly.
- Spread Rice on Nori: Add 1 cup of the seasoned sushi rice onto the nori sheet. Using a rice paddle or your fingers dipped in water to prevent sticking, spread the rice evenly to cover the entire surface up to the edges.
- Add Sesame Seeds and Flip: If using, sprinkle toasted black sesame seeds evenly over the rice. Then, cover the rice with a sheet of plastic wrap and carefully flip the nori rice-side-down onto the bamboo mat.
- Add Fillings: Near the edge closest to you and slightly off-center, place 2-3 strips of cream cheese, about 1 ounce of smoked salmon, and a few julienned cucumber pieces in a line to form the filling.
- Roll the Sushi: Starting from the edge near you, lift the bamboo mat and roll it forward, using the mat to tuck the fillings tightly inside as you roll. Take care not to roll up the plastic wrap. Continue until the sushi is fully rolled into a tight cylinder. Repeat this process for the remaining sheets of nori and fillings to make 4 rolls.
- Slice the Rolls: For easiest slicing, cut the rolls while still wrapped in plastic wrap. Use a sharp chef’s knife dipped in cold water to cut the rolls into 8-10 pieces, cleaning the knife between cuts to ensure clean slices.
- Serve: Remove the plastic wrap if left on, sprinkle a little toasted sesame seeds over the rolls if desired, and serve with wasabi, pickled ginger, and soy sauce for dipping. Enjoy your homemade Philadelphia Rolls fresh!
Notes
- Bamboo Mat: If you don’t have a bamboo sushi mat, a clean dish towel or tea towel can be used as an alternative for rolling.
- Storage: Homemade sushi is best enjoyed immediately for optimal texture and flavor. If you must store, keep uncut rolls tightly wrapped in plastic wrap in the refrigerator and consume within 2 days before the rice hardens.
- Sushi Rice: Make sure your seasoned sushi rice cools completely to room temperature before rolling to prevent the nori from getting soggy.
- Filling: Avoid overfilling the rolls as it makes rolling difficult and can cause the roll to fall apart.
- Prevent Sticking: Keep a bowl of water nearby to wet your fingers before handling the rice; this prevents it from sticking to your hands.
Nutrition
- Serving Size: 1 roll (approximately 8-10 pieces)
- Calories: 320
- Sugar: 4 g
- Sodium: 450 mg
- Fat: 12 g
- Saturated Fat: 6 g
- Unsaturated Fat: 5 g
- Trans Fat: 0 g
- Carbohydrates: 38 g
- Fiber: 2 g
- Protein: 9 g
- Cholesterol: 30 mg


