
If you’re on the hunt for the ultimate spooky treat, I’ve got just the thing for you: my Creepy Halloween Spider Cupcakes Recipe. These cupcakes are not just delicious—they bring that perfectly eerie vibe to your Halloween table. I absolutely love how the rich chocolate paired with a hint of pumpkin spice creates a moist, flavorful base, while the stunning black buttercream transforms them into little spider-covered creepy crawlies. Stick with me, and I’ll walk you through every detail so you can impress everyone, even if you’re not usually a dessert pro!
Why You’ll Love This Recipe
- Perfect balance of flavor: The chocolate and pumpkin combo is surprisingly delightful and seasonal.
- Spooky yet approachable design: The spider decorations look complex but are actually fun and manageable to make.
- Buttercream magic: The black cocoa powder creates a rich color and flavor that’s not too sweet.
- Family favorite: My kids and their friends go crazy for these every Halloween party—always a hit!

Ingredients You’ll Need
All the ingredients you’ll use here combine to create moist cupcakes perfect for Halloween, topped with a luscious black buttercream that really sets the creepy spider scene. A little tip: use real pumpkin puree for that authentic flavor punch!
- Self-raising flour: This keeps the cupcakes light and fluffy without extra leavening fuss.
- Cocoa powder: Unsweetened; it brings the chocolate depth and color.
- Salted butter: Adds richness and balances sweetness.
- Granulated sugar: For just the right sweetness and texture.
- Eggs: They provide structure and moisture.
- Pumpkin puree: Use fresh or canned, it adds moisture with fall flavor.
- Milk: Helps keep the batter smooth and moist.
- Baking powder: For that gentle rise.
- Salt: Enhances all those yummy flavors.
- Pumpkin pie spice: A little goes a long way to spice things right.
- Vanilla extract: Always boosts flavor in baked goods.
- Powdered sugar: The base of the buttercream sweetness.
- Black cocoa powder: Gives the buttercream its rich, dark color and flavor.
- Black food coloring: Optional but helpful for intensifying the frosting’s spooky black tone.
- White fondant: For crafting the spider bases—easy to work with.
- Tiny green sprinkles: Perfect for giving your spiders those creepy little eyes.
Variations
One of my favorite things about this Creepy Halloween Spider Cupcakes Recipe is how easy it is to make your own tweaks. Whether you want it vegan, gluten-free, or even want to add some more spooky flair, there’s so much room to get creative.
- Gluten-Free Version: I used a gluten-free baking mix once, and it worked beautifully—just remember to check your baking powder and cocoa powder are gluten-free.
- Vegan Variation: Try swapping eggs with flax eggs and butter with a vegan alternative; the pumpkin puree keeps them moist enough!
- Flavor Boosters: Adding a bit of espresso powder to the batter amps up the chocolate flavor without tasting like coffee.
- Different Decorations: Instead of fondant, I’ve even used black licorice strings for spider legs when short on time.
How to Make Creepy Halloween Spider Cupcakes Recipe
Step 1: Baking the Perfect Chocolate Pumpkin Cupcakes
Start by preheating your oven to 175°C (350°F) and lining your cupcake pan with liners. I love using muffin liners with a sturdy base so nothing sticks. In a mixing bowl, whisk together the self-raising flour, cocoa powder, pumpkin pie spice, baking powder, and salt—then sift everything together to avoid lumps. This helps keep the texture light and smooth.
In another bowl, cream together the butter and sugar until it’s light and fluffy—this is crucial, so your cupcakes won’t turn out dense. Take your time here: it usually takes about two minutes on medium speed; don’t forget to scrape the sides halfway through to mix everything evenly.
Next, beat in the eggs one at a time, scraping the bowl as you go to keep the mix silky. Then add the pumpkin puree; it’ll look a bit curdled, but that’s totally normal—it will come together with the flour later. Gradually fold in half your flour mixture, then add the milk, and finally the remaining flour. Don’t overmix here or your cupcakes might get tough. Stir in the vanilla extract last.
Scoop your batter into the liners, filling them about three-quarters full. I like to use a cookie scoop for consistent sizes, so they bake evenly. Pop them in the oven for 15 to 18 minutes—start checking at 15. A toothpick inserted in the center should come out clean or with just a couple moist crumbs when they’re done. Let them cool in the pan for a couple of minutes before transferring to a rack. Cover them loosely with a kitchen towel to keep them soft—you’ll thank me!
Step 2: Whipping Up That Perfect Black Buttercream
Grab a large mixing bowl and beat the butter till it’s creamy and smooth. Then sift in your powdered sugar followed by the black cocoa powder. I always mix lightly by hand first so the sugar doesn’t fly everywhere when the mixer starts—trust me, it’s a lifesaver! Use your mixer on medium speed until everything looks like a luscious, smooth frosting.
Scrape the bowl and beaters well to make sure everything’s totally combined. Add the vanilla extract and beat again. At this point, your buttercream might look greyish—that’s normal. Let it rest for about 10 to 20 minutes. This waiting time helps the black cocoa deepen in color.
If after resting your frosting isn’t quite spooky black, add a few drops of black food coloring or a mix of red, green, and brown gels to get that rich shade. Mix well and rest again for another 10 to 15 minutes. Your patience really pays off when the color intensifies beautifully.
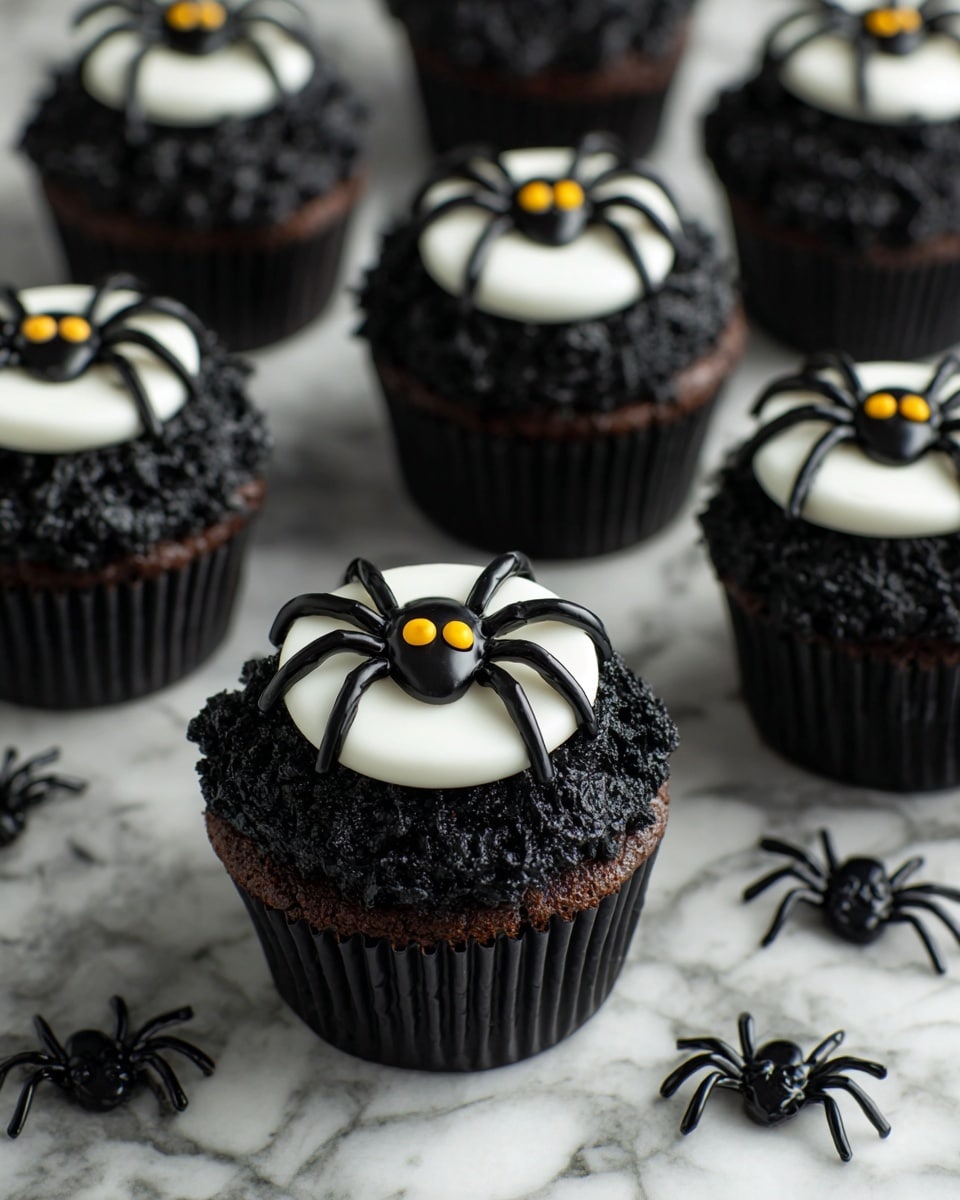
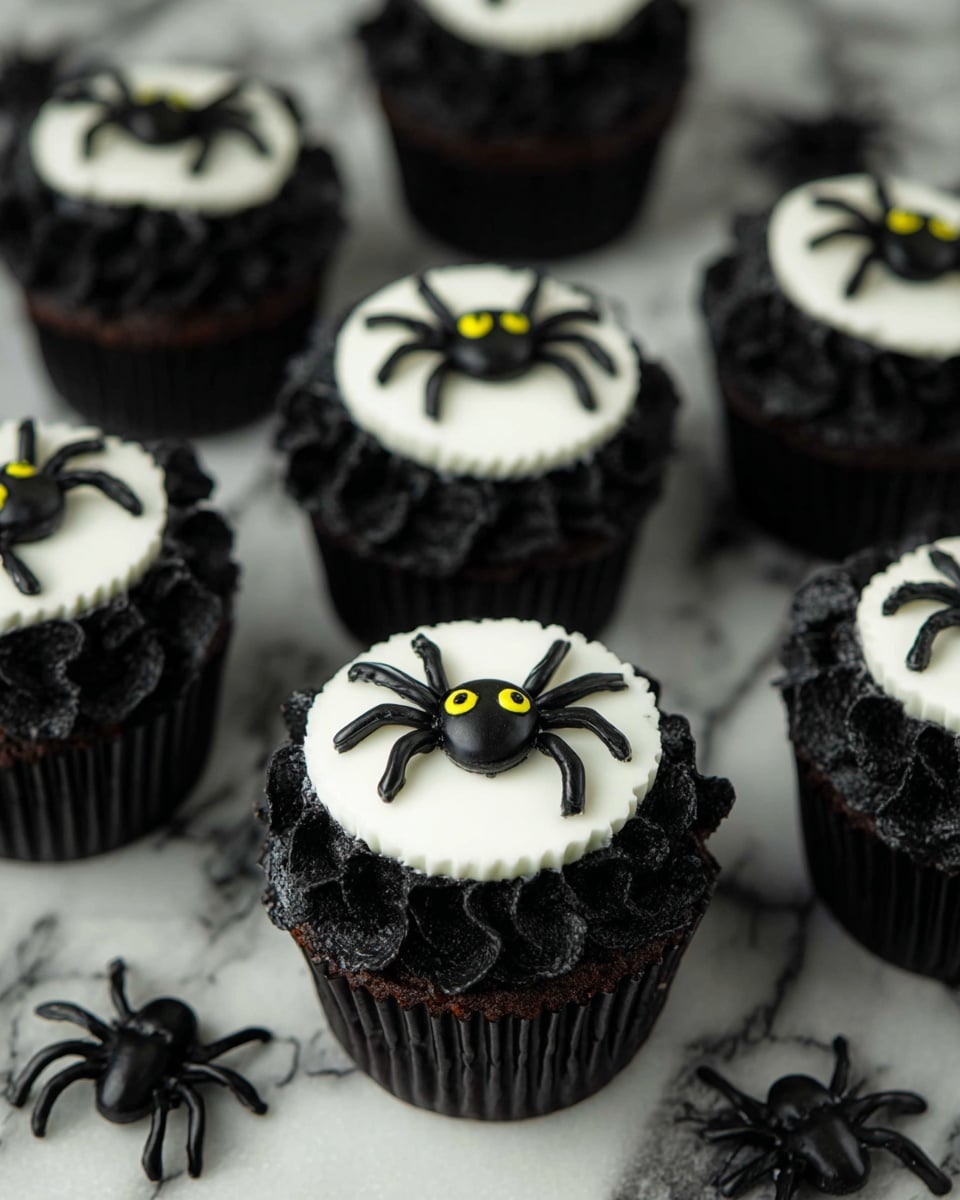
Step 3: Decorating Your Creepy Halloween Spider Cupcakes
Time to bring these creepy spiders to life! Fit your piping bag with a star tip (#1M) and fill it with black buttercream. Pipe a ring of reverse stars along the cupcake edges—this creates a spooky web effect.
Next, roll out your white fondant until it’s about ⅛ inch thick and cut out circles (roughly 2 inches in diameter) to fit over each cupcake—this acts like the spider’s webbed base. Place these gently on top of the frosted cupcakes.
Switch your piping bag to a small round tip (#3) and pipe the spiders’ bodies right onto the fondant: a big circle for the body, a smaller one for the head, then pipe on 4 legs on each side. I love how fiddly this step is; it really brings the cupcakes to life.
Finally, use tweezers to add tiny green sprinkles as eyes—it’s the perfect little creepy touch. I learned early on that these tiny details make such a difference!
Pro Tips for Making Creepy Halloween Spider Cupcakes Recipe
- Scrape, scrape, scrape: I can’t stress enough how important it is to scrape the bowls when mixing; it makes sure everything is evenly distributed for perfect texture.
- Cookie scoop magic: Using a cookie scoop or ice cream scoop keeps your cupcakes uniform in size, so they bake evenly every time.
- Fondant finesse: Kneading the fondant until smooth makes rolling it out easier and prevents cracks in your spider web circles.
- Keep cupcakes covered: Cover them with a light kitchen towel while cooling to lock in moisture and keep them soft for decorating.
How to Serve Creepy Halloween Spider Cupcakes Recipe
Garnishes
I love keeping garnishes simple but effective here: those tiny green sprinkles for eyes bring the spiders to life and add a fun pop of color on the black backdrop. Sometimes, I add edible glitter lightly dusted on the fondant to give the webs a shimmering, eerie vibe.
Side Dishes
These cupcakes shine as a centerpiece, but if you want to build out a Halloween spread, I usually pair them with spiced apple cider, or a tangy cranberry punch. On the savory side, mini pumpkin soup shooters or cheesy ghost-shaped quesadillas complement the sweetness perfectly.
Creative Ways to Present
One year, I displayed the spider cupcakes on a black cake stand surrounded by faux cobwebs and little plastic spiders for extra creep factor. You can also serve them on a platter lined with black lace doilies, or arrange them as part of a Halloween dessert table for maximum “wow.” Kids especially love when you add a dry ice effect around the platter for spooky smoke!
Make Ahead and Storage
Storing Leftovers
I keep my leftover cupcakes in an airtight container at room temperature for up to 2 days. If your home is warm, the fridge is okay, but remove the cupcakes 30 minutes before serving so the buttercream softens back up. Cover the container loosely so the fondant doesn’t get sticky.
Freezing
I’ve frozen the un-frosted cupcakes wrapped tightly in plastic wrap and stored in a freezer bag—works great! When you’re ready, thaw them overnight at room temperature before frosting and decorating. Freezing fully decorated cupcakes isn’t ideal since the fondant may get soggy.
Reheating
If you want to freshen up cupcakes after storing or thawing unfrosted ones, pop them in the oven at 150°C (300°F) for 5-7 minutes to restore that fresh-baked softness—just don’t warm the buttercream or fondant!
FAQs
-
Can I make these cupcakes ahead of time?
Absolutely! You can bake the cupcakes a day or two in advance and keep them wrapped airtight at room temperature. It’s best to frost and decorate them the day you plan to serve for the freshest look.
-
What if I don’t have black cocoa powder?
If you don’t have black cocoa powder, you can use regular unsweetened cocoa powder and add black gel food coloring to your buttercream. The color might not be quite as intense, but it’ll still be delicious and spooky!
-
How can I make this recipe vegan?
Swap the eggs for flax eggs (1 tablespoon flaxseed meal + 3 tablespoons water per egg), replace butter with vegan butter alternatives, and use plant-based milk. The pumpkin puree keeps them moist, so you won’t lose texture.
-
Can I use fondant alternatives for the spider body?
Definitely! I’ve used white chocolate discs or even circular cookie cutouts as spider bases. Just make sure they’re sturdy enough to hold the piped frosting on top.
-
What’s the best way to pipe the spider legs?
Use a small round piping tip and steady hands! It helps to practice piping on parchment paper before decorating your cupcakes to get a feel for the pressure and speed.
Final Thoughts
When I first tried this Creepy Halloween Spider Cupcakes Recipe, I struggled to get the spider legs just right, but with a little patience, it became one of my go-to Halloween treats. The combination of chocolate, pumpkin, and that rich black buttercream frosting makes these cupcakes irresistible. Plus, guests never fail to comment on how fun and spooky they look! If you’re looking to add some gothic flair to your Halloween spread with a recipe that’s both tasty and a conversation starter, I wholeheartedly recommend giving these a try—you’ll enjoy every step and bite!
Print
Creepy Halloween Spider Cupcakes Recipe
- Prep Time: 20 minutes
- Cook Time: 15 minutes
- Total Time: 1 hour 35 minutes
- Yield: 14 cupcakes
- Category: Dessert
- Method: Baking
- Cuisine: American
Description
These Creepy Halloween Spider Cupcakes are a fun and festive treat perfect for spooky celebrations. Moist chocolate pumpkin cupcakes are topped with rich black buttercream frosting and decorated with white fondant spiders featuring tiny green sprinkle eyes, bringing a creepy-cute vibe to your Halloween party.
Ingredients
Chocolate Cupcakes
- 180 g self raising flour
- 20 g cocoa powder
- 100 g salted butter
- 200 g granulated sugar
- 2 eggs
- 200 g pumpkin puree
- 100 ml milk
- ½ teaspoon baking powder
- ¼ teaspoon salt
- ½ teaspoon pumpkin pie spice
- 1 teaspoon vanilla extract
Buttercream
- 450 g powdered sugar
- 225 g salted butter
- 2 tablespoon black cocoa powder
- 2 tablespoon milk
- 1 teaspoon vanilla extract
- Black food coloring
Decoration
- 175 g white fondant
- Tiny green sprinkles (for the spiders’ eyes)
Instructions
- Bake the cupcakes: Preheat the oven to 175°C and line a cupcake pan with muffin or cupcake liners. In a bowl, whisk together self-raising flour, cocoa powder, pumpkin pie spice, baking powder, and salt. Sift the mixture and set aside. In another bowl, cream sugar and salted butter together until light and fluffy, about 2 minutes on medium speed, scraping down the bowl halfway. Beat in eggs one at a time, scraping the sides and bottom for thorough mixing. Add pumpkin puree and mix until combined, allowing the mixture to curdle. Fold in half the dry ingredients gently, then add milk and fold again, followed by the remaining dry ingredients. Mix in vanilla extract. Scoop the batter into liners, filling each about three-quarters full. Bake for 15 to 18 minutes or until a toothpick inserted comes out clean. Allow cupcakes to rest in tin for 1-2 minutes, then transfer to a cooling rack. Cover with a kitchen towel while cooling to keep moist.
- Make the black buttercream frosting: Beat salted butter in a large bowl until smooth and creamy. Sift in powdered sugar and black cocoa powder. Mix lightly with a spatula before using an electric mixer on medium speed until smooth. Scrape the bowl and beaters to incorporate all ingredients. Add vanilla extract and beat again. The buttercream will appear grey; let it rest for 10-20 minutes to deepen the color. If needed, add a few drops of black gel food coloring or a blend of red, green, and brown gel colors for a true black hue. Mix well and rest again for 10-15 minutes. Transfer frosting to a piping bag fitted with a star tip (#1M) and another with a small round tip (#3).
- Decorate the cupcakes: Using the star tip, pipe reverse stars in a circle pattern on each cooled cupcake. Roll out white fondant to about ⅛ inch thickness and cut circles approximately 2 inches in diameter (enough to cover cupcakes). Place each fondant circle centrally atop each frosted cupcake. Switch to the round tip bag with black buttercream. Pipe a small circle for the spider’s body, then a slightly smaller one in front for the head. Pipe four legs on each side of the body. Use tweezers to place two tiny green sprinkles onto the spider’s head as eyes.
Notes
- Scraping the bowl during mixing ensures all ingredients are fully combined with no pockets of unmixed portions.
- Using a cookie or ice cream scoop with a spring release helps maintain uniform cupcake sizes.
- Cupcake liners used measure approximately 5 cm diameter at the bottom and 3.5 cm high; adjust baking time for different liner sizes.
- Cover cupcakes with a kitchen towel while cooling to keep them moist and prevent drying out.
- Mixing powdered sugar with a spatula before beating prevents sugar dust flying when using the mixer.
- Gel-based food coloring is preferred to preserve frosting texture; alternatives include blending red, green, and brown gel colors to achieve a similar black tone.
- If too much frosting for one piping bag, use two bags and replace as needed during decorating.
- Knead fondant well to make it smooth and pliable; dust workspace with icing sugar or cornstarch to prevent sticking.
- Fondant cutout size can be adjusted to cupcake size. Avoid refrigerating cupcakes after fondant is placed to prevent condensation and sogginess; keep in a cool, air-conditioned environment instead.
Nutrition
- Serving Size: 1 cupcake
- Calories: 320 kcal
- Sugar: 30 g
- Sodium: 150 mg
- Fat: 18 g
- Saturated Fat: 10 g
- Unsaturated Fat: 6 g
- Trans Fat: 0 g
- Carbohydrates: 38 g
- Fiber: 2 g
- Protein: 4 g
- Cholesterol: 55 mg


