
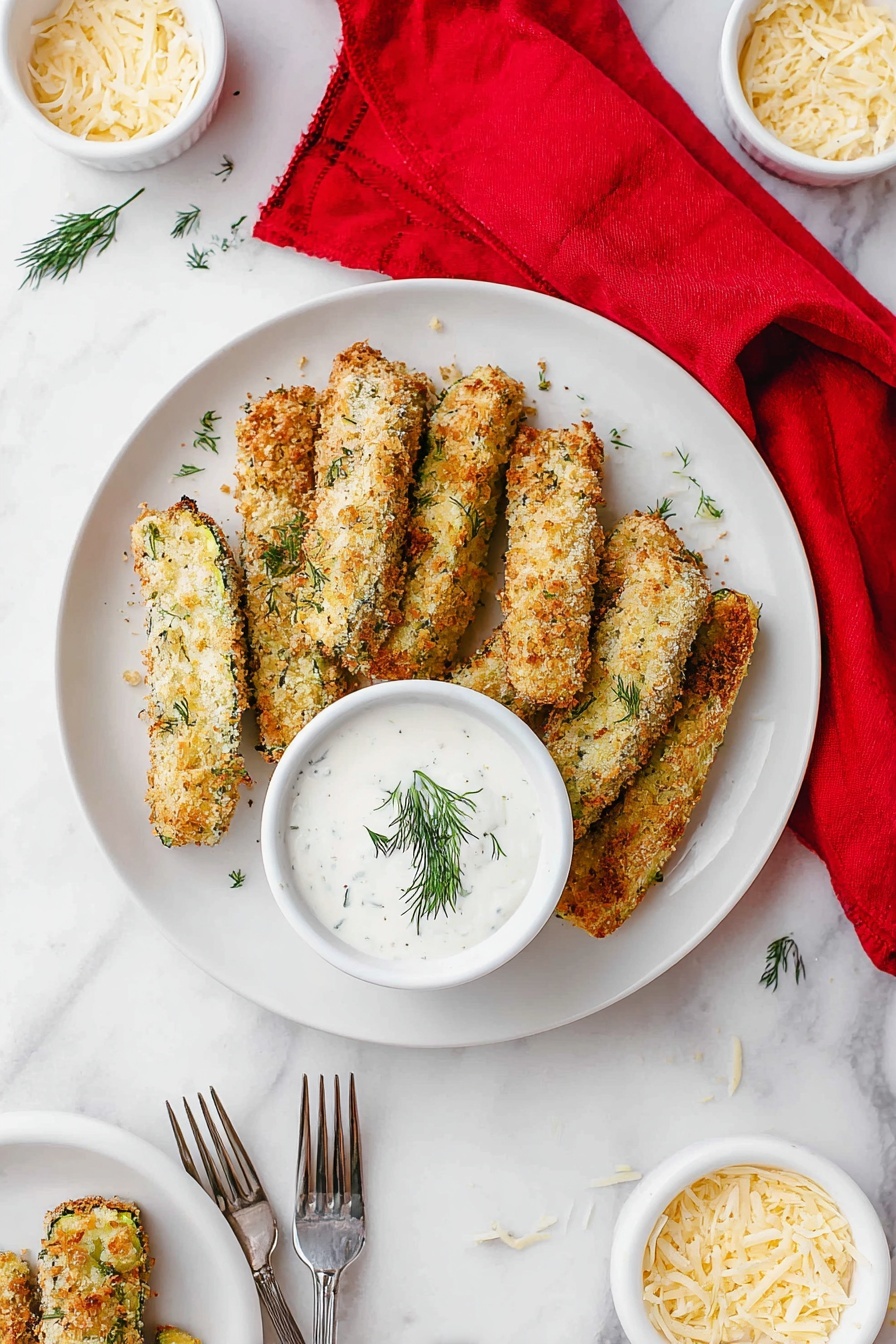
If you’re anything like me and love that perfect combo of tangy, salty, and crispy, then this Crispy Dill Pickle Fries Recipe is going to blow your mind. I absolutely love how these fries come out golden, crunchy, and bursting with that iconic pickle flavor. Whether you’re hosting a game day or just craving a fun snack, you’ll find that these fries hit the spot every single time!
Why You’ll Love This Recipe
- Super Crispy Texture: The combo of seasoned breadcrumbs and Parmesan cheese creates an unbeatable crunchy coating.
- Easy to Make: No deep fryer needed—bake these in the oven or air fryer for less mess and less fuss.
- Perfect Tangy Flavor: Using dill pickle spears gives you that salty, sour tang that we all crave.
- Versatile Serving Options: Great as a snack, an appetizer, or even a side for burgers and sandwiches.

Ingredients You’ll Need
Getting your ingredients right makes all the difference here. The balance between the wet and dry mixtures, plus that Parmesan kicker, ensures each pickle spear is perfectly coated and crackly crispy after baking.
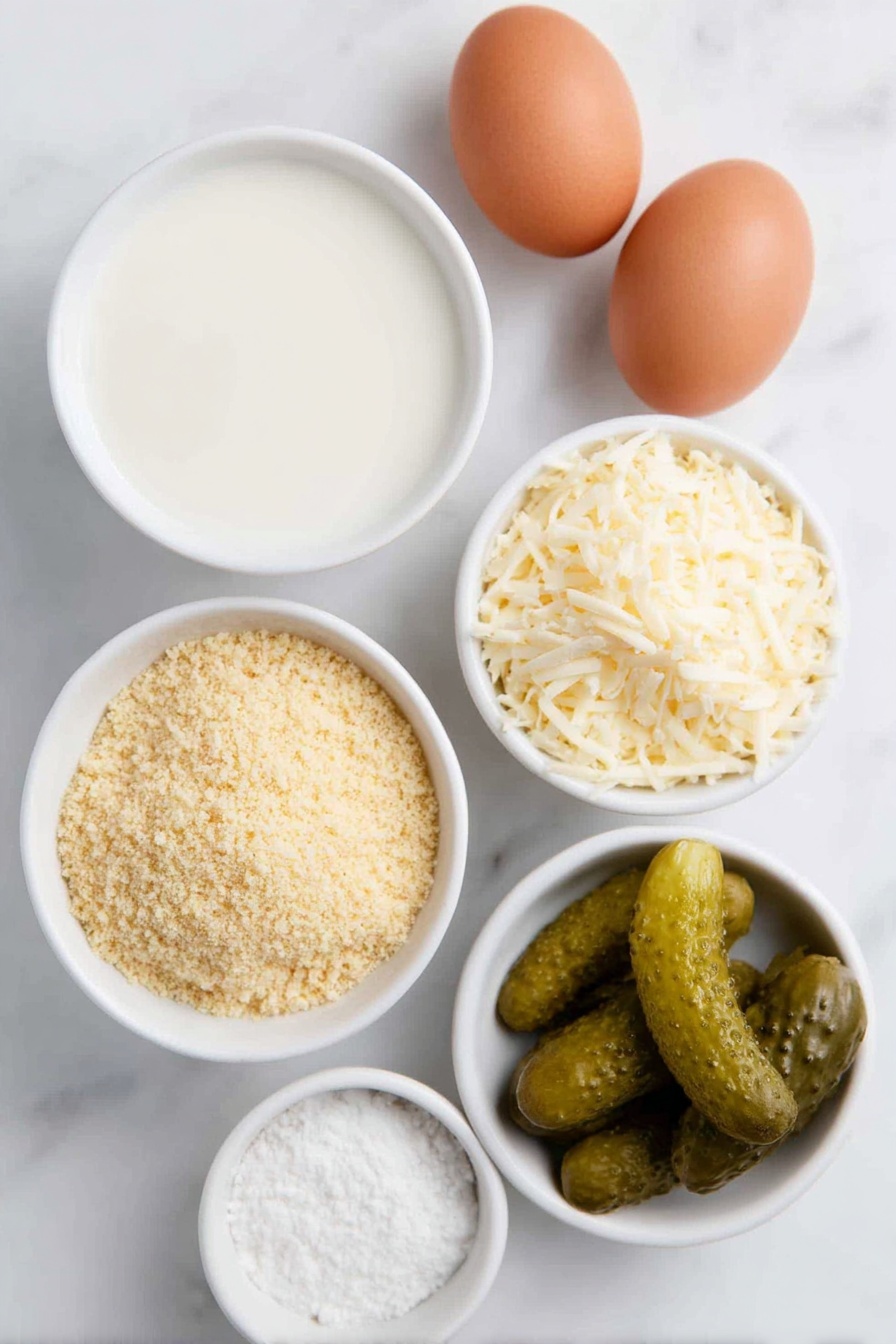
- Skim Milk: I usually use skim, but whole milk works great if you want a richer batter.
- Eggs: They’re the glue that holds the coating on, so don’t skip or replace without a good binder.
- Seasoned Breadcrumbs: Adds flavor and crunch—feel free to swap for panko if you like extra crispiness.
- Parmesan Cheese: Gives a savory depth that’s a game changer in these fries.
- Dill Pickle Spears: The star of the show! Pat them dry well, or the coating won’t stick.
Variations
I love tweaking this Crispy Dill Pickle Fries Recipe depending on what’s in my pantry or who I’m sharing it with. Don’t be shy about making it your own!
- Air Fryer Version: I switched to the air fryer a while back to save time and oil, and my family still can’t tell the difference.
- Dairy-Free Option: Try plant-based milk and vegan Parmesan to keep the flavor while avoiding dairy—works like a charm.
- Change the Pickles: Dill pickle chips work too; just watch your cooking time as they may crisp up faster.
- Spicy Twist: Add a little cayenne or smoked paprika to the breadcrumbs for a subtle heat that’s so addictive.
How to Make Crispy Dill Pickle Fries Recipe
Step 1: Prep Your Workspace and Pickles
First things first, preheat your oven to 425°F and line a baking sheet with parchment paper—this helps with an easy cleanup and keeps your fries from sticking. Next, grab your dill pickle spears and pat them completely dry with paper towels. This little step is something I learned can’t be skipped; moisture makes the coating slide right off and soggy fries aren’t fun!
Step 2: Mix Your Wet and Dry Coatings
In one bowl, whisk together your milk and eggs until smooth—this is your ‘wet’ dip. In another bowl, combine the seasoned breadcrumbs with grated Parmesan cheese. This cheesy breadcrumb mix creates the magic crust. Using shallow bowls or pie plates makes it easier to evenly coat the pickles.
Step 3: Coat the Pickles
Dip each dried pickle spear first into the egg mixture, letting any excess drip off, then roll it in the breadcrumb-Parmesan mix. Make sure the spears are evenly coated to get that satisfying crunch. If you have extra pickle spears and leftover coating, don’t hesitate to throw together a second batch—I usually do!
Step 4: Bake Until Golden and Crispy
Arrange the coated pickles on your parchment-lined baking sheet in a single layer, making sure they’re not touching. Pop them in your preheated oven for 20 to 25 minutes. Keep an eye on them starting at 20 minutes—when they turn golden brown and super crispy, they’re ready! If you’re using an air fryer, cook at 400°F for 8 minutes, flip, then cook another 3-5 minutes.
Pro Tips for Making Crispy Dill Pickle Fries Recipe
- Pat Those Pickles Dry: Moisture is the enemy of crispiness—using paper towels to get the spears dry really makes the coating stick.
- Double Dip for Crunch: For an extra crunchy coating, try dipping each pickle twice—egg mixture, breadcrumbs, then back in egg and breadcrumbs again.
- Use Parmesan Wisely: Freshly grated Parmesan adds the best flavor and texture, but pre-grated works in a pinch.
- Don’t Overcrowd the Pan: Give each fry some breathing room to crisp up evenly without steaming.
How to Serve Crispy Dill Pickle Fries Recipe
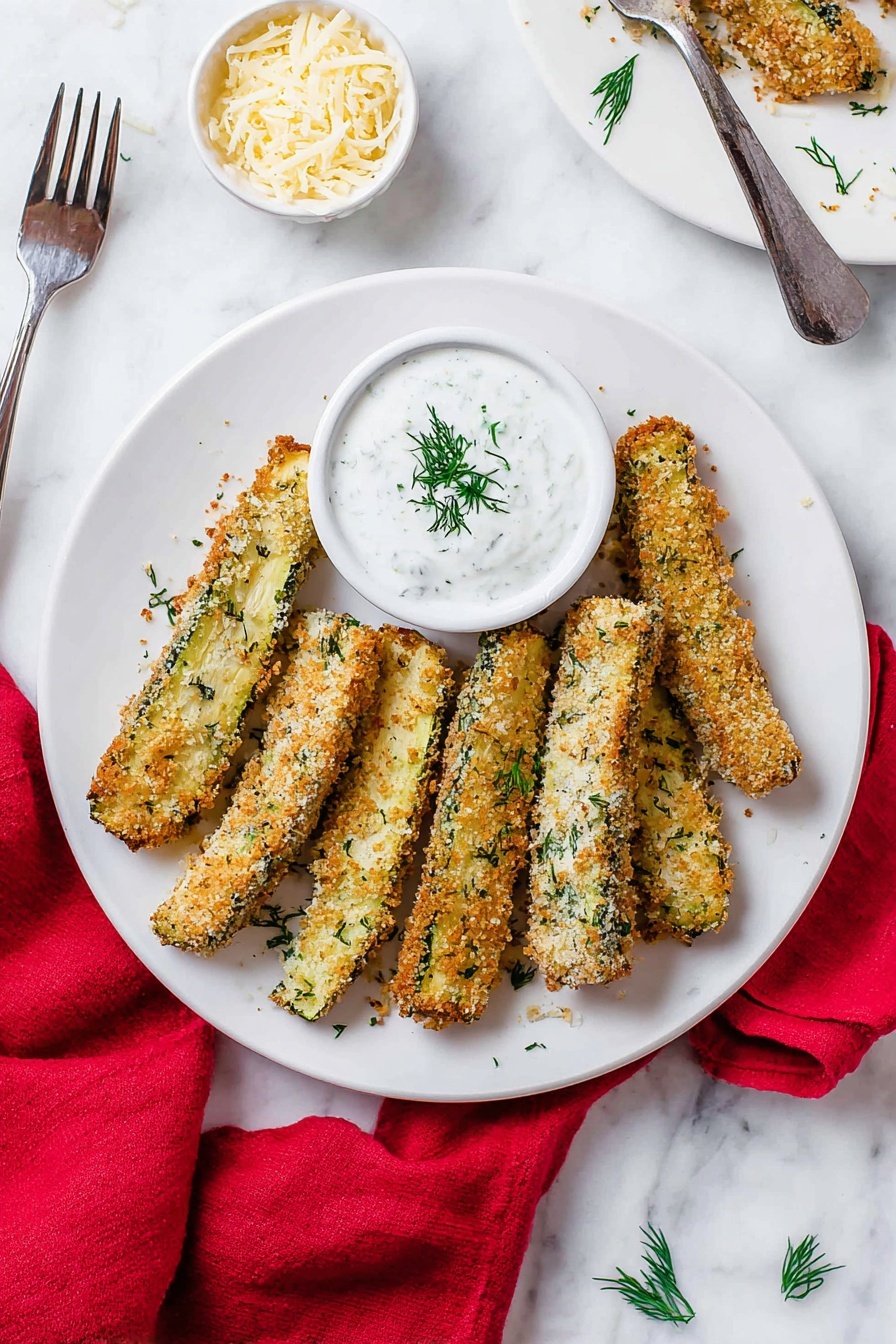
Garnishes
I usually sprinkle a little extra grated Parmesan on top right after baking—it melts slightly and looks so good. Fresh chopped dill or parsley is also amazing if you want to amp up the fresh-herb vibe. A dollop of creamy ranch or a yogurt dill dressing on the side is where the magic really happens.
Side Dishes
These fries pair perfectly with classic burgers, chicken sandwiches, or even alongside a smoky BBQ platter. Sometimes I serve them with a crisp coleslaw or a simple green salad for a complete, satisfying meal.
Creative Ways to Present
For parties, I love serving these fries in little paper cones or mini baskets lined with parchment paper—it instantly makes them feel festive and fun. You could also make a “pickle fry” platter with different dipping sauces to keep guests guessing and dipping!
Make Ahead and Storage
Storing Leftovers
If you’re lucky enough to have leftovers, store them in an airtight container in the fridge for up to 2 days. I recommend layering them with parchment paper so they don’t stick together and lose that crispiness.
Freezing
I’ve frozen these fries before by flash-freezing them on a sheet pan first, then transferring to a zip-top bag. When you’re ready to enjoy, bake them straight from frozen at 425°F until reheated and crisp again—about 15 minutes.
Reheating
To bring back that beautiful crunch, reheat leftovers in the oven or air fryer rather than the microwave. I set my oven to 400°F and bake for 5-8 minutes, keeping an eye so they don’t dry out.
FAQs
-
Can I make Crispy Dill Pickle Fries without Parmesan cheese?
Yes, you can omit the Parmesan if you’re dairy-free or prefer a simpler coating. Your fries will still be tasty but might have a slightly less savory crust. To boost flavor, you can add extra seasoning to the breadcrumbs like garlic powder or smoked paprika.
-
What’s the best way to ensure the coating sticks to the pickles?
Patting the pickles very dry before dipping is key. Also, using a wet dip (milk and eggs) followed by a seasoned dry mix creates a “double adhesion effect” that keeps the coating intact during baking.
-
Can I use dill pickle chips instead of spears?
Absolutely! Dill pickle chips work nicely, though cooking times will be shorter since they’re smaller and thinner. Watch to avoid burning, and enjoy the same tangy crunch in a bite-sized form!
-
Is air frying better than baking for this recipe?
Both methods work well. The air fryer cooks faster and can make the fries even crispier with less oil, but baking is super convenient and yields delicious results too. If you air fry, make sure not to overcrowd the basket.
Final Thoughts
This Crispy Dill Pickle Fries Recipe has become one of those snacks I love serving when friends come over because it’s easy, unique, and downright addictive. I used to struggle with getting that perfect crunch without a fryer, and this recipe quickly became my go-to cheat. Go ahead and try it—you’ll find yourself craving these tangy, cheesy fries as much as I do. Trust me, your snack time just got exponentially better!
Print
Crispy Dill Pickle Fries Recipe
- Prep Time: 10 minutes
- Cook Time: 20 minutes
- Total Time: 30 minutes
- Yield: 6 servings
- Category: Appetizer
- Method: Baking
- Cuisine: American
Description
Dill Pickle Fries are a crispy, tangy snack featuring dill pickle spears coated in a seasoned breadcrumb and parmesan mixture, then baked to golden perfection. Perfect as a crunchy appetizer or a unique side dish, these fries offer a delightful combination of savory, cheesy, and pickly flavors.
Ingredients
For the Coating
- 1/2 cup skim milk
- 2 eggs
- 1/2 cup seasoned breadcrumbs
- 1/2 cup grated Parmesan cheese
Main Ingredient
- 24 oz dill pickle spears
Instructions
- Preheat Oven: Preheat your oven to 425 degrees Fahrenheit. Line a large baking sheet with parchment paper to prevent sticking and set it aside for later.
- Prepare Egg Mixture: In a medium bowl, whisk together the skim milk and eggs until well combined. This mixture will help the breadcrumbs stick to the pickles.
- Mix Breadcrumbs and Cheese: In another medium bowl, thoroughly combine the seasoned breadcrumbs with the grated Parmesan cheese. This mixture creates a flavorful, crispy coating.
- Dry the Pickles: Pat each dill pickle spear completely dry using paper towels. Removing excess moisture is crucial to achieving a crispy coating.
- Bread the Pickles: Dip each dried pickle spear first into the egg and milk mixture, ensuring it’s fully coated, then roll it in the breadcrumb and Parmesan mixture. Make sure the pickles are evenly coated for best texture.
- Arrange on Baking Sheet: Place the coated pickle spears on the prepared baking sheet in a single layer. If you have extra breading and pickle spears, repeat the coating process for a second batch.
- Bake: Bake in the preheated oven for 20 to 25 minutes, or until the pickle fries are golden brown and crispy. Keep an eye on them to avoid burning.
- Serve: Remove from the oven and let them cool slightly. Serve immediately with your favorite yogurt dill dressing or dipping sauce for best flavor.
Notes
- You can use any variety of milk from skim to whole milk according to your preference.
- For dairy allergies, substitute with plant-based milk and omit Parmesan or use a vegan Parmesan alternative.
- Use large, shallow bowls or pie plates for easier breading of the pickle spears.
- The recipe can also be made using dill pickle chips, but cooking time may vary.
- If you have extra breadcrumb and egg mixture, you can make a second batch if you have additional pickles.
- These fries can also be cooked in an air fryer at 400°F for 8 minutes, then flipped and cooked for another 3-5 minutes until crisp and golden.
- When air frying, cook in a single layer and avoid overcrowding. Cook in small batches if necessary.
Nutrition
- Serving Size: 1 serving (approximately 4 fries)
- Calories: 150
- Sugar: 2g
- Sodium: 650mg
- Fat: 5g
- Saturated Fat: 1.5g
- Unsaturated Fat: 3g
- Trans Fat: 0g
- Carbohydrates: 18g
- Fiber: 2g
- Protein: 6g
- Cholesterol: 60mg

