
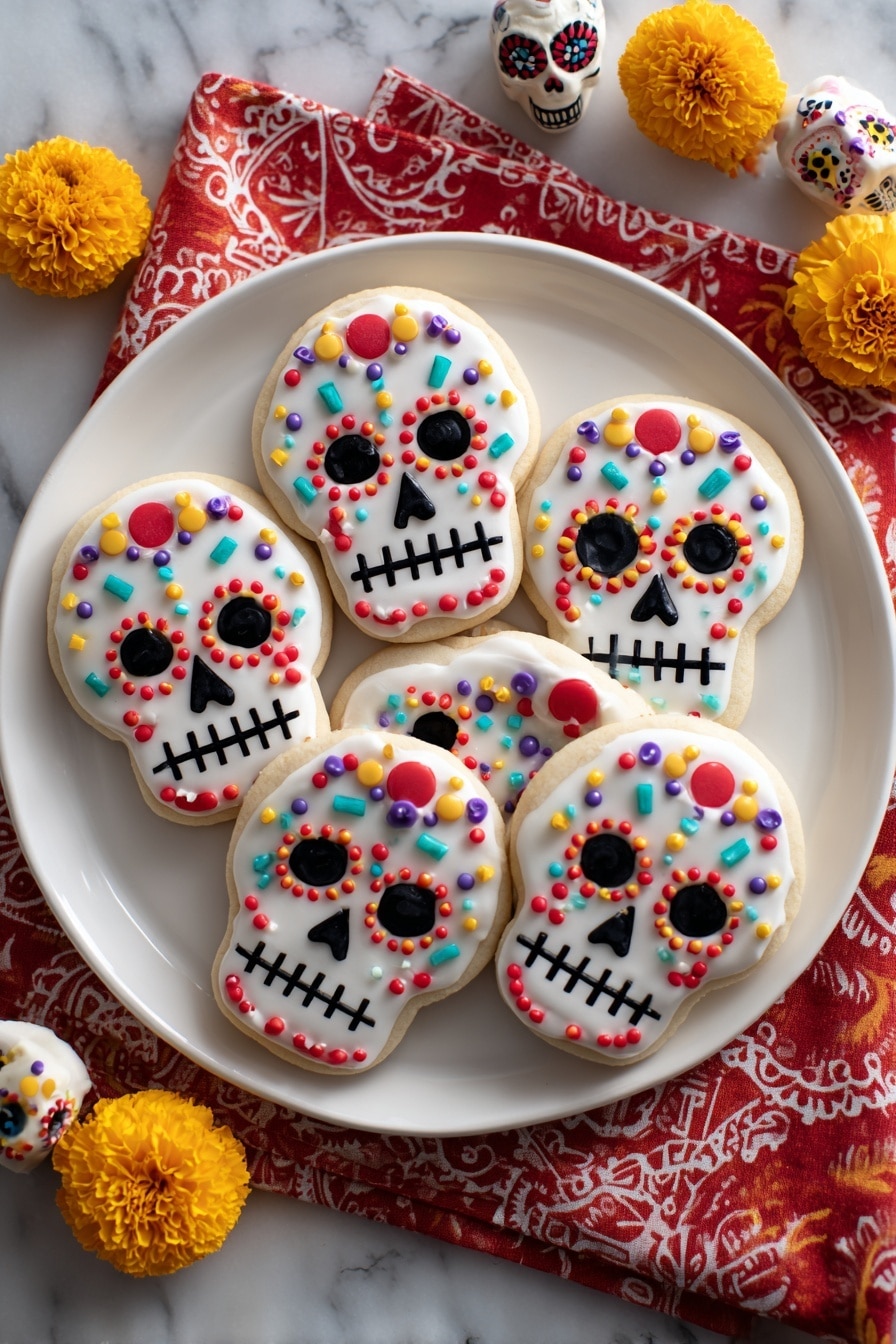
If you’re looking to make a treat that’s both festive and delicious, you’re going to love this Day of the Dead Cookies Recipe. These cookies are not just any sugar cookies—they’re soft, buttery, and come with that irresistible almond flavor thanks to almond paste. And the best part? You decorate them with vibrant, spooky candy coatings that are perfect for celebrating Día de los Muertos or any fun occasion where you want to impress your friends and family. Trust me, once you try this recipe, you’ll be hooked!
Why You’ll Love This Recipe
- Authentic Flavor: The almond paste adds a rich, nutty depth that really sets these cookies apart.
- Fun Decorating: You get to play with colorful candy coatings and candies, making these cookies a real showstopper.
- Perfect Texture: Soft but sturdy sugar cookies that hold their shape beautifully during baking and dipping.
- Festive Tradition: These cookies bring the spirit of Day of the Dead right into your kitchen in the tastiest way.

Ingredients You’ll Need
The ingredients in this Day of the Dead Cookies Recipe come together to create a tender, flavorful dough that’s easy to work with and decorated to impress. I always recommend using fresh butter and good-quality almond paste because they really make a difference in taste.
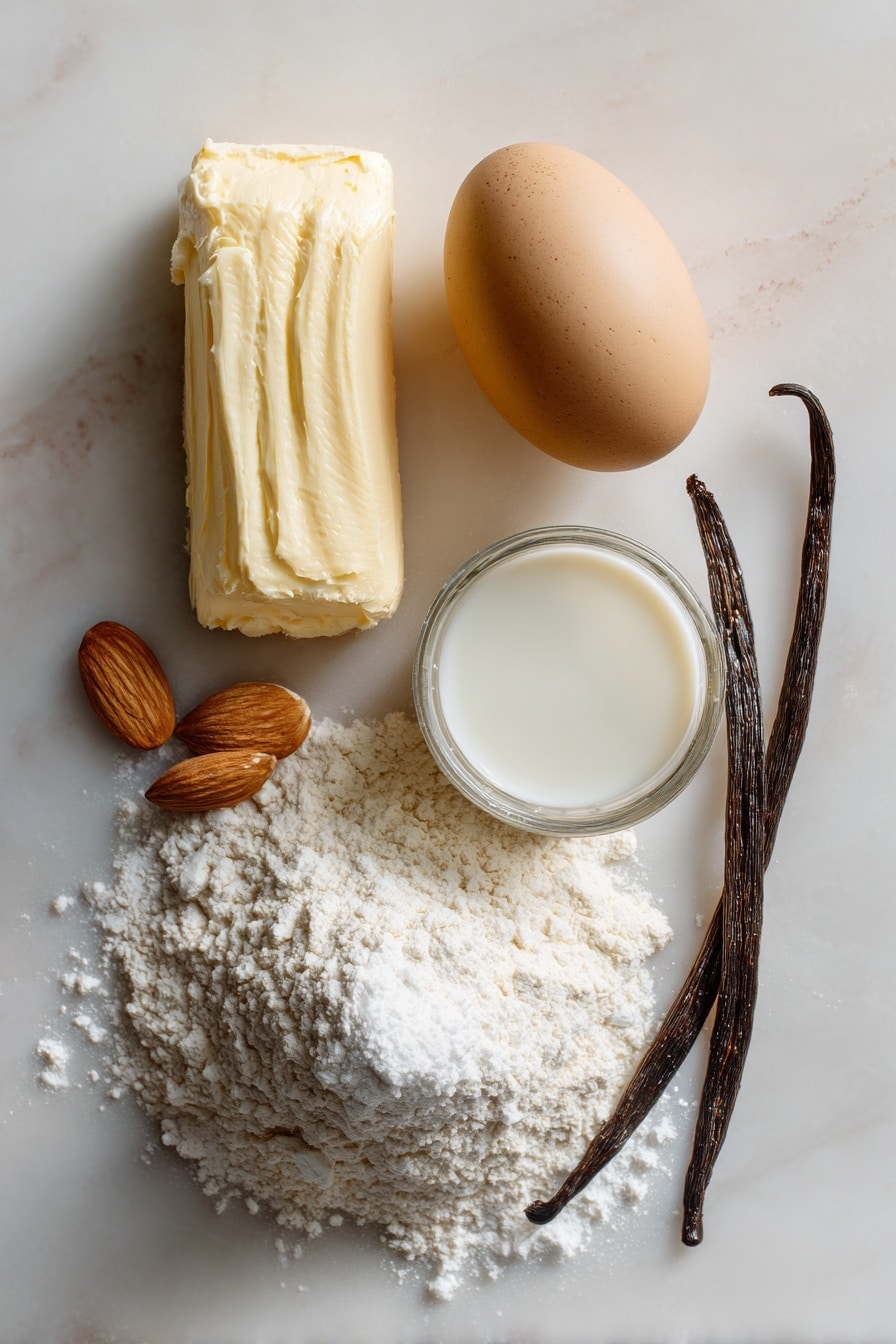
- Butter: Use unsalted and softened butter for the perfect creamy texture in the dough.
- Confectioners’ sugar: This helps keep the cookies soft and smooth, much more than regular granulated sugar would.
- Almond paste: Gives that unmistakable almond flavor and moisture; try not to substitute with almond extract alone.
- Egg: Brings the dough together and adds richness; make sure it’s at room temperature for smooth mixing.
- Milk (2%): Just a splash to keep the dough tender without making it too sticky.
- Vanilla extract: Enhances the sweetness and complements the almond taste beautifully.
- All-purpose flour: Creates structure; measuring it correctly is key to not ending up with dry or crumbly cookies.
- Salt: Balances the sweetness and deepens the flavors.
- White candy coating melts: For dipping and decorating – these melt smoothly and harden nicely.
- Optional decorations: Jumbo sprinkles, peppermint candies, candy-coated sunflower kernels, Skittles, Twizzlers Rainbow Twists, and Good & Plenty candies make your cookies pop.
- Black paste food coloring: Used to tint some of the candy coating for piping details like mouths.
Variations
One of the coolest things about this Day of the Dead Cookies Recipe is how easy it is to personalize. Whether you want to switch up the decorations or adapt the flavors, there’s lots of room to have fun and make it your own.
- Gluten-free version: I’ve tried swapping in a gluten-free flour blend with great success; just be mindful that texture might be a little different but still yummy!
- Spiced twist: Some cinnamon or a pinch of ground cloves in the dough adds a warm fall feel that I adore, especially around Day of the Dead celebrations.
- Vegan option: Use vegan butter and a flax egg substitute, keeping the almond paste (just check that it fits your dietary preferences).
- Chocolate dip: For a twist on decorating, try dipping half the cookie in dark chocolate melts instead of white for a striking contrast.
How to Make Day of the Dead Cookies Recipe
Step 1: Cream the Butter and Sugar Till Light and Fluffy
Start by whipping your softened butter and confectioners’ sugar together for about 3-4 minutes using a stand mixer or handheld beaters. You’ll know it’s ready when the mixture looks pale and fluffy—this step is crucial because it gives the cookies a tender crumb. I remember the first time I skimmed this part, and the cookies felt too dense, so take your time here!
Step 2: Add Almond Paste, Egg, Milk, and Vanilla
Next, crumble in the almond paste and beat it into the butter mixture until it’s well combined—don’t worry; it might look a little chunky initially, but keep going. Then, add the egg, milk, and vanilla extract, mixing until smooth. Using room temperature eggs helps everything come together beautifully without lumps.
Step 3: Mix in Flour and Salt Gradually
Combine your flour and salt in a separate bowl, then add it slowly to the wet mixture. I like to add it in thirds, stirring gently each time to prevent over-mixing. Once the dough is uniform, cover it and chill in the fridge for about an hour. This rest time makes rolling easier and helps the cookies keep their shape while baking.
Step 4: Roll Out Dough and Cut into Skulls
On a lightly floured surface, roll the dough out to about 1/4-inch thickness. Then, use a 5-inch skull cookie cutter to make the shapes. I found that dusting the cutter with flour before each cut prevents sticking and keeps the details sharp. Place the cookies about 1 inch apart on an ungreased baking sheet—it helps them bake evenly without spreading too much.
Step 5: Bake and Cool
Bake in a preheated 375°F oven for 7-9 minutes, until the edges feel firm but the centers are still a little soft. Let the cookies stand for 2 minutes on the baking sheet before transferring to a wire rack to cool completely. This waiting game is tough, but it prevents breakage and makes decorating much easier.
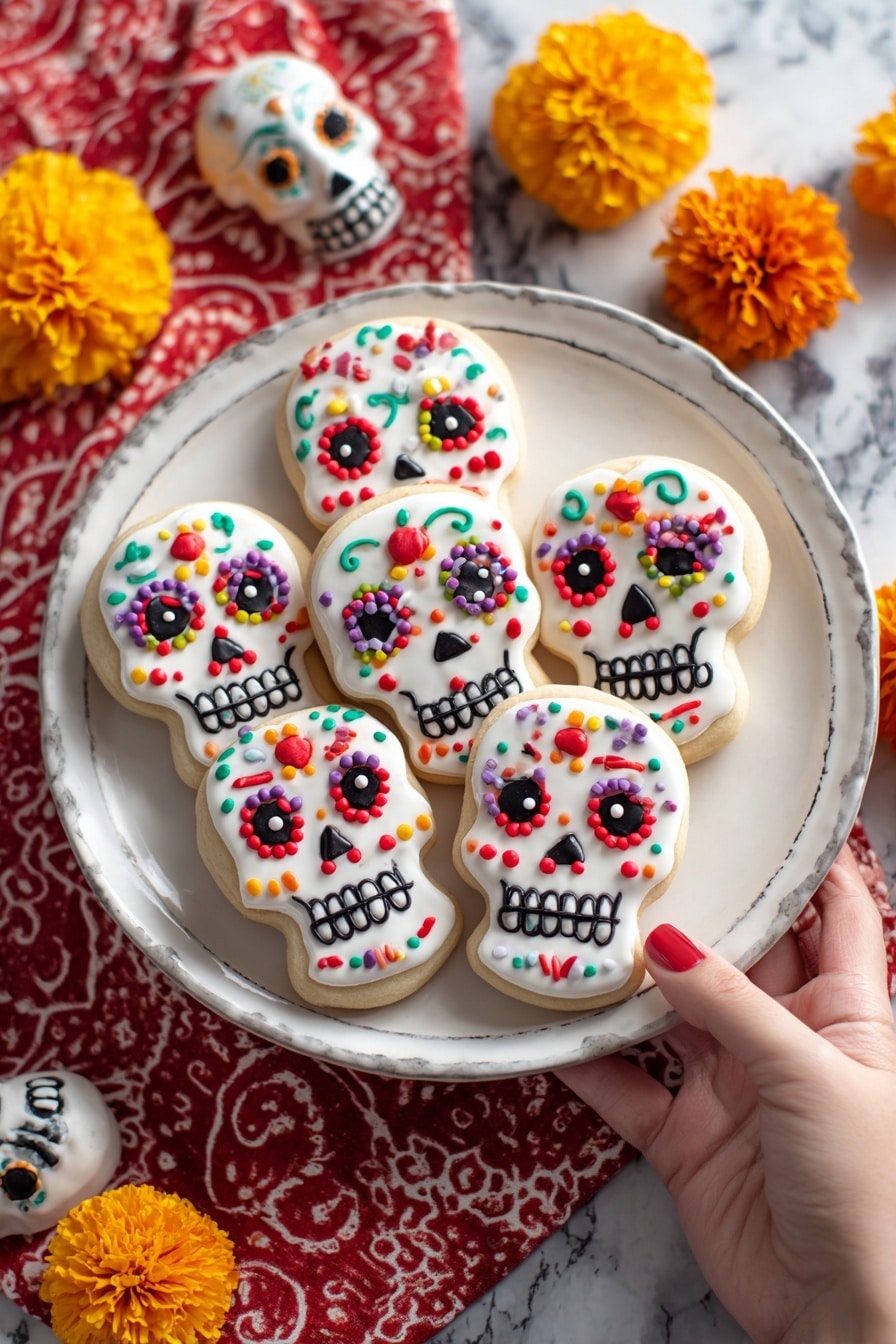
Step 6: Dip and Decorate
Melt your white candy coating melts in a shallow, microwave-safe dish according to package instructions. Dip the top side of each cookie in the candy, allowing the excess to drip off before setting them on waxed paper. While still wet, add your favorite sprinkles and candies. Tint some of the remaining white coating black with paste food coloring to pipe on mouths—this contrast really brings the sugar skulls to life!
Pro Tips for Making Day of the Dead Cookies Recipe
- Chill the Dough Thoroughly: I learned that letting the dough rest for the full hour makes rolling smoother and prevents cookies from shrinking in the oven.
- Flour Your Tools: Dust your work surface and cookie cutters lightly with flour for crisp shapes every time.
- Keep Candy Melts Smooth: Stir the candy coating gently as you melt it to avoid clumps and ensure a glossy finish.
- Decorate While Wet: Adding decorations right after dipping helps them stick perfectly, avoiding any flaking later on.
How to Serve Day of the Dead Cookies Recipe
Garnishes
I love using a colorful mix of jumbo sprinkles, peppermint candies, and tiny candy-coated sunflower kernels for an authentic flair. Sometimes, I get creative with Skittles or Twizzlers Rainbow Twists to deliver both sweet bursts of flavor and vibrant visuals. It really turns your cookie platter into an eye-catching centerpiece.
Side Dishes
Pair these cookies with a warm cup of Mexican hot chocolate or your favorite spiced coffee for a cozy, festive combo. I also like serving them alongside fruit punch or fresh horchata for a refreshing twist that balances the sweetness.
Creative Ways to Present
For parties, I arranged the decorated cookies standing upright on skewers stuck into a decorated foam base, creating a festive “cookie bouquet” effect. Another fun idea is placing them on a tiered serving tray surrounded by marigold flowers and candles to honor the Day of the Dead tradition in style.
Make Ahead and Storage
Storing Leftovers
I store leftover cookies in an airtight container at room temperature with parchment paper between layers to keep them from sticking. They usually stay fresh and delicious for about 4-5 days, though the candy coating can get a little softer after a couple of days.
Freezing
Freezing works well if you want to make these ahead of time. I freeze the undecorated cookies on a baking sheet first, then transfer them to a freezer bag. When I’m ready to decorate, I thaw them overnight in the fridge. Make sure to decorate right after thawing because the candy coating doesn’t freeze well.
Reheating
Because these are already baked cookies, reheating isn’t necessary. But if you want that fresh-baked feel, I pop them briefly in a low oven (around 300°F) for 3-4 minutes, just warm enough to soften them slightly without melting decorations.
FAQs
-
Can I use regular sugar instead of confectioners’ sugar in the Day of the Dead Cookies Recipe?
It’s best to stick with confectioners’ sugar for this recipe because it dissolves completely in the dough, giving you a smooth texture and soft cookie. Regular granulated sugar can make the dough grainy and produce a crunchier cookie than intended.
-
What if I don’t have an almond paste? Can I substitute with almond extract?
Almond paste gives both flavor and moisture, so substituting just with almond extract will change the texture and might dry out your cookies. If you can’t find almond paste, try making a quick homemade version with ground almonds and sugar, or consider adding a little almond extract plus extra milk to compensate.
-
How do I prevent the candy coating from cracking after it sets?
Let the candy coating cool and set at room temperature in a dry environment. Avoid putting decorated cookies in the fridge immediately since the temperature shift can cause cracking. Also, stirring the coating while melting helps ensure a smooth finish less prone to breaking.
-
Can I make these cookies ahead for a party?
Absolutely! I often bake the cookies a day or two early, store them undecorated in an airtight container, and then dip and decorate them the day of the party. This keeps them fresh and vibrant for your guests to enjoy.
Final Thoughts
Honestly, this Day of the Dead Cookies Recipe has become one of my favorite ways to celebrate with family and friends. There’s something so satisfying about baking these soft, flavorful cookies and then having a blast decorating them with colorful candies. Whether you’re honoring tradition or just want a memorable treat, I can’t recommend making these enough. So grab your skull cookie cutter, turn on some festive music, and get ready to create something truly special!
Print
Day of the Dead Cookies Recipe
- Prep Time: 1 hour 20 minutes
- Cook Time: 10 minutes
- Total Time: 1 hour 30 minutes
- Yield: 12 cookies
- Category: Dessert
- Method: Baking
- Cuisine: Mexican
Description
Celebrate the Day of the Dead with these festive and delicious skull-shaped cookies. Soft almond-flavored sugar cookies are topped with a smooth white candy coating, decorated with colorful candies and striking black piped details to capture the holiday spirit.
Ingredients
Cookie Dough
- 1-1/4 cups butter, softened
- 1-3/4 cups confectioners’ sugar
- 2 ounces almond paste
- 1 large egg, room temperature
- 1/4 cup 2% milk
- 1 teaspoon vanilla extract
- 4 cups all-purpose flour
- 1/2 teaspoon salt
Coating and Decorations
- 2 packages (12 ounces each) white candy coating melts
- Optional decorations: Jumbo sprinkles, peppermint candies, candy-coated sunflower kernels, Skittles, Twizzlers Rainbow Twists, Good & Plenty candies
- Black paste food coloring
Instructions
- Cream Butter and Sugar: In a large bowl, cream together the softened butter and confectioners’ sugar until the mixture is light and fluffy, about 3-4 minutes. Add the almond paste and blend thoroughly.
- Add Wet Ingredients: Beat in the egg, followed by the milk and vanilla extract until fully incorporated.
- Mix Dry Ingredients and Chill: In a separate bowl, combine the all-purpose flour and salt. Gradually add the flour mixture to the creamed mixture, mixing well after each addition. Cover the dough and refrigerate for 1 hour to firm up.
- Roll and Cut Dough: On a lightly floured surface, roll out the chilled dough to 1/4-inch thickness. Using a floured 5-inch skull-shaped cookie cutter, cut out the cookies and place them 1 inch apart on ungreased baking sheets.
- Bake Cookies: Preheat oven to 375°F. Bake the cookies for 7 to 9 minutes or until they are firm. Remove from oven and allow to stand for 2 minutes before transferring to wire racks to cool completely.
- Melt Candy Coating: In a large, shallow, microwave-safe dish, melt the white candy coating melts following package directions.
- Dip Cookies: Dip the top side of each cooled cookie into the melted white candy coating, letting any excess drip off. Place dipped cookies on waxed paper to set.
- Decorate Cookies: Add optional decorations such as jumbo sprinkles, gummy candies, or colorful candy pieces while the coating is still wet.
- Prepare Black Icing: Tint remaining white candy coating black using black paste food coloring. Use this to pipe on mouth designs and other details on each cookie.
- Let Set: Allow cookies to stand until the coating and decorations are fully set before serving or packaging.
Notes
- Ensure butter and egg are at room temperature for easier mixing and smoother dough.
- Refrigerating dough is crucial for easier rolling and better-shaped cookies.
- Use waxed paper to prevent sticking when dipping cookies into candy coating.
- Customize decorations based on your preferred colors and candies to personalize your Day of the Dead cookies.
- Store cookies in an airtight container to maintain freshness for up to 5 days.
Nutrition
- Serving Size: 1 cookie
- Calories: 320
- Sugar: 22g
- Sodium: 140mg
- Fat: 18g
- Saturated Fat: 8g
- Unsaturated Fat: 8g
- Trans Fat: 0g
- Carbohydrates: 38g
- Fiber: 1g
- Protein: 3g
- Cholesterol: 40mg


