
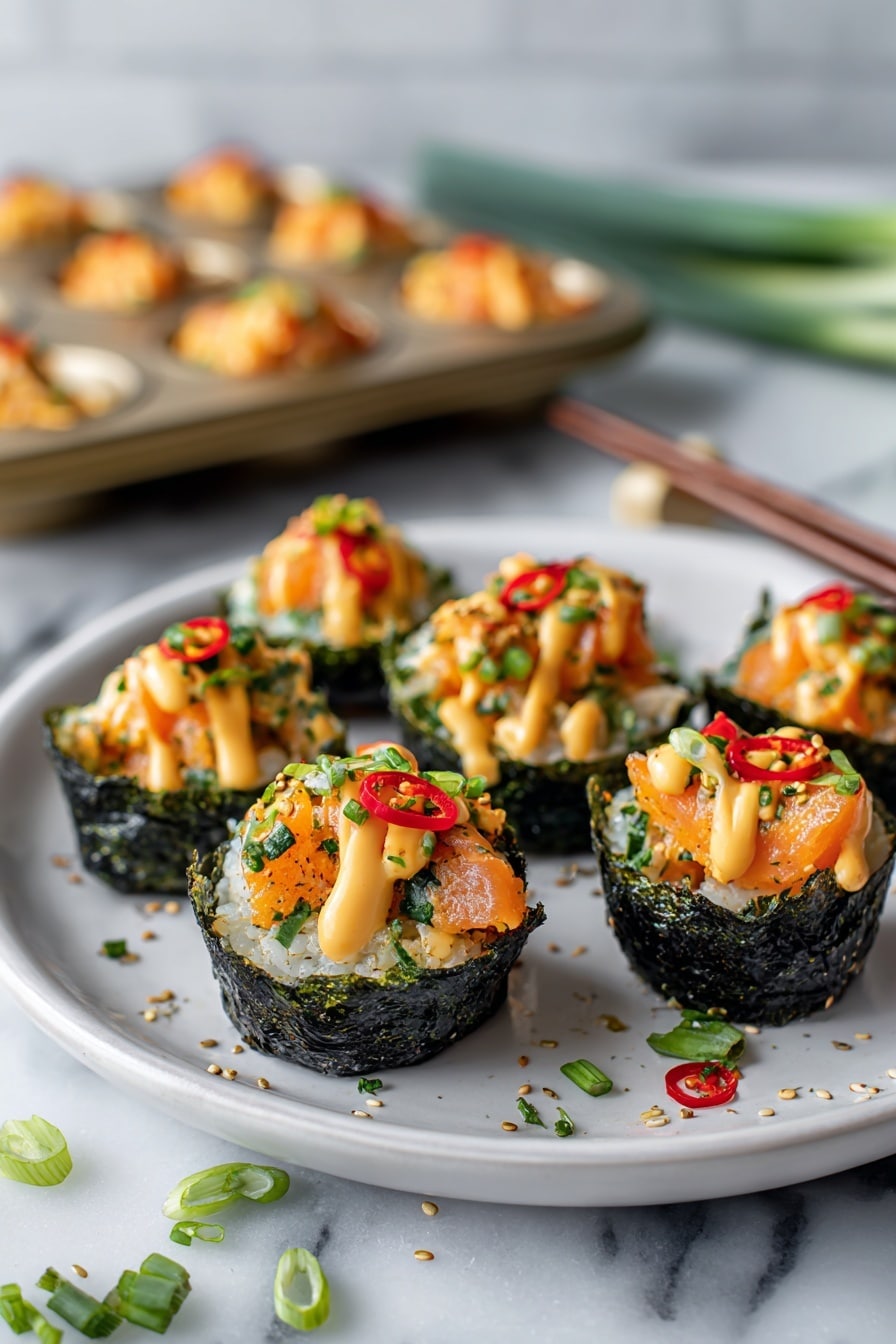
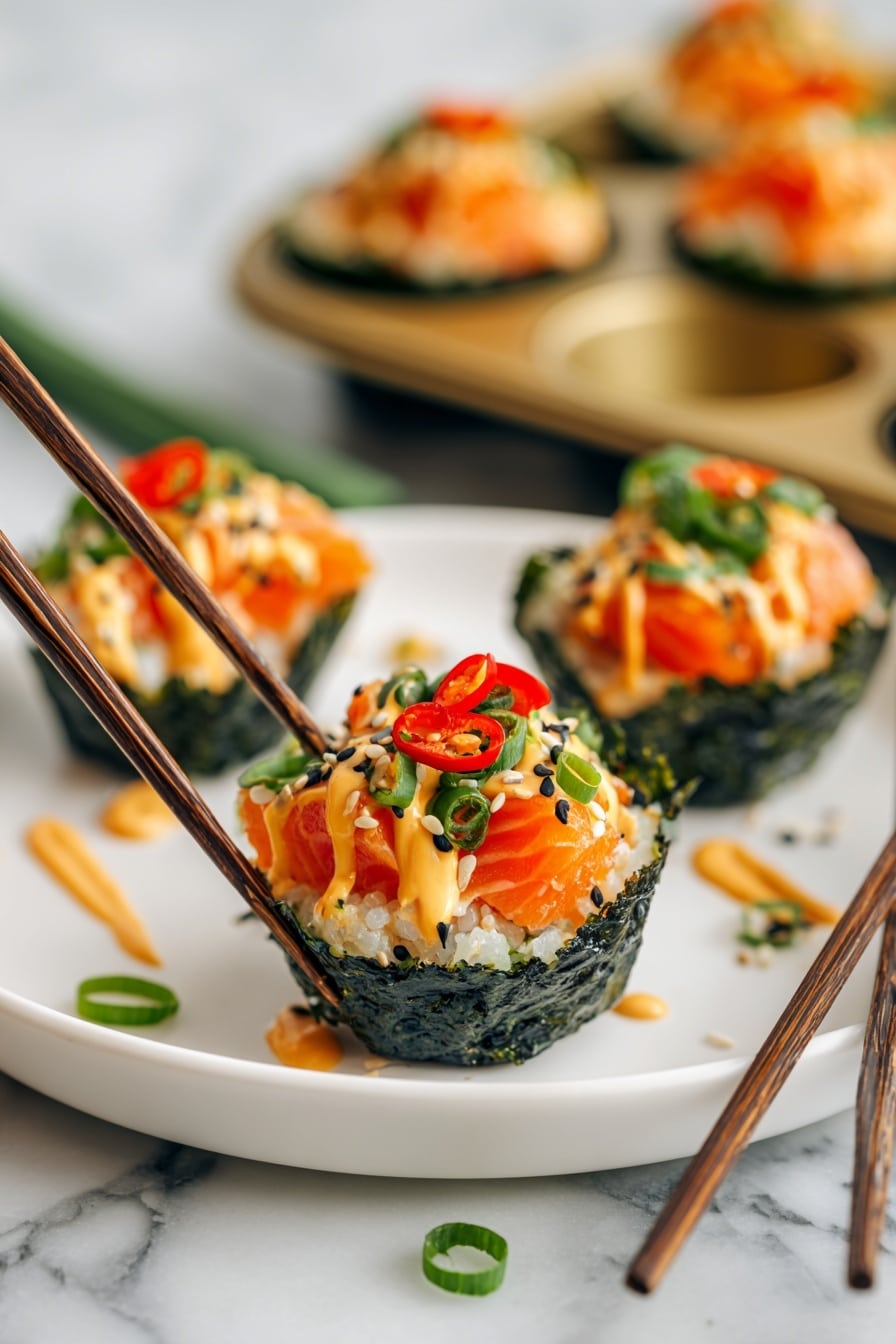
If you’re craving sushi but want something quick, fun, and absolutely delicious, you’re going to adore this Easy Baked Salmon Sushi Cups Recipe. It’s one of those recipes I stumbled upon that totally changed my weeknight dinners—because who doesn’t love sushi flavor that’s effortless to make at home? Stick around, and I’ll share exactly how to nail these perfect little bites that will impress your family and friends without any fuss.
Why You’ll Love This Recipe
- Simple Ingredients: You likely already have everything on hand or can find it easily at your local store.
- Quick Prep and Bake: From start to finish, these sushi cups come together in just about 30 minutes—perfect for busy nights.
- Fun & Family-Friendly: My kids love helping press the rice into the nori and topping the salmon mix—it’s a great way to get everyone involved.
- Customizable Flavors: You can adjust the spice levels or swap ingredients to fit your taste and dietary needs effortlessly.

Ingredients You’ll Need
This recipe balances tender baked salmon with that authentic sushi rice goodness wrapped in nori, finished with classic umami and spicy flavors. Getting the right sushi rice and the quality of salmon makes all the difference, so I’m sharing some tips that ensure your sushi cups come out amazing every time.
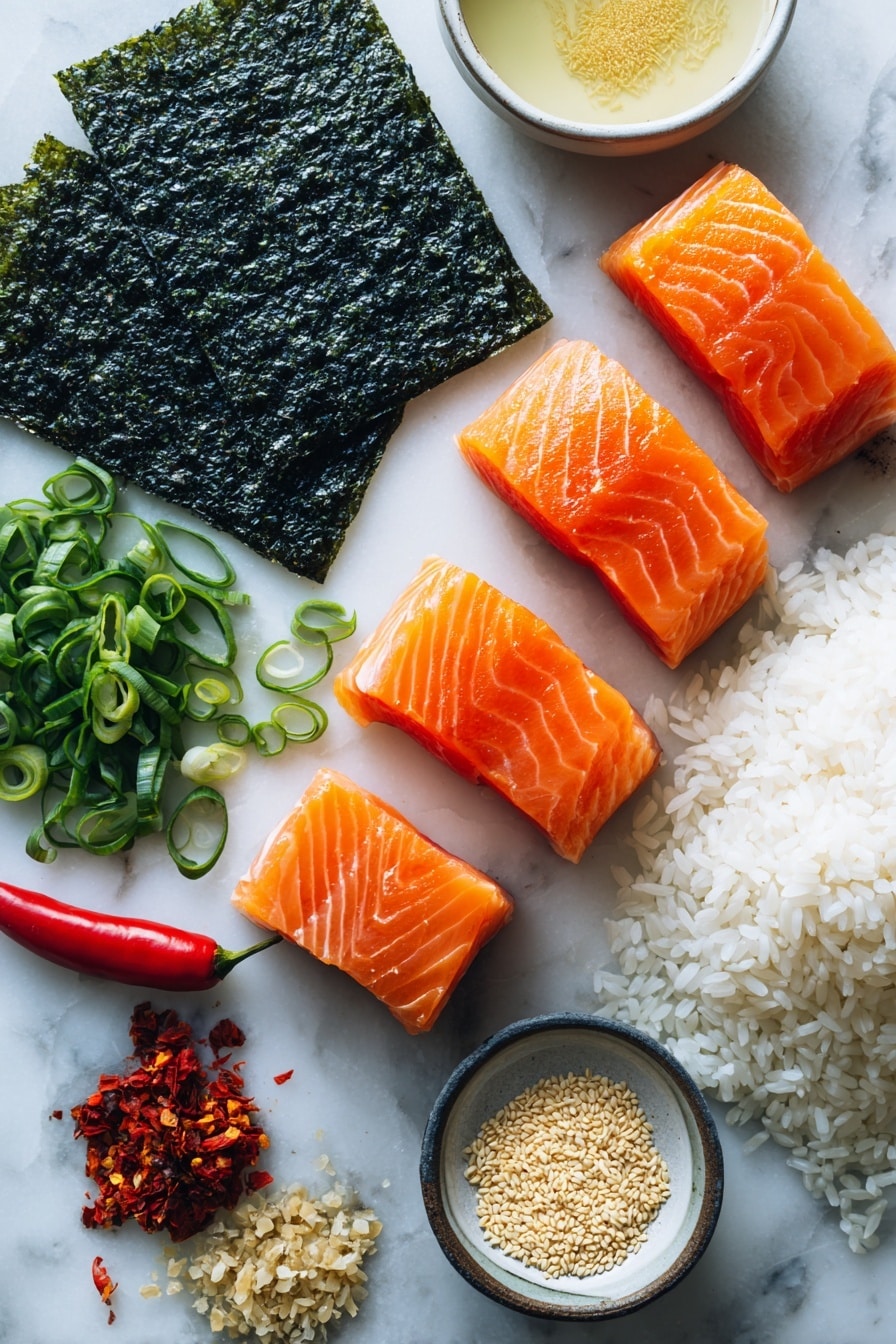
- Salmon: Fresh or thawed salmon works best, cut into bite-sized cubes for even cooking.
- Light soy sauce: Brings just the right salty touch without overpowering the other flavors.
- Kewpie Mayo: This Japanese mayo is creamier and slightly sweeter than regular mayo, giving richness to the salmon mix.
- Sriracha: Adjust to your spice preference—this adds a delicious kick that your taste buds will love.
- Sesame oil: Just a small amount adds depth and a toasty aroma.
- Uncooked sushi rice: Essential for that sticky texture; rinsing it well before cooking makes a big difference.
- Rice vinegar: Combined with sugar to season the rice perfectly without overwhelming it.
- White sugar: Balances the acidity in the rice vinegar for traditional sushi rice flavor.
- Nori sheets: Cut into squares to line your muffin tins and hold everything together neatly.
- Furikake: This Japanese seasoning adds crunch and extra umami as a garnish.
- Green onion: Adds fresh color and a mild onion bite for a perfect finish.
- Cooking spray: For greasing your muffin tin to keep the sushi cups from sticking.
Variations
I love playing around with this basic recipe to tailor it to different occasions or my mood. Don’t hesitate to make it your own—once you get comfortable with the base, it’s fun to mix and match flavors or ingredients.
- Spicy Mayo Variation: I sometimes swap out sriracha for wasabi mayo for a creamy, vibrant heat that’s irresistible.
- Vegetarian Version: Replace salmon with sautéed shiitake mushrooms and roasted veggies for a veggie sushi cup twist.
- Gluten-Free Twist: Use tamari in place of soy sauce to keep things gluten-free without compromising taste.
- Extra Crunch: Sprinkle panko crumbs on top before baking for a crispy texture contrast that my family goes wild over.
How to Make Easy Baked Salmon Sushi Cups Recipe
Step 1: Cook and Season the Sushi Rice
Start by cooking your sushi rice according to package instructions—this usually takes about 15 minutes. While the rice is cooking, combine rice vinegar and sugar in a microwave-safe bowl and heat until the sugar dissolves (about 30 seconds). Once the rice is done, gently mix the vinegar mixture into the rice while it’s still warm. This step is crucial because it gives you that signature sushi rice tang and stickiness. I learned that mixing while warm helps the rice absorb the flavors perfectly.
Step 2: Prepare the Salmon Mixture
While the rice cools slightly, preheat your oven to 400°F. In a bowl, combine the cubed salmon with light soy sauce, Kewpie mayo, sriracha, and sesame oil. Mix everything gently but thoroughly so every piece of salmon gets coated. This marinade is what makes these sushi cups stand out—it’s creamy, spicy, and full of umami. I like to give it a quick taste here to see if I want to add more heat or a touch more soy sauce.
Step 3: Assemble the Sushi Cups
Cut your nori sheets into rectangles large enough to fit into each muffin tin slot—usually quarters work best. Lightly grease your muffin tin with cooking spray to prevent sticking. Place one nori piece into each cup, gently pressing a spoonful of the seasoned sushi rice into the base and slightly up the sides, forming a little cup. Then, spoon the salmon mixture on top. Repeat until all the rice and salmon are used up. The nori holds everything together, creating a neat, handheld sushi cup perfect for parties or casual dinners.
Step 4: Bake to Perfection
Bake your sushi cups in the preheated oven for about 15 minutes. You’ll want to see the salmon cooked through but still tender, with a tiny golden brown on top—that’s the magic that makes these cups irresistible. After baking, let them cool a couple of minutes. This prevents the nori from becoming too soft and falling apart when you serve.
Step 5: Garnish and Serve
Drizzle a bit more sriracha or spicy mayo over the top for that extra flavor punch. Sprinkle on furikake and chopped green onions for color, crunch, and umami bursts. Serve immediately—these sushi cups are best fresh but still delicious if eaten within a few hours.
Pro Tips for Making Easy Baked Salmon Sushi Cups Recipe
- Perfect Rice Texture: Rinse your sushi rice 3-4 times until the water runs clear to avoid soggy rice cups.
- Marinate Wisely: Give the salmon a quick rest in the mayo-sriracha mixture but don’t over-marinate—it can become too mushy to hold shape.
- Nori Placement: Make sure the nori edges extend beyond the muffin tin rim slightly to keep the sushi cups intact when baking.
- Cool Before Serving: Let the cups cool 5 minutes post-bake to firm up and avoid a seaweed soggy mess.
How to Serve Easy Baked Salmon Sushi Cups Recipe
Garnishes
I’m all about simplicity here—furikake is my go-to sprinkle because it adds nuttiness and crunch effortlessly. A drizzle of extra spicy mayo or sriracha ups the flavor and looks gorgeous on top. Fresh chopped green onions add brightness and a little crunch, making the cups look as good as they taste.
Side Dishes
Pair these sushi cups with a light cucumber salad or pickled ginger for a refreshing contrast. Edamame beans or a simple seaweed salad are other favorites I serve alongside—easy, healthy, and they complement the sushi flavors perfectly.
Creative Ways to Present
For parties, I like to serve these sushi cups on a wooden sushi platter with small bowls of soy sauce for dipping. Adding colorful edible flowers or microgreens makes for an elegant presentation that surprises guests. You could also serve them with little bamboo picks for an easy, mess-free bite at casual gatherings.
Make Ahead and Storage
Storing Leftovers
If you have leftovers (though that rarely happens in my house!), store them in an airtight container in the fridge. They keep well for up to 2 days, but the nori may soften slightly over time. To avoid this, store the garnishes separately and add them just before serving.
Freezing
While I don’t usually freeze these sushi cups because of the fresh rice and fish, you can freeze the salmon mixture separately for up to 1 month. Thaw it overnight in the fridge, then assemble and bake fresh for best texture and taste.
Reheating
Reheat the sushi cups in a preheated 350°F oven for about 5-7 minutes to warm through without sogginess. Avoid microwaving if possible, as it can make the rice gummy and the nori chewy.
FAQs
-
Can I use other types of fish instead of salmon?
Absolutely! While salmon is great for its rich flavor and texture, you can try tuna or even cooked shrimp for a different sushi cup experience. Just make sure the fish you choose is fresh and cubed evenly for consistent cooking.
-
How do I make sushi rice without a rice cooker?
No rice cooker? No problem. Rinse your sushi rice thoroughly, then cook it in a pot with the proper water ratio according to the package. Bring to a boil, then reduce heat to low and cover for 15 minutes. Let it rest off the heat for another 10 minutes before seasoning.
-
Can I prepare these sushi cups ahead of time?
You can assemble the sushi cups a few hours ahead and keep them covered in the refrigerator. Just wait to bake them until about 20 minutes before serving to maintain the best texture and flavor.
-
What if I don’t have Kewpie mayo?
Regular mayo is a fine substitute, just consider adding a teaspoon of rice vinegar or lemon juice to brighten the flavor closer to Kewpie’s profile. It won’t be exactly the same, but still delicious!
Final Thoughts
This Easy Baked Salmon Sushi Cups Recipe is one of those surprise hits I love sharing with friends. It’s approachable but feels special enough for entertaining or treating yourself. When I first made these, I was amazed at how the flavors came together so beautifully with minimal effort. You’ll enjoy how versatile they are and how easily you can tweak them to suit your taste. So grab some salmon, sushi rice, and nori, and let’s get baking—you’re in for a delicious, fun, and satisfying meal!
Print
Easy Baked Salmon Sushi Cups Recipe
- Prep Time: 15 minutes
- Cook Time: 15 minutes
- Total Time: 30 minutes
- Yield: 12 sushi cups
- Category: Appetizer
- Method: Baking
- Cuisine: Japanese Fusion
Description
These Easy Baked Salmon Sushi Cups are a delightful fusion dish combining the flavors of sushi with the convenience of baked cooking. Featuring a seasoned salmon mixture atop sushi rice nestled in nori-lined muffin tins, they bake to perfection with a slightly crispy top. Perfect for a quick snack or elegant appetizer, these sushi cups are flavorful, easy to assemble, and sure to impress.
Ingredients
Salmon Mixture
- 1 lb salmon, cubed
- 1 tbsp light soy sauce
- 1 tbsp Kewpie Mayo
- 1 tbsp Sriracha
- 1 tsp sesame oil
Sushi Rice
- 1 ½ cup uncooked sushi rice
- 1 tablespoon rice vinegar
- 2 teaspoon white sugar
Other Ingredients
- 3 large nori sheets
- Furikake, for garnish
- 1 green onion, chopped, for garnish
- Cooking spray, for greasing muffin tin
Instructions
- Cook Sushi Rice: Prepare the sushi rice according to the package instructions until fully cooked and tender. Set aside once done.
- Make Vinegar Mixture: In a microwave-safe bowl, combine the rice vinegar and white sugar. Microwave for about 30 seconds or until the sugar dissolves completely. Pour this mixture over the cooked sushi rice and gently fold to evenly distribute the seasoning. Set aside to cool.
- Preheat Oven: Preheat your oven to 400℉ (204℃) to ensure it’s ready for baking the sushi cups.
- Prepare Salmon Topping: In a mixing bowl, combine the cubed salmon, light soy sauce, Kewpie mayo, sriracha, and sesame oil. Mix thoroughly until all the ingredients are well incorporated. Set aside.
- Prepare Nori Sheets and Muffin Tin: Cut the nori sheets into 4 rectangles or squares each, sized to fit snugly into the muffin tin cups. Lightly grease the muffin tin with cooking spray to prevent sticking.
- Assemble Sushi Cups: Place each nori piece into the muffin tin cups. Spoon a portion of sushi rice onto the center of each nori piece and gently press it down to form a base layer. Then, top each rice base with a spoonful of the salmon mixture, spreading it evenly.
- Bake Sushi Cups: Bake in the preheated oven at 400℉ (204℃) for about 15 minutes, or until the salmon is cooked through and the top appears slightly golden and crisp.
- Garnish and Serve: Remove the sushi cups from the oven and let them cool for a few minutes. Drizzle extra sriracha or spicy mayo on top if desired. Garnish with furikake seasoning and chopped green onions. Serve immediately and enjoy these delicious salmon sushi cups!
Notes
- Ensure the sushi rice is fully cooked and cooled slightly before assembling for best texture.
- You can adjust the spiciness by modifying the amount of sriracha added to the salmon mixture and topping.
- Use fresh, sushi-grade salmon to ensure safety and optimal flavor.
- These cups are best consumed immediately but can be stored in the refrigerator for up to 1 day.
- For a vegetarian version, substitute the salmon with marinated tofu or avocado.
Nutrition
- Serving Size: 1 sushi cup
- Calories: 110
- Sugar: 2 g
- Sodium: 230 mg
- Fat: 4 g
- Saturated Fat: 0.8 g
- Unsaturated Fat: 2.5 g
- Trans Fat: 0 g
- Carbohydrates: 12 g
- Fiber: 1 g
- Protein: 8 g
- Cholesterol: 35 mg


