

If you’ve been intimidated by sourdough baking or just looking for a way to enjoy that delicious tangy bread without breaking a sweat, you’re in the right place. This Easy No-Knead Sourdough Bread Recipe is honestly a game-changer—no fancy gadgets, no complicated kneading, just a beautiful crusty loaf you can feel proud sharing at your table. Trust me, once you try this, you’ll want to make sourdough your new weekend ritual.
Why You’ll Love This Recipe
- Minimal Effort: No kneading means less messing around and more savoring the process and results.
- Delicious Crust & Crumb: You’ll get that perfect artisan crunch with a soft, flavorful inside every time.
- Fail-Proof Fermentation: The method uses oven light warmth, making rising super reliable even in cooler kitchens.
- Flexible Timing: The slow rise gives you some wiggle room in your schedule without ruining the loaf.

Ingredients You’ll Need
I’ve kept this recipe straightforward with simple ingredients that you likely already have or can find easily. The magic really happens with your starter and timing, so let’s dive into the essentials.

- Mature Starter: This is the heart of your sourdough. Make sure it’s active and bubbly for best rise and flavor.
- Bread Flour or Unbleached All-Purpose Flour: Bread flour gives better gluten development, but all-purpose works just fine if that’s what you have.
- Filtered Water: Using filtered water avoids any chlorine that might slow fermentation.
- Sea Salt: Adds balance and enhances the natural flavor of the sourdough.
Variations
What I love about this recipe is how easy it is to tweak. Whether you want to add seeds for crunch or swap flours, feel free to experiment and make it your own. Here are some ideas from my own kitchen adventures.
- Seeded Loaf: I like adding a handful of toasted sesame or sunflower seeds to the dough for a nutty crunch—my family goes crazy for it!
- Whole Wheat Mix: Swapping about 20-30% of the white flour with whole wheat adds a rich, earthy flavor without sacrificing rise.
- Garlic & Herb: Toss in minced garlic and rosemary for a savory twist that’s perfect for sandwiches or alongside soups.
- Gluten Sensitivity: While this recipe isn’t gluten-free, you can try using spelt flour for a lighter gluten version that still tastes great.
How to Make Easy No-Knead Sourdough Bread Recipe
Step 1: Build Your Starter the Night Before
It all begins the evening before baking. Mix about 25 grams of your mature starter with flour and warm water. I always use water around 90°F because it wakes the yeast up gently without stressing it. After stirring until smooth, cover loosely and leave it on your counter overnight—around 8 to 12 hours. In the morning, you’ll see bubbles and a doubled volume, meaning your starter is ripe and ready.
Step 2: Mix the Dough and Let It Rise
Combine the ripe starter with more warm water in a big bowl. I stir until it’s completely mixed, then add flour and salt. Use your hands to form a shaggy, sticky dough—it looks rough but trust me, that’s exactly what you want. Cover and place it inside your oven with the light on (this gives the dough gentle warmth), and let it rise for 5 to 6 hours until puffed and almost doubled. When you press it gently, it should slowly bounce back.
Step 3: Shape Your Dough With Gentle Folds
Once your dough has risen, turn it out onto a floured counter. Using gentle folds from all sides, pinch the dough and create surface tension by shaping it into a smooth, taut ball. Don’t rush here—this shaping step helps your bread develop that lovely structure and crumb texture. Then place it seam-side up in a floured bread basket or bowl lined with a towel, cover it, and let it rise again for 2 to 3 hours in your oven with the light on until it puffs up beautifully.
Step 4: Score and Bake for that Perfect Crust
Preheat your oven to 450°F and get your Dutch oven ready. Carefully transfer the dough from the basket onto a piece of parchment paper, seam side down, and score the top with a sharp knife or lame—not too shallow or your bread won’t open nicely. Lift the dough with the parchment into the Dutch oven, cover it, reduce heat to 425°F, and bake covered for 40 minutes. Then remove the lid and bake another 5 to 10 minutes to get that gorgeous golden crust. The loaf should sound hollow when you tap it—that’s the best “bread baking” sound you’ll ever hear.
Step 5: Cool Before Slicing — Patience is a Virtue
After baking, move your bread onto a cooling rack and let it cool completely for at least two hours. I know it’s tempting to cut in right away, but cooling lets the crumb set perfectly and prevents a gummy texture. When your bread is cool, slice it up and enjoy—you won’t believe this came from such a simple, no-knead recipe!
Pro Tips for Making Easy No-Knead Sourdough Bread Recipe
- Oven Light Temperature Control: I learned to test the oven light warmth with my hand—if it feels too hot, crack the door slightly. This keeps the dough from overproofing.
- Sticky Dough Is Perfect: Don’t try to over-flour or add water; that sticky texture creates amazing crust and crumb.
- Confident Scoring: Use a sharp blade and a quick motion—hesitation can tear the dough unevenly, affecting your rise and shape.
- Waiting is Worth It: Cooling the bread fully before slicing avoids disappointing gummy centers—patience pays off big time.
How to Serve Easy No-Knead Sourdough Bread Recipe

Garnishes
My favorite way to top slices is a generous slather of creamy butter—sometimes with a little flaky sea salt sprinkled on top. For something heartier, avocado smashed with lemon juice and crushed chili flakes is a total crowd-pleaser. If you’re feeling fancy, a drizzle of good olive oil mixed with herbs makes a perfect dip.
Side Dishes
I love pairing this sourdough with warm soups—think roasted tomato basil or creamy mushroom. It’s also amazing alongside a vibrant salad or charcuterie board for easy entertaining. When I’m in a pinch, a simple scrambled eggs and fresh fruit combo makes for a fabulous brunch.
Creative Ways to Present
For special occasions, I like to serve the loaf in a rustic linen basket lined with a colorful kitchen towel, torn into chunks for sharing. Another fun idea is slicing and toasting the bread, then topping with heirloom tomatoes, fresh basil, and a sprinkle of sea salt for a gorgeous bruschetta spread. It’s always a hit!
Make Ahead and Storage
Storing Leftovers
I keep my sourdough in a paper bag at room temperature—this keeps the crust from getting soggy and the crumb fresh for up to three days. If you notice it starting to dry, a quick toast revives it perfectly.
Freezing
Freezing slices is a lifesaver. Just slice your cooled loaf, wrap the pieces tightly in plastic wrap, then place in an airtight container or freezer bag. When I want a quick snack, I pop slices straight from the freezer into the toaster or oven with no loss in flavor or texture.
Reheating
To bring your leftover sourdough back to life, I like reheating it in a preheated 350°F oven for 5-7 minutes wrapped loosely in foil to keep the crust from getting too hard. For toasted slices, a quick spin in the toaster oven does the trick and keeps things crispy.
FAQs
-
What if my starter isn’t bubbly or active enough?
That’s totally normal if you’re new to sourdough. Your starter must be active and bubbly to get a good rise. If yours isn’t ready, feed it a few more times over a couple of days until it doubles in size within 4-6 hours and passes the float test (a small bit floats in water). Without an active starter, your bread won’t rise well.
-
Can I use all-purpose flour instead of bread flour?
Absolutely! Bread flour is ideal for gluten development and a chewier crumb, but all-purpose flour works well too — especially if you prefer a lighter texture. Just be sure to measure accurately and expect a slightly softer dough.
-
What does “no-knead” actually mean in this recipe?
Here, “no-knead” means you don’t have to do the traditional intense folding or kneading steps. Instead, you mix and let the dough rise slowly with minimal handling. This slow fermentation and gentle folding replaces kneading while still developing great texture.
-
How do I know when the dough has risen enough?
Look for your dough to roughly double in size and feel puffy. When you gently press it with your finger, the indentation should slowly fill back in but still remain slightly visible. That’s your cue that it’s ready for the next step.
-
Why do I need to let the bread cool completely before slicing?
Cooling allows the crumb to set and moisture to redistribute. If you slice too early, the inside can be gummy and dense. Waiting at least two hours ensures a perfect, tender crumb and crisp crust.
Final Thoughts
When I first tried this Easy No-Knead Sourdough Bread Recipe, I was surprised at how approachable sourdough baking could be without the usual intimidation factor. This bread always impresses guests and makes my kitchen smell like a cozy bakery. Whether you’re a seasoned baker or just starting out, I promise this recipe will quickly become a favorite in your home. Give it a try—you’ll love slicing into your own homemade crusty, tangy loaf fresh from the oven as much as I do!
Print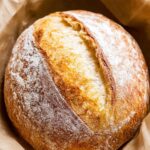
Easy No-Knead Sourdough Bread Recipe
- Prep Time: 15 minutes
- Cook Time: 50 minutes
- Total Time: 10 hours 5 minutes
- Yield: 8 servings
- Category: Bread
- Method: Baking
- Cuisine: American
Description
This Easiest Ever Sourdough Bread recipe is a no-knead artisan loaf that uses time and a simple starter build to develop rich flavor and a perfect crust. Ideal for beginners, it combines minimal hands-on effort with professional-level results, creating a chewy, airy crumb and a golden, crackly crust baked in a Dutch oven.
Ingredients
Starter Build (Night Before)
- 25 grams mature starter (about 2 tablespoons)
- 75 grams unbleached bread flour or all-purpose flour (½ cup + 1 teaspoon)
- 75 grams water at 90°F (⅓ cup)
Dough
- 100 grams ripe starter (heaping ⅓ cup)
- 300 grams filtered water at 90°F (1¼ cups + 1 tablespoon)
- 500 grams white bread flour or unbleached all-purpose flour (3½ cups + ½ teaspoon)
- 10 grams sea salt (2⅛ teaspoons)
Instructions
- Build the Starter: The evening before baking, combine 25 grams of mature starter, 75 grams of flour, and 75 grams of warm water (90°F) in a clean mason jar. Stir thoroughly until no dry flour remains. Cover loosely with plastic wrap and allow to rest at room temperature for 8-12 hours until the starter doubles in size and becomes bubbly.
- Mix the Dough: The next morning, in a large mixing bowl, combine 100 grams of the ripe starter with 300 grams of warm water (90°F). Stir until dispersed. Add 500 grams of bread flour and 10 grams of sea salt. Mix until a shaggy, sticky dough forms, then shape it into a rough ball. The dough should feel sticky and rough, which is ideal.
- First Rise: Cover the bowl with plastic wrap and place it inside the oven with only the oven light on. This creates a warm environment around 80-85°F, perfect for fermentation. Let the dough rise for 5-6 hours until noticeably puffed and doubled. When poked gently, the dough should leave an indent that slowly fills back in. Adjust oven temperature by cracking the door or turning off the light if it becomes too warm.
- Shape the Dough: Lightly dust a counter with flour and turn the dough out seam side down. Starting from the top edge, gently stretch and fold the dough to the center. Repeat with the bottom, left, and right edges, pinching to seal. Repeat this folding once more, then flip the dough seam side down. Using cupped hands, rotate and pull the dough to form a tight, smooth ball with a taut but soft surface.
- Second Rise: Dust a bread basket well with flour and place the dough seam side up in the basket. Lightly dust the top with flour to prevent sticking, cover with plastic wrap, and return to the oven with the light on for another 2-3 hours until doubled and airy. The dough should hold an indentation when pressed.
- Prepare for Baking: Remove the dough from the oven and preheat your oven to 450°F. Unlike some recipes, do not preheat the Dutch oven for this loaf. Place parchment paper on the counter, gently turn the dough out onto it seam side down, and score the top about ½-inch deep lengthwise with a sharp knife or bread lame. Make a decisive cut to allow for proper expansion.
- Bake the Bread: Using the parchment paper corners, lift the dough into the Dutch oven. Cover with the lid and reduce oven temperature to 425°F. Bake covered for 40 minutes, then remove the lid and bake an additional 5-10 minutes until the crust is a dark golden brown and sounds hollow when tapped.
- Cool the Loaf: Remove the bread from the Dutch oven using the parchment and place it on a cooling rack. Let it cool completely for at least 2 hours to set the crumb and harden the crust. The internal temperature should be 190-205°F before slicing and serving.
Notes
- Using an active, bubbly starter is key; if your starter doesn’t float in water, wait before using.
- If you don’t have a proofing basket, a large bowl lined with a well-floured kitchen towel works well.
- The dough will be sticky during mixing, which helps create the artisan texture.
- If your kitchen is cool, fermentation times may be longer; the oven light trick creates ideal warmth.
- Score the dough with confidence; hesitant cuts can cause uneven rising. Beginners can opt for a simple straight line.
- Bread flour yields ideal results but all-purpose flour works fine too.
- Store at room temperature in a paper bag up to 3 days; for longer storage, slice and freeze in an airtight container up to 3 months.
Nutrition
- Serving Size: 1 slice (approx. 70g)
- Calories: 160
- Sugar: 0.2g
- Sodium: 230mg
- Fat: 0.5g
- Saturated Fat: 0.1g
- Unsaturated Fat: 0.4g
- Trans Fat: 0g
- Carbohydrates: 33g
- Fiber: 1.5g
- Protein: 5g
- Cholesterol: 0mg


