
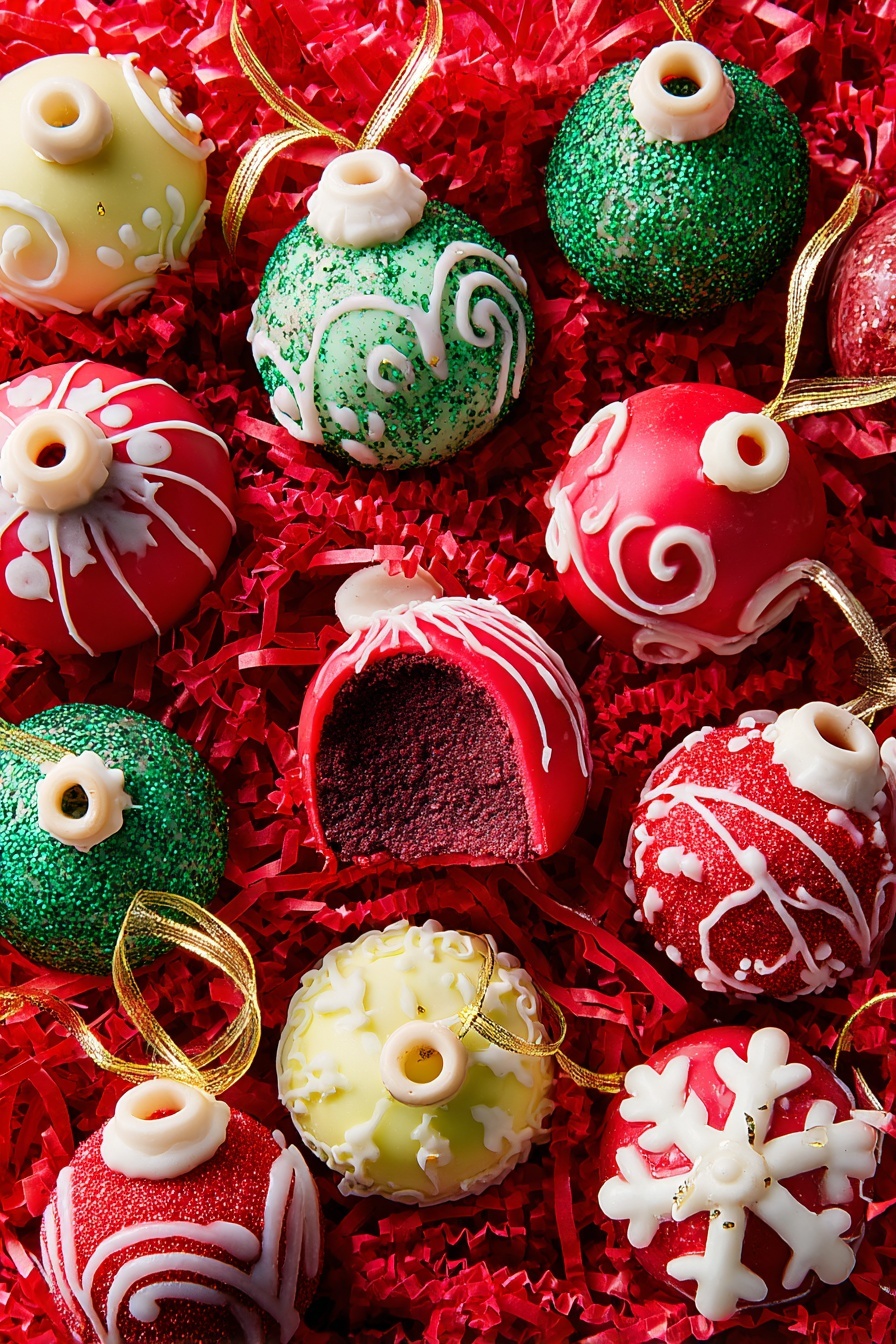
If you’re looking for a festive treat that doubles as adorable holiday décor, you’re going to fall head over heels for this Festive Cake Ball Ornaments Recipe. These cake balls look just like Christmas tree ornaments and taste like a little bite of velvet-smooth holiday magic. I absolutely love how they bring that extra sparkle to our festivities, and the best part? They’re surprisingly easy to make, even if you’re not a seasoned baker. Stick around, and I’ll walk you through every step so your cake ball ornaments turn out perfectly every time.
Why You’ll Love This Recipe
- Dual-purpose Delight: These cake balls aren’t just yummy—they double as gorgeous holiday ornaments.
- Simple Ingredients: You can make this with a boxed cake mix and a handful of pantry staples—super approachable!
- Customizable Colors & Designs: Melted candy coatings let you customize your ornament colors to match your tree perfectly.
- Kid-Friendly & Fun: Great for baking with little helpers; decorating the cake balls is always a party.

Ingredients You’ll Need
These ingredients come together beautifully to create cake balls that are moist and flavorful, with just the right touch of sweetness and creaminess. When shopping, I find the red velvet cake mix is easiest to find this time of year, and the candy melts come in festive colors that make decorating fun and foolproof.
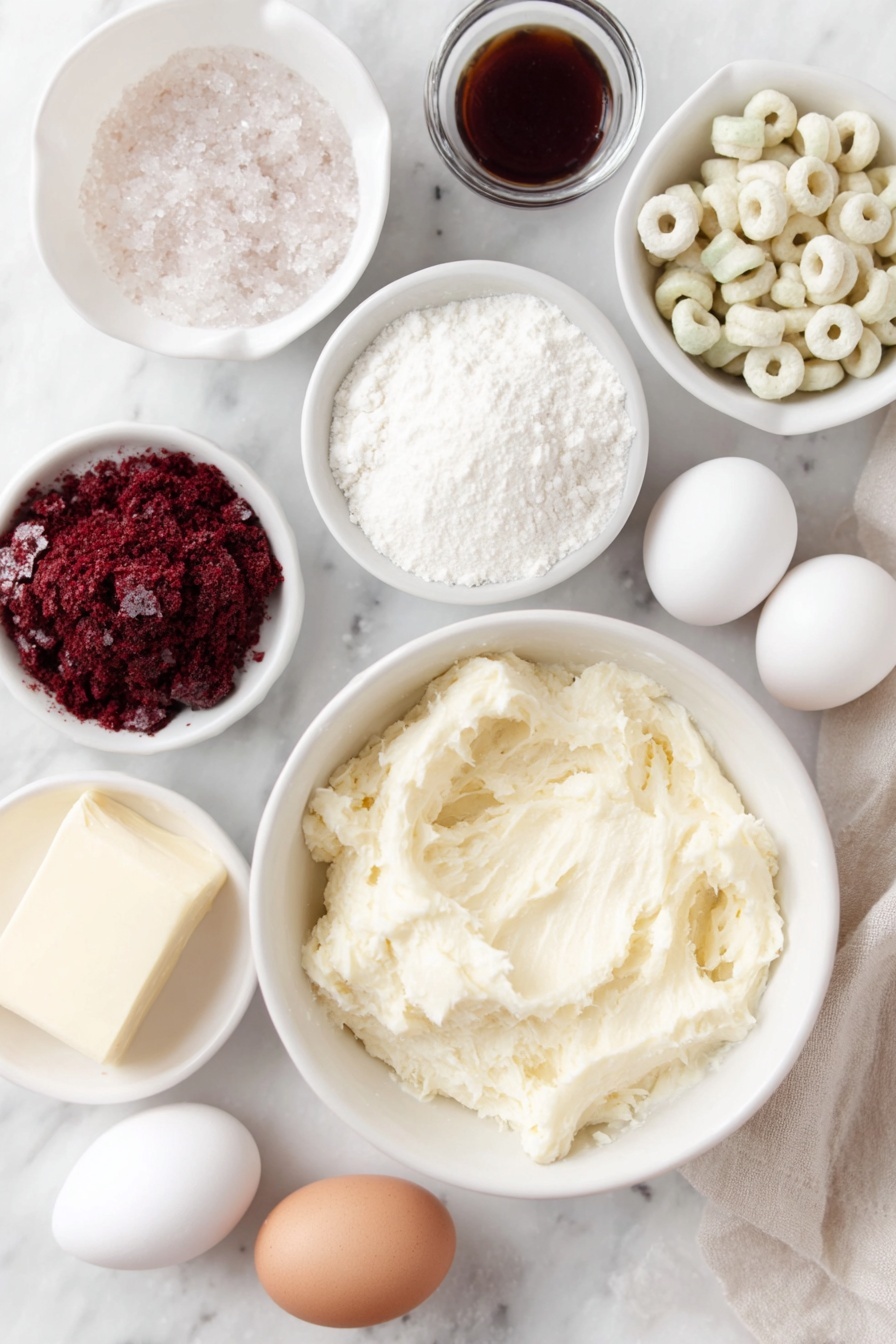
- Red velvet cake mix: This gives the balls that signature festive red tint and rich cocoa flavor.
- Cream cheese: Softened cream cheese adds a delicious tang and creamy texture inside the balls.
- Unsalted butter: Helps keep the mixture smooth without overpowering the cream cheese flavor.
- Confectioners’ sugar: Adds sweetness and helps bind the mixture.
- Vanilla extract: Just a splash for warmth and depth of flavor.
- Kosher salt: Balances sweetness perfectly.
- Frosted Cheerios: Extra crunchy cereal pieces that become the “hooks” for hanging your ornament cake balls.
- Green, red, and white candy melts: Melted for coating the cake balls and decorating—think of it as edible ornament paint!
- Sanding sugar: For adding sparkle and a festive finish.
- Cooking spray: To grease your pan, so your cake bakes evenly without sticking.
Variations
I love how versatile this Festive Cake Ball Ornaments Recipe is—you can switch up the cake mix or decorations to suit your style and pantry. Feel free to get creative; each variation brings a new spin to this festive favorite.
- Flavor Swap: I once used a peppermint cake mix instead of red velvet, and it gave the ornaments a lovely holiday minty twist that my family adored.
- Gluten-Free Option: Using a gluten-free cake mix works great here, just make sure your candy melts and toppings are GF too.
- Decorating Themes: Try gold or silver candy melts for an elegant look, or add edible glitter for extra sparkle.
- Nut Mix-ins: If you don’t have little ones around, folding in some finely chopped nuts adds a satisfying crunch inside the cake balls.
How to Make Festive Cake Ball Ornaments Recipe
Step 1: Bake Your Red Velvet Cake
Start by preheating your oven to 350°F and greasing a 13″ x 9″ pan with cooking spray—this ensures easy cake removal. Mix your cake batter exactly as the package instructs. Pour it evenly into the pan and bake for about 25 to 30 minutes until a toothpick comes out clean. I’ve found letting the cake cool fully at room temperature is key—warm cake will make mixing tricky later.
Step 2: Mix the Cream Cheese Frosting
While the cake cools, beat together softened cream cheese and butter until they’re nice and fluffy—about 2 to 3 minutes on medium-high speed. Then add the confectioners’ sugar, vanilla, and a pinch of kosher salt. Beat until it’s all smooth and combined. This luscious frosting is the secret that keeps the cake balls perfectly moist and flavorful.
Step 3: Combine & Chill the Cake Balls
Crumble the cooled cake into fine pieces in a large bowl, then stir in the cream cheese frosting using your hands or a spatula. Mix until you get a sticky dough. When I do this, I sometimes break up any lumps with my fingers so all the crumbs absorb that creamy frosting. Roll the mixture into 1½-inch balls—about 34 of them—and lay them on a baking sheet. Pop them in the fridge for about an hour so they firm up nicely before decorating.
Step 4: Make Your Candy Melt Hooks
To create the little “hooks” that look like ornament hangers, lay 34 Frosted Cheerios flat on a baking sheet. Hold an extra Cheerio upright, dip its bottom into white melted candy, and attach it to the center of one of the flat ones. Repeat until all hooks are ready. This is a small step but so worth the effort—those hooks make your cake balls look like real ornaments! I discovered this trick after trying all sorts of ideas; cereal pieces stick well and look adorable.
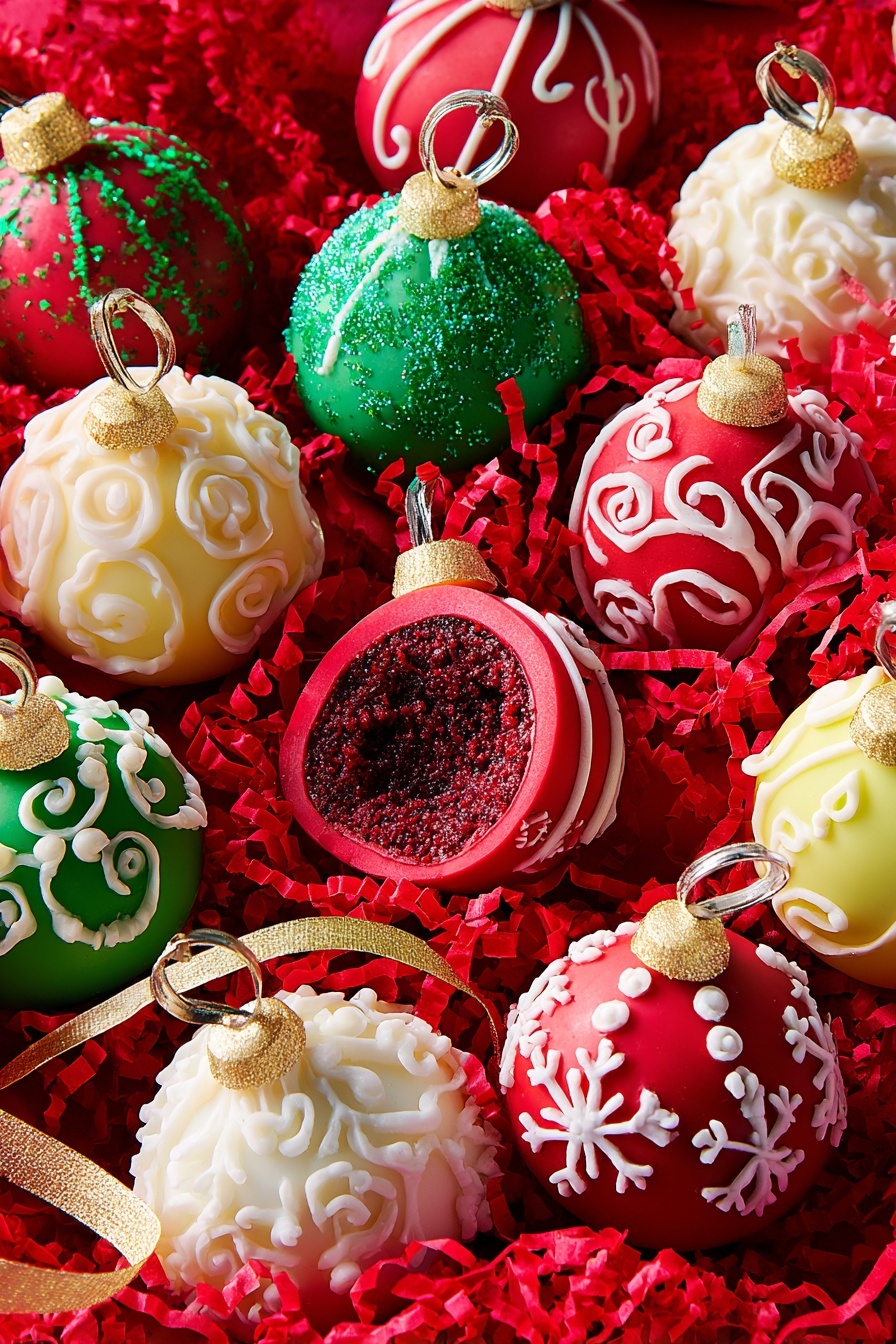
Step 5: Dip and Decorate Your Cake Balls
Divide your cake balls into three groups. Dip one-third into green candy melts, another third into red, and the rest into white. Let excess chocolate drip off before laying them back on your baking sheet. Before the coating hardens, sprinkle some with sanding sugar for a sparkly finish. After about 15-20 minutes, when the coating is set, transfer most of the remaining white candy melt to a plastic bag with a tiny cut in the corner and pipe festive designs on your cake balls. Again, sprinkle sanding sugar while the drizzle is still wet for that twinkle. Finally, dip the hook bottoms into leftover white candy melts and attach them to the top of the cake balls. Let everything set fully before displaying or eating.
Pro Tips for Making Festive Cake Ball Ornaments Recipe
- Let Cake Cool Completely: Warm cake makes crumbly dough that’s hard to shape—be patient and cool it fully.
- Use Room Temperature Cream Cheese & Butter: It blends more smoothly, making your cake balls silky.
- Don’t Skip Chill Time: Refrigerating your cake balls makes dipping easier and results in less cracking coating.
- Handle Candy Melts Gently: Melt them slowly in short bursts; overheating can cause clumping or grainy texture.
How to Serve Festive Cake Ball Ornaments Recipe
Garnishes
I love adding sanding sugar on top—it mimics the look of twinkling snowflakes on real ornaments. Sometimes I sprinkle crushed peppermint candy for a burst of minty crunch and extra Christmas vibes. If I’m going for a rustic vibe, a little drizzle of melted dark chocolate over the candy coating adds a delicious contrast and charm.
Side Dishes
These cake ball ornaments are sweet enough to shine alone, but I like serving them alongside a cup of rich hot chocolate or a spiced holiday coffee. They also pair beautifully with a cheese board during parties—balancing the savory flavors with something sweet and joyful.
Creative Ways to Present
One of my favorite ideas is to hang these cake ball ornaments on a faux mini Christmas tree at dessert tables—they’re both décor and dessert! Another fun presentation is arranging them in a clear glass bowl like festive candy, or packaging them in cello bags tied with bright ribbons for gifts. It’s such a crowd-pleaser every time.
Make Ahead and Storage
Storing Leftovers
I keep leftover cake ball ornaments in an airtight container in the fridge. They hold up well for about a week. Just make sure they’re stored in a single layer or separated with parchment to keep your candy coating from sticking to each other.
Freezing
If you want to make these ahead of time for a party, you can freeze the cake balls after they are coated and fully set. I wrap each one gently in wax paper and place them in a freezer-safe container. When you thaw them overnight in the fridge, they taste just as fresh as the day you made them.
Reheating
Since these are best enjoyed cold, I usually serve them chilled. However, if you want to soften the coating slightly before serving, just let them sit at room temperature for 10–15 minutes—no microwave needed. That way, you keep the delicate decoration intact while enhancing flavor and texture.
FAQs
-
Can I use a different cake flavor in this Festive Cake Ball Ornaments Recipe?
Absolutely! While red velvet gives that classic holiday look and taste, you can experiment with chocolate, vanilla, or even peppermint-flavored cake mixes to customize the flavor. Just be sure the color and flavors complement your candy coatings for the best festive effect.
-
How do I prevent the candy coating from cracking?
Make sure your cake balls are well chilled before dipping. Also, melt your candy coatings gently and dip quickly to keep the coating smooth. Avoid overcrowding the dipped balls while setting to prevent cracking or smudging.
-
Can I make the cake balls ahead of time and decorate later?
Yes! You can make and chill the cake balls up to 2 days before dipping and decorating. Keep them refrigerated in an airtight container, then decorate just before your event for the freshest look.
-
What if I don’t have candy melts?
If candy melts aren’t available, you can use high-quality white or colored chocolate chips, but you may need to add a small amount of vegetable shortening to get a smooth, thin coating suitable for dipping.
Final Thoughts
Making this Festive Cake Ball Ornaments Recipe has become one of my favorite holiday traditions. There’s something so joyful about turning something delicious into something visually magical that everyone can admire—and eat! I honestly think these cake ball ornaments add an extra dash of cheer that makes the season feel even more special. So grab your cake mix, gather your decorations, and dive in—you’re going to love how easy and fun these are. Happy holidays and happy baking!
Print
Festive Cake Ball Ornaments Recipe
- Prep Time: 20 minutes
- Cook Time: 30 minutes
- Total Time: 2 hours 10 minutes
- Yield: Approximately 34 cake ball ornaments
- Category: Dessert
- Method: Baking
- Cuisine: American
- Diet: Vegetarian
Description
Celebrate the holidays with these festive Christmas Cake Ball Ornaments made from red velvet cake and cream cheese frosting, coated in colorful candy melts and decorated like beautiful ornaments to hang or enjoy as a sweet treat.
Ingredients
Cake Balls
- Cooking spray
- 1 (15.25-oz.) box red velvet cake mix, plus ingredients called for on box
- 4 oz. cream cheese, softened
- 4 Tbsp. unsalted butter, softened
- 1 1/2 cups (170 g) confectioners’ sugar
- 1/2 tsp. pure vanilla extract
- Pinch of kosher salt
Assembly
- 1/4 cup Frosted Cheerios (about 70 pieces)
- 1 (12-oz.) bag green candy melts, melted
- 1 (12-oz.) bag red candy melts, melted
- 2 (12-oz.) bags white candy melts, melted
- Sanding sugar, for decorating
Instructions
- Prepare Cake Batter: Preheat the oven to 350°F (175°C). Grease a 13″ x 9″ baking pan with cooking spray. In a large bowl, prepare the red velvet cake mix according to the package directions, then pour the batter into the prepared pan.
- Bake the Cake: Bake the cake for 25 to 30 minutes, or until a cake tester inserted into the center comes out clean. Remove from oven and allow it to cool completely.
- Make Frosting Mixture: In a large bowl, beat the softened cream cheese and butter together on medium-high speed until light and fluffy, about 2 to 3 minutes. Add the confectioners’ sugar and mix until combined. Beat in the vanilla extract and a pinch of kosher salt.
- Form Cake Balls: Crumble the cooled cake into the frosting mixture and mix to combine thoroughly. Shape the mixture into 1 1/2-inch balls, producing about 34 cake balls. Arrange them on a baking sheet and refrigerate for about 1 hour until firm.
- Make Hooks: Place 34 Frosted Cheerios flat on a baking sheet. Take the remaining Cheerios, dip the bottom of each upright piece into melted white candy melts, and attach it to the center of a flat cereal piece on the baking sheet. Repeat for all Cheerios.
- Coat Cake Balls: Dip one-third of the chilled cake balls into the melted green candy melts, another third into the melted red candy melts, and the remaining third into the melted white candy melts. Tap off any excess coating. While the candy is still wet, sprinkle some cake balls with sanding sugar. Place back on the baking sheet and let set for 15 to 20 minutes.
- Decorate Ornaments: Transfer about three-quarters of the remaining white candy melts to a resealable plastic bag and cut a tiny corner off to create a piping bag. Pipe designs onto the coated cake balls and sprinkle with sanding sugar before the candy hardens. Dip the bottoms of the cereal hooks into the remaining white candy melts (reheat if necessary) and place them atop the decorated cake balls to complete the ornaments.
Notes
- Make sure the cake is completely cooled before mixing with the cream cheese frosting to ensure easy shaping.
- The sanding sugar adds a festive sparkle; use colored sanding sugar for extra effect.
- If candy melts begin to harden while decorating, gently reheat them in short bursts in the microwave to maintain a smooth consistency.
- Store cake ball ornaments in an airtight container in the refrigerator to keep them fresh for up to one week.
- These cake balls can also be served as individual treats without the cereal hooks if preferred.
Nutrition
- Serving Size: 1 cake ball ornament
- Calories: 180 kcal
- Sugar: 25 g
- Sodium: 150 mg
- Fat: 7 g
- Saturated Fat: 4.5 g
- Unsaturated Fat: 2 g
- Trans Fat: 0 g
- Carbohydrates: 28 g
- Fiber: 0.5 g
- Protein: 2 g
- Cholesterol: 25 mg


