
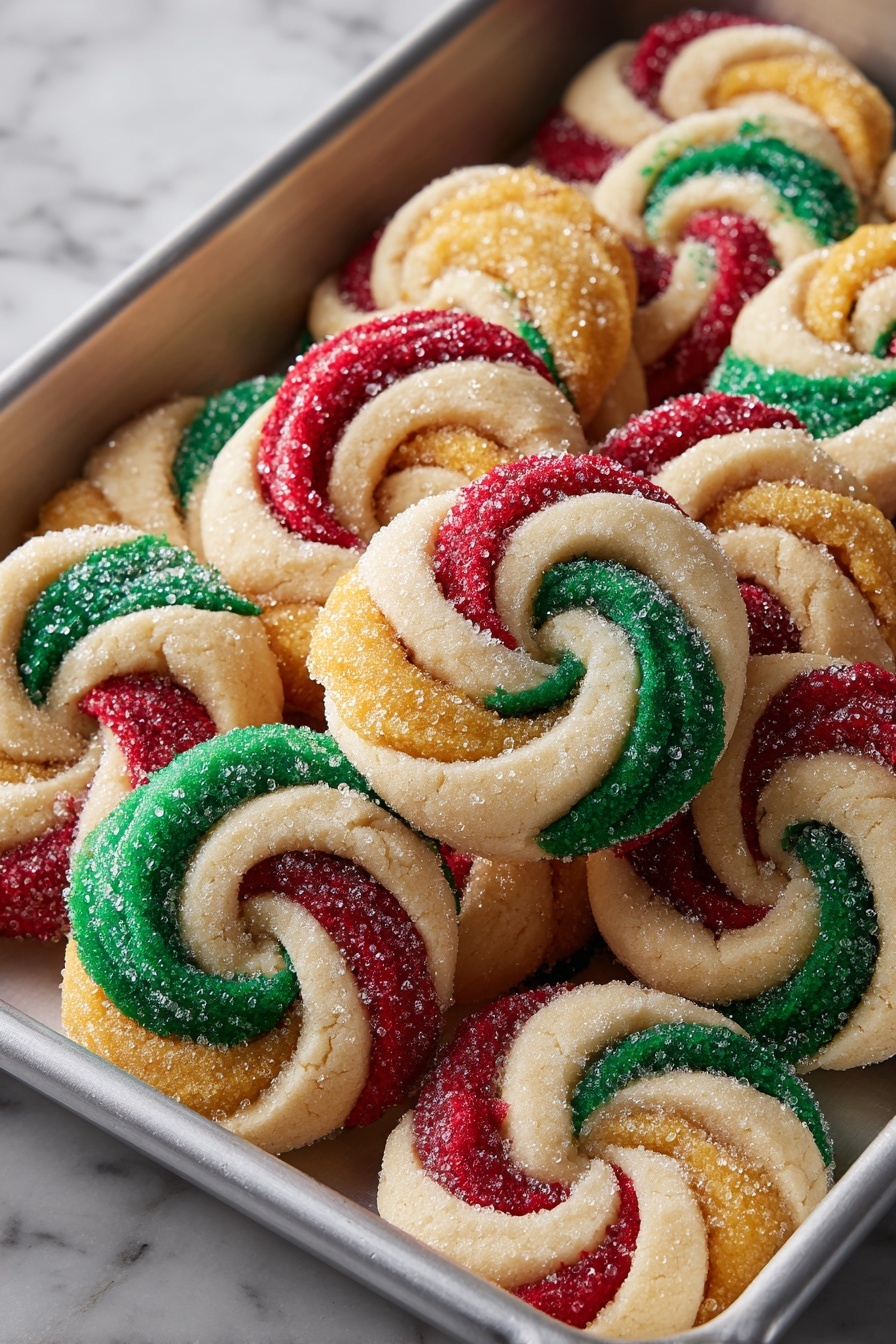
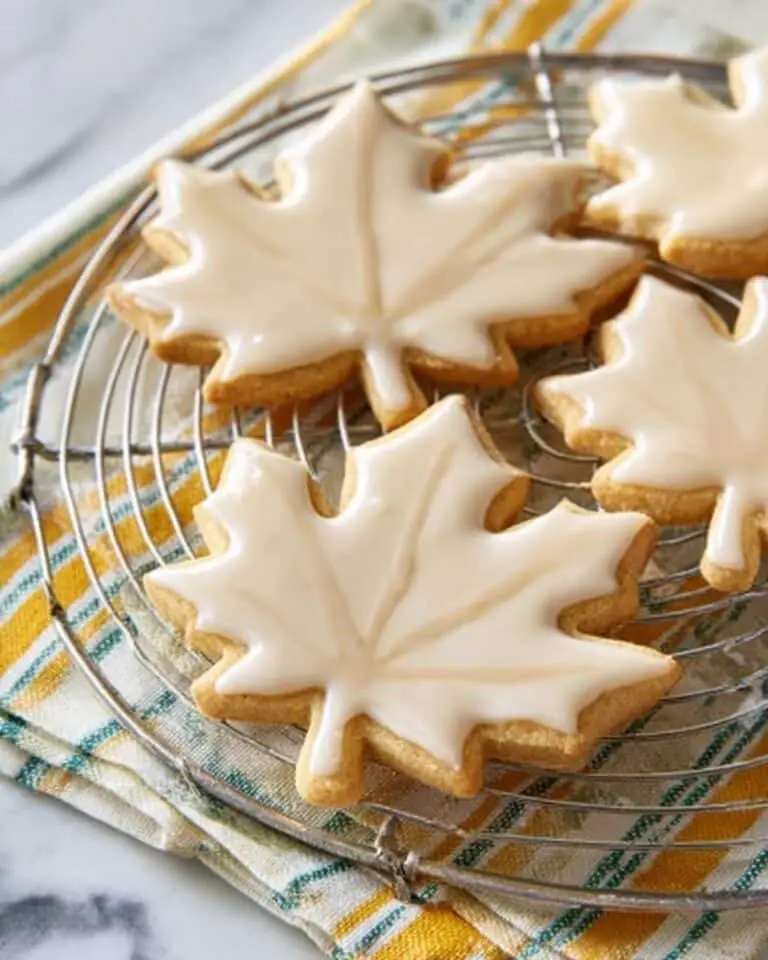
If you’re looking to fill your home with the cozy, joyful scent of baked treats this holiday season, then you’ve got to try my Festive Christmas Cookies with Bright Icing Recipe. This recipe is not just any cookie — these are buttery, tender Twisted Christmas Cookies that you decorate with the brightest, cheeriest icing you can imagine. I absolutely love how these cookies turn out every single time; they’re perfect for sharing, gifting, or just sneaking a few bites when no one’s watching. Keep reading and I’ll walk you through everything so you can get your batch just right, with all my favorite tips and tricks along the way!
Why You’ll Love This Recipe
- Buttery & Tender Texture: These cookies strike a perfect balance between soft and sturdy, so they hold their shape while staying deliciously tender.
- Vibrant, Stunning Icing: The bright icing colors give these cookies a festive zing that instantly brighten up any holiday gathering or cookie tray.
- Customizable & Fun to Decorate: I’ll show you how easy it is to get creative—whether you’re a novice or a cookie pro, you’ll have a blast making these your own.
- Kid-Approved & Crowd-Pleasing: Whenever I bake a batch, my whole family goes crazy for these, and kids especially love the fun shapes and colorful decorating process.

Ingredients You’ll Need
These ingredients come together to create a classic cookie base that’s both sturdy enough to hold all that bright icing and soft enough to enjoy bite after bite. When shopping, fresh butter and good-quality vanilla make a noticeable difference in flavor.
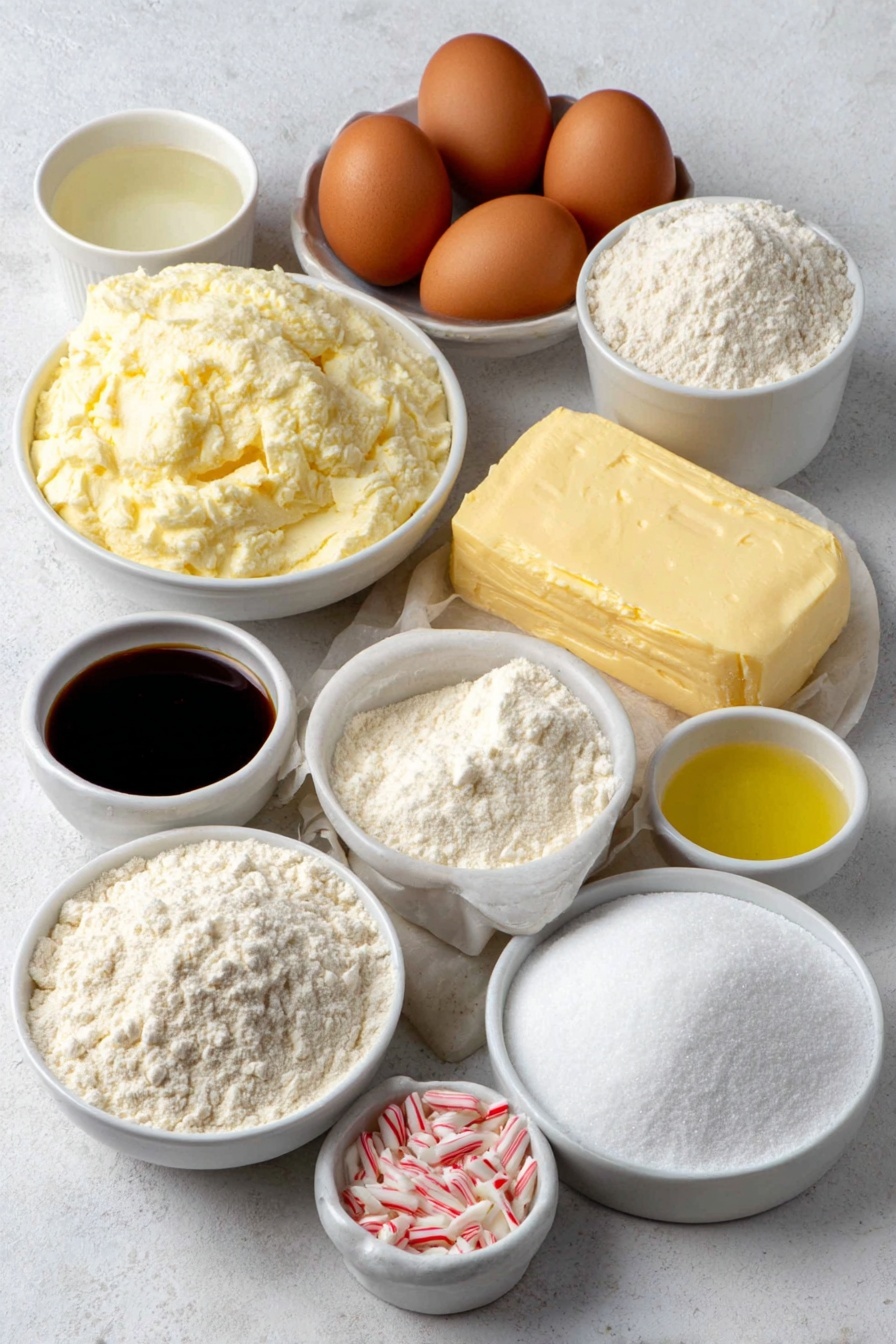
- White sugar: This is your cookie’s sweet backbone, and I prefer granulated for that clean sweetness and texture.
- Butter: Using softened butter is key here—I like to let mine sit out for about an hour before baking for perfect creaminess.
- Eggs: They bind everything together and give a great structure to the dough.
- Vanilla extract: The classic warm flavor that brings all the cookie flavors together.
- Almond extract: This is my little festive secret that adds a lovely depth and nutty warmth to the cookies.
- Orange zest: Optional, but I love the bright citrus pop it adds, especially for holiday baking.
- Plain flour: The base of your dough; make sure it’s all-purpose for best results.
- Meringue powder: The magic behind that glossy, stable royal icing that sets perfectly.
- Water: Used for both the dough (if needed) and icing, but add it carefully to keep the right texture.
- Lemon juice: Adds a subtle tang that balances the sweetness in your icing beautifully.
- Powdered sugar: Sifted for silky smooth icing that’s easy to pipe and decorate with.
- Gel food coloring: Red, green, gold, and white to create your classic festive palette.
- Sprinkles, edible glitter, crushed candy canes: Have fun with these to add that extra holiday sparkle and crunch!
Variations
I love how flexible this Festive Christmas Cookies with Bright Icing Recipe is. Over the years, I’ve tried mixing up flavors and decorations to keep things fresh—and you should too! It’s fun to personalize depending on your family’s favorite tastes or dietary needs.
- Flavor Boost: One Christmas, I swapped out almond extract for peppermint extract—such a cool twist that made these instantly festive in a whole new way!
- Gluten-Free Version: I’ve experimented with gluten-free flour blends here with great success, just make sure to check the texture and add a splash of milk if it needs more moisture.
- Icing Variations: Sometimes I prefer a simple glaze icing or even chocolate drizzle instead of royal icing to switch up the look and flavor.
- Shapes & Themes: Don’t hesitate to use whatever cookie cutters you have—gingerbread men, candy canes, or even snowflakes all work wonderfully.
How to Make Festive Christmas Cookies with Bright Icing Recipe
Step 1: Creaming the Butter and Sugar
Start by preheating your oven to 350°F (175°C) and lining your cookie sheets with parchment paper. Now, in a large bowl, beat your softened butter and white sugar together until the mixture is light, fluffy, and creamy—that usually takes about 3 to 5 minutes with an electric mixer. This step is crucial because it’s what gives your cookies that tender texture. When I first made these, I didn’t cream long enough and ended up with dense cookies—so trust me, don’t skip this!
Step 2: Adding the Flavors and Eggs
Next up, add in the eggs, vanilla extract, almond extract, and orange zest. Mix them well until smooth and combined. The almond and orange zest give such a festive lift—in fact, there was one year I made these without the zest and the cookies just felt…missing something. Once you get this step right, you’re set for a delicious dough.
Step 3: Mixing in the Flour
Gradually stir in the plain flour until the dough starts to come together. If it feels crumbly or dry, add up to a tablespoon of milk, but only a little at a time—too much liquid and you’ll end up with dough that’s too sticky and hard to work with. I usually mix by hand at this point just to feel the texture better. The dough should be soft but not sticky.
Step 4: Rolling, Cutting, and Chilling
Roll your dough out on a lightly floured surface to about ¼ inch thickness. Use your favorite festive cookie cutters—trees, stars, mittens—you name it! Arrange the shapes on your lined baking sheets with a little space between. Pop them in the fridge to chill for 10 to 15 minutes to help them keep their shape during baking. This step is one I learned after my early batches spread too much in the oven.
Step 5: Baking Until Just Golden
Bake the cookies for 10 to 12 minutes, until the edges are just starting to turn a warm golden brown. Be careful not to overbake—these are meant to be tender, not crispy and dry. Once baked, cool them completely on wire racks before the decorating fun begins.
Step 6: Preparing the Bright Icing
While your cookies cool, whisk together the meringue powder with water and lemon juice until smooth. Gradually add the sifted powdered sugar and beat it until you get that glossy, thick royal icing texture. If it’s too thick, thin with tiny amounts of water—you’re aiming for a consistency that you can pipe but that doesn’t run off your cookies. Divide the icing into bowls and add your gel food coloring—red, green, gold, and the perfect holiday white. I always make a few smaller batches of these colors to have more control during decorating.
Step 7: Decorating and Adding Flair
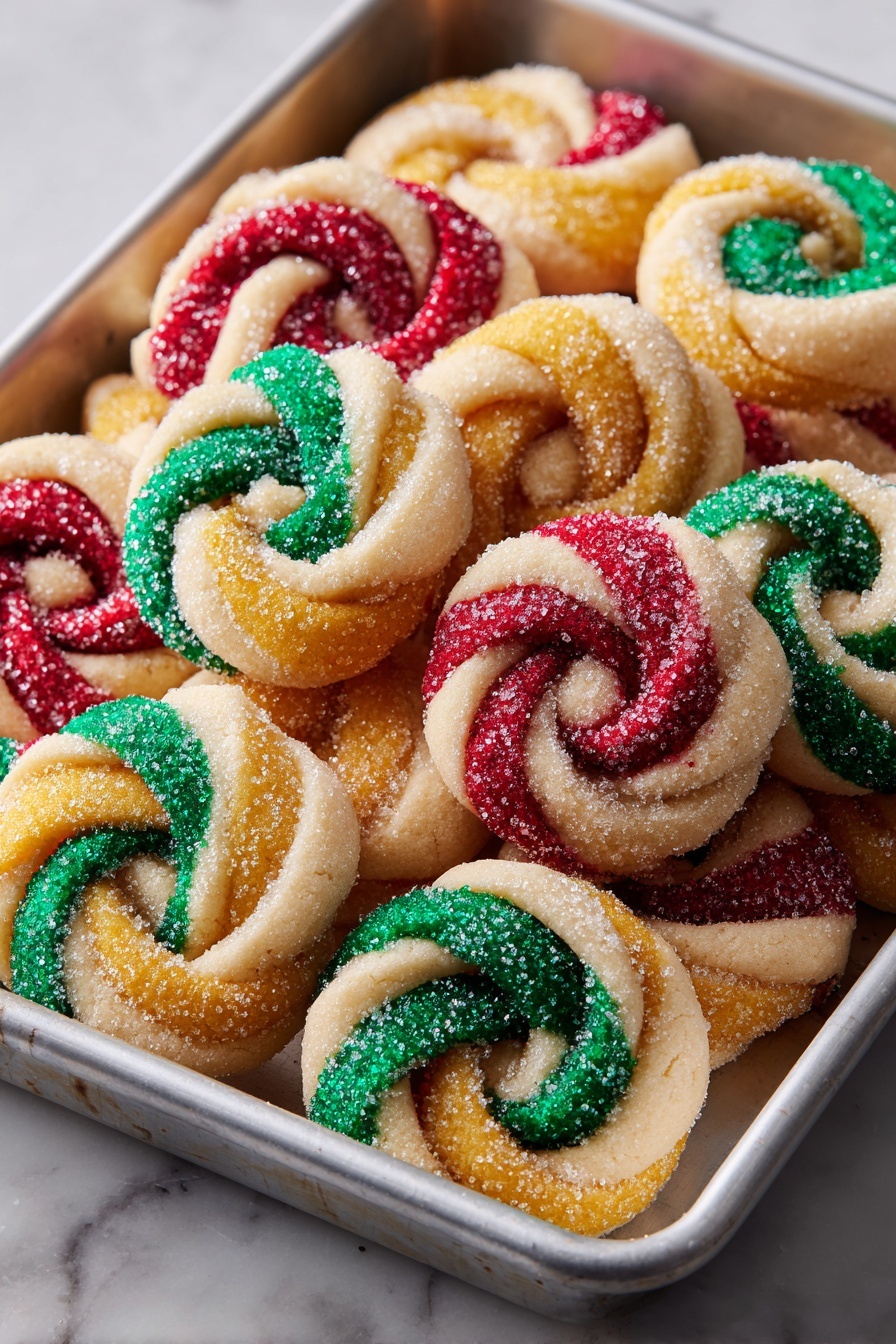
Now comes the best part—decorating! Pipe your icing designs on the cookies however you like and sprinkle with edible glitter, crushed candy canes, or colorful sprinkles for that extra festive sparkle. Pro tip: Let each layer dry before piling on heavier decorations to keep everything neat. It’s the highlight of my holiday baking ritual, and I promise it’s way easier than it looks!
Pro Tips for Making Festive Christmas Cookies with Bright Icing Recipe
- Butter at Room Temperature: Always soften your butter fully before mixing—it’s the secret to those ultra-tender cookies.
- Chill the Dough: Chilling keeps the cookies from spreading too much, meaning sharper, more professional cookie shapes.
- Sift Your Powdered Sugar: This prevents lumps in your icing, so it’s silky smooth and easy to work with.
- Thin Icing Gradually: Add water slowly when thinning icing—you can always add more but can’t fix icing that’s too runny.
How to Serve Festive Christmas Cookies with Bright Icing Recipe
Garnishes
I’m a sucker for sprinkles on these cookies, especially the classic red and green nonpareils or crushed candy canes for a minty crunch. Edible glitter adds a magical sparkle that really brings the holiday spirit to the party platter.
Side Dishes
I love pairing these festive cookies with a warm mug of spiced hot cocoa or a classic eggnog. For parties, I’ll also serve alongside cheese boards or fruit platters to balance all that sweet goodness.
Creative Ways to Present
One of my favorite ways to present these cookies is in a clear jar layered with festive tissue paper and tied with a big red bow — it doubles as both decoration and a lovely gift. Another time, I made a cookie wreath by arranging decorated star and tree shapes in a circle on a platter — it was a real showstopper at our holiday brunch.
Make Ahead and Storage
Storing Leftovers
I usually store these cookies in an airtight container layered with parchment paper at room temperature. If you’re wondering how long they last, my experience says about a week while staying fresh and tasty. If your icing is thoroughly dry, they maintain their beautiful look and texture just fine.
Freezing
Freezing works great too! I freeze the plain baked cookies before icing—just layer them with parchment to prevent sticking, seal tightly, and pop in the freezer. When you’re ready to decorate, thaw completely at room temperature. I avoid freezing decorated cookies because the icing can get damaged.
Reheating
No need to reheat these cookies, but if you prefer warm cookies, just pop them in the microwave for 10-15 seconds. Be careful not to overheat or you’ll melt the icing and lose that gorgeous finish. Warm cookies taste especially comforting with your hot holiday drink of choice!
FAQs
-
Can I make these cookies gluten-free?
Absolutely! I’ve had good results using a 1:1 gluten-free baking flour blend. Just make sure to check the dough’s consistency, adding a splash of milk if it feels too dry, since gluten-free flours absorb moisture differently.
-
How do I prevent the bright icing from cracking?
To keep your icing smooth without cracking, avoid applying it too thickly and let each decorated layer dry fully at room temperature. Don’t rush the drying with a fan or fridge, which can cause cracks.
-
Can I prepare the dough ahead of time?
Yes! You can make the dough up to 2 days in advance and keep it wrapped tightly in the fridge. Just let it warm slightly before rolling it out. This makes holiday cookie prep so much easier.
-
What’s the best way to store decorated cookies?
Store them in an airtight container with parchment paper layers at room temp. Avoid stacking heavily decorated cookies on top of each other to preserve the icing details.
Final Thoughts
This Festive Christmas Cookies with Bright Icing Recipe has become such a joyful tradition in my holiday baking. The combination of buttery, tender cookies and vibrant, glossy icing never fails to bring smiles and Christmas cheer. I hope once you try it, it becomes your go-to cookie recipe to share with family and friends (or sneak a few tasty bites yourself!). There’s something truly special about gathering around the kitchen counter with a batch of these colorful, festive cookies, and I can’t wait for you to experience that magic too.
Print
Festive Christmas Cookies with Bright Icing Recipe
- Prep Time: 50 mins
- Cook Time: 24 mins
- Total Time: 1 hr 14 mins
- Yield: Approximately 48 cookies depending on cookie cutter size
- Category: Dessert
- Method: Baking
- Cuisine: American
Description
Celebrate the festive season with Twisted Christmas Cookies, featuring buttery, almond- and orange-scented dough cut into fun holiday shapes and beautifully decorated with glossy, colorful royal icing. Perfect for holiday gatherings or gifting, these cookies combine classic flavors with eye-catching designs and a touch of sparkle.
Ingredients
For the Cookies:
- 1 cup white sugar
- 14 oz (400g) butter, softened
- 2 eggs
- 2 tsp vanilla extract
- 1 tsp almond extract (for a festive flavor lift)
- Zest of 1 orange (optional, for brightness)
- 6 cups plain flour
For the Icing:
- 6 tbsp meringue powder
- 8 tbsp water
- 2 tsp lemon juice
- 7 cups powdered sugar, sifted
- Extra water (for thinning)
- Gel food coloring (red, green, gold, white)
- Sprinkles, edible glitter, or crushed candy canes (for topping)
Instructions
- Preheat Oven and Prepare Baking Sheets: Preheat your oven to 350°F (175°C) and line 2-3 baking sheets with parchment paper to prevent sticking and ensure even baking.
- Cream Butter and Sugar: In a large mixing bowl, cream together the softened butter and white sugar until the mixture is light and fluffy. This creates a tender texture for your cookies.
- Add Wet Ingredients: Incorporate the eggs, vanilla extract, almond extract, and orange zest into the butter-sugar mixture. Mix thoroughly until smooth and well combined to infuse your dough with festive flavors.
- Mix in Flour: Gradually add the plain flour into the wet ingredients, mixing until a dough forms. If the dough feels too dry or crumbly, add a tablespoon of milk to bring it together smoothly.
- Roll and Cut Dough: Roll out the dough on a lightly floured surface to about ¼-inch thickness. Use festive cookie cutters such as trees, stars, and mittens to cut out shapes, embracing the Christmas spirit.
- Chill the Cookies: Place the cut dough shapes on the prepared baking sheets and chill them in the refrigerator for 10–15 minutes to help maintain shape during baking.
- Bake Cookies: Bake the cookies in the preheated oven for 10–12 minutes, or until the edges are just turning golden. This ensures a perfectly baked, crisp edge with a tender center.
- Cool Completely: Remove the baking sheets from the oven and allow the cookies to cool completely on wire racks before icing. This prevents the icing from melting.
- Prepare Icing: In a bowl, whisk together the meringue powder, lemon juice, and water. Gradually add the sifted powdered sugar while beating until the icing is glossy and thick. Thin the mixture with a little extra water if needed for desired consistency.
- Decorate the Cookies: Divide the icing into separate bowls and tint with gel food coloring in red, green, gold, and white. Decorate your cooled cookies with the colored icing using piping bags or spatulas, then add sprinkles, edible glitter, or crushed candy canes for extra festive flair.
- Let Set: Allow the decorated cookies to sit at room temperature until the icing hardens completely, which may take a few hours. This ensures the decorations are firm and perfect for handling or gifting.
Notes
- For a brighter citrus flavor, be sure to use fresh orange zest in the dough.
- If the dough is too sticky, refrigerate a bit longer before rolling.
- Use gel food coloring for vibrant icing colors without altering the icing consistency.
- Store cookies in an airtight container at room temperature for up to one week.
- Allow icing to fully harden before stacking cookies to avoid smudging decorations.
Nutrition
- Serving Size: 1 cookie (approx. 30g)
- Calories: 150
- Sugar: 12g
- Sodium: 60mg
- Fat: 8g
- Saturated Fat: 5g
- Unsaturated Fat: 2.5g
- Trans Fat: 0g
- Carbohydrates: 18g
- Fiber: 0.5g
- Protein: 2g
- Cholesterol: 30mg

