
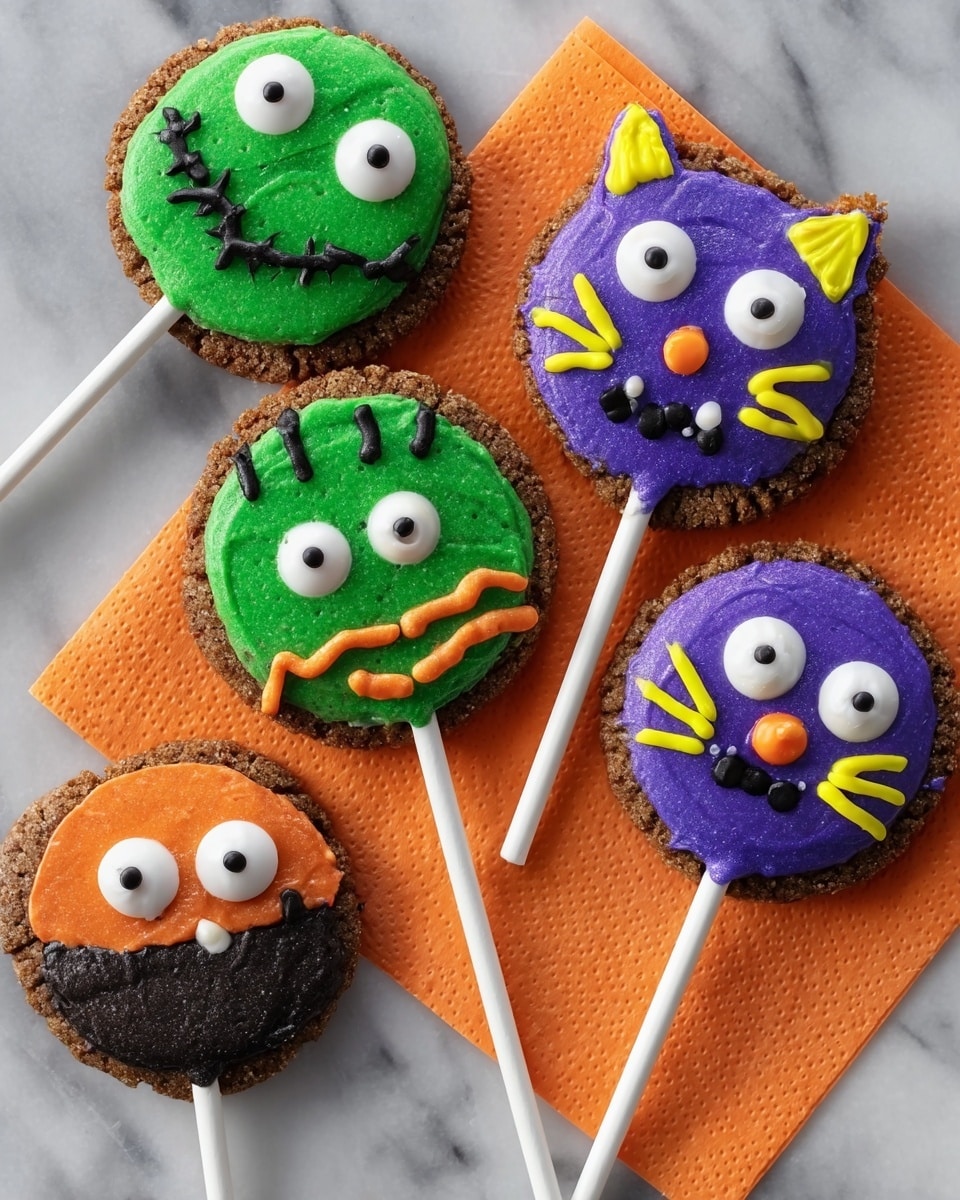
If you’re looking for a festive treat that’s fun to make and even more fun to eat, you’re going to adore this Halloween Chocolate Cookie Pops Recipe. It’s the perfect blend of rich chocolatey goodness and adorable spooky flair that’s sure to be a hit at any Halloween party or just a cozy night in with the family. Stick with me here because I’m about to share every little detail that makes this recipe fan-freaking-tastic and foolproof!
Why You’ll Love This Recipe
- Super Fun to Make: Kids and adults alike will enjoy shaping and decorating these festive cookie pops.
- Perfect Halloween Treat: These pops are spooky, sweet, and totally Instagram-worthy for your next party.
- Rich, Chocolatey Flavor: The cocoa-packed dough is both fudgy and tender, giving you that amazing chocolate cookie taste.
- Customizable Decorations: You can get creative with frosting colors, gels, and candy toppings to suit your style.

Ingredients You’ll Need
These ingredients come together beautifully to give you soft, chocolate-packed cookie pops that hold their shape and deliver a rich flavor. Plus, the decorating supplies let you personalize every pop for some spooky fun!
- Butter: Using softened butter gives the dough the perfect texture for mixing and baking.
- Sugar: Granulated sugar sweetens your cookies and helps with that tender crumb.
- Eggs: Room temperature eggs blend in easily, adding moisture and richness.
- Vanilla Extract: This adds a warm, subtle flavor that enhances the chocolate.
- All-Purpose Flour: The sturdy base for your cookies, giving them structure.
- Baking Cocoa: Unsweetened cocoa powder packs in the chocolate flavor without extra sweetness.
- Baking Powder & Baking Soda: These leaveners help the cookies rise just enough for a tender texture.
- Salt: Balances the sweetness and highlights the cocoa’s richness.
- Lollipop Sticks: Essential for the fun cookie pop shape—make sure they’re sturdy!
- Prepared Vanilla Frosting: This is your canvas for decoration; easy to color and pipe.
- Food Coloring and Decorating Gels (Black and Yellow): For spooky designs and fun accents.
- Optional Candy Decorations: Candy corn, candy eyeballs, M&M’s minis, and cinnamon hearts make these pops pop!
Variations
One of the things I love most about this Halloween Chocolate Cookie Pops Recipe is how flexible it is. I like to switch things up depending on who I’m baking for and what kind of Halloween vibes I want to create.
- Flavor Variation: Once, I swapped half the cocoa for pumpkin spice mix—definitely gave it a cozy fall twist that my family went nuts over.
- Dietary Adjustments: You can swap regular flour for gluten-free, and use dairy-free butter and frosting to make these allergy-friendly.
- Decorating Trends: Try neon food coloring or edible glitter for extra wow factor.
- Chocolate Dipping: For a decadent touch, dip the cookie pops partially in melted white or dark chocolate before decorating.
How to Make Halloween Chocolate Cookie Pops Recipe
Step 1: Cream the Butter and Sugar
Start by beating the softened butter with the sugar until it’s creamy and fluffy—this usually takes about 3-5 minutes with an electric mixer. I like to scrape down the sides halfway through so everything blends evenly. This step is crucial because it sets the texture base for your cookie pops.
Step 2: Mix in the Eggs and Vanilla
Next, beat in the eggs one at a time, making sure each is fully incorporated before adding the next. This keeps your dough smooth and cohesive. Then, add the vanilla extract for that warm, fragrant hint that pairs so well with chocolate.
Step 3: Combine Dry Ingredients and Add Gradually
In a separate bowl, whisk together your flour, cocoa powder, baking powder, baking soda, and salt. Gradually beat this dry mix into your wet ingredients. I like to add it in parts—about 1/2 cup at a time—so the dough stays smooth and the cocoa blends evenly.
Step 4: Shape the Dough Balls and Insert Sticks
Roll the dough into 1½-inch balls and place them about 3 inches apart on greased baking sheets. Here’s a little trick: dip the end of your lollipop sticks in a little melted chocolate or frosting before inserting—they’ll grip better and won’t slide out when baking. Then, push each stick gently halfway through each dough ball. Using a glass dipped in sugar, flatten each cookie ball so it’ll bake evenly and have a nice surface to hold the frosting and decorations.
Step 5: Bake and Cool Completely
Bake your cookie pops at 350°F for 10–12 minutes, or until they’re just set. The key here is not to overbake—you want a soft, tender cookie rather than a crispy one. Once done, transfer them carefully to wire racks and let them cool completely before decorating.
Step 6: Tint the Frosting and Decorate
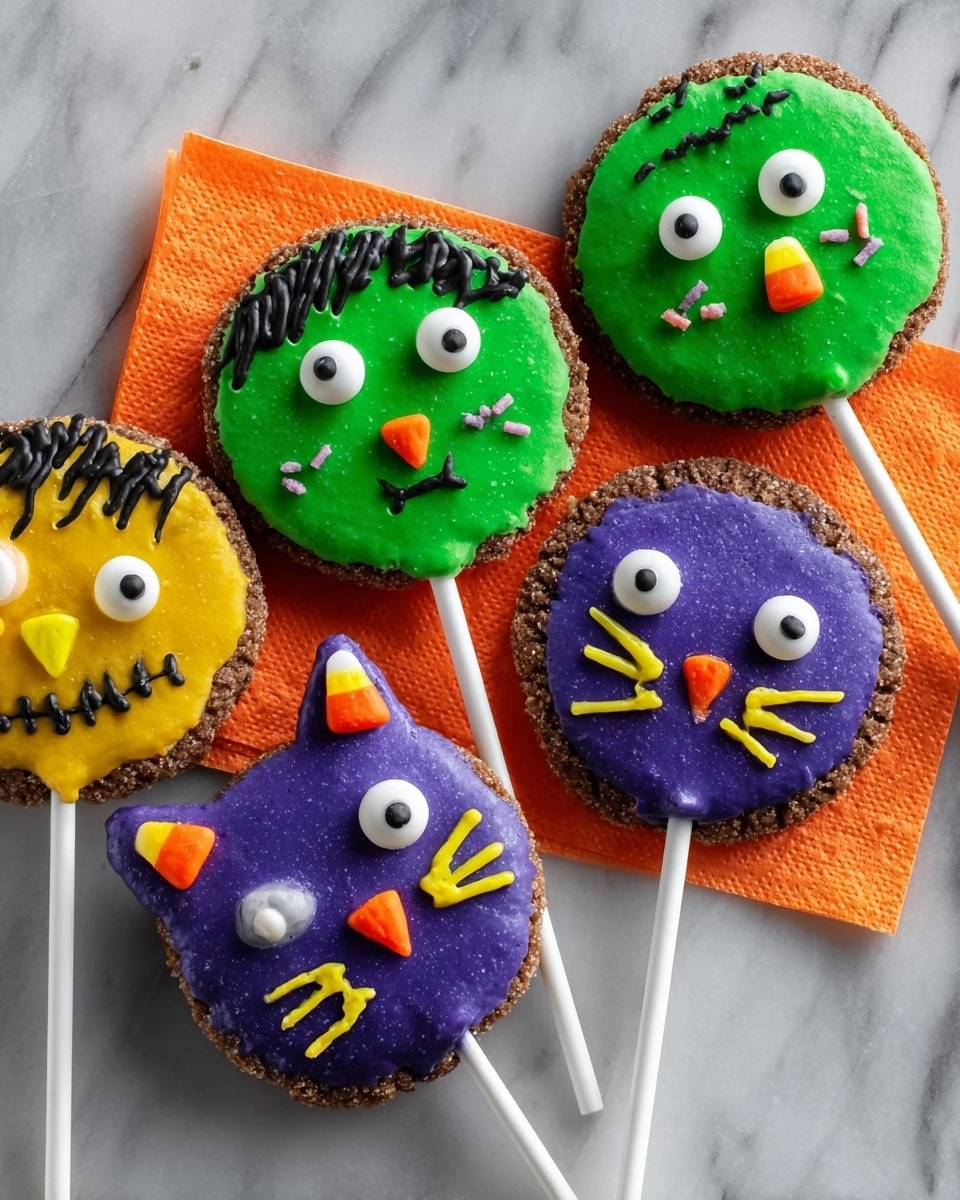
This is where the fun gets real! Divide your vanilla frosting into small bowls, add a few drops of food coloring to each for your desired Halloween colors, and mix well. Spread or pipe the frosting onto each cookie pop. Then, go wild with decorating gels and the optional candy decorations to create cute monsters, pumpkins, or spooky eyes. I find using small piping bags or even sandwich bags with a corner snipped helps make neat designs easier!
Pro Tips for Making Halloween Chocolate Cookie Pops Recipe
- Stick Stability: Dip the sticks in melted chocolate before inserting to keep them from wiggling during baking.
- Even Shaping: Use a cookie scoop to get perfectly sized dough balls, so pops bake evenly every time.
- Sugar-Dipped Glass Trick: Dipping your glass in sugar before flattening the balls prevents sticking and gives a subtle crunchy texture.
- Cool Completely: Always cool the cookies fully before frosting to avoid melting your decorations.
How to Serve Halloween Chocolate Cookie Pops Recipe
Garnishes
For garnishing, I usually stick with classic Halloween favorites like candy eyeballs and candy corn—they add such a fun, spooky touch! Plus, a little sprinkle of edible glitter or colored sanding sugar can make your pops sparkle under the party lights. Black and yellow decorating gels are perfect for drawing cute faces or spider webs.
Side Dishes
These cookie pops pair wonderfully with a warm cup of cider or classic hot chocolate. For a party, I like to serve them alongside pumpkin-shaped sugar cookies or a simple bowl of mixed nuts to give guests a little salty crunch that complements the sweet pops.
Creative Ways to Present
I love creating a “Halloween treat bouquet” by arranging these cookie pops upright in a floral foam base hidden inside a decorated bucket or vase. Wrapping each pop in clear cellophane tied with a cute Halloween-themed ribbon also makes them perfect for handing out as party favors or gifts. Trust me, it instantly elevates your dessert table!
Make Ahead and Storage
Storing Leftovers
If you have any cookie pops left (which I doubt!), store them in an airtight container at room temperature for up to 3 days. Make sure to place them in a single layer or separate layers with parchment paper so they don’t stick or smudge your decorations.
Freezing
I’ve frozen these cookie pops successfully by wrapping each one tightly in plastic wrap and then placing them in a freezer-safe bag. They keep well for up to 2 months. When it’s time to eat, just thaw them overnight in the fridge and bring them to room temp before serving.
Reheating
Since these are cookies, reheating isn’t usually necessary — but if you want to warm them slightly, pop them in a low 300°F oven for a few minutes. Be cautious not to melt your frosting; you can also microwave briefly on low power for 5-10 seconds.
FAQs
-
Can I use store-bought frosting for the Halloween Chocolate Cookie Pops Recipe?
Absolutely! Prepared vanilla frosting works perfectly and saves time. Plus, it’s easy to tint with food coloring for your desired Halloween shades.
-
How do I prevent the lollipop sticks from falling out?
Dip the ends of the sticks in melted chocolate or frosting before inserting into the dough; this helps them stick firmly and prevents sliding during baking.
-
Can I make these cookie pops gluten-free?
Yes! Just substitute all-purpose flour with a gluten-free flour blend that measures 1:1 for regular flour. Keep an eye on baking times as they might vary slightly.
-
What’s the best way to decorate if I’m short on time?
Keep it simple—frost the pops with one color and sprinkle candy toppings or sanding sugar on top. It looks festive with minimal effort!
-
How long do the Halloween Chocolate Cookie Pops stay fresh?
Stored in an airtight container at room temp, they stay fresh and tasty for about 3 days. Beyond that, their texture and decoration quality can start to degrade.
Final Thoughts
I absolutely love how these Halloween Chocolate Cookie Pops turn out every time—there’s something so satisfying about combining classic chocolate cookies with playful holiday decor. When I first tried this recipe, it became an instant tradition for my family’s Halloween celebrations. You’ll find that these cookie pops aren’t just tasty; they’re a creative canvas for your festive spirit, perfect for sharing with friends or gifting. Give this recipe a try—I promise you’re going to love the smiles they bring!
Print
Halloween Chocolate Cookie Pops Recipe
- Prep Time: 25 minutes
- Cook Time: 10-12 minutes
- Total Time: 35-37 minutes
- Yield: 24 cookie pops
- Category: Dessert
- Method: Baking
- Cuisine: American
Description
These Halloween Chocolate Cookie Pops are festive, fun-to-make treats perfect for parties or spooky celebrations. Rich chocolate cookies baked on lollipop sticks are topped with colorful vanilla frosting and decorated with gels and candy to delight both kids and adults.
Ingredients
Cookie Dough
- 1 cup butter, softened
- 2 cups sugar
- 2 large eggs, room temperature
- 3 teaspoons vanilla extract
- 3 cups all-purpose flour
- 1 cup baking cocoa
- 1/2 teaspoon baking powder
- 1/2 teaspoon baking soda
- 1/2 teaspoon salt
- 24 lollipop sticks
Decoration
- Prepared vanilla frosting
- Food coloring
- Black and yellow decorating gels
- Optional decorations: Candy corn, candy eyeballs, M&M’s minis, cinnamon hearts
Instructions
- Preheat Oven: Preheat your oven to 350°F (175°C) to ensure it reaches the right temperature for baking the cookies evenly.
- Prepare Dough: In a large bowl, beat softened butter and sugar together until the mixture is creamy and well blended. Then, add in the eggs and vanilla extract, mixing thoroughly to create a smooth batter.
- Mix Dry Ingredients: In a separate small bowl, whisk together the all-purpose flour, baking cocoa, baking powder, baking soda, and salt until evenly combined.
- Combine Ingredients: Gradually beat the dry ingredient mixture into the butter and sugar mixture to form a chocolate cookie dough.
- Shape Cookies: Roll the dough into 1½-inch balls and place them 3 inches apart on greased baking sheets to allow room for spreading during baking.
- Insert Lollipop Sticks: Carefully insert a lollipop stick into each dough ball, ensuring it goes through the center but does not poke out the other side.
- Flatten Cookies: Using a glass dipped in sugar, gently flatten each dough ball to form cookie shapes suitable for holding and decorating as cookie pops.
- Bake Cookies: Bake in the preheated oven for 10-12 minutes or until the cookies are set. They should be firm but not overbaked to maintain a tender texture.
- Cool Cookies: Remove the cookies from the baking sheets and transfer to wire racks to cool completely before decorating.
- Decorate Cookies: Tint prepared vanilla frosting with desired food coloring. Frost each cooled cookie pop with the tinted frosting, then decorate using black and yellow decorating gels and optional decorations such as candy corn, candy eyeballs, M&M’s minis, or cinnamon hearts for a festive Halloween look.
Notes
- Ensure the eggs are at room temperature for better mixing and texture.
- Use a glass dipped in sugar to prevent sticking when flattening the cookie dough balls.
- Let cookies cool completely before frosting to avoid melting the frosting.
- Store decorated cookie pops in an airtight container at room temperature to maintain freshness for up to 3 days.
Nutrition
- Serving Size: 1 cookie pop
- Calories: 180
- Sugar: 14g
- Sodium: 90mg
- Fat: 9g
- Saturated Fat: 5g
- Unsaturated Fat: 3g
- Trans Fat: 0g
- Carbohydrates: 24g
- Fiber: 2g
- Protein: 2g
- Cholesterol: 35mg

