
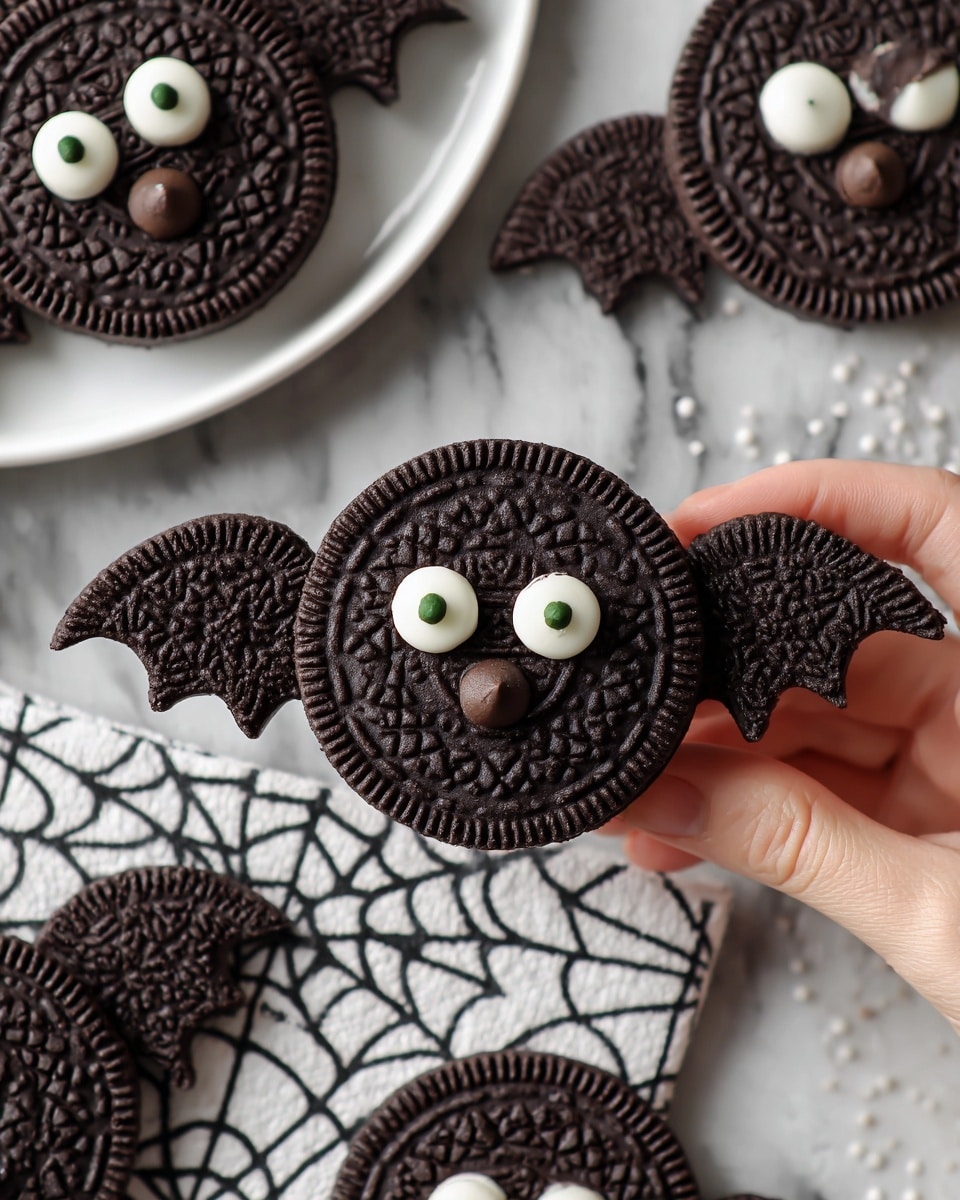
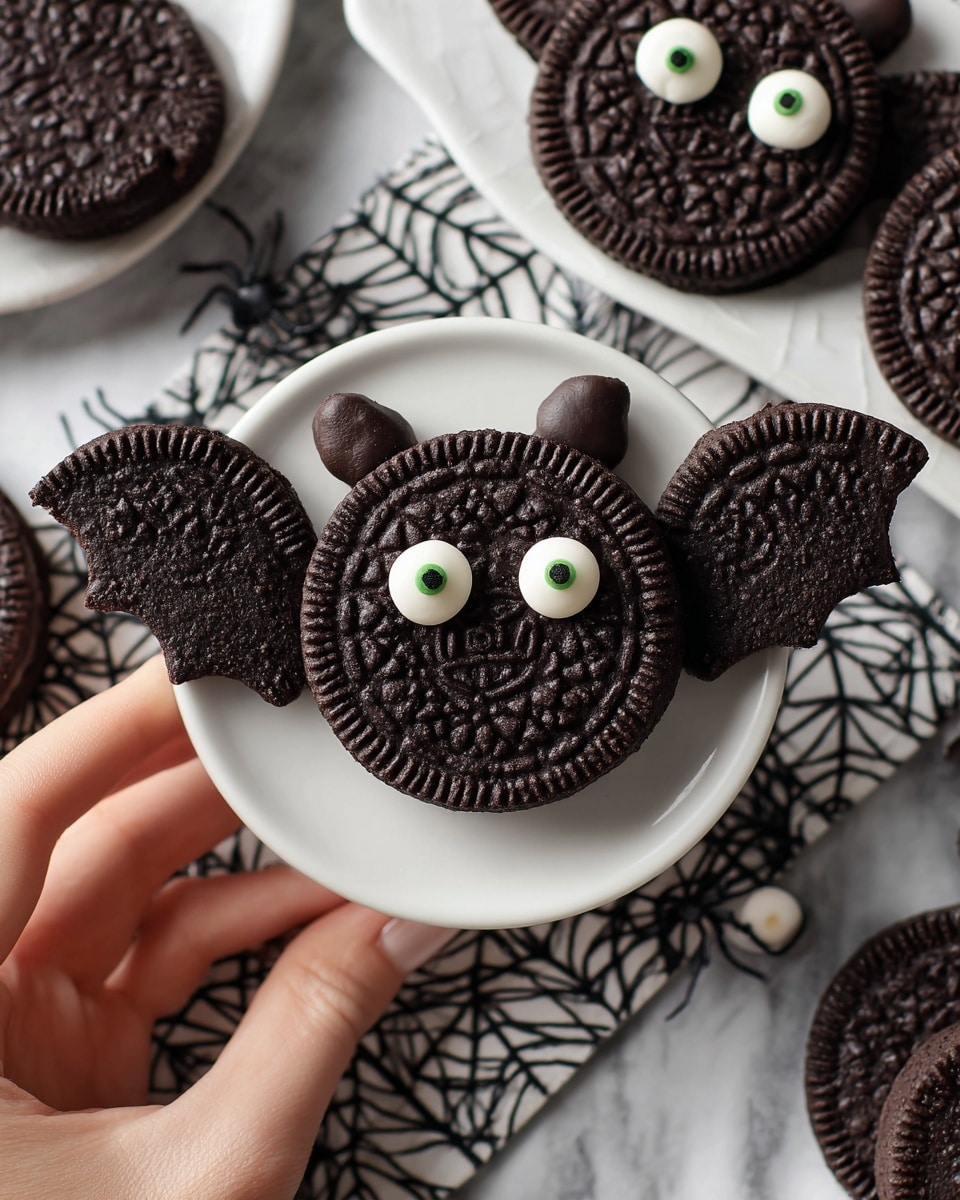
If you’re looking for a fun and spooky treat to wow your friends and family this season, let me introduce you to my absolute favorite Halloween Oreo Bat Cookies Recipe. These little bat-shaped cookies are not just adorable—they’re ridiculously delicious and surprisingly easy to make. Seriously, once you try this recipe, you’ll want to make a whole colony of these creepy-cute cookies to share (or maybe just keep all to yourself!).
Why You’ll Love This Recipe
- Super Simple Ingredients: You probably already have most of these spooky essentials in your pantry or local store.
- Fun and Festive: These bat cookies are perfect for Halloween parties, classroom treats, or just decorating your dessert table.
- No Baking Required: Yes, you read that right! This recipe is quick and mess-free, great for an easy festive activity.
- Kid-Friendly Project: Perfect for making with kids who’ll love helping assemble and decorate their own bat creations.

Ingredients You’ll Need
These ingredients come together like magic to create the perfect balance of creamy, chocolaty, and delightfully spooky. Choosing Double Stuf Oreos is key because that extra filling helps hold your bat wings in place!
- Oreos (Double Stuf): Their extra cream filling is perfect for “gluing” the bats’ wings and body together.
- Candy eyes: These little candies add just the right spooky touch and personality to each bat.
- Mini semisweet chocolate chips: These melt beautifully and are used for both sticking pieces together and decorating horns and eyes.
Variations
I love playing around with this Halloween Oreo Bat Cookies Recipe to suit different occasions or dietary needs. Feel free to get creative and make it your own!
- Use Regular Oreos: When Double Stuf isn’t an option, I add a little melted chocolate or frosting to the cream filling to help hold the wings in place—works like a charm.
- White Chocolate Version: Swapping out semisweet chips for white chocolate chips gives the bats a different look and flavor.
- Nut-Free: This recipe is naturally nut-free, so perfect if you’re baking for kids or school parties where allergies are a concern.
- Spookier Eyes: For an extra creepy effect, try using glow-in-the-dark candy eyes or those with red pupils for Halloween night!
How to Make Halloween Oreo Bat Cookies Recipe
Step 1: Prep Your Oreos and Wings
First things first, line a baking sheet with parchment paper—it’ll keep your bat cookies from sticking and make cleanup a breeze. Now, carefully separate 10 Oreos and twist them apart gently so you have 20 halves. Scrape off the cream from these halves with a butter knife—this is key because these cream-less halves become your bat wings! If you’re like me, peeling off the cream starts to feel oddly satisfying after a while—pro tip: be gentle to avoid cracking the cookie pieces.
Step 2: Snip the Wing Shapes
Take the 20 Oreo halves without cream, and break them again in half—this creates smaller wings that look just right for the bats. Try to break them somewhat evenly so you can match two similar-sized pieces for each wing set. Pair these halves and set them aside while you prep the chocolate.
Step 3: Melt Your Chocolate Chips
Set aside about ¼ cup of mini chocolate chips for decorating. The remaining ½ cup will be melted to act as your edible glue. I like melting mine in the microwave on the defrost or low power setting in 30-second bursts, stirring after every round to ensure smooth, even melting without scorching. If you’re feeling fancy, you can absolutely do a double boiler instead. Patience here helps because burnt chocolate ruins everything!
Step 4: Build Your Bat Bodies
Time for the fun! Start with an Oreo half that still has the cream filling—that’s your bat’s body base. Using a small dab of melted chocolate in the center, attach the wing halves to the side edges of the bat’s body piece. Then top it with another Oreo half (cream side down). The melted chocolate acts like super glue to hold everything together. I always set them on the parchment-lined tray exactly as I want them displayed, so they stay put while the chocolate sets.
Step 5: Add Eerie Details
Grab a toothpick or a small skewer and gently ‘paint’ tiny dots of melted chocolate onto the top of the bat’s head to stick on two chocolate chips that look like horns. Then apply more melted chocolate near the middle—this is where you’ll attach two candy eyes. I find pressing the eyes on gently but firmly helps them stay put without cracking the cookie underneath.
Step 6: Let Them Set
Once all your bat cookies are assembled and decorated, let the chocolate set completely. My little trick? Pop the whole tray in the fridge for about 10 minutes to speed this up. This helps the chocolate harden quickly and means your bats will hold their shape nicely, especially if your kitchen is warm.
Pro Tips for Making Halloween Oreo Bat Cookies Recipe
- Use Double Stuf Oreos: I discovered this trick when my first batch fell apart with regular Oreos. The extra filling really holds everything together!
- Gentle Cream Removal: Scrape the cream carefully with a butter knife to avoid breaking your cookie wings.
- Low Heat Chocolate Melting: Stir often when melting chocolate chips so they melt evenly without scorching.
- Refrigerate to Set: Don’t skip the fridge step after assembling – it helps your bat cookies keep their spooky shape until serving.
How to Serve Halloween Oreo Bat Cookies Recipe
Garnishes
I love adding an extra sprinkle of edible glitter or some tiny black sugar pearls to the tray just before serving—it adds a little eerie sparkle that delights the kids and makes the bats look even more festive!
Side Dishes
These Halloween Oreo Bat Cookies go perfectly with a tall glass of cold milk or a warm cup of hot chocolate, especially when you add a hint of cinnamon or marshmallows. For a party, I’ve served them alongside pumpkin-shaped sugar cookies to round out the spooky spread.
Creative Ways to Present
I once arranged these bats flying around a fake spider web on a black platter, which was a huge hit at a Halloween party! Wrapping a few in clear cellophane bags tied with orange and black ribbon also makes an adorable treat to gift to friends or neighbors.
Make Ahead and Storage
Storing Leftovers
I store leftover Halloween Oreo Bat Cookies in an airtight container in the fridge to keep the chocolate firm and the Oreos fresh. They stay delicious for about 4-5 days, making it easy to enjoy the spooky vibes for a while.
Freezing
While I haven’t frozen these particular bat cookies often, I’ve found they freeze fine wrapped individually in plastic wrap and then placed in a freezer-safe bag. When thawed in the fridge, they hold their shape and taste just as great—convenient for prepping Halloween treats early!
Reheating
Since these involve no baking, you don’t really reheat them. Just let frozen bat cookies thaw naturally in the fridge. If the chocolate feels soft at room temp, a quick chill back in the fridge will firm them up nicely.
FAQs
-
Can I use regular Oreos instead of Double Stuf for this Halloween Oreo Bat Cookies Recipe?
Yes! You can use regular Oreos, but because they have less cream filling, I recommend adding a little extra melted chocolate or frosting to act as “glue” when attaching the wings. This helps keep your bat wings secure and prevents falling apart.
-
What’s the best way to melt chocolate chips for these bat cookies?
The microwave method works well—use a low or defrost power setting and melt in short 30-second intervals, stirring frequently. This prevents the chocolate from burning and ensures smooth, even melting. Alternatively, a double boiler on the stove works perfectly if you prefer.
-
How long do Halloween Oreo Bat Cookies last?
Stored in an airtight container in the refrigerator, these bat cookies stay fresh for 4 to 5 days. They’re best enjoyed within that timeframe for the best texture and flavor.
-
Can kids help make this recipe?
Absolutely! This Halloween Oreo Bat Cookies Recipe is a fantastic kid-friendly activity. Just supervise the melting chocolate part, but kids will have a blast assembling the bats and adding candy eyes.
Final Thoughts
I absolutely love how this Halloween Oreo Bat Cookies Recipe brings together simple ingredients to create a festive, fun, and irresistibly tasty treat. From the first time I made them, they quickly became a Halloween tradition in my household. Whether you’re baking with little helpers or just want a stress-free way to add some spooky charm to your dessert table, these Oreo bats never disappoint. I really encourage you to give them a try this season—you’ll be thrilled with the results and so will anyone lucky enough to bite into your delicious, creepy-cookie creations!
Print
Halloween Oreo Bat Cookies Recipe
- Prep Time: 30 minutes
- Cook Time: 0 minutes
- Total Time: 40 minutes
- Yield: 20 Oreo bats
- Category: Dessert
- Method: No-Cook
- Cuisine: American
Description
Create spooky Halloween Oreo Bat Cookies that are perfect for festive treats! These no-bake cookies feature Double Stuf Oreo halves assembled with melted chocolate to form bat wings, eyes, and horns, making a fun and easy recipe for kids and adults alike during the Halloween season.
Ingredients
Cookies
- 30 Oreo cookies, Double Stuf
Decorations
- 40 candy eyes
- ¾ cup mini semisweet chocolate chips
Instructions
- Prep the baking sheet: Line a baking sheet with parchment paper to prepare a clean surface for assembling the cookies.
- Separate and remove cream: Take 10 Oreo cookies and gently split each into two halves to get 20 halves. Carefully scrape off the cream filling from these halves using a butter knife; these will be used as the bat wings.
- Break wing pieces: Break each of the 20 Oreo halves without cream in half again using your hands or a thin knife, then pair similar-sized pieces together to form wings.
- Melt the chocolate: Reserve ¼ cup of mini semisweet chocolate chips for decorating. Melt the remaining ½ cup chocolate chips in a microwave-safe bowl at low power, microwaving in 30-second intervals and stirring between each until fully melted and smooth.
- Assemble the wings: Attach the prepared Oreo wing pieces to one Oreo half that still has cream filling by applying a small amount of melted chocolate as glue in the center. Then place another Oreo half on top to sandwich together and set this on the parchment-lined baking sheet.
- Create the horns: Using a toothpick or skewer, dab a small amount of melted chocolate near the top of the bat’s head. Place 2 mini chocolate chips as horns on this spot.
- Add the eyes: Apply a bit more melted chocolate to the center of the bat’s face and stick two candy eyes onto each bat.
- Repeat: Continue assembling all cookies following the above steps until all Oreo bats are complete.
- Chill to set: Allow the melted chocolate to set completely in a cool area, or to speed up the process, refrigerate the assembled Oreo bats before serving.
Notes
- You can melt chocolate chips using a microwave or a double boiler—stir frequently to prevent scorching.
- For sturdier bat wings, use Double Stuf or Mega Stuf Oreos as they have extra cream filling to hold pieces together better. If using regular Oreos, you might add a bit of frosting or melted chocolate in the filling to ensure assembly stays intact.
- Refrigerating the finished bats will speed up setting, especially in warm environments, and keep the treats fresh until serving.
Nutrition
- Serving Size: 1 Oreo bat
- Calories: 150
- Sugar: 15g
- Sodium: 90mg
- Fat: 8g
- Saturated Fat: 4g
- Unsaturated Fat: 3g
- Trans Fat: 0g
- Carbohydrates: 20g
- Fiber: 1g
- Protein: 2g
- Cholesterol: 0mg


