
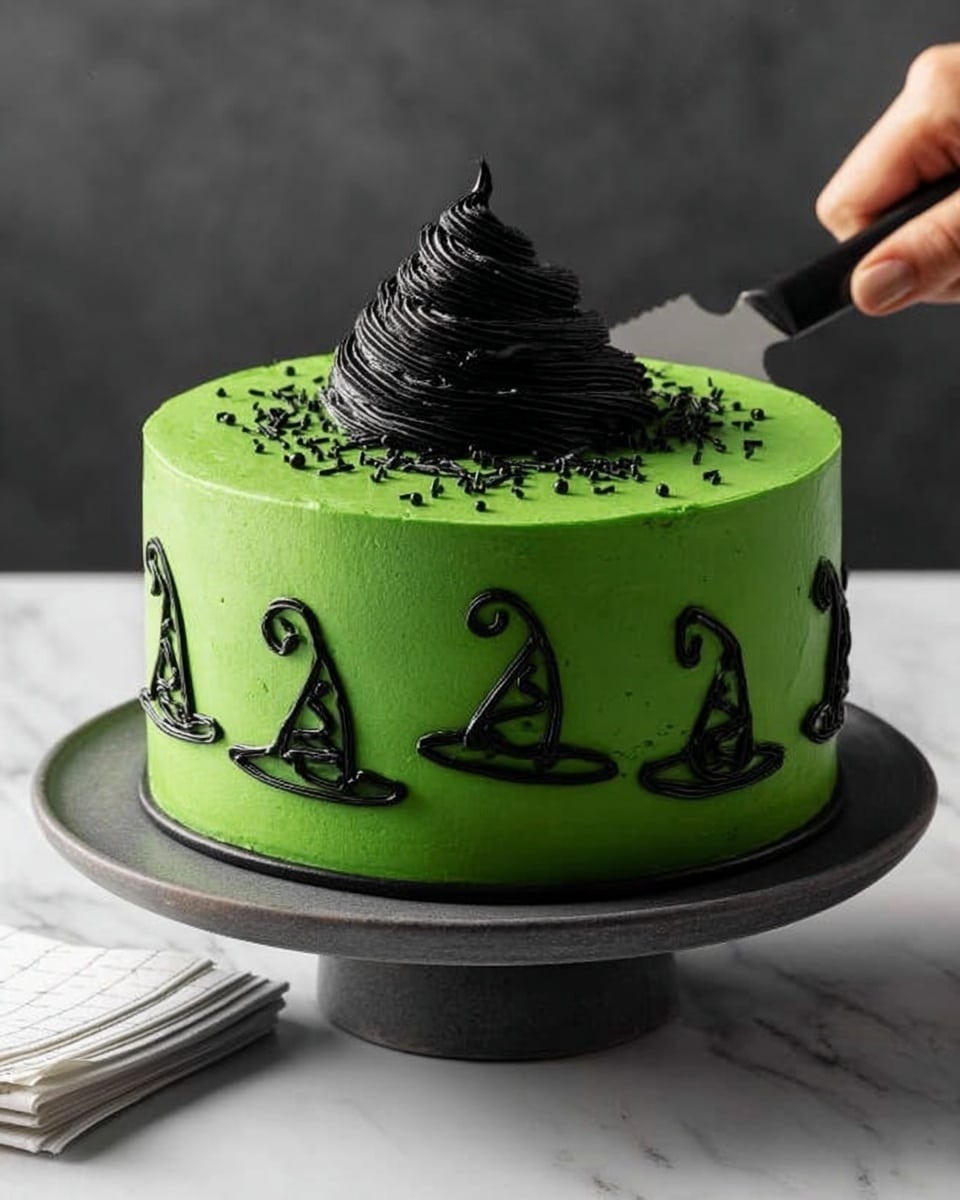
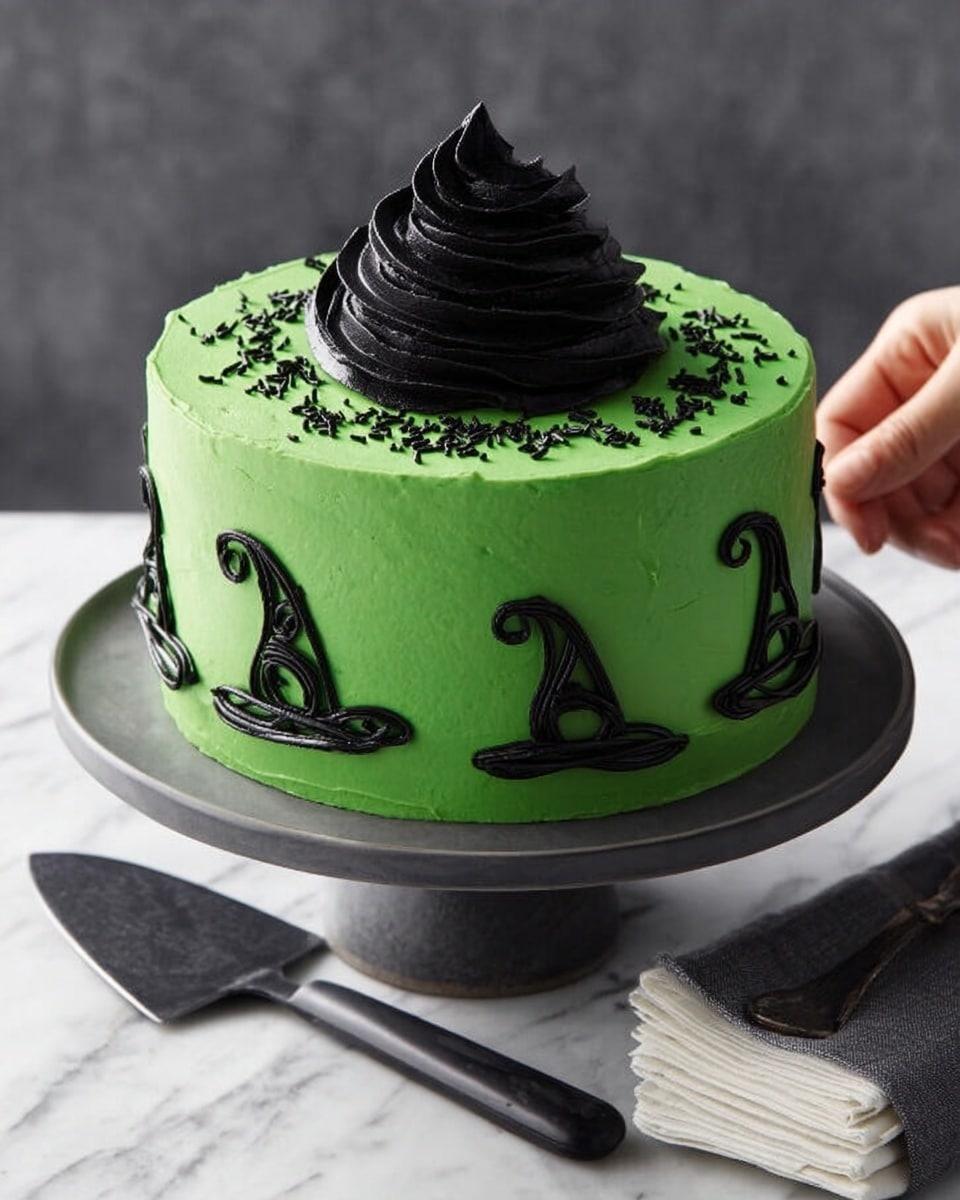
If you’re hunting for a show-stopping dessert this spooky season, I absolutely have to share my all-time favorite Halloween Witch Cake Recipe with you. This cake isn’t just about looking fun and festive — it tastes so unbelievably rich and moist, and the creamy frosting with those adorable witch hat decorations? Total crowd-pleaser every single time. Trust me, once you try this recipe, you’ll find it’s the perfect centerpiece for your Halloween party or cozy night in!
Why You’ll Love This Recipe
- Rich, Moist Texture: The combination of melted chocolate and sour cream keeps the cake incredibly moist and tender.
- Festive & Fun Decoration: Handmade witch hats and colorful frosting make it a Halloween showstopper.
- Family Favorite: My family goes crazy for this cake every October — it’s always a hit with kids and adults alike.
- Easy to Make From Scratch: No weird ingredients here, just simple pantry staples and a few decorating extras.

Ingredients You’ll Need
These ingredients work beautifully together to create a perfect balance of chocolatey richness and tangy freshness from the sour cream. When you shop, opt for high-quality chocolate and fresh eggs to get the best flavor and texture in your Halloween Witch Cake Recipe.
- Butter: Using softened butter helps create that light, fluffy cake texture you want.
- Brown sugar: Adds deep caramel notes and moisture.
- Large eggs: Room temperature eggs mix better into the batter for more even texture.
- Semisweet chocolate: Melted for that rich chocolate flavor — I prefer chips for convenience.
- Vanilla extract: Gives a warm background flavor that complements the chocolate.
- All-purpose flour: The base for our cake, use fresh for best results.
- Baking soda: Helps the cake rise nicely and adds tenderness.
- Salt: Balances sweetness and enhances flavors.
- Sour cream: Key for moisture and a subtle tang that keeps the cake from feeling too sweet.
- Water: Added gradually for the perfect batter consistency.
- Frosting ingredients: Butter, confectioners’ sugar, vanilla, salt, milk, and gel food coloring for the vibrant green and black hues.
- Black candy coating disks: Melted to pipe tiny witch hats that make decorating so fun.
- Assorted black sprinkles, sanding sugar, and pearls: Fun details for that spooky, elegant finish.
Variations
One of my favorite things about the Halloween Witch Cake Recipe is that you can make it your own — whether you want a dairy-free twist, a little more chocolate, or even a simpler decoration style for beginners.
- Dairy-Free Version: I swapped sour cream with coconut yogurt once, and it still came out super moist and delicious.
- Extra Chocolate Explosion: Add chocolate chips into the batter for an even richer chocolate experience — we love this for chocoholics in my family.
- Beginner-Friendly Decorating: If you’re short on time, just do a smooth green frosting coat and sprinkle on black sanding sugar — looks festive without the fuss.
How to Make Halloween Witch Cake Recipe
Step 1: Ready Your Pans and Batter
Start by preheating your oven to 350°F and prepping three 8-inch round pans – greasing the bottoms and lining them with parchment paper ensures your cakes come out smoothly. I like to grease the parchment too; makes removing the layers so much easier. Then, cream your softened butter and brown sugar until it’s fluffy and light — about 5-7 minutes. This is where a mixer really saves your arm! Add eggs one by one, beating well after each to get that perfect emulsion.
Step 2: Mix in Chocolate and Dry Ingredients Alternately
Once your eggs are in, beat in the melted chocolate and vanilla. Meanwhile, whisk together your flour, baking soda, and salt in a separate bowl. Now here’s a trick I learned — add your dry ingredients alternately with sour cream to the butter mixture, beating well with each addition. This keeps everything smooth and prevents the batter from getting lumpy. Finally, gradually mix in the water until your batter reaches a pourable consistency.
Step 3: Bake and Cool Your Layers
Divide the batter evenly between your three pans, then pop them in the oven for about 40-45 minutes. Check for doneness by inserting a toothpick; if it comes out clean, you’re golden. I always let mine cool in the pans for 10 minutes before turning out onto wire racks — this step helps prevent cracks. Don’t rush cooling; you want the layers completely cool before the fun decorating starts!
Step 4: Make the Frosting and Color It
Beat your softened butter until smooth in a large bowl, then slowly add confectioners’ sugar, vanilla, salt, and milk until you get the perfect frosting consistency — smooth and spreadable, but not runny. Take out 1.5 cups and tint it black with gel food coloring for contrast. The rest you’ll color green for that classic witchy look. It’s fun to play with gel colors since a little goes a long way and you get vibrant shades.
Step 5: Assemble and Decorate
If your cake layers domed in the oven, gently level them with a serrated knife so the layers stack evenly. Spread about 2/3 cup of green frosting between each layer, then frost the top and sides with the remaining green. For those cute witch hats, melt your black candy coating and pipe into hat shapes on wax paper — super easy and seriously adorable. Once they’re set, stick one on top of the cake just before serving and press the others, along with black pearls and sprinkles, gently into the sides using the black frosting. The contrast really makes your spooky cake pop!
Pro Tips for Making Halloween Witch Cake Recipe
- Butter Softening: I like setting my butter out an hour before baking for that perfect creamy beat — don’t microwave it, or you’ll risk melting!
- Batter Consistency: The batter should be pourable but thick; add the water slowly and check frequently so it doesn’t get too runny.
- Piping Witch Hats: Melt your candy coating gently in increments and pipe with a small tip for smooth shapes — leftover hats can be stored in an airtight container for weeks.
- Leveling Layers: Don’t skip trimming domed tops; uneven layers make decorating trickier and can cause the cake to wobble.
How to Serve Halloween Witch Cake Recipe
Garnishes
In my kitchen, those black pearls and sanding sugar add just the right sparkle and texture — they make the frosting pop and add a touch of elegance. I also love a few edible glitter accents for some magical shimmer, especially if kids are around. Sometimes a scattering of candy eyeballs amps up the fun!
Side Dishes
Pair this cake with something light like vanilla ice cream or a scoop of pumpkin spice whipped cream for a perfect contrast. For drinks, a warm cup of spiced cider or hot chocolate works wonders to complement the chocolatey richness.
Creative Ways to Present
I once set this cake on a platter surrounded by mini candy pumpkins and felt spider webs for a creepy-cute vibe that had my guests oohing and aahing. Another time, I grabbed a black cake stand from the dollar store and stacked the cake centerpiece with themed cupcake “cauldrons” around it — total party magic! Presentation can really turn this from fun to unforgettable.
Make Ahead and Storage
Storing Leftovers
After your spooky festivities, wrap leftover cake in plastic wrap and store in an airtight container in the fridge. It keeps beautifully for up to 4 days, and honestly, it tastes even better the next day as the flavors meld together.
Freezing
I’ve frozen frosted cake layers before by wrapping them tightly in plastic and foil — just thaw overnight in the fridge before decorating or serving. The texture stays moist and the flavors remain amazing, which is a lifesaver if you bake ahead for a party.
Reheating
If you want to warm a slice (especially in fall weather), I gently microwave it for 15-20 seconds to soften the frosting a bit without melting it completely. This brings out the cake’s richness and improves that fresh-baked feel.
FAQs
-
Can I make the Halloween Witch Cake Recipe gluten-free?
Absolutely! I recommend swapping the all-purpose flour for a gluten-free baking blend that’s one-to-one substitute ready. Keep an eye on the texture as gluten-free flours can sometimes make cakes a bit denser, so you might want to add a teaspoon of xanthan gum if your blend doesn’t include it.
-
How far ahead can I prepare this cake?
You can bake the cake layers up to 2 days in advance and store them wrapped tightly at room temperature. Frost and decorate just before serving for the freshest look and taste. Alternatively, freeze the layers and decorate a day or two before your event.
-
What if I don’t have black candy coating disks for the witch hats?
Not a problem! You can use regular dark chocolate or candy melts if you have those on hand—just melt gently and pipe your shapes as directed. Alternatively, store-bought mini witch hat candies can be a quick and cute substitute.
-
How do I avoid the cake being dry?
The key is not overbaking — check the cake with a toothpick a few minutes before the timer goes off. Also, the sour cream and melted chocolate in this recipe help lock in moisture, so be sure to follow the ingredient amounts closely for best results.
Final Thoughts
This Halloween Witch Cake Recipe has become my go-to for spooky celebrations because it brings together the best of Halloween flair and delicious homemade flavor. Every time I make it, whether for family or friends, it sparks joy and a few “oohs” and “ahs” at the table. If you’re looking to make your next Halloween unforgettable, I wholeheartedly recommend giving this recipe a whirl—you’ll love how easy and rewarding it is to bake, decorate, and share!
Print
Halloween Witch Cake Recipe
- Prep Time: 1 hour 15 minutes
- Cook Time: 40 minutes
- Total Time: 1 hour 55 minutes
- Yield: 16 servings
- Category: Dessert
- Method: Baking
- Cuisine: American
Description
This Halloween Witch Cake is a spooky and delightful layered chocolate cake perfect for festive celebrations. Featuring moist chocolate layers made with brown sugar and semisweet chocolate, it is frosted with a vibrant green buttercream and decorated with black candy witch hats and sprinkles for a playful seasonal touch.
Ingredients
Cake:
- 3/4 cup butter, softened
- 2-1/2 cups packed brown sugar
- 4 large eggs, room temperature
- 6 ounces semisweet chocolate, melted and cooled
- 3 teaspoons vanilla extract
- 3 cups all-purpose flour
- 3 teaspoons baking soda
- 1 teaspoon salt
- 1-1/2 cups sour cream
- 1-1/2 cups water
Frosting:
- 1-1/4 cups butter, softened
- 10 cups confectioners’ sugar
- 3 teaspoons vanilla extract
- 1/4 teaspoon salt
- 1/2 to 2/3 cup 2% milk
- Green gel food coloring
- Black gel food coloring
Decoration:
- 4 ounces black candy coating disks, melted
- Assorted black sprinkles, sanding sugar and pearls
Instructions
- Prepare and Preheat: Preheat the oven to 350°F. Grease three 8-inch round baking pans and line the bottoms with parchment paper; grease the parchment to prevent sticking.
- Cream Butter and Sugar: In a large bowl, cream together the softened butter and packed brown sugar using an electric mixer until the mixture is light and fluffy, approximately 5-7 minutes.
- Add Eggs and Flavorings: Add the eggs one at a time, beating well after each addition to incorporate fully. Then beat in the melted and cooled semisweet chocolate followed by the vanilla extract.
- Combine Dry Ingredients: In a separate bowl, whisk together the all-purpose flour, baking soda, and salt to evenly distribute ingredients.
- Mix Batter: Alternately add the flour mixture and sour cream to the creamed butter mixture, beginning and ending with the flour mixture. Beat well after each addition to ensure smooth batter. Gradually beat in the water until combined.
- Bake Cake Layers: Divide the batter evenly among the prepared pans. Bake for 40-45 minutes, or until a toothpick inserted into the center of each cake layer comes out clean. Remove from oven and cool layers for 10 minutes in pans before transferring them to wire racks to cool completely.
- Make Frosting: In a large bowl, beat the softened butter until smooth. Gradually add the confectioners’ sugar, vanilla extract, salt, and enough 2% milk to achieve a spreadable consistency. Reserve 1-1/2 cups frosting for black coloring and tint the remaining green with green gel food coloring. Tint the reserved frosting black with black food coloring.
- Level Cake Layers: If the cake layers have domed tops, use a serrated knife to trim them to level surfaces to ensure stable stacking.
- Assemble Cake: Place one cake layer on a serving plate. Spread with about 2/3 cup of the green frosting. Repeat with the next layer and frosting. Top with the final layer and frost the top and sides of the entire cake with the remaining green frosting.
- Create Witch Hat Decorations: Place the melted black candy coating into a piping bag fitted with a small round tip. Pipe witch hat shapes onto waxed paper and allow them to set until firm.
- Decorate Cake: Using black frosting in a piping bag fitted with a large star tip, pipe decorative star shapes on top of the cake. Adhere assorted black sprinkles, sanding sugar, and pearls to the top and sides of the cake. Just before serving, gently place one witch hat on top and press remaining witch hats and pearls onto the sides by lightly pressing them into the green frosting.
Notes
- Ensure eggs are at room temperature for better creaming and batter texture.
- If you don’t have green and black gel food coloring, use regular liquid food coloring but add sparingly as it may affect frosting consistency.
- Chill the frosting if it becomes too soft to work with during decorating.
- For best results, prepare the candy coating witch hats ahead of time so they have plenty of time to set.
- The cake layers can be baked a day ahead, wrapped well, and stored at room temperature to save time on the day of assembly.
Nutrition
- Serving Size: 1 slice (1/16th of cake)
- Calories: 540
- Sugar: 45g
- Sodium: 320mg
- Fat: 28g
- Saturated Fat: 16g
- Unsaturated Fat: 10g
- Trans Fat: 0.5g
- Carbohydrates: 65g
- Fiber: 3g
- Protein: 6g
- Cholesterol: 110mg


