
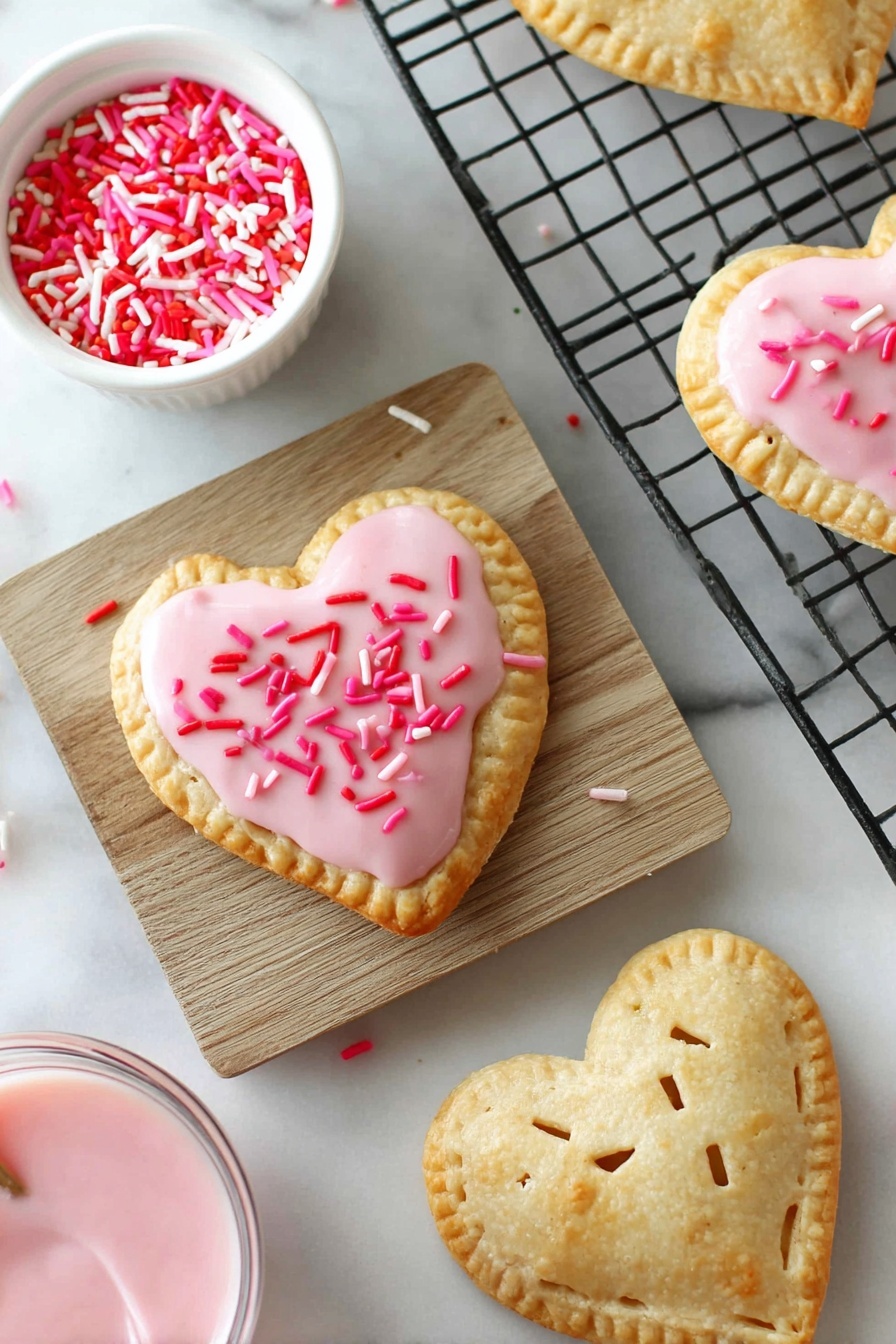
If you’re looking for a fun and absolutely delightful breakfast treat, I have the perfect recipe for you. This Homemade Strawberry Pop Tarts Recipe is seriously a game-changer in the kitchen. Imagine flaky, golden crusts filled with sweet strawberry jam and topped with a soft, glossy icing and festive sprinkles. I’ve made these plenty of times, and they always bring a little sparkle to my mornings. Trust me, once you try this, store-bought pop tarts will feel like a thing of the past.
Why You’ll Love This Recipe
- Simple Ingredients: Uses just a few pantry staples for easy prep.
- Flaky & Buttery Crust: The premade pie crust makes the texture unbeatable without extra fuss.
- Customizable Filling & Icing: Play with jam flavors and sprinkles for your perfect combo.
- Fun to Make: My kids and I love cutting shapes and decorating—it’s a kitchen party every time!

Ingredients You’ll Need
These ingredients work magically together to create a flaky crust and that sweet, gooey strawberry filling you want. I always keep a jar of good-quality strawberry jam on hand for things like this—it makes all the difference. Plus, the premade pie crust saves so much time while still giving you that homemade feel.

- Refrigerated Premade Pie Crusts: Make sure they’re at room temperature for easy rolling and cutting.
- Strawberry Jam: Pick a jam with a good balance of sweetness and tartness—homemade or store-bought works great.
- Egg: For that gorgeous glossy egg wash to seal the edges and add that golden color.
- Confectioners Sugar: Key for that smooth, sweet icing on top.
- Milk: Helps thin the icing just right for spreading.
- Vanilla Extract: Adds a warm, comforting flavor to the icing.
- Red Food Coloring: Just a drop to give a pretty tint to your icing—totally optional but super fun!
- Sprinkles: Adds that cheerful pop of color and texture on top.
Variations
I love how versatile this Homemade Strawberry Pop Tarts Recipe is. You can absolutely play around with different jams or even add a little cream cheese for a dreamy combo. Personalizing this recipe makes it your own — and I think that’s half the fun.
- Jam Variants: I once tried raspberry and apricot jam instead of strawberry, and my family went crazy for it!
- Gluten-Free: Swap out the pie crust for a gluten-free version; just roll carefully as some gluten-free crusts can be a bit fragile.
- Dairy-Free Icing: Use almond or oat milk instead of regular milk for a dairy-free version.
- Shape Variations: Hearts are cute, but you can use stars or squares for different occasions or just for fun.
How to Make Homemade Strawberry Pop Tarts Recipe
Step 1: Prepare Your Workspace and Pie Crust
First things first: preheat your oven to 400°F. While that’s warming up, unroll your refrigerated pie crusts onto either a baker’s mat, a sheet of parchment paper, or a lightly floured counter. This is when you’ll want to make sure the dough is at room temperature to avoid cracks when rolling out. If the dough feels too cold and stiff, just let it sit a few more minutes—it makes cutting much easier.
Step 2: Cut Your Heart Shapes
Using a heart-shaped cookie cutter (or any shape you like!), start cutting out as many pieces as possible. I like to rotate and reposition the cutter carefully to get the most shapes per crust. Don’t waste those scraps—you can knead them gently, roll out again to about 1/8 inch thick, and cut out more hearts. This way, you minimize waste and get more delicious pop tarts to enjoy!
Step 3: Add the Strawberry Filling
Place half of your heart cutouts onto a parchment-lined baking sheet. Now spoon about one tablespoon of strawberry jam into the center of each. Don’t fuss about spreading it perfectly—unless you’re aiming for a super neat look, the jam will spread out naturally when baked. I’ve learned that trying to smooth it out too much just makes the process longer and messier.
Step 4: Seal the Pop Tarts
Beat one egg in a small bowl—this is your egg wash, which will help seal the tarts and give them that beautiful golden sheen. Brush the edges of your jammed hearts lightly with the egg wash, then place the remaining heart cutouts on top. Seal them together by pressing the edges gently with your finger, then use a fork to crimp all around. This not only seals the filling in but adds that classic pop tart look.
Step 5: Prepare to Bake
Before baking, use the fork again to poke a few holes in the top crusts—this lets steam escape and prevents your tarts from puffing up unevenly. Give the tops another light brush with the egg wash to ensure they get that golden glow in the oven. Now slide your baking sheet into the oven and bake for about 10-12 minutes, watching for a gorgeous golden color.
Step 6: Cool and Ice Your Pop Tarts
Once baked, transfer the pop tarts to a wire rack to cool completely. This is key before icing them, so your icing doesn’t melt off. While they’re cooling, mix up the icing by whisking together confectioners sugar, milk, and vanilla extract until smooth. Add a drop of red food coloring for that festive, rosy finish.
Use a spoon or a small spatula to spread the icing on top of each cooled pop tart. I like to smooth it out evenly and then sprinkle on some red and pink sprinkles for extra fun. Honestly, my kids get so excited they sometimes just lick the icing straight from the spoon—and who can blame them?
Pro Tips for Making Homemade Strawberry Pop Tarts Recipe
- Keep Dough Cold but Pliable: Room temperature crust rolls and cuts easier, but if it starts getting too soft, pop it in the fridge briefly.
- Don’t Overfill: Too much jam can cause leaks during baking; one tablespoon per tart is just right.
- Use a Fork for Crimping: It creates a better seal and that classic edge texture which looks so good when baked.
- Cool Before Icing: Patience here makes a difference—icing won’t melt off and stays beautifully glossy.
How to Serve Homemade Strawberry Pop Tarts Recipe

Garnishes
I usually keep it simple with sprinkles—red and pink go perfectly for a strawberry pop tart vibe. But if you want to get fancy, a light dusting of powdered sugar or a drizzle of white chocolate can be incredible. I love playing around with garnishes because it’s such an easy way to impress guests or make weekday mornings feel special.
Side Dishes
These pop tarts are great served with a side of fresh fruit or a tall glass of cold milk. On weekends, I like pairing them with scrambled eggs for a balanced and festive brunch. Honestly, they also make a fantastic grab-and-go snack any time of day.
Creative Ways to Present
For birthdays or holidays, I set these pop tarts out on a pretty platter with colorful cupcake liners underneath each tart. You can arrange them in fun shapes or even stack a couple with parchment paper between layers for a delightful pop tart tower. It’s always a hit at parties and makes the presentation feel super special.
Make Ahead and Storage
Storing Leftovers
I store leftover Homemade Strawberry Pop Tarts in an airtight container at room temperature for up to two days. After that, I prefer to keep them in the fridge to maintain freshness, especially if they’re iced. Just bring them back to room temperature before eating for the best texture.
Freezing
I’ve had great success freezing these pop tarts! After baking and cooling, I flash freeze them on a tray, then transfer to a freezer-safe container or bag. They freeze well for up to a month. When you want a treat, just thaw at room temperature and you’re good to go.
Reheating
To reheat, I pop the pop tarts in a toaster oven for a few minutes until warmed through and the crust is crisp again. If you’re using a microwave, just a quick 20 seconds does the trick but you might lose some of the crispness. Keep an eye on them to avoid overheating!
FAQs
-
Can I make these pop tarts without premade pie crust?
Absolutely! If you prefer a homemade crust, a simple pie dough recipe with flour, butter, salt, and cold water works wonderfully. Just remember to chill the dough well before rolling to ensure it’s easy to work with and yields a flaky crust.
-
How do I prevent the jam from leaking during baking?
Use a moderate amount of jam—around one tablespoon per pop tart is ideal. Make sure to brush the edges with egg wash before sealing and press the edges firmly with a fork to create a tight seal.
-
Can I make these pop tarts vegan?
Yes! Swap the egg wash for a plant-based milk alternative like almond or soy milk for brushing the edges, and use a vegan premade crust. For the icing, substitute dairy milk with plant-based milk, and ensure your sprinkles are vegan-friendly.
-
Can I use other jam flavors for this recipe?
Definitely! This recipe is wonderfully adaptable. Blueberry, raspberry, apricot, or even peach jams work great and can give your pop tarts a new twist any time you make them.
-
How long do homemade pop tarts last?
When stored properly in an airtight container, they last about 1-2 days at room temperature and up to a week refrigerated. For longer storage, freezing is your best option.
Final Thoughts
I honestly can’t recommend this Homemade Strawberry Pop Tarts Recipe enough—it’s a joy to make, tastes incredible, and brings people together in the kitchen. Whether it’s a cozy weekend breakfast or a special occasion treat, these pop tarts never fail to impress. Give it a try, and I promise you’ll love how they turn out. Plus, making something this delicious from scratch feels so rewarding—you’ll want to make them again and again, just like I do!
Print
Homemade Strawberry Pop Tarts Recipe
- Prep Time: 15 minutes
- Cook Time: 12 minutes
- Total Time: 30 minutes
- Yield: 10 pop tarts
- Category: Breakfast
- Method: Baking
- Cuisine: American
- Diet: Vegetarian
Description
This Homemade Pop Tarts recipe gives you a fun and delicious way to enjoy classic flaky pastries filled with sweet strawberry jam, topped with a colorful vanilla icing and sprinkles. Made using premade pie crusts and simple pantry ingredients, these heart-shaped pop tarts are perfect for breakfast or a festive treat.
Ingredients
Pop Tart Pastry
- 2 Refrigerated Premade Pie Crusts (at room temperature)
- Strawberry Jam (approximately 10 tablespoons)
- 1 Egg (for egg wash)
Icing
- 1/2 Cup Confectioners Sugar
- 2 Tbsp Milk
- 1/2 Tsp Vanilla Extract
- 1 Drop Red Food Coloring
- Red and Pink Sprinkles
Instructions
- Preheat Oven: Preheat your oven to 400°F (204°C) to prepare for baking the pop tarts.
- Roll Out Pie Crust: On a bakers mat, parchment paper, or lightly floured countertop, unroll the premade pie crusts carefully to maintain the dough’s texture.
- Cut Heart Shapes: Using a heart-shaped cookie cutter, cut out as many heart shapes as possible from the rolled-out dough. Place them on a parchment-lined cookie sheet. Gather the remaining dough, roll it out again to approximately 1/8 inch thick, and cut additional hearts.
- Add Jam Filling: On half of the heart-shaped dough pieces, place about one tablespoon of strawberry jam in the center. The jam does not need to be spread perfectly as it will even out during baking.
- Apply Egg Wash: Beat the egg in a small bowl. Brush the edges of the jam-topped hearts lightly with egg wash to help seal the pop tarts.
- Seal Pop Tarts: Place a plain heart-shaped dough piece on top of each jam-filled piece. Seal the edges by pressing with your fingers, then use a fork to crimp around the edges securely.
- Vent and Brush: Use a fork to poke several small holes on top of each pop tart to allow steam to escape during baking. Brush the entire top surface with the remaining egg wash for a golden finish.
- Bake: Bake the pop tarts at 400°F for 10-12 minutes until they are golden brown and cooked through.
- Cool: Transfer the baked pop tarts to a wire rack to cool completely before icing.
- Prepare Icing: Whisk together confectioners sugar, milk, and vanilla extract until smooth. Add one drop of red food coloring and mix until evenly colored.
- Ice and Decorate: Spoon the icing onto the cooled pop tarts. Use the back of the spoon or a small spatula to spread it evenly. Sprinkle with red and pink sprinkles to decorate. Allow icing to set before serving.
Notes
- Make sure your pie crusts are at room temperature for easy rolling and cutting.
- You can substitute strawberry jam with any jam or preserves of your choice.
- Adjust baking time slightly depending on your oven; watch for golden brown edges.
- These pop tarts are best enjoyed the same day but can be stored in an airtight container for up to 2 days.
- For a dairy-free option, use a plant-based milk in the icing and egg substitute or omit the egg wash.
Nutrition
- Serving Size: 1 pop tart
- Calories: 210
- Sugar: 12g
- Sodium: 150mg
- Fat: 9g
- Saturated Fat: 3g
- Unsaturated Fat: 5g
- Trans Fat: 0g
- Carbohydrates: 29g
- Fiber: 1g
- Protein: 3g
- Cholesterol: 35mg

