

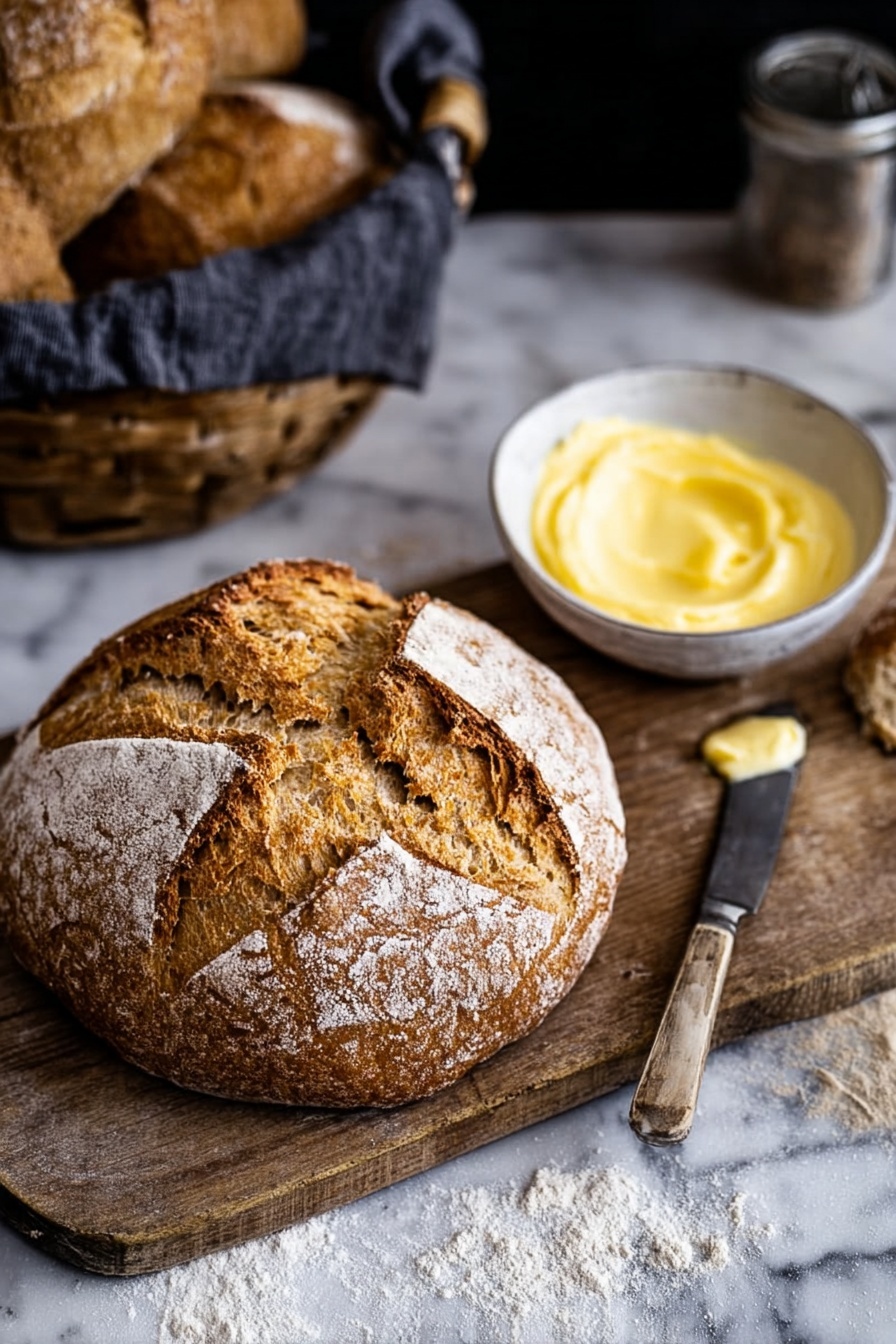
If you’ve ever wanted to make a classic, comforting bread that’s simple, quick, and totally foolproof, then this Irish Soda Bread Recipe is about to become your new favorite. I absolutely love how it comes out with that rustic, golden crust and tender crumb, and I promise you’ll appreciate how straightforward it is—no fancy equipment or yeast required! Stick with me, and I’ll show you exactly how to get it right every time.
Why You’ll Love This Recipe
- No Yeast Needed: This isn’t your typical bread because it uses baking soda and buttermilk for leavening, so it’s faster and easier to make.
- Rustic and Flavorful: The bread has a crisp crust with a soft, slightly tangy inside that’s perfect for butter and jam.
- Minimal Ingredients: You’ll only need pantry basics, and I’ll help you pick the right ones for the best result.
- Perfect for Beginners: I’ll walk you through where people usually trip up, so you won’t have to worry about it.

Ingredients You’ll Need
The beauty of this Irish Soda Bread Recipe is in its simple ingredients that work together to create that unique texture and flavor. Choosing the right flour and fresh buttermilk really makes a difference, so let me share a bit about that.
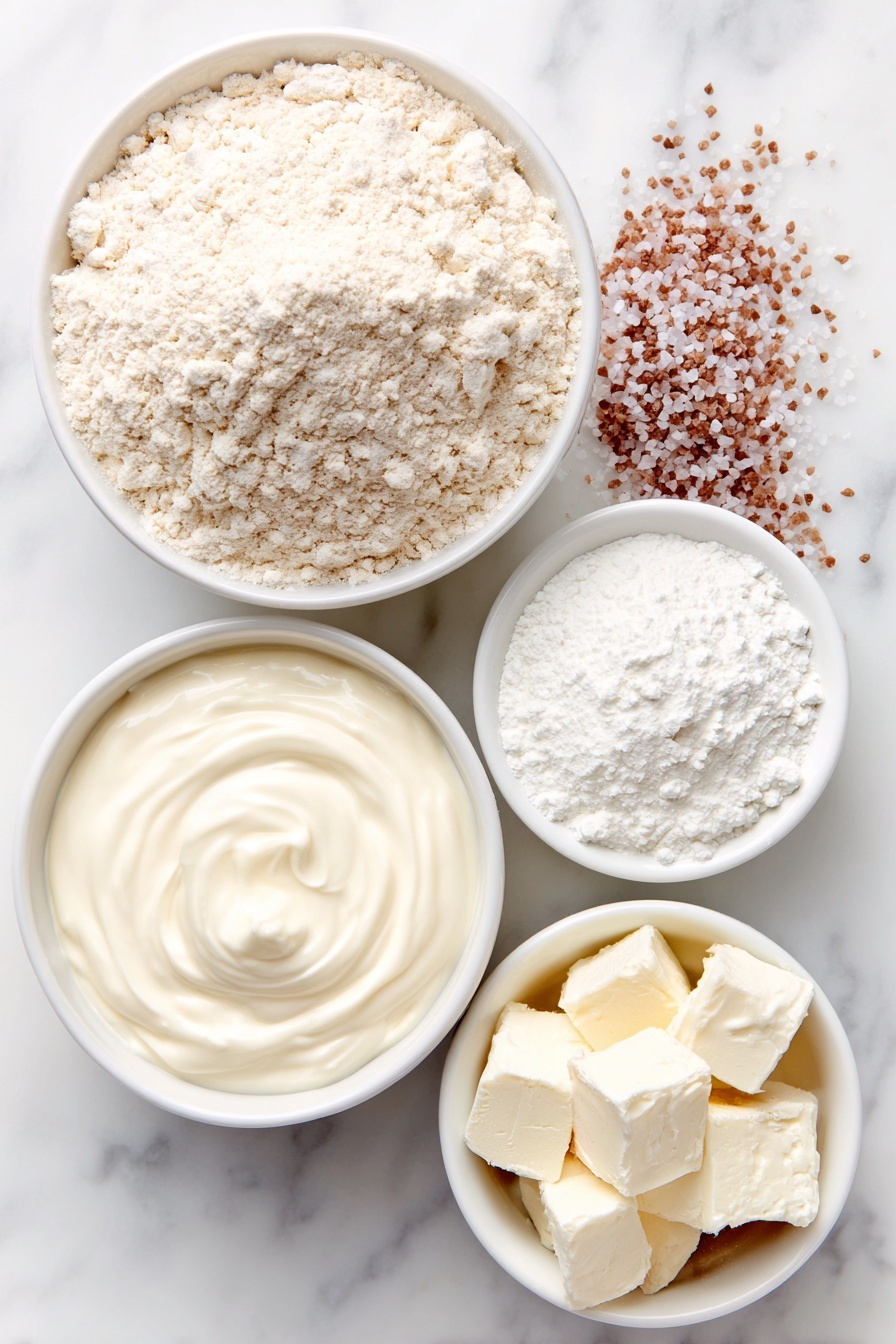
- Unbleached All-Purpose Flour: I always opt for unbleached because it has better flavor and texture than bleached; plus, it keeps the bread tender without being too dense.
- Kosher Salt: Use kosher salt for a clean, well-rounded saltiness—you don’t want iodized salt here as it can affect the bread’s taste.
- Baking Soda: This is the magic leavening agent that reacts with the buttermilk to make the bread rise—make sure it’s fresh for best results.
- Buttermilk: I like to use full-fat buttermilk to get that slight tang and rich moisture; if you don’t have buttermilk, I’ll tell you how to make a quick substitute later!
Variations
While I love the traditional version as is, I’ve had fun tweaking this Irish Soda Bread Recipe in a few ways to suit different tastes or dietary needs. Feel free to make it your own!
- Whole Wheat Version: I swapped half the all-purpose flour for whole wheat once, and it gave a lovely nutty flavor and heartier texture, perfect for breakfast sandwiches.
- Add-Ins: Some days, I toss in raisins or caraway seeds for a bit of sweetness or a little spice—my family loves the raisins with their morning butter!
- Dairy-Free Option: If you’re avoiding dairy, you can use a plant-based buttermilk substitute (like almond milk mixed with lemon juice) which worked surprisingly well in my tests.
- Gluten-Free Adaptation: Experimenting with gluten-free flours is tricky, but combining a gluten-free all-purpose blend with xanthan gum has given me decent results if you’re up for a challenge.
How to Make Irish Soda Bread Recipe
Step 1: Mix Dry Ingredients Thoroughly
Start by preheating your oven to 450°F and lining a baking sheet with parchment paper—this helps your bread bake evenly and prevents sticking. In a large bowl, whisk together your flour, kosher salt, and baking soda. This ensures the soda and salt are evenly distributed, so your bread rises uniformly and tastes perfect every time. Trust me, I’ve skipped this step before, and the texture was uneven.
Step 2: Add Buttermilk and Form the Dough
Create a well in the center of your dry ingredients and pour in the buttermilk all at once. Using a wooden spoon (my go-to for this), stir gently from the center outward. Don’t worry if the dough looks shaggy and somewhat sticky; that’s exactly right. Overmixing can lead to a tough loaf, so be gentle here!
Step 3: Knead Lightly and Shape
Bring your dough onto a lightly floured surface. Use your hands to knead the dough about four times—just enough to bring it together into a smoothish ball. If you knead too much, the bread can become dense, so keep it minimal. Shape it into a round loaf, and place it on your prepared baking sheet. Don’t forget to sprinkle a little flour on top; it gives the bread that authentic rustic look.
Step 4: Score and Bake
Use a sharp chef’s knife to cut a large X across the top of the loaf—this helps the bread expand while baking and is a signature touch on Irish soda bread. Immediately pop the bread into your hot oven. Bake at 450°F for 15 minutes, then lower the temperature to 400°F, rotate the pan halfway through, and bake another 25 to 30 minutes until the bread is a deep golden brown. You’ll smell that amazing aroma filling your kitchen!
Step 5: Cool and Enjoy
Once the baking’s done, give the loaf at least 20 minutes to cool. This resting phase lets the crumb set so it won’t be gummy when you slice it. I love serving it warm with a generous slather of salted butter—pure bliss.
Pro Tips for Making Irish Soda Bread Recipe
- Fresh Baking Soda Matters: I learned the hard way that old baking soda won’t give your bread the rise it deserves, so always check the expiration date.
- Don’t Overwork the Dough: The gentle touch keeps the bread tender; too much kneading leads to a dense loaf.
- Watch Your Oven Temperature: Starting at a hot 450°F is the secret to a crispy crust, then lowering it finishes the bread without burning.
- Cut the X Deep Enough: A shallow cut won’t allow the bread to expand properly, so go about an inch deep for the perfect rise.
How to Serve Irish Soda Bread Recipe
Garnishes
I’m a simple girl when it comes to garnishes on Irish Soda Bread: good-quality salted butter is king. Sometimes I add a little honey or a dollop of homemade jam, especially when serving for breakfast or brunch. If you’re feeling fancy, a bit of sharp cheddar melted on top pairs beautifully too.
Side Dishes
This bread is incredibly versatile at the table. I love serving it alongside hearty stews, like classic Irish beef stew or even a simple vegetable soup. It also shines with a breakfast spread, paired with eggs and smoked salmon for a special treat.
Creative Ways to Present
For celebrations like St. Patrick’s Day, I’ve cut the loaf into thick wedges and arranged them in a rustic wicker basket lined with a green checkered cloth—instant festive vibes. You can also hollow out the center to use as a bread bowl for soups, which always wows guests!
Make Ahead and Storage
Storing Leftovers
I usually wrap leftover Irish Soda Bread tightly in a clean kitchen towel, then place it in a paper bag to keep the crust crisp but the interior soft. Stored this way, it lasts about two days at room temperature. If you notice it drying out, that’s when the next storage step comes in handy.
Freezing
Freezing soda bread works great! I slice it first, then wrap each slice individually in plastic wrap and tuck them all into a freezer-safe bag. This way, I can pull out just what I need without thawing the whole loaf. It keeps well for up to three months.
Reheating
To bring your bread back to life, I pop slices directly into a toaster or warm them in a 350°F oven for about 5-7 minutes. If reheating from frozen, just add a couple of extra minutes. This method restores that crispy crust and warm, tender crumb just like fresh-baked.
FAQs
-
Can I substitute regular milk for buttermilk in this Irish Soda Bread Recipe?
While buttermilk is ideal because of its acidity, you can easily make a substitute by adding 1 tablespoon of lemon juice or white vinegar to 1 cup of milk. Let it sit for 5-10 minutes until it curdles slightly, then use it just like buttermilk for the recipe. This will provide the necessary acidity to activate the baking soda.
-
Why did my Irish Soda Bread turn out dense and heavy?
That usually happens when the dough is overworked or the baking soda is old and inactive. Remember to mix just enough to combine ingredients and knead lightly. Also, ensure your baking soda is fresh; expired soda won’t give the bread the lift it needs.
-
How do I know when the bread is fully baked?
The crust should be a deep golden brown, and when you tap the bottom of the loaf, it should sound hollow. If you have a kitchen thermometer, the internal temperature should be around 200°F. Cooling the bread for 20 minutes before slicing also helps the structure to set.
-
Can I add raisins or seeds to this Irish Soda Bread Recipe?
Absolutely! Adding raisins, currants, or caraway seeds is a traditional variation and adds wonderful flavor. Just toss them with the flour before mixing in the wet ingredients so they’re evenly distributed.
Final Thoughts
Irish Soda Bread has a special place in my kitchen because it feels like such an honest, wholesome bread you can pull together in no time. Whether you’re making it for a cozy breakfast, a side for dinner, or a last-minute gift, this recipe always delivers that warm, nostalgic feeling. I hope you enjoy making and sharing it as much as I do—there’s something truly magical about slicing into a homemade loaf fresh from the oven. Give this Irish Soda Bread Recipe a try, and I’m confident it’ll become a beloved staple in your home too!
Print
Irish Soda Bread Recipe
- Prep Time: 12 minutes
- Cook Time: 45 minutes
- Total Time: 57 minutes
- Yield: 1 loaf (about 8 servings)
- Category: Bread
- Method: Baking
- Cuisine: Irish
Description
Traditional Irish Soda Bread is a simple, rustic bread made without yeast that relies on baking soda for leavening. This quick bread combines flour, salt, baking soda, and buttermilk to create a dense yet tender loaf with a crisp golden crust. Perfectly suited for serving warm slathered with butter, it offers an authentic taste of Irish heritage with minimal ingredients and effort.
Ingredients
Dry Ingredients
- 3 1/2 cups (420 g) unbleached all-purpose flour
- 3/4 teaspoon (3 g) kosher salt
- 3/4 teaspoon baking soda
Wet Ingredients
- 1 1/2 cups (337 g) buttermilk
Instructions
- Preheat Oven and Prepare Baking Sheet: Preheat your oven to 450°F (232°C) and line a baking sheet with parchment paper to prevent sticking and ensure even baking.
- Combine Dry Ingredients: In a large mixing bowl, whisk together the flour, kosher salt, and baking soda thoroughly to evenly distribute the leavening agent and seasoning.
- Add Buttermilk: Make a well in the center of the dry ingredients using a wooden spoon, then pour in the buttermilk. Stir gently from the center outward to combine, forming a shaggy dough. It’s important not to overmix to keep the bread tender.
- Knead the Dough: Lightly flour a clean work surface, turn the dough out onto it, and knead gently about 4 times until the dough comes together and the surface becomes slightly smoother. Avoid heavy kneading.
- Shape the Loaf: Using the palms of your hands, shape the dough into a round loaf. Place it onto the prepared baking sheet.
- Score the Top: Lightly sprinkle the top of the loaf with flour, then use a sharp chef’s knife to slash a large X across the surface. This helps the bread expand while baking.
- Bake the Bread: Immediately place the loaf in the preheated oven and bake at 450°F for 15 minutes. Then reduce the oven temperature to 400°F (204°C), rotate the pan 180 degrees for even baking, and continue baking for another 25-30 minutes until the crust is deeply golden brown.
- Cool and Serve: Remove the bread from the oven and let it cool on a rack for at least 20 minutes. Serve warm, ideally with Kerrygold Salted Butter for an authentic Irish touch.
Notes
- Use unbleached all-purpose flour for the best texture and flavor.
- Do not over-knead; minimal kneading produces a tender crumb.
- Make sure to slash the dough before baking to allow proper expansion.
- Serving the bread warm with butter enhances the flavor.
- Buttermilk reacts with baking soda to leaven the bread, so do not substitute unless it has similar acidity.
Nutrition
- Serving Size: 1 slice (1/8 of loaf)
- Calories: 190
- Sugar: 2 g
- Sodium: 230 mg
- Fat: 3.5 g
- Saturated Fat: 2 g
- Unsaturated Fat: 1.5 g
- Trans Fat: 0 g
- Carbohydrates: 36 g
- Fiber: 2 g
- Protein: 5 g
- Cholesterol: 10 mg


