
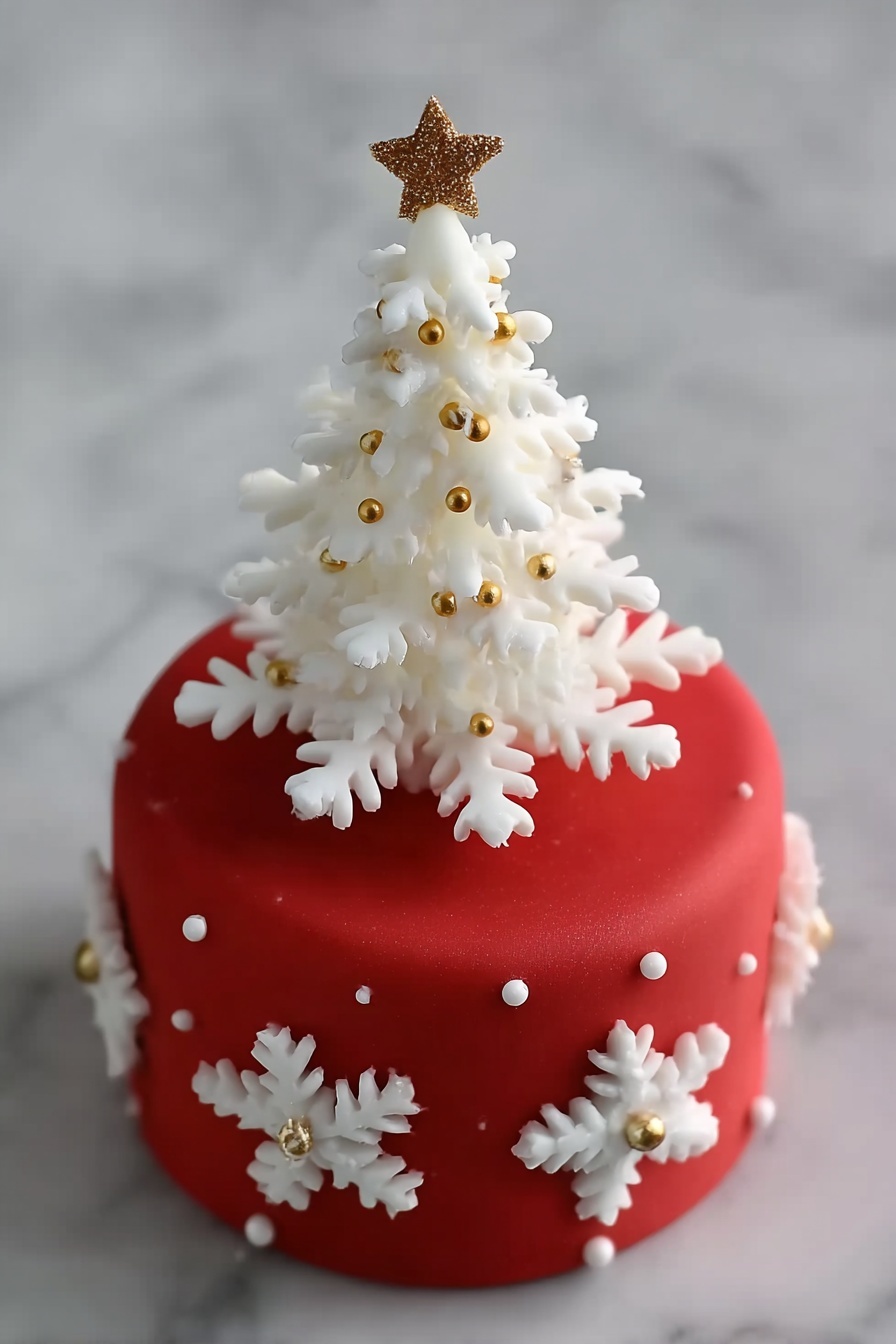
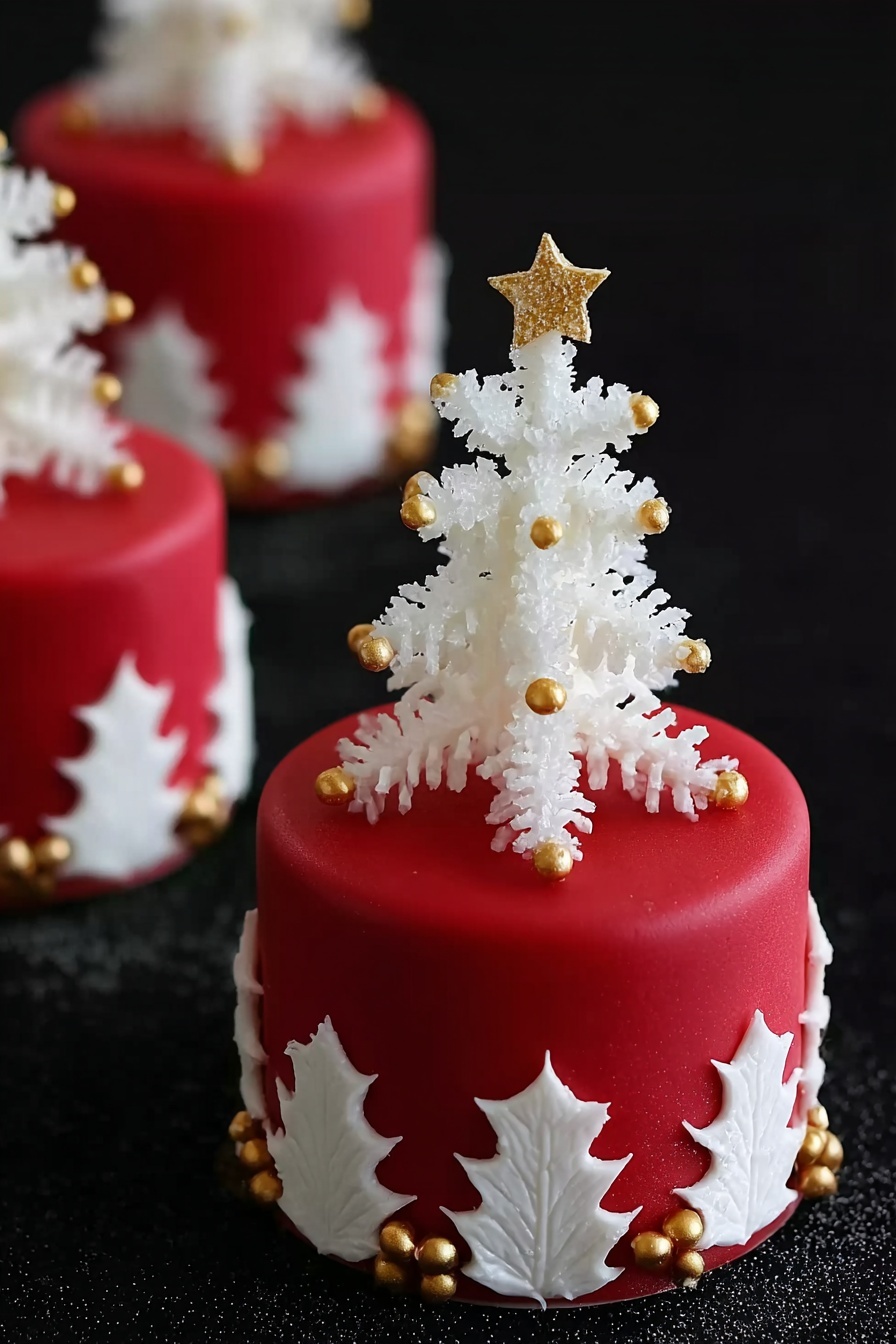
If you’re looking to impress your guests this holiday season with something truly magical, you’ve got to try my Kerst Sneeuwvlokken Fondant Taartje Recipe. These adorable mini snowflake fondant cakes are just the right mix of festive, elegant, and delightfully fun to make. Honestly, every time I put one of these on the table, my family goes crazy for them — and you’ll find your friends asking for the recipe too once they see these charming little beauties!
Why You’ll Love This Recipe
- Festive Elegance: These fondant taartjes are like little snowy Christmas trees, perfect for the holidays.
- Fun to Make: You’ll enjoy the process of shaping snowflakes, stacking layers, and adding sparkly details.
- Customizable: Whether it’s a family party or a special gift, you can personalize the decoration easily.
- Impressive Yet Manageable: Don’t let the fancy look fool you—this recipe is totally doable even if you’re new to fondant work.

Ingredients You’ll Need
Getting the right ingredients is half the battle for the perfect Kerst Sneeuwvlokken Fondant Taartje Recipe. I love using quality fondant and a few special touches like edible glitter and golden pearls to really make these pop.
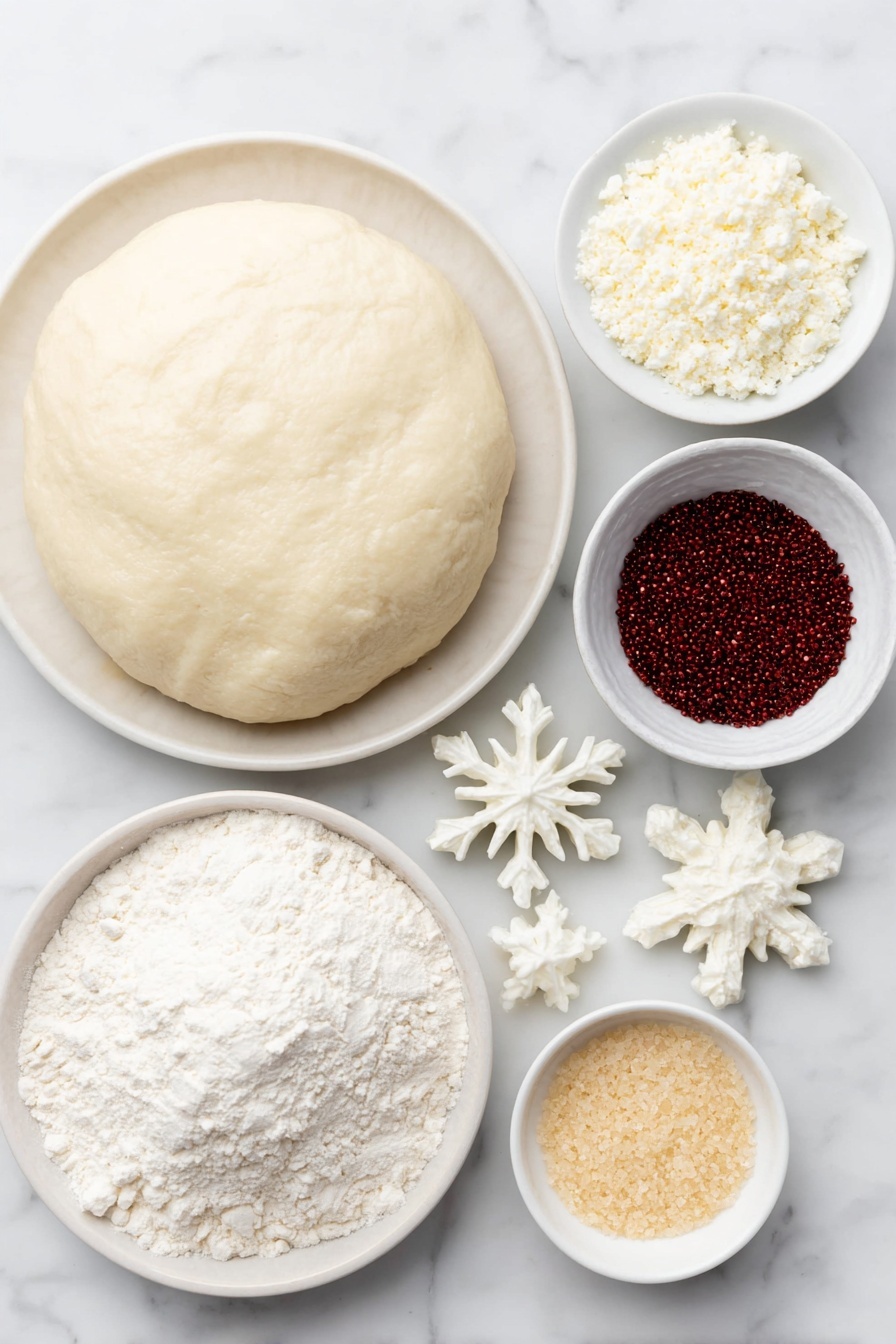
- White Fondant: Essential for your snowflakes and the tree; makes a crisp, clean canvas.
- Red Fondant: For covering the mini cake base; adds that classic Christmas pop.
- Tylose Powder: A must-have to stiffen your fondant pieces so they hold their shape perfectly.
- Snowflake Plungers (3 sizes): These cutters give your fondant those beautiful snowflake shapes in different sizes.
- Small Star Cutter: For topping off your tree with a cute golden star.
- Golden Mini Pearls: To decorate the branches and add sparkle – they really bring life to the cake.
- Edible Glue: Keeps everything stuck together without the mess of regular glue.
- Glitter (like Squires Kitchen Sparkledust): Adds that magical frostiness to your snowflakes.
- Golden Color Powder (like Solar Gold from Edible Art): For coloring the star and adding subtle shimmer to highlights.
- Mini Cakes or Cake Circles: You can bake your own or cut shapes from a bigger cake for the base.
- 10 cm Skewers: To create the structure for assembling your snowflake tree securely.
Variations
One of my favorite things about the Kerst Sneeuwvlokken Fondant Taartje Recipe is how easy it is to make it your own. I like to tweak the colors or add different edible decorations depending on the season or occasion — and you can too!
- Chocolate Fondant Base: I tried covering the mini cakes with dark chocolate fondant once, and it gave a rich contrast to the white snowflakes that looks stunning.
- Colored Sparkle: Swap out the standard glitter for pastel or silver tones to match your party’s theme; your guests will love the personalized touch.
- Fruit Filling Mini Cakes: For a tasty surprise, use mini cakes filled with raspberry or lemon curd that pairs beautifully with the fondant.
How to Make Kerst Sneeuwvlokken Fondant Taartje Recipe
Step 1: Prepare and Stiffen Your White Fondant
Before you dive into cutting out snowflakes, you want your white fondant to be sturdy enough to hold up without sagging. I discovered that kneading a small amount of tylose powder into the fondant—about the size of a small pea for a ball the size of a chicken egg—makes all the difference. Wrap it tightly in plastic wrap and let it rest for at least an hour. Patience here pays off big time for clean, strong shapes later.
Step 2: Cover Your Mini Cake with Red Fondant
While the white fondant is resting, cover your mini cake with red fondant for that festive base. I find rolling it smooth and trimming neatly around the edges sets a solid foundation for your snowflake tree to sit on.
Step 3: Cut Out Snowflakes and Other Shapes
Using your three snowflake plungers in different sizes, cut two snowflakes from each size for a total of six. Don’t forget to also cut out six small circles in varying thicknesses (two each of 6mm, 4mm, and 2mm), a small cone shape for the tree top, and a tiny star. Here’s a pro tip: poke a hole in each piece using the skewer—make the hole big enough to slide onto the skewer later without breaking, or you’ll risk cracking your snowflakes when assembling.
Step 4: Add Sparkle and Let Everything Dry
Lightly brush your white fondant pieces with edible glitter dust for that fresh-fallen snow effect. Dip the small star in the golden color powder for a royal finishing touch. Then, let all your cut outs dry on a clean surface for a few hours. I usually leave them overnight if I can—it helps them become nice and firm.
Step 5: Stack and Assemble Your Snowflake Tree
Time to get creative! Take your skewer and start stacking from biggest to smallest: first a larger circle, brush it with edible glue, and stick on the biggest snowflake. Then continue layering circle, snowflake, circle, snowflake, working your way up to the top cone shape. This “shingle” style not only looks professional but helps your tree stay balanced.
Step 6: Decorate with Golden Pearls and Holly
With a steady hand and a thin skewer, apply small dots of edible glue along the branches. Using tweezers, place the golden mini pearls like little Christmas ornaments—this detail really wows folks! If you want to go the extra mile, cut out some white fondant holly leaves and add golden berries for a charming finishing touch.
Pro Tips for Making Kerst Sneeuwvlokken Fondant Taartje Recipe
- Use Tylose Powder: I learned this trick for stiffening fondant, so your snowflakes dry crisp and don’t droop.
- Hole Size Matters: Making the holes slightly larger with the skewer prevents breakage when stacking your pieces.
- Layer Like Roof Shingles: This approach helps with stability and gives that cool, dimensional look.
- Use Tweezers for Details: I avoid fingers for placing pearls because glue can get messy, but tweezers give precision and prevent smudges.
How to Serve Kerst Sneeuwvlokken Fondant Taartje Recipe
Garnishes
I like to keep garnishes simple but festive: extra golden pearls sprinkled lightly around the plate, a few powdered sugar-dusted cranberries, or fresh holly sprigs add a natural and elegant touch that complements the fondant snowflakes beautifully.
Side Dishes
Since these are individual mini cakes, I often serve them alongside a warm cuppa — think rich hot chocolate or spiced mulled wine — and sometimes a bowl of fresh mixed berries or lightly sweetened whipped cream on the side for contrast. It makes an indulgent holiday treat that’s just the right size.
Creative Ways to Present
When I take these along to parties, I like presenting them clustered together on a mirrored platter to multiply their sparkle. Or place each one in a little decorative paper cup and top with a mini candy cane or a tiny festive flag for extra charm. Your guests will be charmed before they even take a bite!
Make Ahead and Storage
Storing Leftovers
These fondant taartjes can last for a couple of days at room temperature if kept covered in an airtight container away from heat or sunlight. I usually store them on a cake stand covered with a glass dome to keep them fresh without getting soggy.
Freezing
I haven’t personally frozen the fully decorated snowflake taartjes because the fondant can sometimes lose its delicate texture, but you can freeze the mini cakes before decorating. Just thaw completely before applying fondant to avoid condensation issues.
Reheating
Since these are fondant-covered cakes, I don’t recommend reheating them. You’ll want to enjoy them fresh because warm fondant tends to get sticky and lose its shape. If you have leftovers, let them come to room temperature for best flavor.
FAQs
-
Can I use pre-colored fondant or should I color it myself?
Absolutely, you can use pre-colored fondant if you want to save time. Just make sure to choose high-quality fondant that’s pliable. If you prefer more control over shades, especially for delicate hues like gold or red, coloring white fondant with gel food colors works well too.
-
What is tylose powder, and why is it important?
Tylose powder is a thickening agent for fondant that helps it dry harder and hold its shape better. When you knead a little into your fondant, your cut-out shapes become sturdy and less likely to bend or crack, which is perfect for making snowflake decorations.
-
How long does it take for the fondant pieces to dry?
Drying times vary with humidity and thickness of the fondant, but typically a few hours to overnight is enough for small snowflakes and shapes to firm up. I usually plan ahead and make the decorations a day before assembling to ensure they’re completely dry.
-
Can I make this recipe vegan or gluten-free?
You can use gluten-free mini cakes or bake your own gluten-free base easily. For vegan versions, look for fondant that’s gelatin-free and substitute the mini cakes with vegan options. Just double-check your edible glitters and pearls are suitable for your dietary needs.
Final Thoughts
I absolutely love how this Kerst Sneeuwvlokken Fondant Taartje Recipe turns out every single time. It’s like creating a tiny winter wonderland that’s edible and adorable, which makes this recipe a hit in my house year after year. If you’re looking for a festive project that feels special but is totally manageable, give this a try—you’ll nail it and might even find yourself making these every holiday from now on. Trust me, this recipe brings the sweetest joy right to your kitchen and your table.
Print
Kerst Sneeuwvlokken Fondant Taartje Recipe
- Prep Time: 1 hour 30 minutes
- Cook Time: 0 minutes
- Total Time: 1 hour 30 minutes
- Yield: 1 decorated mini cake (6-8 servings as dessert bites)
- Category: Dessert Decoration
- Method: No-Cook
- Cuisine: Dutch
- Diet: Vegetarian
Description
This charming Sneeuwvlokken kerstboom recipe creates festive mini Christmas trees using fondant decorated with delicate snowflakes, edible glitter, and golden accents, perfect for adding a spectacular holiday touch to small cakes or mini pastries.
Ingredients
Fondant Decoration
- White fondant
- Red fondant
- Tylose powder (a small pinch)
- Sneeuwvlok plungers in 3 sizes (snowflake cutters)
- Small star-shaped cutter
- Golden mini sugar pearls
- Edible glue
- Edible glitter powder (e.g., Squires Kitchen Sparkledust)
- Golden color powder (e.g., Solar Gold by Edable Art)
Assembly & Base
- Mini cake or mini tart base (can also be cut from cake)
- Small cone-shaped piece of fondant
- 10 cm wooden skewer (sateprikker)
- White fondant holly leaves for decoration
Instructions
- Prepare White Fondant: Take a fondant ball about the size of an egg and add a small pinch of tylose powder. Knead it well until the tylose is fully incorporated, then wrap tightly in plastic wrap and let it rest for at least one hour. This will make the fondant firmer and prevent it from collapsing while drying.
- Prepare Components: Cover one mini cake or mini tart with red fondant as the base. Using the snowflake plunger cutters in three sizes, cut 6 snowflakes total (two of each size). Also, cut 6 small round discs in varying thicknesses (two at 6mm, two at 4mm, and two at 2mm). Cut a small cone shape and a small star to use as the topper. Use the 10 cm skewer to carefully poke holes in each piece large enough to slide onto the skewer later without breaking the fondant. Allow all pieces to air dry for a few hours to harden.
- Color and Decorate Fondant Pieces: Dust the white fondant pieces with edible glitter powder for a sparkling effect. Color the small star topper gold using edible gold powder. Let dry completely with the holes still intact for assembly.
- Assemble the Christmas Tree: Start assembling on the skewer from the largest to the smallest snowflake, alternating with the small round discs to create spacing. Apply edible glue on each round disc before stacking a snowflake on top in a shingle-style arrangement. Continue layering until all snowflakes and discs are used. Finish by placing the small cone and then the gold star at the very top of the skewer.
- Decorate the Tree: Use a toothpick to apply edible glue to the branches and attach the small golden sugar pearls as ‘berries,’ using tweezers for precision. Finally, add white fondant holly leaves and golden berries around or on the mini cake base for an elegant finish.
- Presentation: Your sneeuwvlokken kerstboom mini cake is now ready to impress and will surely earn many compliments from your holiday guests.
Notes
- Tylose powder is essential for firming the fondant to ensure snowflakes do not collapse.
- Ensure holes made with the skewer are big enough to prevent fondant breakage during assembly.
- Use edible glue sparingly to avoid soggy fondant pieces.
- Let each fondant piece dry thoroughly to maintain shape and ease of handling.
- Using tweezers makes placing tiny decorations like golden pearls easier and neater.
- If mini cakes are not available, cut small rounds from a sheet cake to serve as bases.
Nutrition
- Serving Size: 1 mini decorated cake (approx. 50g)
- Calories: 150
- Sugar: 20g
- Sodium: 15mg
- Fat: 2.5g
- Saturated Fat: 1g
- Unsaturated Fat: 1g
- Trans Fat: 0g
- Carbohydrates: 30g
- Fiber: 0.5g
- Protein: 1g
- Cholesterol: 0mg


