

If you’re craving something soft, pillowy, and bursting with flavor, this Korean Chicken Steamed Bao Buns Recipe is absolutely going to wow you. I remember the first time I made these baos—it felt like discovering a secret food treasure. The combination of tender Korean-style chicken tucked inside fluffy steamed buns is easy, comforting, and honestly, downright addictive. Stick with me here, and I’ll show you all the tips and tricks to make sure your bao buns come out perfect every single time.
Why You’ll Love This Recipe
- Soft & Fluffy Buns: Mastering the steamed bun dough means you’ll get that perfect cloud-like texture every time.
- Flavor-Packed Chicken: The Korean-style marinade infuses the chicken with sweet and savory notes that are absolutely irresistible.
- Customizable Fillings: You can easily swap fillings or add extras like pickled veggies for a personalized touch.
- Impress Your Guests: These baos feel special enough for parties but are easy enough for weeknight dinners.

Ingredients You’ll Need
Getting your hands on fresh and quality ingredients is half the battle won with this Korean Chicken Steamed Bao Buns Recipe. The dough is pretty simple, and the chicken filling packs a punch with just a few well-chosen Asian pantry staples.
- All-purpose flour: Look for a good quality brand; it gives your buns the right chewiness.
- Active dry yeast: Essential for getting those fluffy, risen baos—make sure it’s fresh for best results.
- Sugar: Adds sweetness to the dough and balances the chicken marinade.
- Warm water: Activates the yeast and hydrates the dough just right.
- Baking powder: Gives a little extra lift and lightness to the buns.
- Chicken thighs: Juicy, tender, and perfect for soaking up that Korean marinade.
- Soy sauce: The salty backbone of the marinade.
- Gochujang (Korean chili paste): Adds heat and depth of flavor—don’t skip it unless you want mild flavors.
- Garlic & ginger: Fresh is best here for that pungent, aromatic punch.
- Sesame oil: Just a drizzle for nutty richness in the chicken.
- Rice vinegar or mirin: Balances the flavors with a little tang.
- Cilantro and scallions: Fresh garnishes that brighten every bite.
Variations
I love how versatile this Korean Chicken Steamed Bao Buns Recipe is—sometimes I stick to the classic, but other times I like switching things up depending on what I have in the fridge. Feel free to make it your own!
- Spicy Upgrade: When I want an extra kick, I add a bit more gochujang or toss in some sliced fresh chilies with the chicken filling.
- Vegetarian Option: Swap the chicken for marinated tofu or tempeh—just as satisfying and perfect for meat-free nights.
- Crunch Factor: I sometimes add quick-pickled cucumbers or shredded carrots inside the buns for texture contrast and freshness.
- Sweet Twist: A drizzle of honey or a sprinkle of toasted sesame seeds on top adds a subtle sweetness that my family goes crazy for.
How to Make Korean Chicken Steamed Bao Buns Recipe
Step 1: Make the Bao Dough
Start by activating your yeast in warm water with a pinch of sugar. You’ll want it bubbly and fragrant—this tells you your yeast is alive and ready to work its magic. While waiting, mix your flour, sugar, and baking powder in a big bowl. Then add the yeast mixture gradually and knead until you get a smooth, elastic dough. I usually knead by hand for about 8-10 minutes; it’s a great way to connect with your food and feel when the dough is just right. Cover and let it rise in a warm spot until it doubles—mine takes about an hour.
Step 2: Prepare the Korean Chicken Filling
While your dough is rising, mix soy sauce, gochujang, minced garlic, ginger, sesame oil, sugar, and a splash of rice vinegar to make the marinade. Cut the chicken thighs into bite-size pieces, toss them in the marinade, and let them soak up all those flavors for at least 20 minutes. When ready, cook the chicken in a hot skillet until it’s caramelized and tender. Trust me, the caramelization brings out this amazing sweet-savory depth you’ll love.
Step 3: Shape and Steam the Bao Buns
Once the dough has risen, punch it down gently and roll it out on a lightly floured surface. Cut into equal pieces and shape each piece into an oval. The trick I learned is to lightly brush a little oil on the dough before folding it in half with parchment paper to prevent sticking. Arrange them in your steamer basket, making sure to leave some space to grow. Steam over medium-high heat for around 10-12 minutes—you’ll know they’re done when they puff up and feel soft and fluffy. No overcooking or the buns get tough! I like to steam just before serving for that fresh, warm bite.
Step 4: Assemble and Enjoy
Open up each steamed bun, fill generously with your Korean chicken, and top with fresh scallions and cilantro for brightness. You can also add pickled veggies or a drizzle of sriracha if you like a little heat. The balance of tender bun, savory chicken, and fresh garnishes will have you coming back for more—I promise.
Pro Tips for Making Korean Chicken Steamed Bao Buns Recipe
- Warm Water Matters: I discovered if your water is too hot, it kills the yeast; if it’s too cold, it won’t activate—aim for about body temperature to get perfect dough rise.
- Don’t Skip the Rest: Let resting the dough adequately is key; rushing this step often made my buns dense before I learned patience.
- Steaming Setup: I like to line my steamer with parchment paper or cabbage leaves to prevent sticking and make clean up easier.
- Even Spacing: Give buns enough room in the steamer so they don’t stick together—a common mistake that’s easy to avoid.
How to Serve Korean Chicken Steamed Bao Buns Recipe
Garnishes
I always pile on fresh scallions and cilantro because they add such a bright, fresh pop against the savory chicken. Sometimes, I toss in some quick-pickled carrots or daikon for crunch and tang, and a sprinkle of toasted sesame seeds gives a nutty twist that’s just irresistible.
Side Dishes
Pair your baos with a simple Korean cucumber salad or kimchi to balance the richness. A cold rice noodle salad or even some miso soup makes a lovely, light side that rounds out the meal beautifully.
Creative Ways to Present
For special occasions, I like to line bamboo steamers with banana leaves or pretty parchment, then stack the buns layered with parchment squares. Serving them family-style and letting everyone build their own baos turns dinner into a fun interactive experience that guests adore.
Make Ahead and Storage
Storing Leftovers
If you have leftovers, store the steamed buns and chicken separately in airtight containers in the fridge. This prevents the buns from getting soggy and helps preserve the texture and flavor better.
Freezing
I’ve frozen both steamed buns and cooked chicken for busy weeknights. Just wrap buns individually in plastic wrap before placing in a freezer bag. Chicken freezes well too—just thaw overnight in the fridge and reheat gently.
Reheating
To keep buns soft, I steam frozen or refrigerated buns for 5-7 minutes rather than microwaving them. For chicken, a quick sauté or warm in the microwave covered with a damp towel helps retain moisture.
FAQs
-
Can I use store-bought bao buns for this recipe?
Absolutely! Store-bought bao buns are a great shortcut if you’re short on time. Just steam them according to package instructions and fill them with the Korean chicken marinade I share here—you’ll still get fantastic flavor with less effort.
-
What cut of chicken is best for Korean Chicken Steamed Bao Buns Recipe?
Chicken thighs are my go-to because they’re juicy and flavorful, but boneless skinless breasts work too if you prefer leaner meat—just be careful not to overcook them so they stay tender.
-
How long can I store leftover bao buns and chicken?
Stored separately in airtight containers, you can keep buns and chicken in the fridge for up to 3 days. Always reheat buns by steaming to maintain softness.
-
Can I make this recipe gluten-free?
Traditional bao buns call for all-purpose flour, so gluten-free takes some experimentation. You might try a gluten-free flour blend suitable for yeast breads, but be prepared for differences in texture. For the chicken, use tamari instead of soy sauce to keep it gluten-free.
Final Thoughts
This Korean Chicken Steamed Bao Buns Recipe has become a real favorite in my kitchen, and I know you’ll find it just as delightful once you get the hang of it. The smell while cooking, the soft buns, and that saucy chicken filling—it’s all pure comfort in every bite. Whether you’re cooking for your family or impressing friends, this recipe hits all the right notes without being intimidating. Give it a go, and don’t hesitate to play around with the flavors—cooking should always be this fun!
Print
Korean Chicken Steamed Bao Buns Recipe
- Prep Time: 10 minutes
- Cook Time: 30 minutes
- Total Time: 1 hour 40 minutes
- Yield: 4 to 6 servings
- Category: Dessert
- Method: Steaming
- Cuisine: Thai
- Diet: Vegetarian
Description
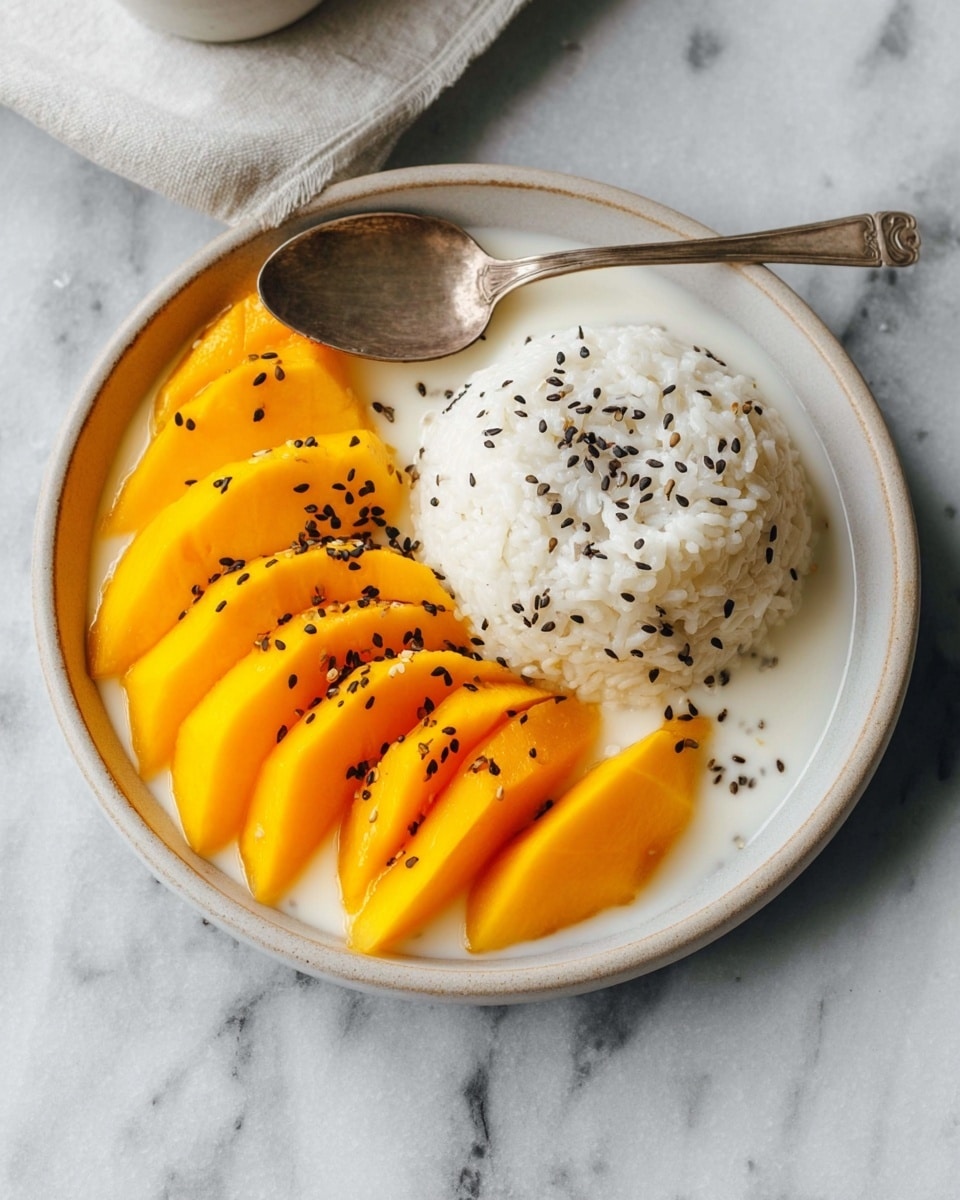
Mango Sticky Rice is a classic Thai dessert featuring sweet sticky rice cooked to perfection and combined with rich coconut milk sauce, served alongside fresh, ripe mango slices. This comforting and tropical dish balances creamy, sweet, and fruity flavors, garnished optionally with toasted sesame seeds for a delightful finish.
Ingredients
Sticky Rice
- 1 cup uncooked sticky rice
- Water for soaking and steaming
Coconut Sauce
- 1 can full-fat coconut milk (13.5 oz / 400 g can)
- 1/4 cup sugar
- 1/2 teaspoon salt
- 2 teaspoons cornstarch (optional)
- 4 tablespoons water (for cornstarch slurry, optional)
Fruit & Garnish
- 3 ripe mangoes, peeled and sliced
- Toasted sesame seeds for garnish (optional)
Instructions
- Rinse and Soak Rice: Rinse the sticky rice under tap water while gently stirring with your hand to remove excess starch. Drain and repeat once more. Then cover with cold water and soak the rice for at least 1 hour or up to overnight in the refrigerator. After soaking, rinse and drain again.
- Steam the Rice: Transfer the soaked rice into a heatproof bowl. Add about 2 inches of water to your steamer base, ensuring the water doesn’t touch the rice. Place the bowl on the steaming rack, cover the steamer, and bring water to a boil over medium-high heat. Once steaming, reduce to medium heat and steam the rice for 20 to 25 minutes until fully cooked with no raw bits. Remove from heat and keep covered.
- Prepare Coconut Sauce: While the rice steams, combine coconut milk, sugar, and salt in a saucepan over medium to medium-low heat. Stir until sugar dissolves and mixture is hot but do not boil.
- Optional Thickening: If the coconut milk is thin, mix cornstarch with 4 tablespoons water until dissolved. Add half the slurry to the coconut sauce, stirring immediately to thicken. Adjust thickness by adding more slurry or water as needed, aiming for a sauce that coats the back of a spoon.
- Mix Sauce with Rice: Carefully remove hot rice bowl and pour 1 cup of the coconut sauce into it. Stir gently to combine until sauce is fully absorbed.
- Serve: Allow the rice mixture and sauce to cool to room temperature or lukewarm. Divide about 1/3 cup of coconut sticky rice per serving onto small bowls or plates. Arrange sliced mango on the side, spoon extra coconut sauce over rice, and garnish with toasted sesame seeds if desired.
Notes
- Most coconut milk brands are creamy enough and don’t require cornstarch to thicken. Use the slurry only if your coconut milk is thin or you prefer a creamier sauce.
- A serving size of 1/3 cup rice with half a mango makes a well-balanced dessert portion. For a larger serving or snack, use 1/2 cup rice per serving, serving 4 people in total.
Nutrition
- Serving Size: 1 serving (approx. 1/3 cup rice with mango)
- Calories: 300 kcal
- Sugar: 18 g
- Sodium: 150 mg
- Fat: 12 g
- Saturated Fat: 10 g
- Unsaturated Fat: 2 g
- Trans Fat: 0 g
- Carbohydrates: 45 g
- Fiber: 2 g
- Protein: 3 g
- Cholesterol: 0 mg


