
If you’re looking to add a little spooky fun to your Halloween treats this year, I’ve got just the thing for you. This Make-Your-Own Halloween Brownies Recipe is an absolute game-changer—fun, easy, and totally customizable. Trust me, once you whip up these fudgy brownies and get creative with the decorating, you’ll find yourself wanting to host a Halloween bake-off every year!
Why You’ll Love This Recipe
- Super Simple Base: Using a boxed brownie mix means you can focus your energy on the fun decorating part without stressing about baking from scratch.
- Creative Freedom: The frosting and candy decorations let you customize every inch—perfect to get kids or friends involved in the kitchen.
- Make-Ahead Friendly: You can bake these up to a day in advance and decorate right before the party, making your prep manageable and fun.
- Guaranteed Crowd-Pleaser: Whether it’s a classroom party or a family gathering, these brownies are always a hit that disappear fast.

Ingredients You’ll Need
For this Make-Your-Own Halloween Brownies Recipe, I’ve kept the ingredients simple so you can focus on what really makes this recipe shine—the decorations! Everything pairs perfectly to give you that rich brownie flavor with vivid, fun frosting colors.
- Betty Crocker™ Fudge Brownie Mix: This mix gives you that classic fudgy texture without needing extra effort—my go-to for quick brownies.
- Water, vegetable oil, and eggs: Standard basics for the brownie mix—pro tip, room temperature eggs help the batter blend better for a smoother result.
- Betty Crocker™ Rich & Creamy Vanilla Frosting: The blank canvas for all your spooky designs; it spreads easily and tastes great with chocolate.
- Betty Crocker™ Neon Gel Food Colors: These gels create vibrant hues, perfect for Halloween’s signature bright orange, green, purple, or whatever you dream up.
- Betty Crocker™ Black Writing Gel or Cookie Icing: Fantastic for drawing faces, spider webs, or writing fun Halloween messages.
- Assorted candies and snacks: Think candy corn, spooky sprinkles, Bugles™, candy eyeballs, mini chocolate candies, and black licorice—these add texture and personality that your guests will adore.
Variations
I love how this Make-Your-Own Halloween Brownies Recipe lets you play around and make it your own. Over the years, I’ve tried a bunch of tweaks, and I encourage you to experiment too—because that’s what makes this recipe super fun and personalized!
- Gluten-Free Variation: Whenever I’ve had guests with gluten sensitivities, I swap the brownie mix for a gluten-free version, and it works just as well!
- Vegan Version: Try using a dairy-free frosting and substitute eggs with flax eggs for a vegan twist—this requires a bit more hands-on effort but is totally worth it.
- Spicy Pumpkin Brownies: For a seasonal change, I mix a little cinnamon and pumpkin pie spice into the brownie batter before baking—it’s a cozy Halloween treat.
- Extra-Decadent: Add chopped nuts or chocolate chips into the batter for some irresistible texture.
How to Make Make-Your-Own Halloween Brownies Recipe
Step 1: Bake the Perfect Brownie Base
Start by preheating your oven to 350°F (I always set my timer here to avoid distractions). Grease the bottom of an 8- or 9-inch square pan with shortening or cooking spray—you want it to be well-coated so your brownies slide out easily later. Follow the instructions on the brownie mix box: combine the mix with the required water, vegetable oil, and eggs. Stir until just combined; overmixing can toughen brownies, so gentle is better here. Pour the batter into the pan and bake according to the box directions. When the brownies come out, let them cool completely. I usually give them about an hour and a half to cool—this step is key so your frosting doesn’t melt during decorating. Once cooled, cut them into 6 rectangles, which will be your decorating canvas.
Step 2: Customize Your Frosting Colors
Divide the vanilla frosting into small bowls—one for each color you want to create. I like to use gel food coloring (the neon ones are so bright and festive!). Add a drop or two until you get the shade you’re aiming for, then stir well. This part always feels like a mini science experiment, and the kids get a real kick out of mixing colors.
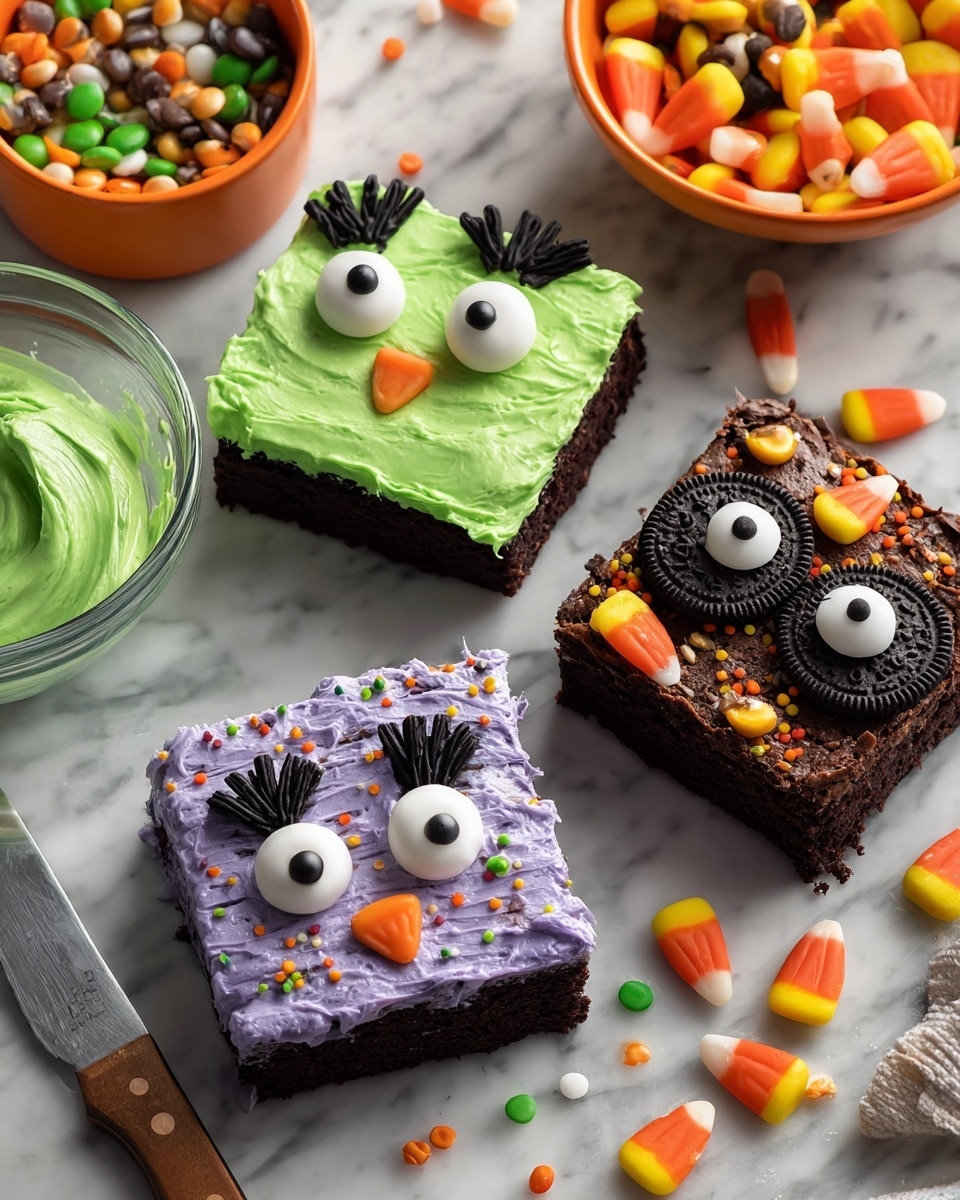
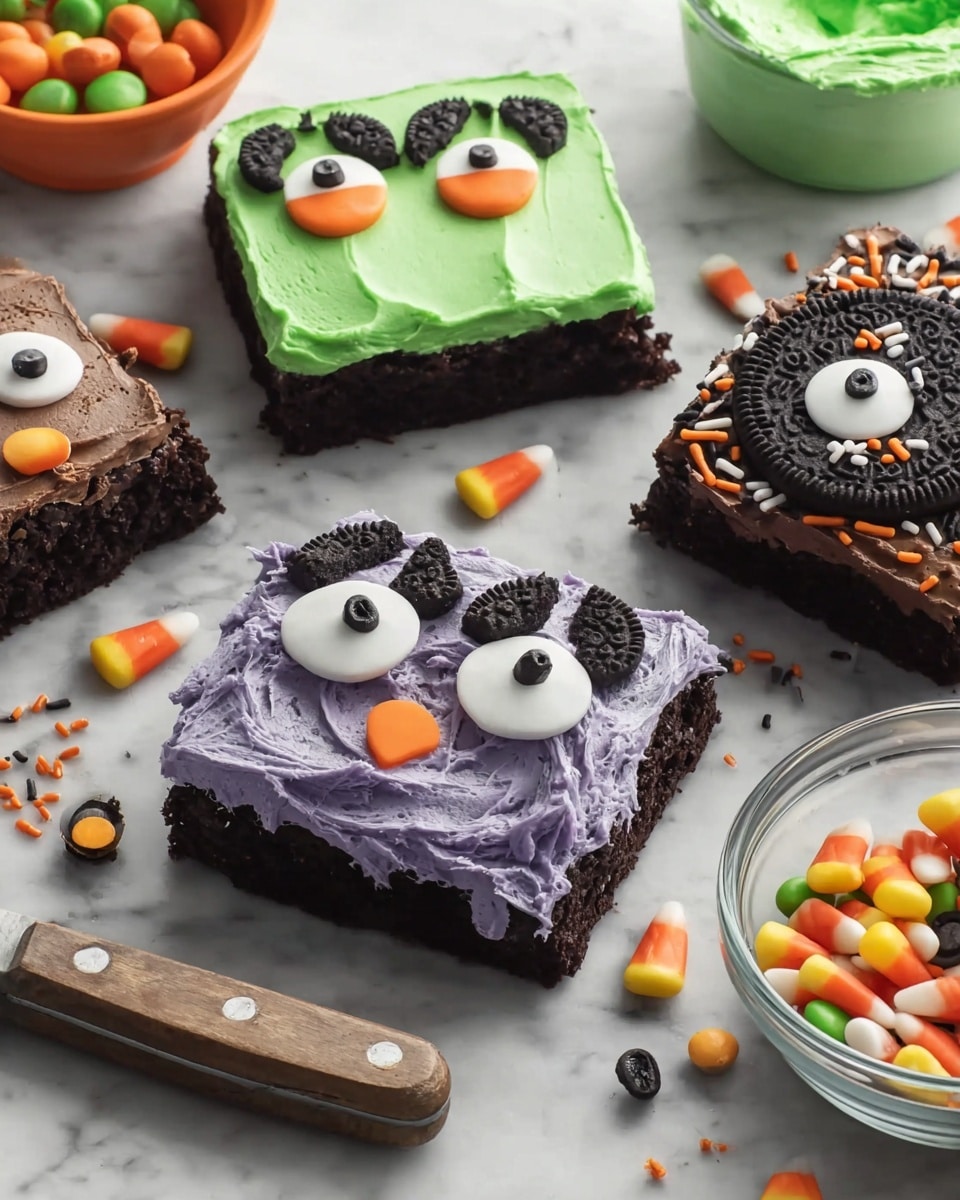
Step 3: Decorate Like a Pro (Or Just Have Fun!)
Now comes the best part—decorating! Use a butter knife or small offset spatula to spread your colored frostings over each brownie rectangle. Grab your black writing gel or cookie icing to add spider webs, jack-o’-lantern faces, or ghostly outlines. Sprinkle on your candies and spooky decorations to bring your creepy creations to life. There’s no wrong way to do this—just let your imagination run wild. I discovered that setting aside a “decoration station” with all your candies and frostings laid out makes this step easier and way more fun for everyone involved.
Pro Tips for Making Make-Your-Own Halloween Brownies Recipe
- Don’t Skip Cooling Completely: I learned the hard way that frosting warm brownies makes a mess—you’ll want a fully cooled base for clean and smooth decorating.
- Use Gel Food Coloring: It gives you vibrant colors without thinning out the frosting like liquid food coloring would.
- Prep Your Candy Ahead: Having all decorative items ready and in separate bowls saved me chaos when the kids couldn’t wait to start frosting.
- Cut Neatly with a Sharp Knife: Warm your knife under hot water and wipe it dry between cuts to get clean brownie edges without crumbly messes.
How to Serve Make-Your-Own Halloween Brownies Recipe
Garnishes
For garnishes, I stick with a mix of candy eyeballs and mini sprinkles—it’s a quick way to inject personality without getting too fussy. Plus, the eyeballs are just plain hilarious and perfect for Halloween vibes. If you want to get extra spooky, sprinkle a tiny pinch of edible glitter on some brownies—it adds a magical shimmer that’s super impressive when the lights go low.
Side Dishes
This Halloween brownies recipe pairs wonderfully with a glass of cold milk or even a warm cup of spiced apple cider. For a party, I like to serve it alongside some Halloween-themed popcorn or pumpkin spice cookies. These sweet combos balance the rich brownie flavors and keep the Halloween theme alive throughout the spread.
Creative Ways to Present
Presentation is everything for a festive occasion! One year, I arranged the brownies on a platter lined with fake spider webs and scattered plastic spiders around them—instant eerie effect. Another time, placing brownie rectangles on small black plates with orange napkins underneath made the colors pop beautifully. If you’re hosting kids, let them place their own decorated brownies on a tiered cake stand—it’s a fun and interactive display.
Make Ahead and Storage
Storing Leftovers
I always store leftover decorated brownies in an airtight container at room temperature. They stay fresh and soft for about 2 to 3 days—perfect if you want to enjoy them the next morning with your coffee. Avoid refrigerating unless your kitchen is very warm, as that can dry them out.
Freezing
Freezing decorated brownies can be a bit tricky because of the frosting, but I’ve found success by freezing the plain brownies first before decorating. Just wrap them tightly in plastic wrap and foil. When you’re ready, thaw overnight in the fridge and then add your frosting and decorations fresh. This keeps everything looking and tasting amazing.
Reheating
For reheating, I prefer eating these brownies cold or at room temp since you don’t want to melt the decorations. But if you want them warm, a quick 10-second zap in the microwave works—just be gentle. You could always warm your brownie without frosting separately if serving fresh is a must.
FAQs
-
Can I make these brownies from scratch instead of a boxed mix?
Absolutely! While this Make-Your-Own Halloween Brownies Recipe is designed to be quick and easy with boxed mix, you can use any homemade brownie recipe you love. Just ensure your brownies are fully cooled before decorating to avoid frosting melt.
-
What’s the best way to color the frosting without it getting too runny?
Gel food coloring is the way to go here because it’s concentrated and won’t thin out your frosting like liquid food coloring does. Start with a small amount and add more until you reach the perfect shade.
-
Can kids help with decorating?
Definitely! Decorating these brownies is one of the best parts—and a safe, hands-on activity kids love. Just make sure to supervise when using sharp knives or small candy pieces.
-
How do I keep brownies moist if I’m making them a day ahead?
Store baked brownies in an airtight container at room temperature to lock in moisture. Wrapping them tightly in plastic wrap before placing in the container helps prevent drying out.
Final Thoughts
I absolutely love how this Make-Your-Own Halloween Brownies Recipe brings out the kid in all of us—whether it’s the thrill of bright colors, the silly candy eyeballs, or just the perfect fudgy bite at the end. It’s become a beloved tradition in my house, and I promise you’ll feel the same way once you try it. So, grab your favorite candies, whip up this easy brownie base, and get ready for some seriously magical Halloween fun in your kitchen!
Print
Make-Your-Own Halloween Brownies Recipe
- Prep Time: 40 minutes
- Cook Time: 30 minutes
- Total Time: 2 hours 40 minutes
- Yield: 6 brownies
- Category: Dessert
- Method: Baking
- Cuisine: American
Description
Create festive Halloween-themed brownies using a simple boxed brownie mix decorated with colorful frosting, gels, and assorted candies to delight kids and adults alike during the spooky season.
Ingredients
Brownies
- 1 box Betty Crocker™ Fudge Brownie Mix
- Water, vegetable oil, and eggs required on brownie mix box
Frosting and Decorations
- 1 tub (16 oz) Betty Crocker™ Rich & Creamy Vanilla Frosting
- Betty Crocker™ Neon Gel Food Color (assorted colors)
- Betty Crocker™ Black Writing Gel or Cookie Icing
- Assorted candies and snacks for decorating, such as candy corn, Betty Crocker™ Spooky Sprinkles, Bugles™ Snacks, Betty Crocker™ Dessert Decorations Candy Eyeballs, mini candy-coated milk chocolate candies, black licorice
Instructions
- Prepare Brownies: Preheat your oven to 350°F (175°C). Grease the bottom of an 8- or 9-inch square baking pan with shortening or cooking spray to prevent sticking. Follow the instructions on the brownie mix box, adding the specified amounts of water, vegetable oil, and eggs. Pour the batter into the prepared pan and bake as directed on the box, typically around 30-35 minutes, until a toothpick inserted in the center comes out with moist crumbs. Let the brownies cool completely on a wire rack, which will take about 1 hour and 30 minutes. Once cooled, cut the brownies into 6 rectangles.
- Decorate Brownies: Divide the vanilla frosting evenly among several small bowls. Tint each portion with different Betty Crocker™ Neon Gel Food Colors to create an assortment of vibrant shades for decorating. Use the colored frosting, black writing gel or cookie icing, and assorted candies to decorate each brownie rectangle creatively with Halloween themes, such as faces, eyes, or spooky patterns. Allow the decorations to set slightly before serving. Store finished brownies covered at room temperature to keep them fresh.
Notes
- Ensure brownies are completely cooled before decorating to prevent frosting from melting.
- You can use any assortments of candies for decorations based on preference or availability.
- These brownies are best consumed within 2-3 days for optimal freshness.
- Use gel food coloring sparingly to avoid overly runny frosting.
Nutrition
- Serving Size: 1 brownie (1 rectangle)
- Calories: 320
- Sugar: 28g
- Sodium: 180mg
- Fat: 16g
- Saturated Fat: 7g
- Unsaturated Fat: 7g
- Trans Fat: 0g
- Carbohydrates: 42g
- Fiber: 2g
- Protein: 3g
- Cholesterol: 35mg

