
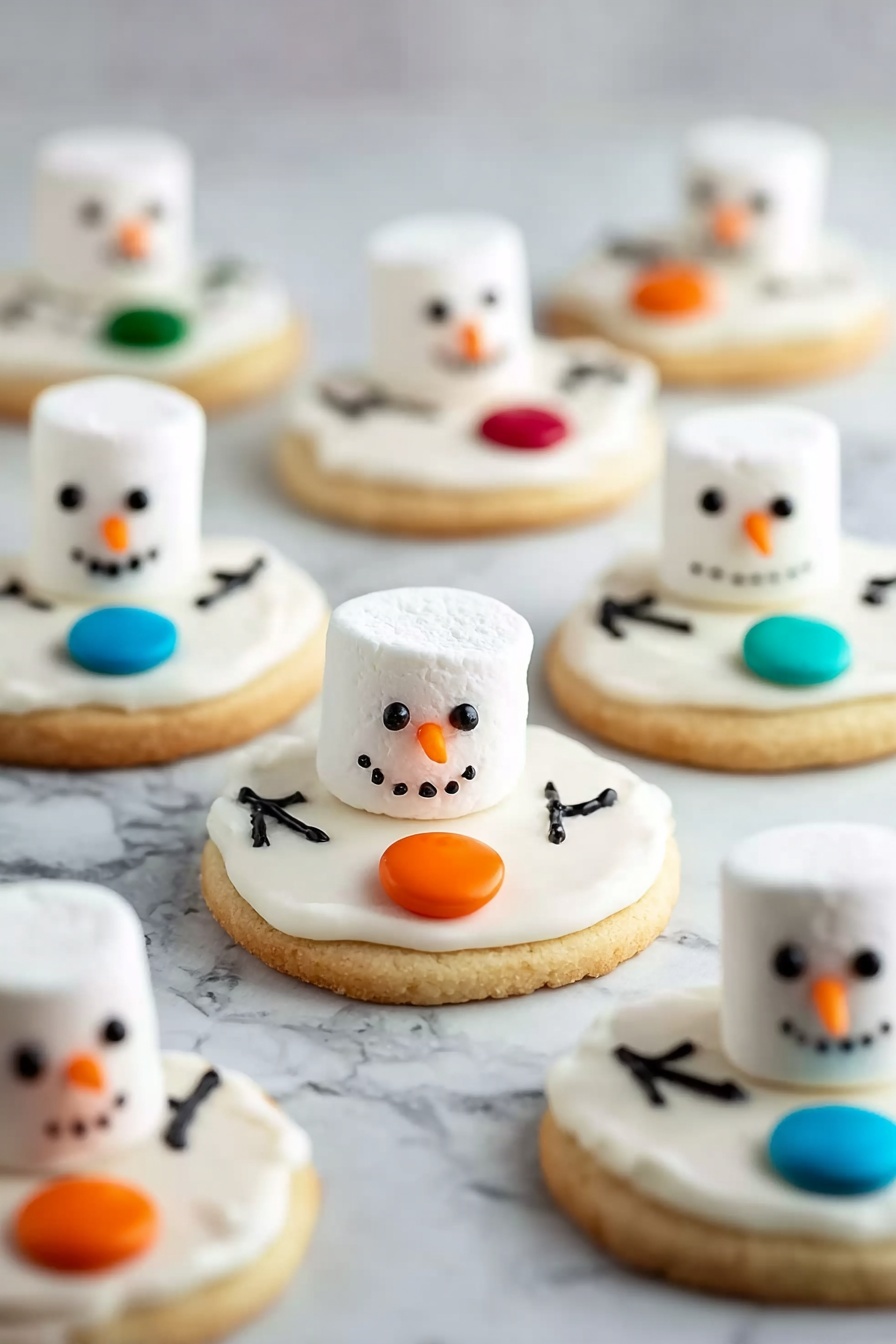
If you’re looking for a fun and adorable holiday treat, you’ve got to try this Melted Snowman Cookies Recipe. These cookies bring such a whimsical twist to classic sugar cookies, capturing that sweet moment when a snowman melts just enough to make us smile. I absolutely love how they look almost too cute to eat — but trust me, once you bite into one, you won’t be able to stop at just one!
Why You’ll Love This Recipe
- Whimsical Design: These cookies are a playful and eye-catching way to add some holiday cheer to your dessert table.
- Simple Ingredients: Made with basic pantry staples, plus a few fun extras, so you can whip them up anytime.
- Kid-Friendly Fun: Decorating them is a blast for kids and adults alike, making it a great family activity.
- Quick Prep Time: You’ll have these charming cookies ready in about 20 minutes, perfect for last-minute holiday baking.

Ingredients You’ll Need
These ingredients come together beautifully to create that classic sugar cookie base with the fun melted snowman look on top. The decorating supplies like marshmallows and colored icing bring the character to life — trust me, I discovered the secret is thinning the royal icing just right!
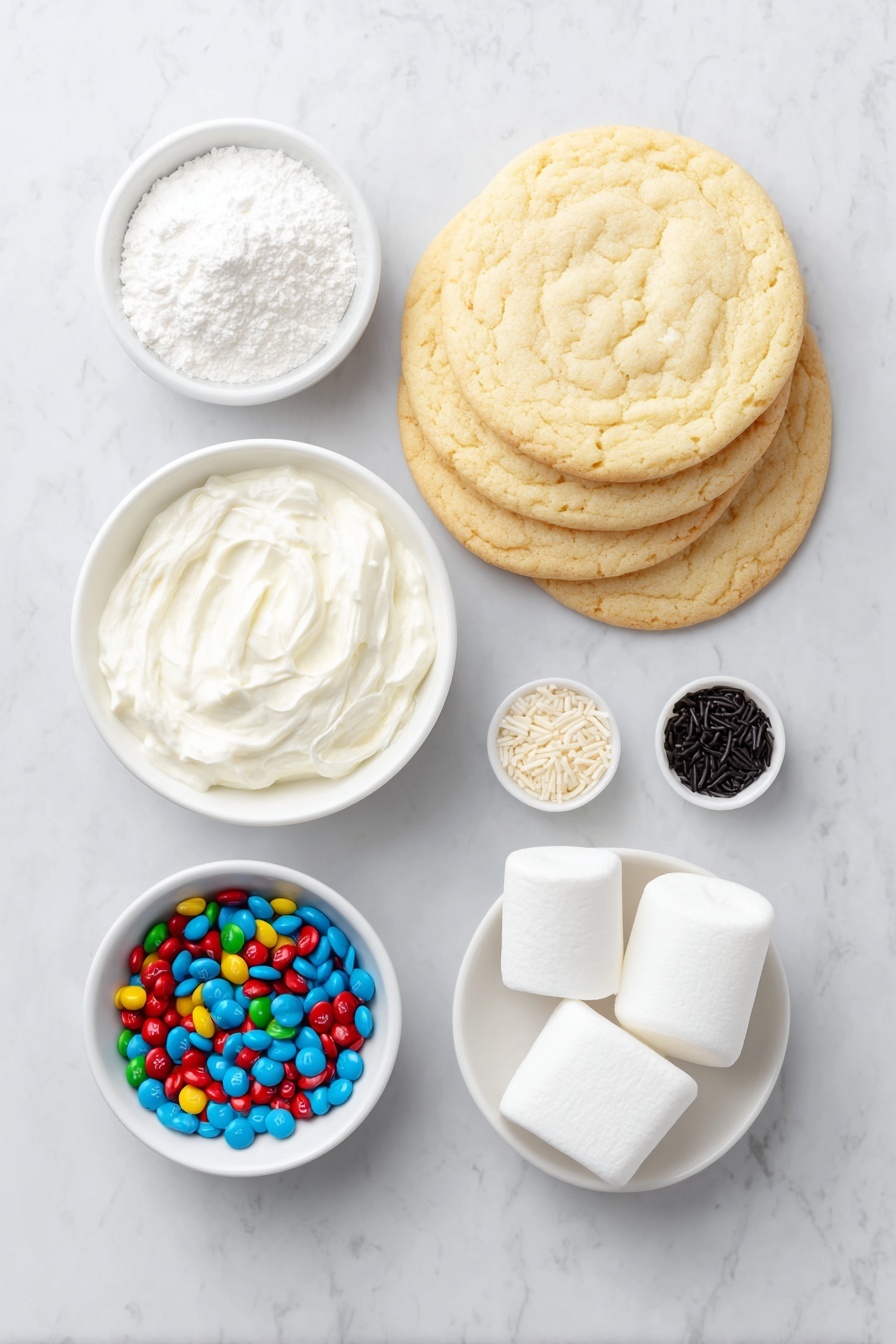
- Sugar cookies: Using a sturdy sugar cookie base makes sure your snowman won’t crumble under the decorations.
- Royal icing: This icing dries hard, perfect for creating those dripping “melted” effects and detailed faces.
- Marshmallows: Cutting them in half creates that puffy snowman head effect, which looks so cute perched on the cookie.
- Long orange sprinkles: These work like mini carrot noses and add a pop of color.
- M&Ms: They make perfect buttons or eyes — but I usually use black icing for the eyes to get the classic “surprised” look.
- Black gel food coloring: Must-have to get that rich black detail for the snowman’s stick arms and facial features.
Variations
One of the best things about this Melted Snowman Cookies Recipe is how easy it is to make it your own. I like to switch up the decorations sometimes or even try different flavor tweaks. Feel free to get creative — the melting snowman vibe is what really sells the look!
- Chocolate-Dipped Variation: I once dipped half the cookie in dark chocolate for an extra indulgent twist; it was a big hit with my family and added a rich depth to the sweetness.
- Colored Icing: For a fun holiday party, I added subtle pastel colors to the royal icing for a ‘frosty sunset’ effect that looked so pretty on the cookie trays.
- Gluten-Free Option: Substitute your sugar cookies with a gluten-free recipe – just make sure they’re sturdy enough to hold the decorations!
- Mini Melted Snowmen: Try making these with smaller cookies for bite-sized treats that are perfect finger food at parties.
How to Make Melted Snowman Cookies Recipe
Step 1: Prepare Your Icing for Detail Work
Start by taking about half a cup of your royal icing and tinting it with black gel food coloring until you get a rich, dark shade. I like to thin this black icing to about a 15-second consistency, meaning it flows slowly off a spoon but still holds shape when piped—that’s perfect for drawing the snowman’s arms and facial features with precision. Load this into a piping bag and snip just a tiny tip off to keep your lines neat.
Step 2: Thin Your White Royal Icing and Frost
Next, thin the remaining royal icing to a slightly thicker 10-second consistency. This is key so the icing will drip naturally down the sides of your cookies, creating that melted snow effect you’re aiming for. Pipe the white icing generously over each sugar cookie and let it cascade over the edges. This part is really fun because each cookie turns out uniquely “melty.”
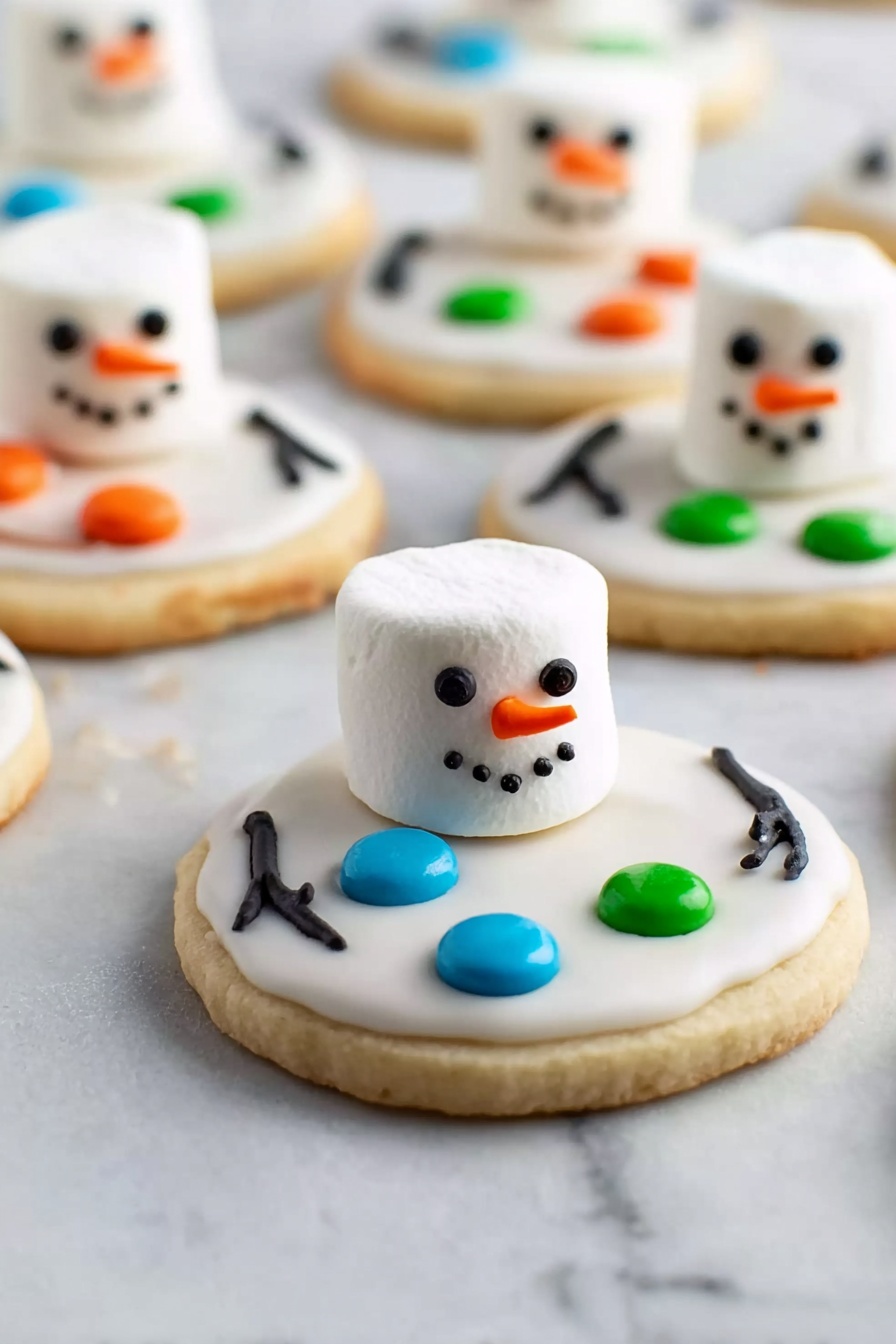
Step 3: Assemble the Melted Snowman Details
While the icing is still wet, press a halved marshmallow toward the back of each cookie to form your snowman’s head. Then arrange your M&Ms as buttons down the front. Using the black icing, pipe stick arms reaching “out” and away from the marshmallow head so they appear to be floating — this little detail really brings them to life! Let these set for about 20-30 minutes so everything hardens just right.
Step 4: Add the Final Facial Touches
Once your cookies have set, use the black icing to carefully pipe two wide eyes and a surprised “O” mouth that captures the classic melted snowman expression. I always use a bit of leftover white icing as glue to stick on a long orange sprinkle for the carrot nose—this little pop of color is priceless! Let the cookies dry completely before serving or packaging.
Pro Tips for Making Melted Snowman Cookies Recipe
- Icing Consistency Matters: Getting the royal icing consistency just right is key—thinner for drips, slightly thicker for piping details. I learned this after some trial runs where my arms melted into blobs!
- Work Quickly: Since you add marshmallows and buttons while the white icing is still wet, have everything prepped and ready to go before you start icing.
- Use Small Piping Tips: I prefer to snip the tiniest opening when piping arms and faces to avoid the icing flooding around the cookie.
- Avoid Overcrowding the Cookie: Putting on too many decorations can make your snowman look busy and the icing won’t dry properly—less is definitely more here!
How to Serve Melted Snowman Cookies Recipe
Garnishes
I like to serve these cookies with a light dusting of powdered sugar around the plate to mimic fresh snow — it adds a little festive sparkle and makes the cookies look even more magical. Sometimes I throw in a few peppermint sticks or holiday sprinkles on the platter for extra flair during the holidays.
Side Dishes
These cookies pair perfectly with classic hot cocoa topped with marshmallows (because, of course!), or a warm cup of spiced apple cider to warm up the winter chill. I also love setting them out alongside a cheese and fruit board for a fun holiday party dessert counter.
Creative Ways to Present
For a special occasion, I’ve arranged these Melted Snowman Cookies on a tiered serving tray with mini pinecones and twinkling fairy lights around them—it instantly turns into a festive centerpiece. Wrapping a few cookies in cellophane tied with a red ribbon makes them thoughtful, homemade gifts for neighbors or coworkers.
Make Ahead and Storage
Storing Leftovers
I store leftover melted snowman cookies in an airtight container at room temperature to keep their crispiness. They tend to stay fresh for about 3-4 days this way — though, full disclosure, mine never last that long once the family digs in!
Freezing
If you want to freeze these cookies (which is great for prepping ahead!), wrap them individually in plastic wrap and place them in a freezer-safe container. When you thaw them, the royal icing stays intact surprisingly well—just let them come to room temperature before serving.
Reheating
I don’t actually reheat these cookies, since they’re best enjoyed at room temperature to keep the icing perfectly firm. If you prefer a slightly softer bite, leaving them out for fifteen minutes does the trick without compromising the design.
FAQs
-
Can I use store-bought sugar cookies for this Melted Snowman Cookies Recipe?
Absolutely! Store-bought sugar cookies work fine, especially if they’re on the sturdier side, but I find that homemade sugar cookies usually hold up better under the royal icing and marshmallow head.
-
How do I thin royal icing to the right consistency?
Mix in small amounts of water to the royal icing slowly and test the flow by lifting a spoon and timing how long it takes to smooth out. For this recipe, thin to about 10-15 second consistency depending on the use—you want a nice drip effect without it running off the cookie entirely.
-
Can I make these cookies ahead of time?
Yes! You can bake and decorate them a day or two before your event. Just be sure to store them in an airtight container to keep the icing from softening or cracking.
-
What’s the best way to pipe the black icing for the arms and face details?
A piping bag with a small round tip or a plastic bag with a tiny snip works best. Keep steady pressure for thin, clean lines and pipe while the white icing is still wet so arms look like they’re floating.
Final Thoughts
I genuinely think this Melted Snowman Cookies Recipe is one of those festive classics that brings out the kid in all of us. My family goes crazy for them every season — they’re super cute, surprisingly easy to make, and a total crowd-pleaser. Next time you want to impress at a holiday party or just share some cozy kitchen cheer, I can’t recommend these enough. You’ll enjoy decorating them as much as eating them, I promise!
Print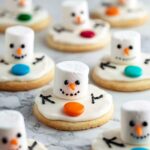
Melted Snowman Cookies Recipe
- Prep Time: 20 minutes
- Cook Time: 0 minutes
- Total Time: 20 minutes
- Yield: 12 cookies
- Category: Dessert
- Method: No-Cook
- Cuisine: American
Description
Create adorable Melted Snowman Cookies with soft sugar cookies, smooth royal icing, marshmallows, and festive decorations to bring a wintery treat to your holiday table. These charming cookies feature dripping white icing to mimic melting snowmen, complemented by marshmallow hats, colorful M&Ms, and playful facial features piped with black icing.
Ingredients
Cookies
- 12 sugar cookies
Icing
- 2 cups royal icing
- black gel food coloring
Toppings and Decorations
- 6 marshmallows, cut in half
- long orange sprinkles
- M&Ms
Instructions
- Dye Black Icing: Take 1/2 cup of your royal icing and add black gel food coloring until you reach your desired shade of black. Thin the black icing to a 15-second consistency (meaning the icing spreads out and smooths out on its own within 15 seconds).
- Prepare White Icing: Thin the remaining white royal icing to a 10-second consistency, making it slightly thicker than the black icing. Transfer both icings into separate piping bags and snip off a small tip for piping.
- Frost Cookies: Using the white icing, frost each sugar cookie generously, allowing the icing to drip naturally over the edges to create a melting snow effect.
- Add Marshmallow Hats and M&Ms: Immediately place the halved marshmallows toward the back of each cookie to form the snowman’s head. Arrange M&Ms below the marshmallows to represent buttons or decorations.
- Pipe Arms: While the white icing is still wet, pipe black stick arms extending out from the snowman’s head using the black icing to give the appearance of floating arms.
- Set the Cookies: Allow the decorated cookies to set at room temperature for 20-30 minutes so the icing hardens slightly before adding facial features.
- Decorate Faces: Use the black icing to pipe two eyes and a surprised ‘O’ shape for the mouth on each marshmallow head. Use leftover white icing to attach a long orange sprinkle for the snowman’s carrot nose.
Notes
- Thinning royal icing to the correct consistency is key to achieving smooth frosting that drips naturally without running off.
- You can make your own sugar cookies or use store-bought ones as a base.
- If you don’t have long orange sprinkles, finely cut orange candy or fondant pieces can substitute for the nose.
- Work quickly while icing is wet to secure marshmallows and M&Ms firmly.
- Store cookies in an airtight container at room temperature to keep icing fresh and crisp.
Nutrition
- Serving Size: 1 cookie
- Calories: 150
- Sugar: 20g
- Sodium: 100mg
- Fat: 3g
- Saturated Fat: 1.5g
- Unsaturated Fat: 1g
- Trans Fat: 0g
- Carbohydrates: 30g
- Fiber: 0.5g
- Protein: 1g
- Cholesterol: 5mg


