
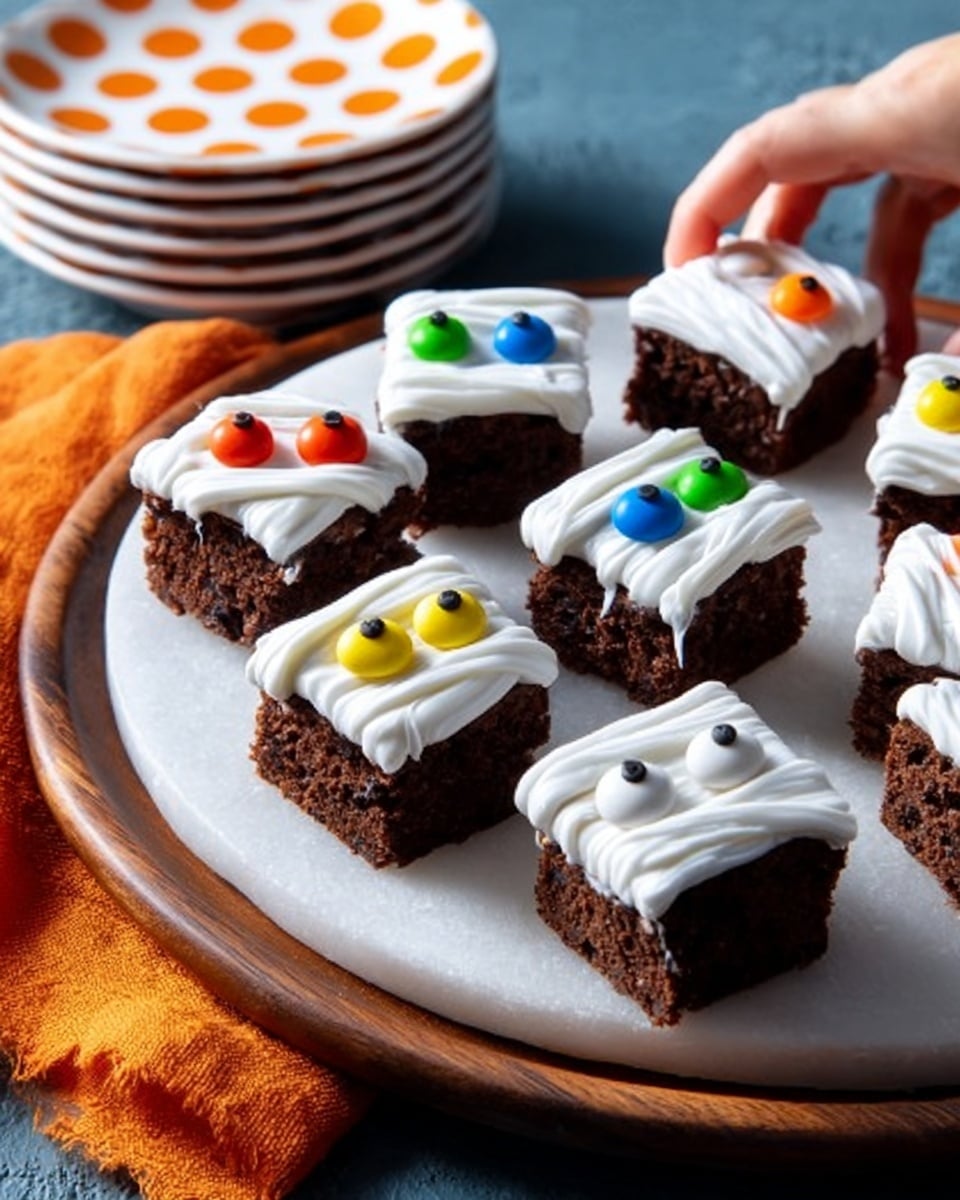
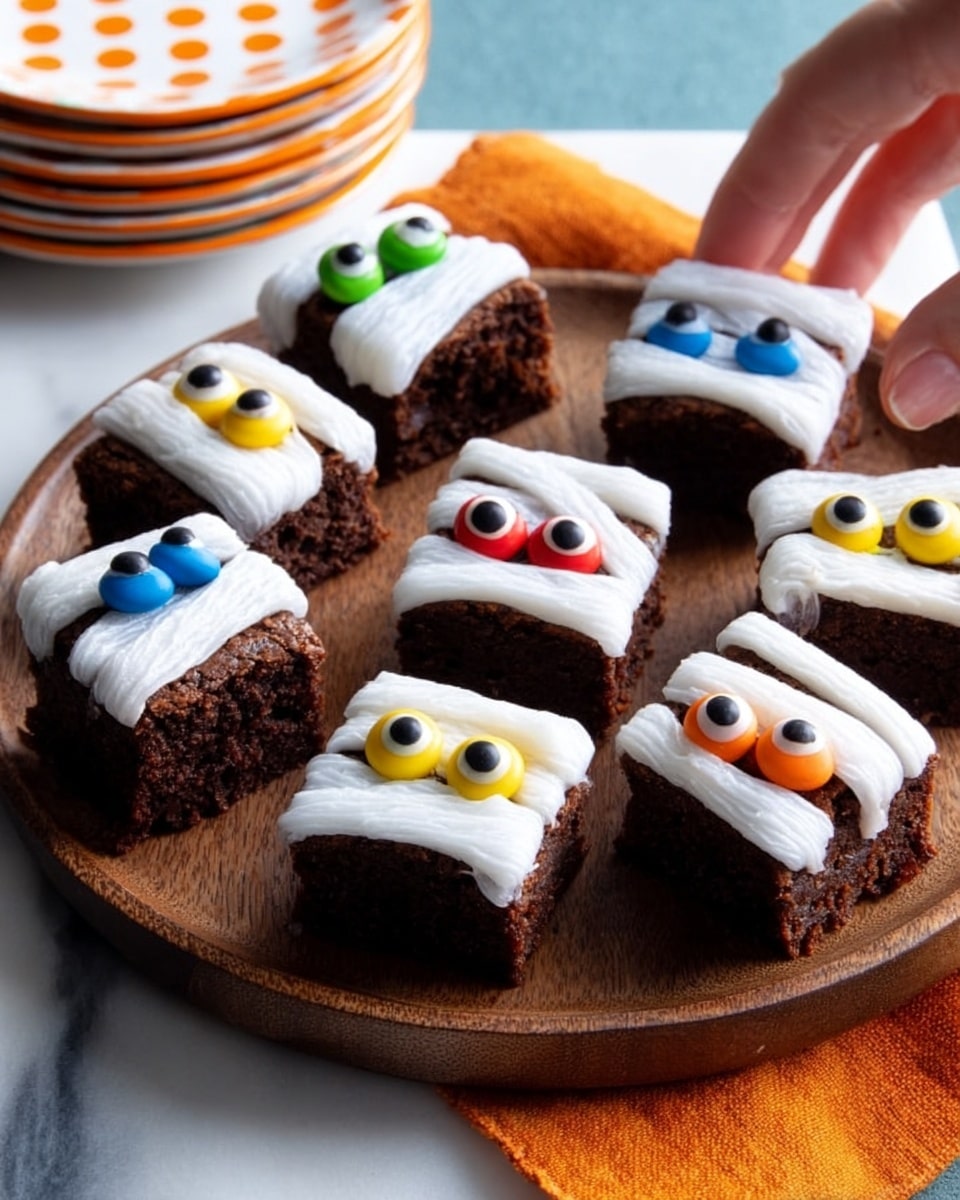
If you’re on the hunt for a Halloween treat that’s both spooky and downright delicious, you’ve got to check out this Mummy Brownies Recipe. I absolutely love how these brownies combine that rich, fudgy chocolate goodness with a cute (okay, maybe slightly creepy) mummy decoration that’s super easy to make. Whether you’re baking for a kids’ party or just want a festive treat at home, this recipe will win hearts and maybe even a few scaredy-cat smiles!
Why You’ll Love This Recipe
- Fun Halloween Twist: Simple mummy frosting decoration that makes plain brownies festive and eye-catching.
- Rich & Fudgy Texture: The smooth blend of chocolate and butter means you get that perfect fudgy bite every time.
- Easy to Make: Minimal ingredients and straightforward steps—great if you want a quick but impressive dessert.
- Kid-Friendly & Customizable: Little ones can help with decoration, and you can add pecans or skip them for allergies.

Ingredients You’ll Need
This Mummy Brownies Recipe uses pantry staples that come together beautifully. Each ingredient plays a role in creating that rich flavor base or the iconic mummy look. When you pick your ingredients, especially the chocolate and frosting, quality can really make a difference, so keep that in mind!
- Butter: I always use unsalted so I can control the salt later, plus it melts smoothly for the chocolate mix.
- Unsweetened chocolate: This gives the brownies their deep chocolate punch—don’t substitute with cocoa powder here or your texture will change.
- Eggs: Make sure they’re at room temperature to help everything blend easily and keep the texture tender.
- Sugar: Regular granulated sugar works perfectly and balances the bitterness from the unsweetened chocolate.
- Vanilla extract: Just a little boost adds warmth and depth to the chocolate flavor.
- All-purpose flour: Essential for structure; handle gently so your brownies stay fudgy rather than cakey.
- Salt: This tiny amount enhances the chocolate’s flavor, trust me—you don’t want to skip it.
- Pecans (optional): I love adding these for a bit of crunch, but if you have nut allergies or just aren’t a fan, feel free to leave them out.
- Vanilla frosting: This is the magic for the mummy “bandages”—choose a smooth, spreadable kind for the best decorating experience.
- Candy eyes: The finishing touch that turns these brownies from tasty to adorable creepy!
Variations
One of the reasons I love this Mummy Brownies Recipe is how easy it is to customize. Depending on your taste or dietary needs, you can make tweaks that still give that satisfying experience. I encourage you to get creative — it’s half the fun!
- Nut-Free Version: I usually swap pecans for mini chocolate chips when baking for my nephew who’s allergic; it’s just as delicious!
- Spicy Chocolate Kick: Once, I added a pinch of cayenne pepper to the batter, and it gave a lovely unexpected warmth that my friends loved.
- Decorating Fun: Instead of candy eyes, try mini marshmallows or edible googly eyes for a playful twist.
- Gluten-Free Option: I’ve tested replacing the flour with a gluten-free blend with great results—just make sure your blend contains xanthan gum for structure.
How to Make Mummy Brownies Recipe
Step 1: Melt That Chocolate and Butter with Love
Start by preheating your oven to 350°F (175°C) and lining two 8-inch square pans with foil. This step makes cleanup and removal easier later. Then, melt the cubed butter and chopped unsweetened chocolate together in the microwave, stirring every 20 seconds until smooth. I like to let this mixture cool for a few minutes because pouring hot chocolate into eggs can scramble them—no one wants scrambled brownie batter!
Step 2: Mix Eggs, Sugar, and Vanilla
In a large bowl, beat the eggs and sugar until well combined. If you have a hand mixer, this only takes about 30 seconds. Stir in the vanilla extract, then slowly fold in the slightly cooled chocolate mixture. This method ensures a smooth, even batter without lumps or curdling.
Step 3: Add Dry Ingredients and Pecans
Whisk together the flour and salt in a separate bowl, then gradually fold it into your chocolate-egg mix until just combined. Overmixing here can make brownies dense, so be gentle! If you’re using pecans, toss them in now—this adds a crunchy contrast I adore.
Step 4: Bake and Cool Completely
Divide the batter evenly between the prepared pans, smoothing the tops with a spatula. Pop them in the oven for 35 to 40 minutes. I usually check at the 35-minute mark with a toothpick—it should come out clean or with just a few moist crumbs, not wet batter. After baking, cool the brownies completely in their pans on a wire rack; frosting warm brownies just turns into a messy puddle.
Step 5: Frost and Decorate Your Mummies
Lift the brownies out using the foil and cut into bars. Using a No. 46 pastry tip or a plastic sandwich bag with a tiny cut at the corner, pipe vanilla frosting in diagonal “bandages” across each brownie. Stick candy eyes onto the frosting before it sets to complete the mummy look. Your friends and family will definitely get a kick out of these!
Pro Tips for Making Mummy Brownies Recipe
- Perfect Chocolate Melt: Microwaving in short bursts and stirring often prevents burnt chocolate, which can ruin the batter.
- Don’t Skip Cooling: Frosting warm brownies is a mess—I learned this the hard way, so always cool completely for neat decorating.
- Use Foil Lifts: Lining pans with foil not only speeds up cleanup but makes getting the brownies out super easy and intact.
- Pipe Slowly and Steadily: To get that authentic mummy “bandage” look, take your time piping frosting evenly—it elevates the whole look.
How to Serve Mummy Brownies Recipe
Garnishes
For garnishing, candy eyes are a must for that hilarious spooky vibe. Sometimes I add a light dusting of powdered sugar to mimic “dusty old bandages,” which gives an extra cute vintage mummy effect. If you want to get extra creative, a drizzle of melted white chocolate over the frosting looks great too!
Side Dishes
I like pairing these brownies with a simple glass of cold milk or even a spiced pumpkin latte—both complement the rich chocolate perfectly. If you’re serving at a party, a fresh fruit platter with citrus adds a nice, bright contrast.
Creative Ways to Present
For Halloween gatherings, I’ve served these brownies on a platter decorated with fake spider webs and mini pumpkins. Another fun idea is to place them individually in clear cellophane bags tied with orange and black ribbons—easy for guests to grab and go!
Make Ahead and Storage
Storing Leftovers
I’ve found the best way to store leftover mummy brownies is in an airtight container at room temperature for up to 3 days. Just make sure the frosting isn’t exposed to heat or it might get sticky or melt. If it’s warm, pop them in the fridge instead to keep things fresh.
Freezing
Freezing these brownies works great if you want to make them in advance. Wrap each bar tightly in plastic wrap, then store in a freezer bag or container. I usually freeze without frosting and add that fresh before serving for the best texture and appearance.
Reheating
If you’re reheating leftovers, I recommend a quick zap in the microwave for about 10 seconds just to take the chill off—not too long or the brownies will get dry. It’s a nice way to simulate that fresh-baked warmth without messing with the frosting.
FAQs
-
Can I use boxed brownie mix for this Mummy Brownies Recipe?
Absolutely! While this recipe is homemade for extra richness and control, you can definitely use baked boxed brownies as your base. Just let them cool completely, then add the frosting and candy eyes to create the mummy look.
-
What if I don’t have a pastry bag or tip to pipe frosting?
No worries! A simple plastic sandwich bag works perfectly—just snip a small corner to create a makeshift piping bag. Alternatively, you can use a spoon or knife to drizzle the frosting in a bandage pattern for a rustic mummy effect.
-
Can I make these brownies vegan or dairy-free?
It’s a bit tricky because this recipe uses butter, eggs, and dairy frosting, but you can experiment by swapping in vegan butter, flax eggs (as an egg substitute), and a dairy-free frosting. Just keep in mind that texture and taste may differ from the original.
-
How long do the frogs (I mean candy eyes!) last on the brownies?
Candy eyes typically hold up well at room temperature and can last the same length as the brownies themselves if stored properly. Just avoid moisture and heat, which can cause them to melt or discolor.
Final Thoughts
I can’t recommend this Mummy Brownies Recipe enough—it’s one of those rare treats that’s both easy to pull off and totally festive. When I first tried it, my kids were so excited to help decorate, and it instantly became a Halloween tradition at our house. If you want a dessert that tastes fantastic, looks adorable, and brings smiles to the table, give this recipe a try. Trust me, you’ll be coming back to it year after year!
Print
Mummy Brownies Recipe
- Prep Time: 15 minutes
- Cook Time: 35 minutes
- Total Time: 50 minutes
- Yield: 32 brownies
- Category: Dessert
- Method: Baking
- Cuisine: American
Description
Delightfully spooky and delicious, these Mummy Brownies combine rich, fudgy chocolate brownies with sweet vanilla frosting piped into mummy bandages and candy eyes for a fun Halloween treat. Perfect for parties or festive gatherings, they are easy to prepare and sure to impress both kids and adults.
Ingredients
Brownie Base
- 1/2 cup butter, cubed
- 4 ounces unsweetened chocolate, chopped
- 4 large eggs, room temperature
- 2 cups sugar
- 1 teaspoon vanilla extract
- 1/2 cup all-purpose flour
- 1/2 teaspoon salt
- 2 cups chopped pecans, optional
Decoration
- 2 cans (16 ounces each) vanilla frosting
- Candy eyes
Instructions
- Preheat Oven: Preheat your oven to 350°F (175°C). Line two 8-inch square baking pans with foil, extending foil up the sides for easy lifting later, and grease the foil well to prevent sticking.
- Melt Butter and Chocolate: In a microwave-safe bowl, melt the butter and unsweetened chocolate together. Stir until the mixture is smooth and set aside to cool slightly.
- Mix Eggs and Sugar: In a large mixing bowl, beat the eggs and sugar until well combined and slightly thickened to create a smooth base.
- Add Vanilla and Chocolate: Stir the vanilla extract and cooled chocolate-butter mixture into the egg and sugar mixture, blending thoroughly.
- Combine Dry Ingredients: In a separate bowl, mix the flour and salt together. Gradually add this to the chocolate mixture, stirring well after each addition to avoid lumps. If using, fold in the chopped pecans to add nutty texture.
- Bake: Divide the batter evenly between the prepared pans and smooth the tops. Bake in the preheated oven for 35 to 40 minutes, or until a toothpick inserted into the center comes out clean or with just a few moist crumbs.
- Cool Completely: Remove the pans from the oven and allow the brownies to cool completely on a wire rack. Cooling fully ensures the brownies are firm enough for decorating.
- Remove from Pans and Cut: Using the foil overhang, lift the brownies out of the pans. Place on a cutting board and cut into 32 even bars.
- Decorate: Fit a piping bag with a No. 46 pastry tip and fill with vanilla frosting. Pipe frosting horizontally and vertically across each brownie to mimic mummy bandages. Add candy eyes on top while the frosting is still soft to complete the mummy look.
Notes
- For a nut-free version, omit the chopped pecans.
- Use room-temperature eggs for better mixing and texture in the batter.
- If you don’t have a No. 46 pastry tip, a small round tip or a zip-top bag with a tiny corner cut will work for piping the frosting.
- Allow the brownies to cool thoroughly before decorating to prevent frosting from melting.
- Store the decorated brownies in an airtight container at room temperature for up to 3 days.
Nutrition
- Serving Size: 1 brownie (approximately)
- Calories: 220
- Sugar: twenty-five grams
- Sodium: 110 mg
- Fat: 12 g
- Saturated Fat: 6 g
- Unsaturated Fat: 5 g
- Trans Fat: 0 g
- Carbohydrates: 29 g
- Fiber: 2 g
- Protein: 3 g
- Cholesterol: 55 mg

