
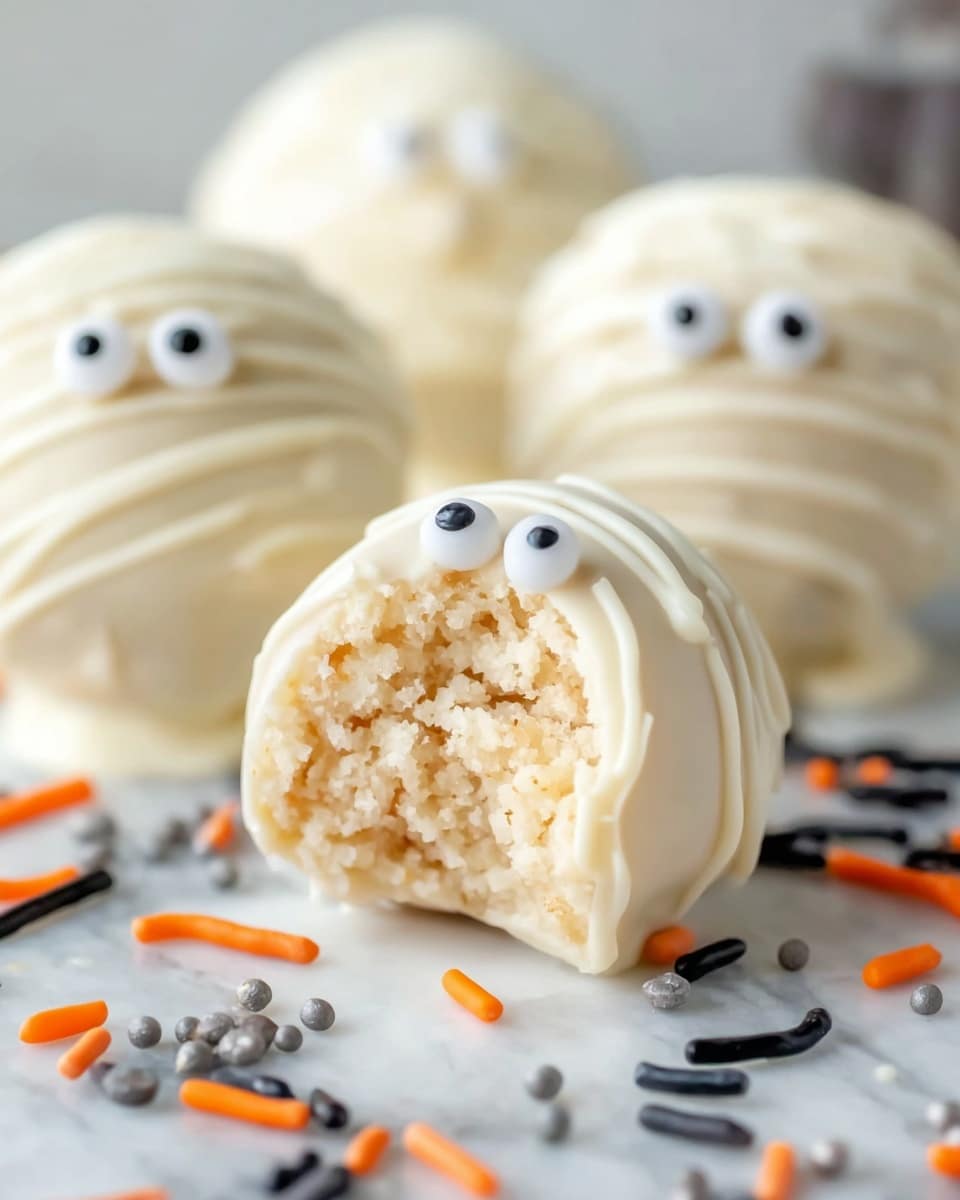
If you’re on the lookout for a spooky sweet treat that’s utterly adorable and irresistibly delicious, you’ve got to try my Mummy Cake Balls Recipe. These little guys are perfect for Halloween parties or when you just want something fun to share with family and friends. I absolutely love how they combine soft, creamy cake with a smooth vanilla coating – plus, they’re as cute as can be with their candy eyeballs and mummy-style drizzle. Trust me, you’ll find yourself making these over and over once you see how simple and satisfying they are!
Why You’ll Love This Recipe
- Super Simple Ingredients: You likely have most of these pantry essentials on hand already.
- Fun and Festive: The candy eyes and drizzle add a playful, spooky vibe that kids (and adults!) adore.
- Make-Ahead Friendly: You can prep these ahead of time and keep them chilled for easy entertaining.
- Perfect Bite-Size Treats: Great portion control and no mess when serving at parties.

Ingredients You’ll Need
These ingredients come together to create a creamy, melt-in-your-mouth treat. The mix of moist cake and smooth cream cheese gives the perfect texture, while the vanilla almond bark coating seals in the flavor and lets you get creative with the mummy look.
- White Cake Mix: Use your favorite boxed mix for convenience; it provides a light, fluffy base that’s easy to crumble.
- Cream Cheese: Make sure it’s softened to room temperature—this helps everything blend smoothly without lumps.
- Vanilla Almond Bark: This candy coating melts easily and hardens with a glossy finish, making your mummy cake balls look polished.
- Candy Eyes: These add instant personality—grab some that’s edible and sized just right for your cake balls.
Variations
I love playing around with flavors and textures to keep my mummy cake balls exciting. Feel free to customize the coating or even mix in some fun add-ins within the cake ball mixture. This recipe is a great canvas to make it your own.
- Chocolate Lovers: Swap the vanilla almond bark for chocolate coating – it adds richness and looks great with spooky white icing drizzle.
- Nutty Twist: Mix in crushed nuts or sprinkles inside the cake ball mixture for texture; my kids get a kick out of the surprise crunch.
- Dairy-Free Option: Use vegan cream cheese and dairy-free white chocolate coating to accommodate dietary needs without losing flavor.
- Seasonal Flavor: Add a teaspoon of pumpkin spice or cinnamon into the cake mixture for a fall-themed treat.
How to Make Mummy Cake Balls Recipe
Step 1: Bake the Cake and Let It Cool
Start by baking your white cake according to the package instructions. This is super easy and only takes about 30 minutes, but don’t skip the cooling step! I learned the hard way that mixing warm cake with cream cheese makes a sticky mess and affects the texture. Let it cool completely before moving on.
Step 2: Crumble and Mix with Cream Cheese
Once your cake is thoroughly cooled, crumble it into a large bowl. Use your hands or a fork to break it up fine. Add softened cream cheese and mix with an electric mixer until the mixture holds together well but is still light. The cream cheese binds everything to create that irresistible creamy center.
Step 3: Shape into Balls and Chill
Roll the mixture into roughly 2-tablespoon sized balls—you’ll end up with about 36. I recommend freezing them for 30 minutes on a parchment-lined sheet. This extra step isn’t essential, but it makes the next step far less messy and helps the coating stick perfectly.
Step 4: Dip in Melted Vanilla Almond Bark
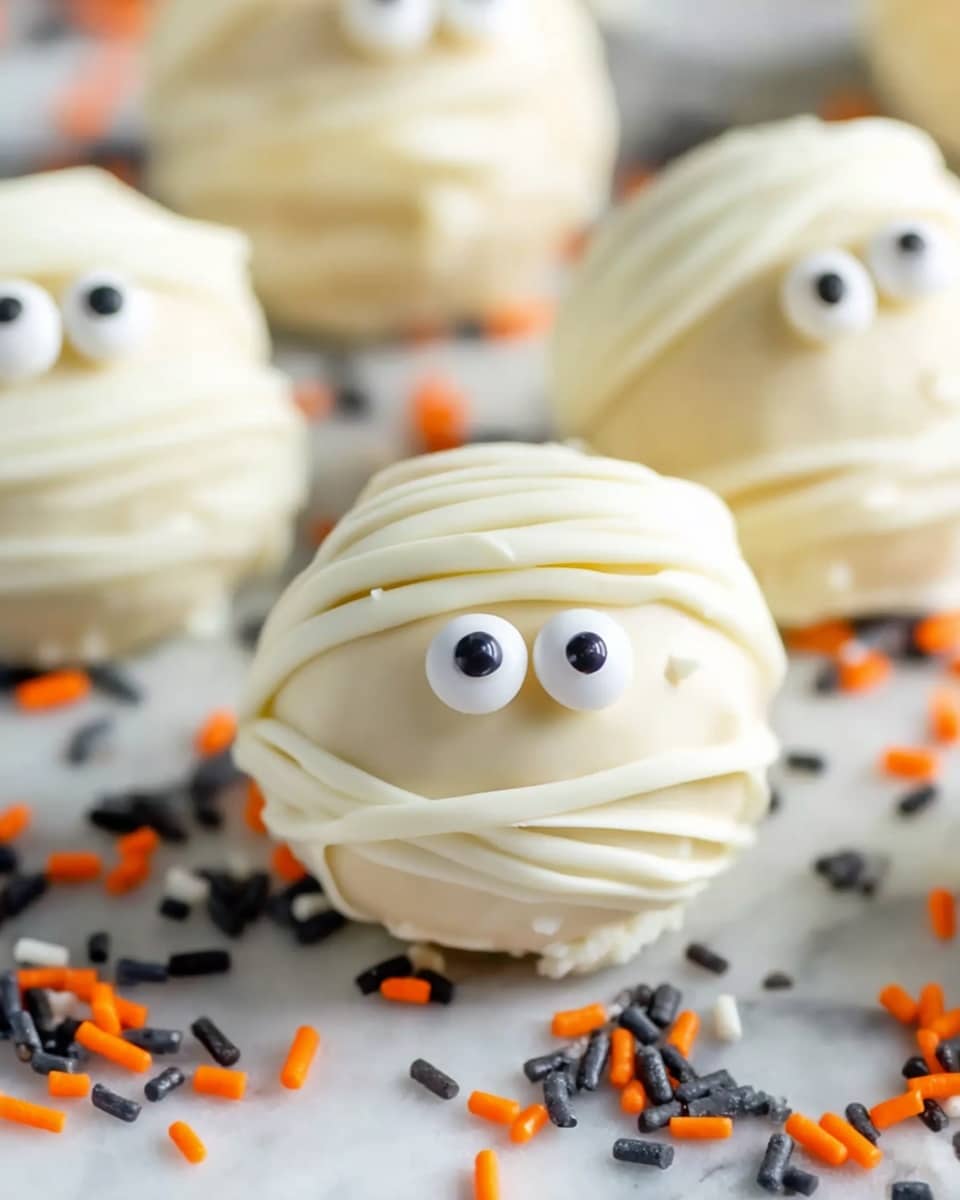
Melt your vanilla almond bark according to package directions, usually in short bursts in the microwave or using a double boiler. Dip each chilled cake ball fully into the coating, letting excess drip off. Then press on two candy eyes before the coating hardens—that’s the moment your mummies really come to life!
Step 5: Drizzle for Mummy Wrappings
Once all balls are coated and have eyes securely attached, drizzle with extra melted almond bark to create the classic mummy wrapping effect. I like to use a fork or piping bag for this. Let the coating set completely at room temperature, then they’re ready to serve.
Pro Tips for Making Mummy Cake Balls Recipe
- Chill Makes Perfect: Freezing the balls before dipping prevents the almond bark from melting the cake inside and helps keep your coating smooth.
- Use Room Temperature Cream Cheese: Cream cheese that’s too cold won’t blend well, while too warm will make the mixture too soft, so find a good in-between.
- Don’t Over-dip: Let excess coating drip off to avoid thick clumps—this makes the mummy drizzle look cleaner and less messy.
- Add Eyes Before the Coating Hardens: This ensures the candy eyes stick firmly without sliding off or sinking in.
How to Serve Mummy Cake Balls Recipe
Garnishes
I usually keep the garnishes minimal since the candy eyes and drizzle steal the show, but sometimes I sprinkle a tiny bit of edible glitter or colored sugar around the serving plate for a magical Halloween sparkle. It adds just the right touch without overwhelming the cute mummies.
Side Dishes
These cake balls stand well on their own, but if you want to create a whole festive spread, try pairing them with pumpkin spice cookies or a little bowl of hot chocolate for dunking. I’ve found my guests love this combo, especially during chilly fall evenings.
Creative Ways to Present
For Halloween parties, I’ve arranged these mummy cake balls on tiered cake stands with cobweb decorations and mini pumpkins around them. Another fun idea is to stick each ball on a lollipop stick for “mummy pops” – the kids went crazy for those! It’s amazing how presentation elevates something simple.
Make Ahead and Storage
Storing Leftovers
My family doesn’t often have leftovers because these disappear fast, but when I make extras, I store them in an airtight container in the fridge. They stay fresh and soft for up to a week, and the coating keeps its shine without cracking.
Freezing
I’ve frozen uncoated cake balls for up to 2 months. Just thaw them in the fridge, then dip and decorate as usual. This is a lifesaver if you want to prep your cake balls in advance for a big party.
Reheating
Since these are best enjoyed chilled or at room temperature, I prefer not to heat them. If you want to soften the coating a bit, leave them on the counter for 15 minutes before serving, and you’ll get that perfect creamy bite.
FAQs
-
Can I use other cake flavors for this Mummy Cake Balls Recipe?
Absolutely! While white cake gives a great neutral base for this recipe, you can try chocolate, red velvet, or even spice cake. Just make sure the cake is fully cooled before mixing with the cream cheese.
-
What if I don’t have candy eyes?
No worries! You can use small chocolate chips, mini M&Ms, or piped dots of black icing to create eyes. It’s all about having fun and getting creative.
-
How do I melt the almond bark without burning it?
Use short 15-20 second bursts in the microwave, stirring in between each. Alternatively, melt it gently over a double boiler. This keeps it smooth and prevents scorching.
-
Can I make these gluten-free?
You can! Just choose a gluten-free cake mix and check that your candy coatings and eyes are gluten-free as well.
Final Thoughts
I truly love sharing this Mummy Cake Balls Recipe because it brings out the kid in all of us—playful, sweet, and a little bit spooky in the best way. Whether it’s a family get-together or a Halloween bash, these treats always get smiles and compliments. So go ahead, give it a try and watch these adorable mummies disappear fast off your platter. I promise you’ll be glad you did!
Print
Mummy Cake Balls Recipe
- Prep Time: 30 minutes
- Cook Time: 36 minutes
- Total Time: 1 hour 6 minutes
- Yield: 36 cake balls
- Category: Dessert
- Method: Baking
- Cuisine: American
- Diet: Vegetarian
Description
These Mummy Cake Balls are a fun and spooky treat perfect for Halloween or any festive occasion. Made from moist white cake mixed with cream cheese, then coated in creamy vanilla almond bark and decorated with candy eyes, these bite-sized desserts combine rich flavors and playful presentation for a delightful snack or party treat.
Ingredients
Cake Balls
- 1 white cake mix, prepared according to box directions, cooled
- 8 ounces cream cheese, softened to room temperature
- 16 ounces vanilla almond bark
- Candy eyes, as needed for decoration
Instructions
- Bake the Cake: Preheat your oven according to the white cake mix package instructions. Bake the cake as directed on the box and allow it to cool completely to ensure easy handling and mixing.
- Prepare the Cake Mixture: Crumble the cooled cake into a large mixing bowl. Add the softened cream cheese and use an electric mixer to combine thoroughly until the mixture is uniform and can hold together when rolled.
- Form Cake Balls: Roll the mixture into approximately 2-tablespoon sized balls. Place each cake ball on a parchment-lined baking sheet for stability.
- Freeze Cake Balls: Freeze the cake balls for 30 minutes. This chilling step makes dipping in the almond bark smoother and helps them hold their shape.
- Melt Almond Bark: Following the package directions, melt the vanilla almond bark until smooth and ready for dipping.
- Dip and Decorate: Dip each chilled cake ball into the melted almond bark to fully coat it. Immediately press two candy eyes onto each coated ball to give them their mummy look.
- Add Mummy Details: Allow the initial coating to harden, then drizzle additional melted almond bark over the cake balls to create a mummy wrap effect for a spooky finish.
- Serve: Let the coating set completely before serving to enjoy these adorable and delicious mummy cake balls at your next event!
Notes
- Freezing the cake balls before dipping is optional but recommended for better coating results.
- If you want to enhance flavor, consider adding a teaspoon of vanilla extract to the cake and cream cheese mixture.
- Use candy melts of different colors if you want to customize the appearance of your mummy cake balls.
- Store leftover mummy cake balls in an airtight container in the refrigerator for up to 5 days.
Nutrition
- Serving Size: 1 cake ball
- Calories: 115
- Sugar: 10g
- Sodium: 90mg
- Fat: 6g
- Saturated Fat: 3.5g
- Unsaturated Fat: 2g
- Trans Fat: 0g
- Carbohydrates: 14g
- Fiber: 0.2g
- Protein: 1.5g
- Cholesterol: 15mg
