
If you love the refreshing zing of peppermint but want a fuss-free treat that’s ready in a snap, you’re going to adore this No-Bake Peppermint Mints Recipe. It’s one of those little kitchen gems I stumbled upon when I needed festive candies without heating up the house or breaking out the oven. These mints are creamy, vibrant, and melt in your mouth, perfect for gifts or just nibbling during cozy winter nights. Stick around—I’ll share all the tips to make these beauties perfectly every time!
Why You’ll Love This Recipe
- No-Bake Ease: Skip heating the oven or stovetop—the preparation is simple and fast.
- Customizable Colors: I love how you can tint the mints for holidays or personal flair.
- Perfect Texture: These mints are creamy and firm up just right after resting.
- Great for Gifting: They hold up well when boxed and wrapped, making for thoughtful homemade presents.

Ingredients You’ll Need
The magic of this No-Bake Peppermint Mints Recipe comes from a blend of creamy and sweet ingredients paired with peppermint extract that really wakes up your taste buds. I like to pick cream cheese that’s nicely softened for easier mixing, and using clear corn syrup helps keep the texture smooth without overpowering flavors.
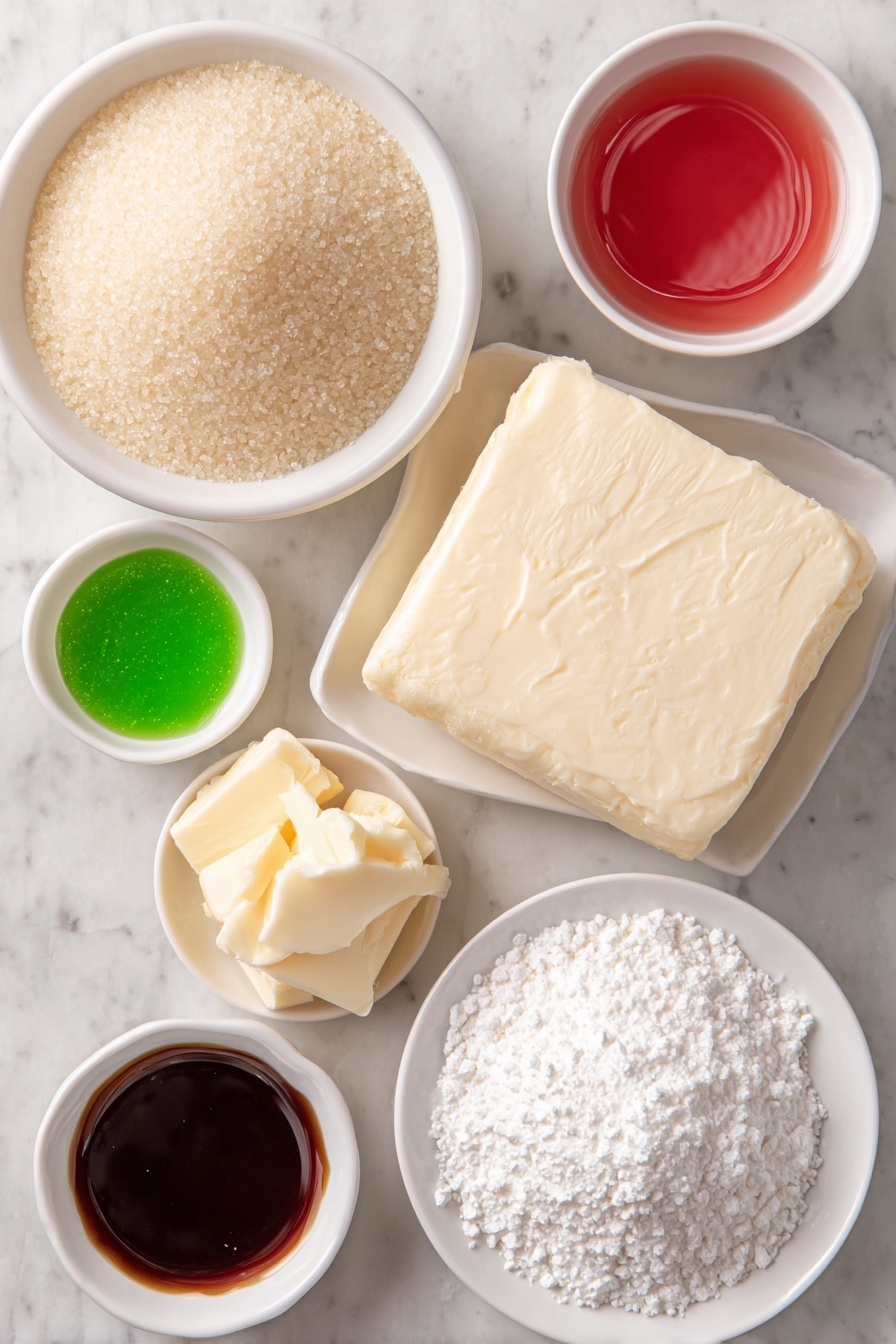
- Granulated sugar: This is for coating the mints later to give a little sparkle and crunch.
- Cream cheese: Using full-fat and at room temperature makes mixing easier and yields the best texture.
- Unsalted butter: Also softened to room temperature to blend smoothly without lumps.
- Clear corn syrup: Keeps the candies from drying out and adds a nice chew.
- Peppermint extract: This is the star flavor—you can’t skip it or substitute lightly.
- Powdered sugar: It thickens the dough and balances sweetness; I use a bit extra when kneading colored dough.
- Green and red liquid food coloring: For that classic holiday look, but feel free to experiment with your favorite shades!
Variations
I love playing around with this No-Bake Peppermint Mints Recipe depending on the season or mood. It’s easy to tweak and always turns out festive and delicious. Don’t be shy—make it your own!
- Classic Peppermint: Sticking with the red and green just as I learned makes these perfect for Christmas treats.
- Chocolate Peppermint: I’ve swirled in some unsweetened cocoa powder before—your family will go crazy for the chocolate twist.
- Fruit Flavored Mints: Try swapping peppermint extract for orange or lemon extracts for a bright, fresh version.
- Allergy-Friendly: You can experiment with dairy-free cream cheese and butter substitutes; just watch the texture during mixing.
How to Make No-Bake Peppermint Mints Recipe
Step 1: Mix the Creamy Base
Start by combining your softened cream cheese, butter, clear corn syrup, and peppermint extract in a large bowl. I like using a handheld mixer on low speed here—it helps blend everything into a smooth, creamy mixture without splattering. About a minute is perfect; you want it silky but not overworked.
Step 2: Sweeten and Thicken the Dough
While mixing on low, gradually add in most of your powdered sugar—about half a cup at a time. This makes a thick dough that your mixer might start to struggle with, and that’s totally fine. When it gets tough to mix, switch to using a spatula or wooden spoon to fold in the last bits by hand. You’ll know you’re done when the dough is firm but pliable.
Step 3: Color and Knead Your Dough
Dust a clean piece of parchment paper with some leftover powdered sugar and turn your dough out onto it. Split the dough into three equal parts — one for each color. Make an indent in two portions and add red food coloring to one and green to the other, leaving one white. Knead each piece gently, sprinkling in powdered sugar as needed to keep the dough from sticking. This is where your hands become your best tool—feel the texture and add sugar little by little until each color is smooth and manageable.
Step 4: Shape and Cut the Mints
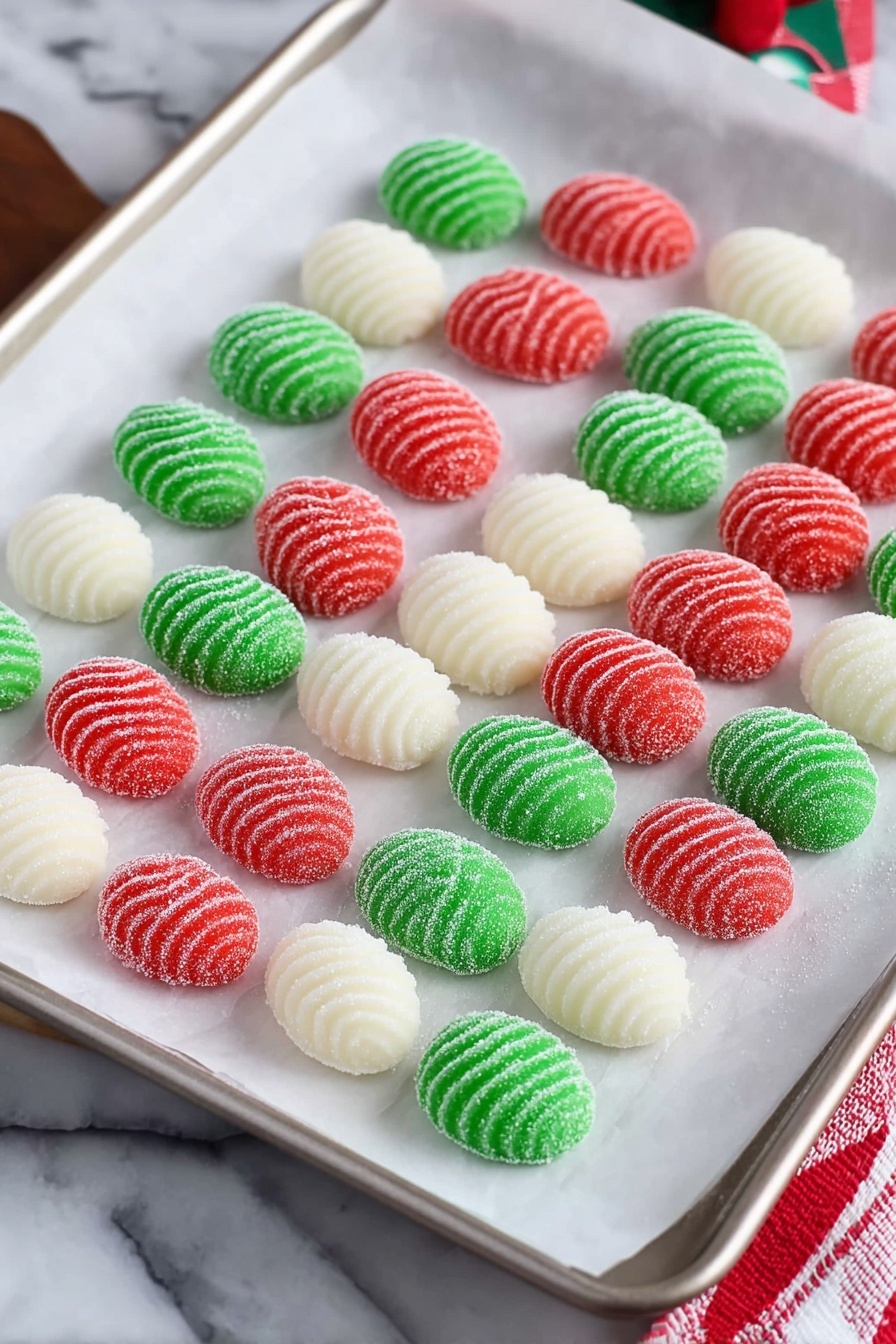
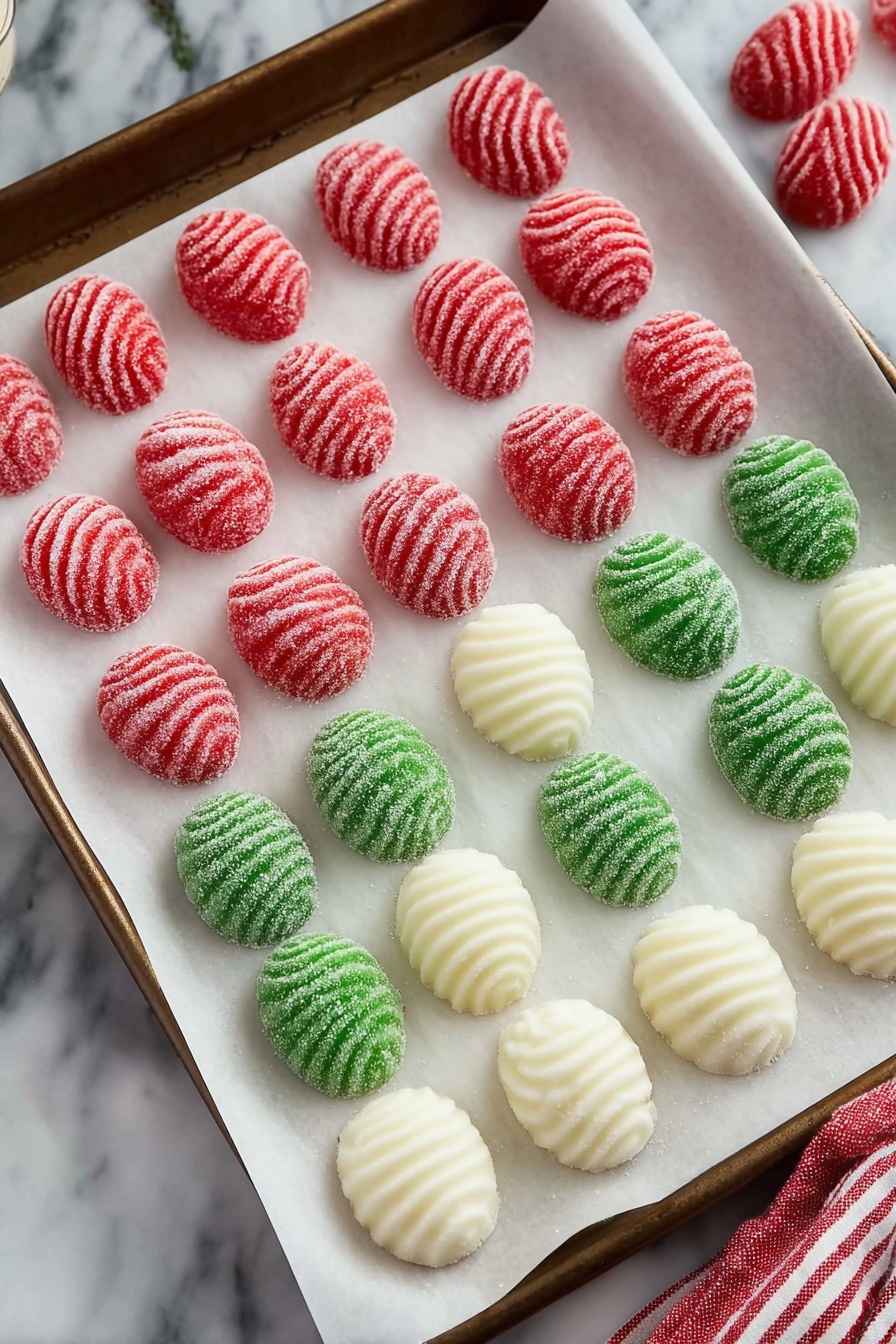
Roll each dough portion into long ropes about 18 inches long and an inch thick. Then, slice each rope into half-inch segments. Roll each piece between your palms to make smooth little balls. This part is fun—I like to imagine I’m making tiny edible jewels!
Step 5: Sugar Coat and Flatten
Toss a handful of your mint balls into the granulated sugar bowl and gently coat them until sparkly. Place them on your parchment-lined baking sheet. Once all are coated, use a fork to gently flatten each candy gently—those fork tines create the signature striped look. Leave the mints out at room temperature for up to 24 hours; this resting time is key to letting them firm up to the perfect texture.
Pro Tips for Making No-Bake Peppermint Mints Recipe
- Room Temperature Ingredients: Always soften cream cheese and butter well—cold ingredients make kneading a hassle.
- Sugar Adjustment: I learned to add powdered sugar gradually when coloring dough to avoid over-dryness or stickiness.
- Gentle Flattening: Using a fork lightly keeps the pretty stripes without smashing your efforts.
- Resting Patience: Don’t skip the 24-hour rest—it’s the secret to that signature melt-in-your-mouth bite.
How to Serve No-Bake Peppermint Mints Recipe
Garnishes
I usually keep it simple and classic—just a light dusting of granulated sugar on top, which I already do when coating. For holiday parties, I sometimes sprinkle a tiny pinch of crushed candy canes over the mints after flattening; it adds crunch and extra peppermint spark that’s always a hit.
Side Dishes
These mints are perfect on their own but also pair wonderfully with hot cocoa, coffee, or a dessert cheese board. Whenever I serve them with a pot of spiced tea, guests come back for more—there’s something about that peppermint freshness alongside warm drinks that’s just magic.
Creative Ways to Present
For gifting, I like boxing these mints in decorative tins lined with tissue paper or placing them in small cello bags tied with festive ribbons. Another fun idea I tried was arranging them in clear glass jars with layered colors for a visually stunning peppermint display!
Make Ahead and Storage
Storing Leftovers
After they’ve rested the full 24 hours, I store these mints in an airtight container at room temperature. They keep beautifully for at least two weeks—if they last that long in your house! Keeping them cool and dry ensures they don’t stick or lose texture.
Freezing
Freezing mints isn’t something I do often, but I have on occasion wrapped them tightly and placed them in freezer-safe bags. When thawed slowly in the fridge, they hold up surprisingly well. Just make sure to separate layers with parchment paper to prevent sticking.
Reheating
You won’t need to reheat these mints since they’re best served chilled or at room temperature. If they feel a bit hard after refrigerating or freezing, just let them sit out for 10-15 minutes before enjoying for that perfect melt-in-your-mouth texture.
FAQs
-
Can I use other extracts instead of peppermint?
Absolutely! While peppermint is classic here, you can swap in extracts like vanilla, almond, or even citrus flavors to create your own signature treats. Just make sure the extract is food-grade and start with small amounts to avoid overpowering the mints.
-
Why do my mints get sticky when I add food coloring?
Food coloring adds moisture, which can make the dough sticky. The trick I learned is to knead gently and sprinkle in small amounts of powdered sugar gradually until the dough feels smooth and less sticky. Patience here is key!
-
How long can I store these no-bake peppermint mints?
Stored in an airtight container at room temperature, these mints last around two weeks. Just keep them out of humid areas and away from heat to maintain their texture and flavor.
-
Is it okay to use gel food coloring instead of liquid?
Yes, gel coloring works well too and often requires less to achieve vibrant colors. Just gently knead the gel into your dough and add powdered sugar as needed to balance moisture.
Final Thoughts
This No-Bake Peppermint Mints Recipe has become a go-to for me every holiday season. I love how it feels like a little hug in candy form—refreshing but comforting, and so easy to make even during busy times. If you try making these, I bet you’ll find yourself reaching for them again and again, and your friends and family might just start asking for the recipe. Give it a shot—you won’t regret it!
Print
No-Bake Peppermint Mints Recipe
- Prep Time: 15 Minutes
- Cook Time: 0 Minutes
- Total Time: 15 Minutes plus 24 hours resting time
- Yield: Approximately 100 peppermint candies
- Category: Candy
- Method: No-Cook
- Cuisine: American
- Diet: Vegetarian
Description
These No-Bake Christmas Mints are a festive and easy-to-make holiday treat that requires no baking. Made with cream cheese, butter, corn syrup, peppermint extract, and powdered sugar, these colorful candies are rolled, shaped, coated in sugar, and left to firm up for a perfect melt-in-your-mouth texture. Ideal for gifting or enjoying at holiday gatherings, they come in classic red, green, and white colors with charming fork-tine stripes on top.
Ingredients
Main Ingredients
- ⅓ cup granulated sugar, plus extra for coating
- 4 ounces cream cheese, softened to room temperature
- 2 tablespoons unsalted butter, softened to room temperature
- 2 tablespoons clear corn syrup
- 1 teaspoon peppermint extract
- 4¼ to 5 cups powdered sugar, separated
Food Coloring
- 6 drops green liquid food coloring
- 6 drops red liquid food coloring
Instructions
- Prepare baking sheet and sugar coating: Line a large rimmed baking sheet with parchment paper. Pour the granulated sugar into a small bowl for coating the mints later.
- Mix wet ingredients: In a large bowl, combine softened cream cheese, butter, corn syrup, and peppermint extract. Blend on low with a handheld mixer for about one minute until smooth and creamy.
- Add powdered sugar: Gradually add 4¼ cups of powdered sugar to the mixture, about ½ cup at a time, mixing on low. When the mixer struggles due to thick dough, switch to a spatula or wooden spoon to incorporate the remaining sugar by hand until a firm dough forms.
- Prepare workspace: Lay parchment paper on the counter and dust with ¼ cup of the remaining powdered sugar. Turn the dough out onto the sugared surface.
- Divide and color dough: Divide dough into three equal portions. Make a small indent in two portions. Add red food coloring to one indent and green food coloring to the other. Leave the third portion plain white.
- Knead colored doughs: Knead the colored portions to evenly distribute the dye. The dough will become sticky; sprinkle in up to ¼ cup additional powdered sugar gradually as needed to reach a smooth, non-sticky consistency. Add a tablespoon or two of sugar if needed to white dough as well.
- Roll dough into ropes: Roll each portion into a long rope about 18 inches long and 1 inch thick.
- Slice dough ropes: Using a knife, cut each rope into ½-inch wide segments until all dough is sliced.
- Shape candy balls: Roll each segment between your palms to form smooth, round balls and set aside.
- Coat in granulated sugar: Toss a few balls at a time in the bowl of granulated sugar to coat evenly. Place coated balls on the parchment-lined baking sheet.
- Flatten candies: Gently press down each sugar-coated ball with a fork to flatten into small discs, leaving striped marks from the fork tines.
- Rest candies: Leave the mints on the tray at room temperature for up to 24 hours to firm up and develop their ideal texture before serving or gifting.
Notes
- These no-bake mints are perfect for making ahead during the busy holiday season.
- The amount of extra powdered sugar needed during kneading varies depending on kitchen temperature—warmer kitchens require more sugar.
- Allowing the mints to rest for 24 hours improves their firmness and signature texture.
Nutrition
- Serving Size: 2 pieces (approx. 12 g)
- Calories: 70
- Sugar: 9 g
- Sodium: 20 mg
- Fat: 2.5 g
- Saturated Fat: 1.5 g
- Unsaturated Fat: 0.8 g
- Trans Fat: 0 g
- Carbohydrates: 12 g
- Fiber: 0 g
- Protein: 0.5 g
- Cholesterol: 5 mg


