

If you’re looking for a cozy, rustic bread bursting with autumn flavors, this No-Knead Cranberry Walnut Bread Recipe is your new best friend. I absolutely love how this bread turns out—crispy crust, tender crumb, with bursts of tart cranberry and crunchy walnuts in every bite. It’s wonderfully easy to make too, thanks to the no-knead, slow-rise method that fits perfectly into busy schedules. Stick with me here, and I’ll walk you through every step so your kitchen smells amazing and your family asks for seconds.
Why You’ll Love This Recipe
- Effortless Preparation: You don’t have to knead the dough, making it a perfect beginner-friendly bread recipe.
- Rich Autumn Flavors: The combination of tart cranberries, toasted walnuts, and zesty orange makes each slice taste like fall.
- Beautiful Crust: Baking it in a Dutch oven creates a crispy, golden-brown crust that rivals bakery loaves.
- Make-Ahead Friendly: The long, slow rise fits smoothly into your day—mix it one evening and bake the next day.

Ingredients You’ll Need
The ingredients here are simple but thoughtfully chosen. Bread flour brings great structure, dried cranberries add a lovely chewy burst, and walnuts give that satisfying crunch. I always recommend looking for high-quality dried cranberries—avoid those with added artificial flavors for the best taste.

- Active dry yeast: The magic that gets the dough rising; make sure it’s fresh for the best rise.
- Warm water: Helps activate the yeast; water too hot can kill it, so keep it around 110–115°F.
- Granulated sugar: Feeds the yeast and adds a hint of sweetness.
- Kosher salt: Enhances flavor and controls yeast activity.
- Bread flour: Provides the perfect gluten structure for chewy, hearty bread.
- Dried cranberries: Adds tangy sweetness; soak them in warm water if you want a softer bite.
- Dried walnuts: Roughly chopped for texture and nutty flavor; lightly toasting walnuts intensifies taste.
- Honey: Adds natural sweetness and helps with browning.
- Orange zest: Gives a fresh, citrusy brightness that balances the sweetness beautifully.
Variations
I love making this No-Knead Cranberry Walnut Bread Recipe just as is, but don’t hesitate to get creative. I’ve played around with swapping nuts, adding spices, or even switching up the fruit. It’s versatile and forgiving, which is why it’s such a favorite in my kitchen.
- Swap the nuts: Pecans or almonds work beautifully if you don’t have walnuts on hand—I’ve used pecans when hosting Thanksgiving, and guests loved the buttery flavor.
- Season with spices: A pinch of cinnamon or nutmeg adds warmth; I discovered this when I wanted a bit more of that holiday feeling.
- Use fresh orange juice: Replace some of the water with fresh orange juice for an extra citrus punch. It subtly lifts the flavor.
- Make it gluten-free: This one’s trickier due to the flour structure, but experimenting with high-protein gluten-free blends can work—just expect a different texture.
How to Make No-Knead Cranberry Walnut Bread Recipe
Step 1: Activate Your Yeast
Start by dissolving your active dry yeast and a teaspoon of sugar in warm water between 110 and 115 degrees F. This temperature range is so crucial—if it’s too hot, the yeast dies; too cold, and it won’t wake up. Let it sit for about 10 minutes until it’s foamy and bubbly on top. When I first learned this step, I realized how unreliable cold or overheated water can be, so I always check with a kitchen thermometer now. If your mixture doesn’t foam, it’s best to start over with fresh yeast.
Step 2: Mix the Dough
In a large bowl, whisk together your bread flour and kosher salt. Pour in the yeast mixture along with honey, and stir just until no dry flour patches remain—don’t overwork it! This dough is supposed to feel very sticky and wet, which surprised me at first. Then fold in your dried cranberries, chopped walnuts, and orange zest. Cover it tightly with plastic wrap, but avoid pressing the wrap directly onto the dough surface. Now, the wait begins: leave this bowl at room temperature for a slow, 18-hour rise. It feels like a long time, but trust me, this slow fermentation is where that deep, complex flavor develops. I usually prepare this in the evening and bake the next afternoon.
Step 3: Shape the Dough Gently
After 18 hours, the dough will be expanded, sticky, and very soft—don’t punch it down or try to knead. Sprinkle a generous amount of bread flour on your work surface and hands, then carefully turn the dough out onto it. Use a gentle folding motion to bring the dough edges towards the center, forming a loose ball. This folding creates structure without deflating all the bubbly air pockets you want for a light loaf. Transfer the dough onto a floured piece of parchment paper with the smooth side facing up. Cover loosely and let it rest for 30 minutes; during this time it’ll puff up a bit more.
Step 4: Preheat Your Dutch Oven & Bake
Place your Dutch oven (yes, the heavy lidded pot) inside your conventional oven and preheat both to 450 degrees F for about 30 minutes. The pot needs to get scorching hot because it creates that steam environment the bread needs for a perfect crust. Using a sharp knife or bread lame, score an “X” or your favorite pattern on top of your dough. Carefully pick up the parchment paper with dough and lower it into the hot pot, then immediately put the lid on to trap steam. Bake covered for 30 minutes, then remove the lid and bake uncovered for an additional 8–10 minutes until the crust is beautifully golden and crispy. Watching the bread come out of the oven like this is one of my favorite kitchen moments!
Step 5: Cool Before Slicing
Lift the bread out with the parchment paper and set it on a wire rack to cool completely. It’s tempting, but slicing while warm leads to a gummy crumb, so give it at least an hour. When I wait patiently for this, the bread slices beautifully and tastes amazing every time.
Pro Tips for Making No-Knead Cranberry Walnut Bread Recipe
- Use a kitchen thermometer: I can’t stress this enough—checking your water temperature and oven temp ensures the yeast activates perfectly and the bread bakes evenly.
- Flour your hands and surface generously: Handling sticky dough is easier when you don’t hesitate putting on lots of flour—it saves frustration and keeps your loaf intact.
- Don’t rush the rise: My early attempts with shorter rising times resulted in dense bread. Waiting the full 18 hours creates that light, flavorful crumb you want.
- Keep the Dutch oven covered when instructed: This traps steam crucial for a crispy crust. Avoid peeking during the covered baking time or you’ll lose that important moisture.
How to Serve No-Knead Cranberry Walnut Bread Recipe

Garnishes
I love serving slices of this cranberry walnut bread with a slather of good butter or cream cheese. Sometimes I add a drizzle of honey on top, which just elevates the sweetness and pairs marvelously with the orange zest. Fresh herbs like rosemary or thyme sprinkled lightly can offer an unexpected fresh note if you want to get fancy.
Side Dishes
My family goes crazy for this bread alongside a steaming bowl of butternut squash soup or creamy pumpkin bisque. It also pairs wonderfully with savory dishes like roasted turkey or baked brie, perfect for fall and holiday meals alike. The bread’s texture holds up well to spreading dips and soups without getting mushy.
Creative Ways to Present
If you’re hosting, try slicing the bread thick and arranging it in a basket lined with a festive cloth napkin. You can also cut it into cubes to serve as croutons over autumn salads or use it to make dazzling cranberry-walnut bread pudding for dessert. When I made this for Thanksgiving once, adding edible flowers to the basket gave it an elegant, photogenic touch that guests loved.
Make Ahead and Storage
Storing Leftovers
To keep the crust crisp and the crumb fresh, I store leftover slices in a paper bag or loosely wrapped in a kitchen towel—this mimics bakery storage and prevents the crust from softening. Plastic bags can trap moisture and make the crust soggy, which is a common mistake I used to make. Kept this way, the bread is fantastic for 2 to 3 days.
Freezing
I freeze this bread a lot since it’s so rich and special. I slice it first, then wrap slices tightly in aluminum foil and place them inside freezer-safe resealable bags for up to 3 months. This method locks in freshness and flavor beautifully. When you’re ready to enjoy, just thaw slices at room temperature.
Reheating
To bring back that freshly baked warmth and crisp crust, I reheat slices in a toaster oven or a hot skillet for a few minutes. Avoid microwaving because it tends to make the bread rubbery. Another trick I discovered is to lightly spritz the bread with water before warming—it helps revive moisture and crustiness.
FAQs
-
Can I shorten the rising time for the No-Knead Cranberry Walnut Bread Recipe?
While you can technically let the dough rise for as little as 12 hours, I highly recommend a full 16 to 18 hours. The longer fermentation develops flavor and creates that perfect airy texture. Shorter rising might leave your bread dense and less flavorful.
-
Why is my dough so sticky? Is that normal for this recipe?
Absolutely normal! The no-knead dough is intentionally wetter than typical bread dough to produce steam inside the Dutch oven, which helps form a crispy crust. Just flour your hands and work surface generously to handle it.
- Can I substitute fresh cranberries for dried?
You can, but fresh cranberries contain more moisture, which may affect dough consistency. If using fresh, you might want to reduce the water slightly and consider a shorter rise. Dried cranberries are preferred for this recipe to maintain dough texture and flavor balance.
- What if I don’t have a Dutch oven?
A Dutch oven is ideal because it traps steam, but if you don’t have one, you can use a heavy oven-safe pot with a lid or even bake on a baking stone with a pan of water nearby to create steam. The crust won’t be quite as crispy but your bread will still be tasty.
Final Thoughts
This No-Knead Cranberry Walnut Bread Recipe holds a special place in my heart because it combines ease with incredible flavor and texture—something I used to think was impossible to get from homemade bread. It’s a recipe I happily recommend to friends and family, especially around the holiday season when those cozy feelings are most welcome. I can’t wait for you to try it out and discover firsthand how luscious and rewarding homemade bread can be without loads of fuss. Grab your flour and Dutch oven and let’s get baking!
Print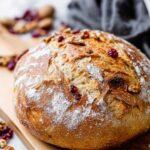
No-Knead Cranberry Walnut Bread Recipe
- Prep Time: 15 minutes
- Cook Time: 40 minutes
- Total Time: 19 hours 25 minutes
- Yield: 12 slices
- Category: Bread
- Method: Baking
- Cuisine: American
- Diet: Vegetarian
Description
This Thanksgiving Cranberry Walnut Bread is a no-knead artisan-style loaf that combines the tartness of dried cranberries with the crunch of walnuts and a hint of citrus from orange zest. Baked in a Dutch oven for a crisp, golden crust and a tender crumb, this bread is perfect for holiday gatherings or cozy breakfasts.
Ingredients
Yeast Mixture
- ½ teaspoon active dry yeast
- 1 ½ cups warm water (110 to 115 degrees F)
- 1 teaspoon granulated sugar
Dry Ingredients
- 3 cups bread flour, plus 2 tablespoons (plus more for surface)
- 2 teaspoons Kosher salt
- ¾ cup dried cranberries
- ½ cup dried walnuts, roughly chopped
Flavorings
- 1 tablespoon honey
- 1 tablespoon orange zest
Instructions
- Prepare Yeast Mixture: Dissolve the yeast and sugar in warm water (110 to 115°F). Let it sit for 10 minutes until foamy. If not foamy, discard and restart.
- Mix Dough: In a large bowl, whisk bread flour with salt. Add the yeast mixture and honey, combining until no dry flour remains but avoiding over-mixing. Stir in cranberries, walnuts, and orange zest until just combined. The dough will be very sticky and wet.
- First Rise: Cover the bowl tightly with plastic wrap without touching the dough. Let the dough rise on the countertop at room temperature for 18 hours.
- Shape Dough: After 18 hours, transfer the sticky dough to a well-floured surface. Flour your hands and fold the edges inward gently to form a ball, preserving air bubbles. Turn dough smooth side up and reshape if needed. Transfer the dough on lightly floured parchment paper.
- Second Rise: Cover the dough with plastic wrap and let it rest for 30 minutes at room temperature.
- Preheat Dutch Oven: Place a 5 to 6 quart Dutch oven with lid inside the oven and preheat to 450°F for 30 minutes.
- Score Dough: Make an X or decorative pattern on the surface of the dough with a sharp knife.
- Bake Covered: Remove the hot Dutch oven from the oven. Using the parchment paper, transfer the dough into the pot. Cover with the lid and bake for 30 minutes, ensuring the lid is not opened to trap steam.
- Bake Uncovered: Remove the lid and continue baking for 8 to 10 minutes until the crust is golden brown.
- Cool: Remove bread from the pot by lifting the parchment paper. Let cool completely before slicing and serving.
Notes
- Allow the dough to rise for 18 hours to develop flavor and texture; a minimum of 12 hours is possible but less flavorful.
- The dough will be very sticky and wet; flour your surface and hands generously when shaping.
- Using a Dutch oven traps steam, which is critical for creating a crispy, golden crust.
- Store bread in a semi-open paper bag to keep the crust crispy.
- Freeze the bread wrapped in aluminum foil and placed inside a freezer-safe bag for up to 3 months; thaw at room temperature.
Nutrition
- Serving Size: 1 slice (approx. 1/12 of loaf)
- Calories: 180
- Sugar: 5 g
- Sodium: 330 mg
- Fat: 4.5 g
- Saturated Fat: 0.5 g
- Unsaturated Fat: 4 g
- Trans Fat: 0 g
- Carbohydrates: 33 g
- Fiber: 3 g
- Protein: 5 g
- Cholesterol: 0 mg


