

If you’re anything like me, baking sourdough bread can feel a bit intimidating, but this Overnight Sourdough Bread Recipe is a total game-changer. It’s straightforward, requires minimal hands-on time, and the result? A crusty, tangy loaf that you’ll be proud to slice and share. Trust me, once you try this, you’ll find yourself craving that beautiful, homemade sourdough aroma wafting through your kitchen night after night!
Why You’ll Love This Recipe
- Effortless Overnight Rise: You mix everything in one go and let it rise slowly while you sleep, making busy mornings a breeze.
- No Kneading Required: The folding technique replaces hard kneading, saving your arms and still developing incredible gluten structure.
- Deliciously Tangy Flavor: Using unfed starter gives the bread a wonderful sour kick that my family goes crazy for.
- Beautiful Crust and Crumb: Baking in a Dutch oven creates that perfect crusty exterior and an airy interior with lovely holes.

Ingredients You’ll Need
I’ve found that simple ingredients, when combined thoughtfully, produce bread that feels truly special. Each item here plays an essential role, and I usually recommend using fresh, high-quality all-purpose flour for the best texture and flavor.

- Sourdough starter: Make sure it’s active, but no need to feed it just before baking—using it straight from the fridge works best for that tangy punch.
- All-purpose flour: This keeps the bread tender yet chewy; a blend with bread flour is okay but all-purpose alone is perfect here.
- Salt: Essential for flavor and fermentation control—don’t skip this!
- Water: Lukewarm but not hot; it helps the yeast wake up gently without shocking it.
Variations
I love experimenting with this recipe by swapping flours or adding a little flair here and there—feel free to make it yours! It’s super flexible and forgiving, which makes it perfect to tweak based on your mood or pantry.
- Whole wheat addition: I sometimes replace about 25% of the all-purpose flour with whole wheat for a nuttier flavor and heartier texture.
- Herbs and seeds: Adding rosemary, thyme, or sunflower seeds right after the initial mix brings exciting flavor and crunch.
- Gluten-free workaround: This recipe isn’t ideal gluten-free, but you can try a sourdough starter made from gluten-free flour blends and adjust hydration accordingly.
How to Make Overnight Sourdough Bread Recipe
Step 1: Mix and Rest
The night before you want fresh bread, toss 520 grams of all-purpose flour, 12 grams salt, and 90 grams sourdough starter into a bowl. Pour in 1 7/8 cups of water, and dive in with your hands to stir everything together. Don’t worry if the dough feels wet and shaggy—that’s actually a good sign for this recipe’s light crumb. Cover the bowl and let it rest for 15 minutes. This little waiting period lets the flour hydrate and makes the dough easier to handle for the next step.
Step 2: Fold and Rise
After the first rest, do a series of folds—take a corner of the dough, stretch, and fold it over the middle, then rotate the bowl and repeat. I usually do this about 15 times, wetting my hands slightly to avoid stickiness. Don’t stress about stretching perfectly; this is all about strengthening the dough’s gluten network gently. Cover it again and rest for another 15 minutes, then repeat the folds. Finally, tuck the bowl under a towel overnight to rise at room temperature. You’ll see it puff up beautifully by morning.
Step 3: Shape and Chill
The next morning, your dough will be airy and ready to go. Sprinkle some flour in the bottom of a clean mixing bowl lined with parchment paper for easy transfer later. Wet your hands and gently loosen the dough from its original bowl edges. Lift the center with both hands and tuck the edges underneath, turning the bowl a quarter at a time—this shapes your loaf neatly. Transfer it to the floured parchment-lined bowl, dust the top with flour, cover loosely, and pop it in the fridge for about 5 hours. This cold proof slows fermentation and makes handling the dough for baking easier.
Step 4: Bake to Perfection
Preheat your oven to 500°F (I like convection if yours has it) and place your Dutch oven inside to heat up. Once ready, take your dough from the fridge, score the surface using a sharp knife or bread lame—this controls how the loaf expands in the oven and adds that signature look. Carefully lift the parchment with the dough and place it inside your hot Dutch oven. Bake covered for 25 minutes, then remove the lid, lower the temperature to 450°F, and bake 12-14 minutes more until golden brown and crusty. Let it cool for at least an hour on a wire rack—you’ll want to resist slicing right away, I promise it’s worth the wait!
Pro Tips for Making Overnight Sourdough Bread Recipe
- Use Unfed Starter: I learned that using unfed starter straight from the fridge really brings out the sour tang, which makes this loaf unique and tasty.
- Wet Hands for Folding: Wet your hands before handling dough to prevent sticking and keep the texture intact without tearing.
- Don’t Skip the Cold Proof: The fridge step helps firm up your dough, making scoring and transferring much easier and preventing shapeless loaves.
- Preheat Dutch Oven: Make sure the Dutch oven is super hot before baking for the best crust development and beautiful oven spring.
How to Serve Overnight Sourdough Bread Recipe

Garnishes
I usually keep it classic with a smear of good quality butter or olive oil and a sprinkle of flaky sea salt. Sometimes, I toast slices and add fresh smashed avocado sprinkled with chili flakes and a squeeze of lemon—that’s one of my all-time favorite combos for breakfast or a quick snack.
Side Dishes
This bread pairs amazingly with hearty soups, like tomato bisque or creamy potato leek, and I love serving it alongside a cheese board with sharp cheddar and honey-whipped goat cheese for an easy entertaining win.
Creative Ways to Present
For special occasions, I hollow out a loaf and fill it with warm spinach artichoke dip or homemade chili—perfect for sharing at a party. You could also slice it thickly, toast, and create gourmet grilled cheese sandwiches packed with fresh herbs and caramelized onions.
Make Ahead and Storage
Storing Leftovers
I find that wrapping the loaf in a clean tea towel and storing it in a bread box keeps it fresh for 2-3 days. Avoid plastic wrap if you want that crust to stay crisp rather than soggy.
Freezing
When I have extra, I slice the bread before freezing, then store slices in freezer bags. That way, I can toast only what I need, and it tastes just as fresh and delicious as the day it was baked.
Reheating
To bring back that fresh-baked warmth, I pop slices into the toaster or wrap the whole loaf in foil and heat it in a 350°F oven for about 10 minutes. This refreshes the crust nicely without drying out the crumb.
FAQs
-
Can I use whole wheat flour instead of all-purpose in this overnight sourdough bread recipe?
Absolutely! You can substitute up to 25% of the all-purpose flour with whole wheat for a nuttier flavor. Just keep in mind that whole wheat flour absorbs more water, so you might need to adjust the hydration slightly for a similar dough consistency.
-
How active should my sourdough starter be for this recipe?
This recipe actually works well using unfed starter straight from the fridge. It yields a tangier flavor. However, if you prefer a milder taste, feeding your starter 8-12 hours before mixing can give you a gentler rise and flavor.
-
Do I have to use a Dutch oven for baking sourdough bread?
While a Dutch oven helps create steam and produces that signature crust, you can bake on a baking stone or heavy-duty pan with a pan of water underneath as a steam source. Just watch the bread closely as baking times might vary.
-
How long should I let the bread cool before slicing?
It’s tempting to cut immediately, but waiting at least one hour lets the crumb set properly and prevents a gummy texture. Patience pays off with a better slice every time!
Final Thoughts
I absolutely love how this Overnight Sourdough Bread Recipe turns out—every loaf feels like a little victory and fills my home with warmth and that unmistakable sourdough scent. It’s truly approachable, even if you’ve struggled with bread before, and you’ll enjoy the satisfaction of slicing into a loaf you made with your own hands. So, go ahead—try this recipe, and let’s share a slice together soon.
Print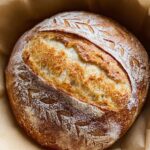
Overnight Sourdough Bread Recipe
- Prep Time: 40 minutes
- Cook Time: 40 minutes
- Total Time: 18 hours 20 minutes
- Yield: 12 slices
- Category: Bread
- Method: Baking
- Cuisine: Artisan
- Diet: Vegetarian
Description
This Easy Overnight Sourdough Bread recipe guides you through creating a flavorful and naturally leavened loaf with a crisp crust and airy crumb. Utilizing a simple mixture of sourdough starter, all-purpose flour, water, and salt, the dough is mixed, folded, and left to rise overnight before baking in a Dutch oven to achieve an artisan-quality loaf at home.
Ingredients
Starter and Dough
- 90 grams sourdough starter
- 520 grams all-purpose flour
- 12 grams salt
- 1 7/8 cups water (approximately 445 ml)
Instructions
- Mix the Dough: The night before baking, combine 520 grams of all-purpose flour, 12 grams of salt, and 90 grams of sourdough starter in a large bowl. Pour in 1 7/8 cups of water and mix together using your hands until the dough forms a wet, sticky mass. It won’t be smooth at this stage, which is normal.
- First Rest and Folding: Cover the bowl with a towel and let it rest for 15 minutes. After resting, perform approximately 15 folds by taking a corner of the dough and folding it over the rest, rotating the bowl each time. Wet your hands slightly to prevent sticking. This helps develop gluten and structure.
- Second Rest and Folding: Cover again and let rest for another 15 minutes. Repeat the folding process once more to further strengthen the dough. Then cover the bowl and leave it to rise out at room temperature overnight.
- Prepare for Shaping: The next morning, your dough should be risen and bubbly. Prepare a mixing bowl lined with parchment paper dusted with flour to hold the shaped dough for proofing.
- Shape and Fold: Wet your hands and gently loosen the dough from the bowl edges. Lift the center of the dough and tuck the ends underneath, rotating the bowl a quarter turn and repeating this process two more times. Finally, transfer the dough to the prepared bowl using the parchment paper, tucking the ends underneath. Sprinkle lightly with flour on top.
- Cold Proof: Place the shaped dough bowl into the refrigerator and allow it to cold proof for 5 hours. This slow proof enhances flavor and texture.
- Preheat Oven and Dutch Oven: About 30 minutes before baking, preheat your oven to 500°F (260°C), preferably using the convection setting. Place a Dutch oven with its lid inside the oven to heat up thoroughly.
- Score and Transfer Dough: Remove the dough from the fridge. Using a sharp knife, score the dough with a long slash down the center and several smaller slashes surrounding it for expansion during baking. Use the parchment paper to lift and transfer the dough into the hot Dutch oven.
- Bake Covered: Bake the bread at 500°F with the Dutch oven lid on for 25 minutes. This traps steam and ensures a crispy crust.
- Bake Uncovered: Remove the lid, reduce the oven temperature to 450°F (232°C), and continue baking for an additional 12-14 minutes until the crust is deep golden and crisp.
- Cool Before Serving: Remove the bread from the oven and once cool enough to handle, transfer it to a cooling rack. Allow the bread to cool for at least 1 hour before slicing to let the crumb set and flavors develop fully.
Notes
- You can substitute other flours, but retaining a large portion of all-purpose flour helps maintain the bread’s texture.
- Experiment with baking times: longer covered baking yields a lighter crust color; shorter covered baking and longer uncovered baking results in a darker crust.
- Feeding your sourdough starter 8-12 hours before using it is optional; using unfed starter can lead to a more pronounced sour flavor.
Nutrition
- Serving Size: 1 slice (approximately 80 grams)
- Calories: 180
- Sugar: 0.2 g
- Sodium: 380 mg
- Fat: 1 g
- Saturated Fat: 0.2 g
- Unsaturated Fat: 0.6 g
- Trans Fat: 0 g
- Carbohydrates: 37 g
- Fiber: 2 g
- Protein: 6 g
- Cholesterol: 0 mg


