
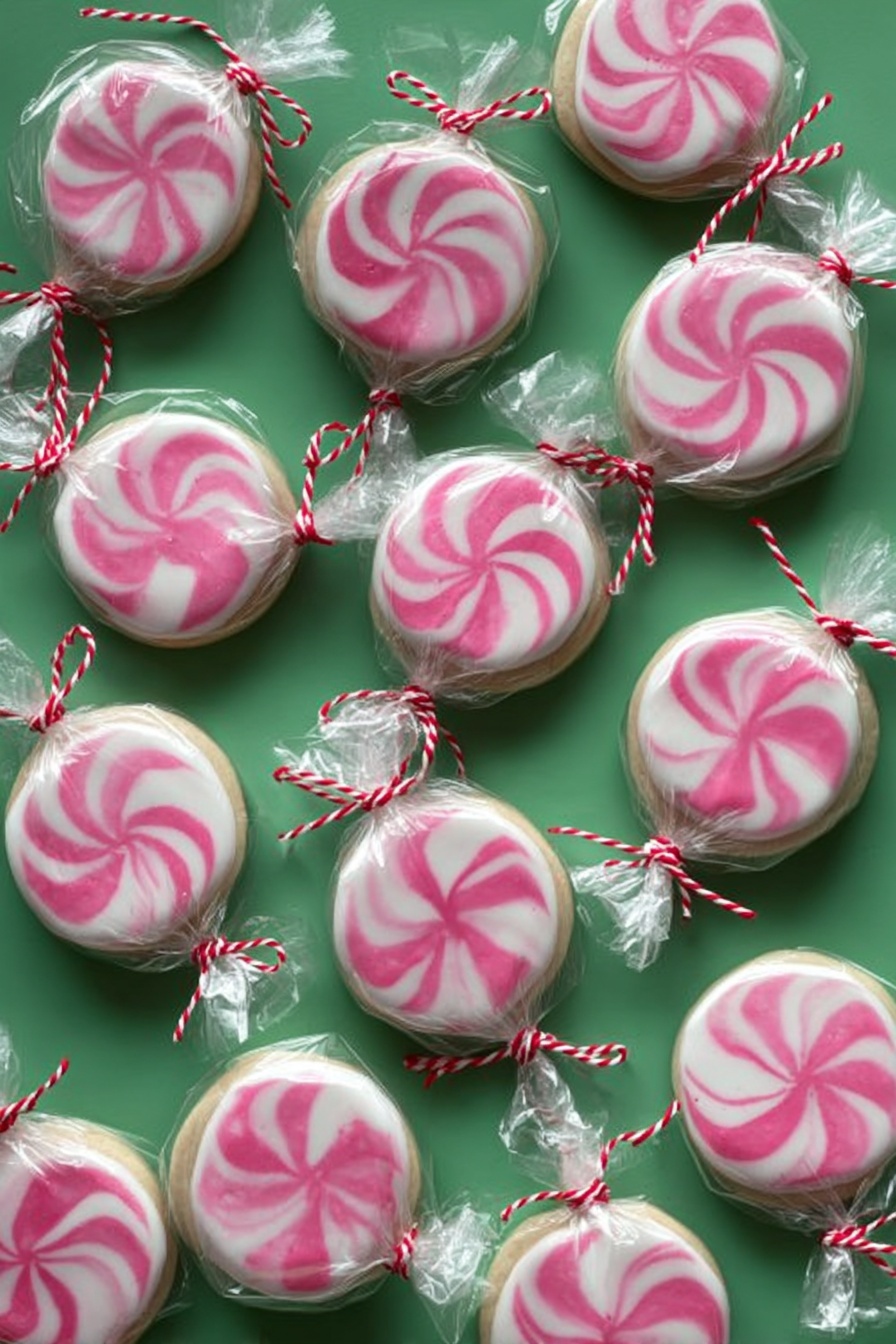
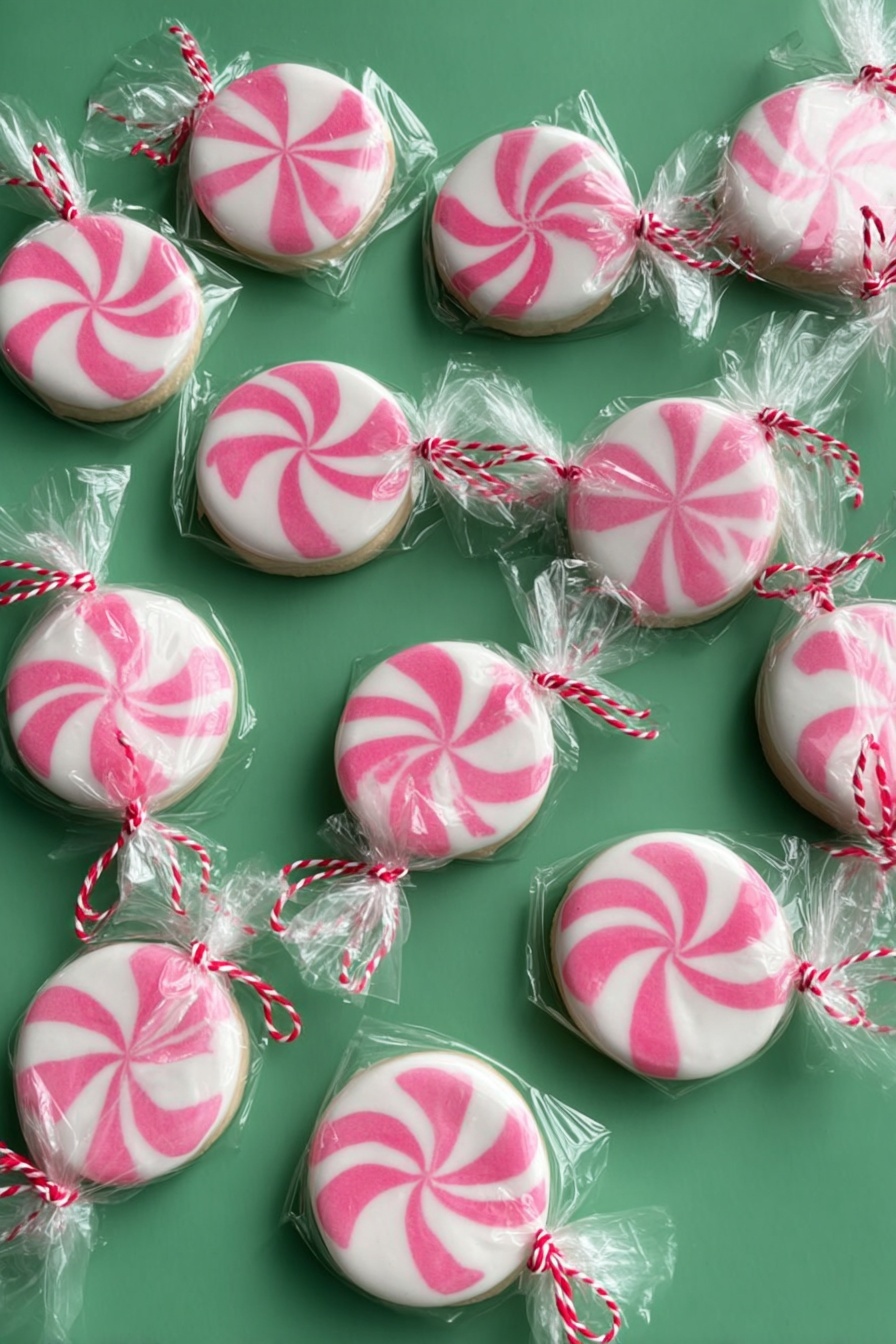
If you’re on the hunt for a festive treat that tastes as magical as it looks, I’ve got you covered with my Peppermint Sugar Cookies with Royal Icing Recipe. These cookies are delightfully soft, perfectly sweet, and topped with gorgeous peppermint-swirled royal icing that’s sure to impress everyone around your holiday table. Trust me, once you try these, they’ll become a staple in your cookie rotation – I absolutely love how this recipe brings together classic sugar cookies and a refreshing peppermint twist!
Why You’ll Love This Recipe
- Festive and Flavorful: The peppermint extract in both the dough and icing adds a refreshing holiday twist you’ll crave year after year.
- Perfect Soft Texture: These sugar cookies aren’t crispy – they stay soft yet sturdy, making them ideal for decorating and enjoying fresh.
- Creative Icing Design: The royal icing lets you pipe and flood over the cookies to create beautiful, professional-looking peppermint swirls.
- Kid-Friendly Fun: Decorating these cookies is a joyful activity the whole family will love during the holiday season.

Ingredients You’ll Need
Getting the ingredients right here makes all the difference in texture and flavor – trusty staples come together to make these peppermint sugar cookies shine. I always prefer unbleached all-purpose flour for that perfect cookie crumb.
- Unbleached all-purpose flour: Makes for a tender crumb and better flavor than bleached varieties.
- Baking powder: Gives your cookies just the right lift without puffing them up too much.
- Salted butter: I like to use it cold and cut into cubes to help with dough consistency and flavor.
- Sugar: Sweetness with a slight crunch before the cookie bakes to soft perfection.
- Egg: Provides structure and moisture.
- Pure vanilla extract: Essential for depth of flavor—never skip it!
- Almond extract: A little goes a long way providing a lovely nutty note that complements peppermint really well.
- Meringue powder: Key to achieving that bright white, glossy royal icing that holds its shape.
- Water (for icing): Use sparingly to adjust icing consistency – start with less and add more as needed.
- Powdered sugar: Provides smooth sweetness and the perfect base for royal icing.
- Light corn syrup: Adds a subtle sheen and keeps icing from cracking.
- Peppermint extract (optional in icing): For an extra peppermint punch to echo the cookies’ flavor.
- Gel icing colors: I recommend super white, plus a festive pink, red, or green for decorating.
- Small squeeze bottles and toothpicks: These little tools make piping effortless and allow you to create those charming peppermint swirl patterns.
- Treat bags and twine or twist ties (optional): Perfect for gifting these beauties to friends and family.
Variations
I love making this recipe my own by switching up the icing colors or adding a little flair to the dough. It’s such a flexible recipe that invites creativity, so don’t hesitate to tweak it for your favorite flavors or festive themes.
- Ginger Peppermint: Adding 1/2 teaspoon of ground ginger to the dough gives a warm, spicy note that complements the peppermint beautifully – my family goes crazy for this twist!
- Chocolate Drizzle: Drizzle melted dark chocolate over the decorated cookies for an elegant contrast and hint of richness.
- Extract Variations: Swap almond extract out for a touch of lemon or orange extract for a citrusy surprise that pairs surprisingly well with peppermint.
- Gluten-Free option: Try a cup-for-cup gluten-free flour blend – just watch the dough closely as it may need a bit more moisture.
How to Make Peppermint Sugar Cookies with Royal Icing Recipe
Step 1: Mixing the Dough to Perfection
Start by preheating your oven to 350°F and lining your baking sheets with parchment paper – this saves you from cookie sticking headaches. In a medium bowl, whisk together the flour and baking powder, and set aside. Using a stand mixer with the paddle attachment, cream your cold, cubed butter and sugar until the mixture looks light and fluffy – this usually takes about 3-4 minutes. I discovered that beating the butter and sugar well really impacts the cookie’s tender texture. Then, add in the egg, vanilla, and almond extracts, beating until everything is combined. Gradually add the flour mixture one cup at a time, mixing slowly so the dough doesn’t get tough. After the last addition, you’ll notice the dough looking thick and crumbly – that’s exactly what you want!
Step 2: Rolling and Cutting Your Cookies
I always line my rolling surface with wax paper and dust it, plus my rolling pin, with flour to keep things moving smoothly. Take a portion of dough, knead it gently on the floured surface until smooth (this helpfully brings the dough together), then roll it out to about 1/4 inch thickness. To get those perfect 1.5-inch circles, dip your cutter in flour before each cut, which prevents sticking. Don’t worry about the scraps – just re-knead and roll again. You might also find it easier to roll the dough right on a parchment-lined surface and then transfer it to your baking sheet. Once all the circles are cut, pop the baking sheet in the freezer for about 10 minutes – I swear this little chill helps the cookies keep their shape and bake evenly.
Step 3: Baking and Cooling
Bake your cookies for 9-12 minutes, watching carefully so the edges just start to get lightly golden but the centers stay soft. I like to remove them from the oven and let them cool on the tray for a couple of minutes before transferring them to a wire rack – this avoids breakage. Sometimes, I use the cookie cutter again at this stage to neaten edges if any puffed or spread too much. Cooling completely is key before you dive into decorating, so be patient!
Step 4: Making the Royal Icing Magic
Once your cookies are cool, it’s time for the fun part – the royal icing. Mix your meringue powder, peppermint extract (if you want that extra minty kick), and water in the bowl of your stand mixer, beating until foamy. Then sift in all that powdered sugar and add the light corn syrup, mixing on low until combined. Scrape down your bowl sides and beat for 5 minutes on medium-low then increase speed to medium-high, stopping as soon as the icing turns glossy and holds stiff peaks. This stiff peak stage is where you know your icing is perfect for piping and flooding.
Step 5: Coloring and Decorating with Peppermint Swirls
Set aside a small portion of white royal icing and tint it pink (or your favorite festive color). I also like to add a few drops of white gel color to the rest to get that bright, super white icing base. Using squeeze bottles, carefully outline each cookie in white icing. Then thin the remaining white icing with a few drops of water at a time until it reaches a flood consistency – think thick syrup, not runny. Flood the center of each cookie with the white icing. Next, pipe some pink dots around the cookie’s edge and use a toothpick to drag the dots toward the center, creating the classic peppermint swirl design. If your pink icing sits on top and doesn’t sink in, thin it just a bit more. Let your decorated cookies dry undisturbed for 24 hours – this is the toughest part! But trust me, it’s worth every minute for that smooth, flawless finish.
Pro Tips for Making Peppermint Sugar Cookies with Royal Icing Recipe
- Cold Butter is Crucial: Using cold, cubed butter helps create a sturdier dough that’s easier to handle and less likely to spread too much while baking.
- Chill the Dough Before Baking: Freezing your cut cookies for 10 minutes keeps their shape intact and makes transferring them to the oven easier.
- Take Your Time Thinning Icing: Add water drop-by-drop to avoid over-thinning; flooding consistency can make or break the look of your decorated cookies.
- Let Icing Dry Overnight: Patience here ensures your royal icing hardens perfectly without smudges or dents.
How to Serve Peppermint Sugar Cookies with Royal Icing Recipe
Garnishes
I like to keep garnishes simple so the peppermint swirl icing shines. A sprinkle of crushed candy canes on top before the icing fully dries adds crunch and extra peppermint goodness. For a festive touch, colored sugar crystals can be gently dusted around the edges.
Side Dishes
These cookies pair beautifully with a steaming mug of hot chocolate or peppermint-spiked coffee. Around the holidays, I often serve them alongside a cheese board or fruit platter for a sweet and savory balance.
Creative Ways to Present
For gifting, I arrange the cookies in 3×4 treat bags tied with twine or festive ribbons – everyone loves receiving these as a handmade holiday gift. Another fun idea I discovered is layering them in glass jars with red and white ribbon, turning simple packaging into elegant decor that doubles as a party favor.
Make Ahead and Storage
Storing Leftovers
I keep leftover Peppermint Sugar Cookies with Royal Icing Recipe in an airtight container at room temperature, layering parchment paper between layers to protect the icing. This keeps them fresh and soft for up to a week – although, honestly, they rarely stick around that long in my house!
Freezing
Freezing baked and decorated cookies can be tricky because icing texture changes. I’ve had the best luck freezing undecorated cookies in a sealed bag, then decorating after thawing. If you want to freeze them with icing, make sure the royal icing is completely hardened, then layer carefully and freeze – but expect a slight texture change upon thawing.
Reheating
Since these are soft cookies, I don’t usually reheat them, but if you want a fresh-from-the-oven feel, pop a cookie in the microwave for about 10 seconds – just enough to warm it gently without melting the icing.
FAQs
-
Can I use regular egg whites instead of meringue powder for the royal icing?
Yes, you can substitute egg whites, but meringue powder is preferred for easier handling and better stability, especially if you’re making large batches. If using egg whites, ensure they’re pasteurized for safety and adjust the water accordingly to avoid overly runny icing.
-
How do I get the perfect peppermint swirl design on my cookies?
After you flood the white icing, pipe small dots of colored icing along the edge and use a toothpick to drag each dot toward the center in one smooth motion. Keep the icing flood consistency just right so the dots don’t sink or spread too quickly for the best swirl effect.
-
Can I make this recipe without almond extract?
Absolutely! While almond extract adds a lovely depth, you can simply omit it or replace it with a bit more vanilla extract if you prefer. The cookies will still taste fantastic.
-
How long does royal icing need to dry before packaging the cookies?
For best results, let the royal icing dry for at least 24 hours at room temperature to ensure it hardens fully and won’t smudge during packaging or storage.
Final Thoughts
I hope you enjoy making this Peppermint Sugar Cookies with Royal Icing Recipe as much as I do. There’s something truly special about the combination of soft sugar cookie dough and those peppermint-swirled icing swirls that always brings out the holiday magic in our kitchen. Whether you’re baking for family, friends, or just because, you’ll find this recipe delivers crowd-pleasing flavor and festive charm every time. Give it a try and I’m sure it’ll become a treasured treat in your recipe box!
Print
Peppermint Sugar Cookies with Royal Icing Recipe
- Prep Time: 25 minutes
- Cook Time: 12 minutes
- Total Time: 1 hour 10 minutes
- Yield: 5 dozen (approximately 60) 1.5-inch cookies
- Category: Dessert
- Method: Baking
- Cuisine: American
Description
Delight in these festive Peppermint Candy Sugar Cookies, featuring a tender sugar cookie base decorated with smooth, peppermint-flavored royal icing. Perfectly crisp on the edges and soft in the center, these cookies are rolled thin, cut with a 1.5-inch round cutter, baked until lightly golden, and beautifully adorned with a peppermint swirl icing design. Ideal for holiday celebrations or any time you crave a sweet, minty treat.
Ingredients
Sugar Cookies
- 3 cups unbleached, all-purpose flour
- 2 teaspoons baking powder
- 1 cup (2 sticks) salted butter, cold and cut into cubes
- 1 cup sugar
- 1 egg
- 3/4 teaspoon pure vanilla extract
- 1/2 teaspoon almond extract
- 1.5 inch round cutter
Royal Icing
- 1/2 cup meringue powder
- 1 scant cup water (almost full)
- 2 pounds (32 ounces) powdered sugar
- 2 teaspoons light corn syrup
- 1 teaspoon peppermint extract (optional)
- Super white gel icing color
- Pink, red or green icing color
- Small squeeze bottles
- Toothpicks
- 3X4 Treat bags
- Twine or twist ties
Instructions
- Preheat and Prepare Dry Ingredients: Preheat your oven to 350 degrees Fahrenheit and line baking sheets with parchment paper. In a medium bowl, whisk together the flour and baking powder, then set aside.
- Cream Butter and Sugar: In the bowl of a stand mixer fitted with a paddle attachment, cream the cold cubed butter and sugar together until the mixture is light and fluffy, which ensures a tender cookie texture.
- Add Egg and Extracts: Beat in the egg followed by the vanilla and almond extracts, mixing until well combined to add flavor depth to your cookies.
- Incorporate Flour Mixture: Add the flour mixture one cup at a time, mixing on low speed just until the dough comes together. Scrape down the bowl sides as needed. The dough will be thick and crumbly at this point.
- Roll Out Dough: Line your rolling surface with wax paper and dust it along with your rolling pin generously with flour. Roll a portion of dough on the prepared surface and knead gently until smooth. Then roll the dough to about 1/4 inch thickness. Dip the 1.5-inch round cutter in flour and cut out as many circles as possible, re-rolling scraps as needed.
- Freeze and Bake: Place the cut cookies on the prepared baking sheets. Freeze for about 10 minutes to help them hold their shape. Bake in the preheated oven for 9-12 minutes until the edges are lightly golden. Remove and allow cookies to cool briefly on the baking sheet, then transfer to a wire rack to cool completely. Trim edges with the cutter if desired.
- Prepare Royal Icing: Once cookies are fully cool, make the royal icing. In a large mixing bowl, combine meringue powder, peppermint extract (optional), and water; beat until foamy. Gradually sift in powdered sugar and add corn syrup, mixing on low until combined. Scrape down sides, then beat on medium-low for 5 minutes. Increase speed to medium-high and continue to beat until the icing is glossy and forms stiff peaks.
- Color and Thin Icing: Tint a small portion of the royal icing pink and leave the rest white, adding a few drops of white gel color if desired. To create flood icing consistency, thin the icings by adding water a few drops at a time until thick syrup-like.
- Decorate Cookies: Using squeeze bottles, pipe an outline of white icing around each cookie. Fill in with white flood icing. Pipe pink dots around the edges, then use a toothpick to drag the dots inward, creating the classic peppermint swirl effect. Allow cookies to dry undisturbed for 24 hours.
Notes
- Ensure butter is cold for optimal cookie texture.
- Freezing the cookies before baking helps maintain their shape and prevents spreading.
- Adjust icing consistency carefully for neat piping and flooding.
- Let decorated cookies dry completely for at least 24 hours before packaging or serving.
- Use gel colors for vibrant icing without altering the consistency.
- Store cookies in an airtight container at room temperature to preserve freshness.
Nutrition
- Serving Size: 1 cookie
- Calories: 110
- Sugar: 13g
- Sodium: 45mg
- Fat: 5g
- Saturated Fat: 3g
- Unsaturated Fat: 2g
- Trans Fat: 0g
- Carbohydrates: 15g
- Fiber: 0.3g
- Protein: 1g
- Cholesterol: 20mg

