

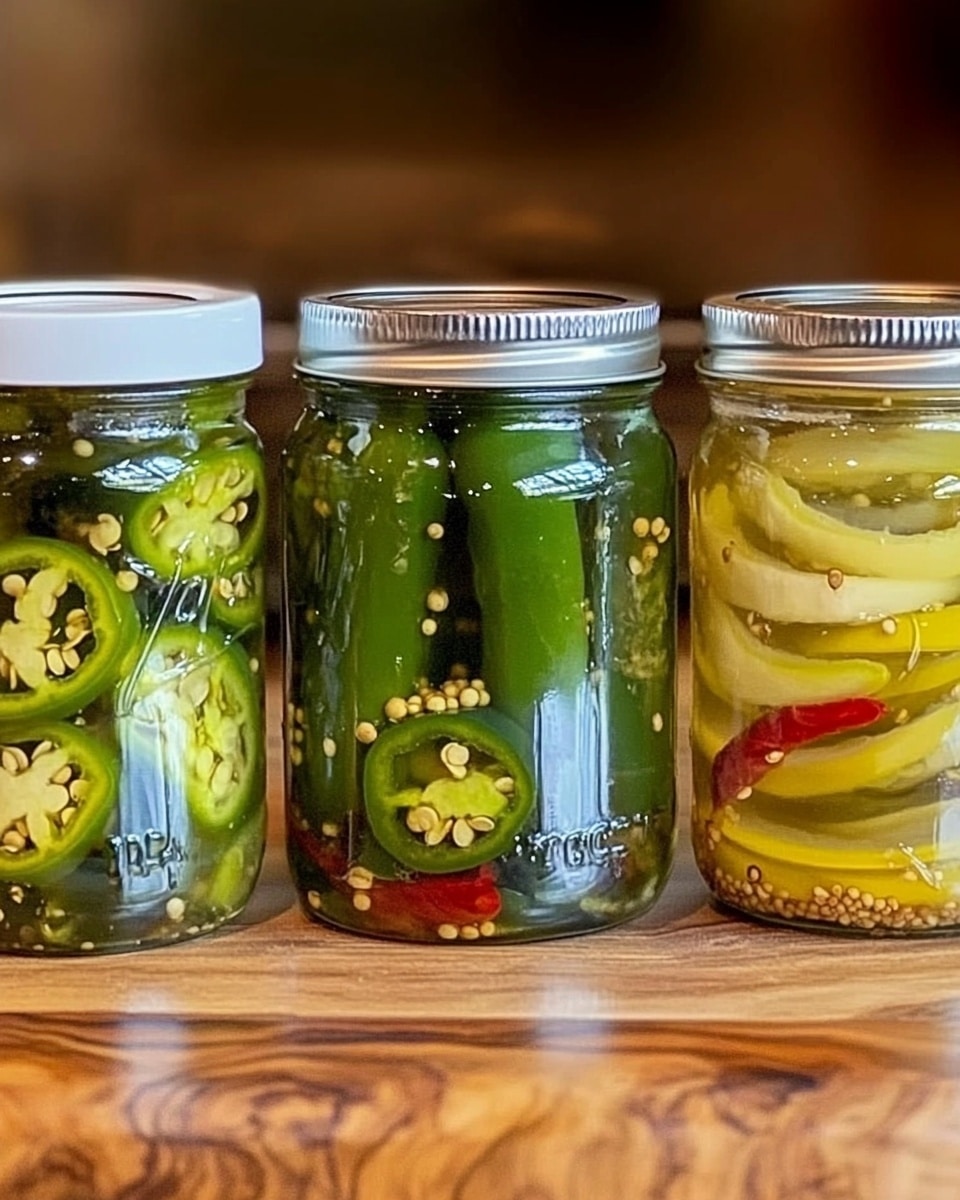
I absolutely love this Pickled Pepperoncini Peppers Recipe because it brings a perfect tangy crunch to so many dishes. Whether you’re topping off a sandwich, spicing up a salad, or just craving a zesty snack, these pickled pepper rings deliver fresh, vibrant flavor that’s hard to beat. The balance of slightly spicy, garlicky, and tangy notes makes this recipe a total winner in my kitchen.
When I first tried making pickled pepperoncini, I was surprised by how quick and simple the process is-and how rewarding the results turned out. If you’ve ever grabbed a jar from the store and thought, I could do better, then this recipe is just for you. With a few basic ingredients and just a bit of patience, you’ll find that homemade pickled peppers really elevate your meals and keep well in the fridge for weeks.
Why You’ll Love This Recipe
- Simple Ingredients: Uses pantry staples you likely already have, making it easy and budget-friendly.
- Quick Preparation: Ready to enjoy in as little as 24 hours, perfect for last-minute cravings.
- Versatile Flavor: Adds brightness and spice to sandwiches, salads, and antipasto platters alike.
- Long Shelf Life: Keeps well refrigerated for weeks, so you can make a batch and enjoy it over time.

Ingredients You’ll Need
For this Pickled Pepperoncini Peppers Recipe, you ll want to gather fresh and straightforward ingredients that work harmoniously to create that classic tangy and slightly spicy flavor. Choosing fresh peppers and quality vinegar is key to getting the best results.
- Pepperoncini Peppers or Banana Peppers: Fresh, firm peppers will produce the best crunch; slice into rings for easy pickling and serving.
- Garlic Cloves: Adds a subtle aromatic flavor that deepens the brine s complexity.
- Vinegar: I prefer distilled white or apple cider vinegar for a clean, sharp acidity.
- Water: Helps balance the vinegar s intensity in the brine.
- Sugar: A touch of sweetness to balance the acidity and heat.
- Kosher Salt: Essential for the brine s seasoning; avoid iodized salt for clear brine.
- Turmeric: Adds a beautiful golden hue and subtle earthy undertone.
- Ice: Used to cool the hot brine quickly and preserve the peppers crunch.
Variations
I love tweaking this Pickled Pepperoncini Peppers Recipe depending on my mood or what I have on hand. Feel free to experiment with different peppers or add your favorite spices to make it truly your own.
- Spicy Kick: Add a few red chili flakes or a sliced jalapeño for extra heat that wakes up your taste buds.
- Herb Infusion: Toss in fresh dill, oregano, or thyme for an herbal twist that s perfect for Mediterranean dishes.
- Low-Sodium Version: Use less salt or a salt substitute if you re watching your sodium intake, but keep the sugar and vinegar ratio the same.
- Sweet & Tangy: Swap out white sugar for honey or maple syrup for a more nuanced sweetness.
How to Make Pickled Pepperoncini Peppers Recipe
Step 1: Prep and Slice the Peppers
Start by washing your pepperoncini or banana peppers thoroughly. Slice them into rings, making sure to discard the stems so your pickles stay neat and easy to use. I like slicing them about a ¼-inch thick – thin enough to soak up that brine but thick enough to keep a satisfying crunch.
Step 2: Pack the Jars
Fill clean mason jars with your sliced peppers, packing them just right without squishing. Having a bit of space at the top is important to later pour in the hot brine. It s a quick, satisfying step because your kitchen starts smelling like garlic and spice already.
Step 3: Make the Brine
In a saucepan, combine vinegar, half the water, salt, sugar, and turmeric. Bring this mixture to a gentle simmer over medium-high heat, stirring well to dissolve the sugar and salt completely. Once it simmers gently, remove from heat and stir in the minced garlic. This ensures the garlic flavor stays fresh and doesn’t get bitter from overheating.
Step 4: Cool the Brine and Pour
Add the remaining water in the form of ice to the hot brine to cool it quickly-this little trick helps the peppers retain their crispness. Once the ice melts, pour the brine over the sliced peppers in your jars, leaving about half an inch of headspace. Seal the jars by hand-tightening the lids but make sure not to over-tighten.
Step 5: Chill and Wait
Let the jars come to room temperature, then transfer them into the fridge. Resist the urge to dig in immediately-the flavor deepens beautifully after 24 hours, and if you can wait up to a week, you ll notice a whole new level of tangy goodness. My family goes crazy for these after a few days of marinating!
Pro Tips for Making Pickled Pepperoncini Peppers Recipe
- Use Fresh Peppers: Choosing fresh, firm pepperoncini ensures your pickles will stay crisp, not soggy.
- Don t Overheat the Garlic: Adding garlic after removing the brine from heat keeps its flavor bright and prevents bitterness.
- Ice Water Trick: Pouring ice into the hot brine cools it rapidly and helps protect the crunchy texture of the peppers.
- Seal Properly but Don t Over-tighten: Hand-tight lids maintain good seal and allow pressure to release naturally, preventing jar damage.
How to Serve Pickled Pepperoncini Peppers Recipe
Garnishes
I often sprinkle my finished dishes with a few rings of these pickled pepperoncini peppers as a garnish – they bring a lively punch to burgers, grilled meats, and even pasta salads. Sometimes I also toss a handful into Mediterranean grain bowls or alongside cheese plates for that perfect acidic contrast.
Side Dishes
This Pickled Pepperoncini Peppers Recipe shines when paired with rustic sandwiches, grilled sausages, or simple roasted veggie sides. My go-to combo is crusty bread, creamy hummus, and a scoop of these peppers-they brighten every bite.
Creative Ways to Present
For special occasions, I like to arrange these pepper rings elegantly on charcuterie boards alongside olives, cheeses, and cured meats. Their vibrant color and sharp tang make them an excellent conversation starter-and a delicious one at that!
Make Ahead and Storage
Storing Leftovers
Once prepared, these pickled pepperoncini peppers keep beautifully in the fridge for 3 to 4 weeks. I store mine right in the mason jars with tight lids and find that the flavor actually improves after the first few days. Just keep them chilled and avoid double-dipping to maximize freshness.
Freezing
I haven t frozen pickled pepperoncini peppers myself because their crisp texture tends to suffer, but if you want to preserve large batches, freezing the brine separately can be an option. I recommend keeping fresh batches refrigerated and enjoying them within a month.
Reheating
Since these peppers are pickled, they re best served cold or at room temperature straight from the fridge. Reheating isn t necessary and can soften their texture, so I usually add them fresh to dishes after cooking or as a final topping.
FAQs
-
Can I use other types of peppers for this Pickled Pepperoncini Peppers Recipe?
Absolutely! While traditional pepperoncini or banana peppers work best for their mild heat and crunch, you can use hot or sweet peppers depending on your taste. Just keep in mind that hotter peppers like jalapeños will make the pickles spicier, so adjust accordingly.
-
How long do these pickled peppers last in the fridge?
When stored properly in sealed mason jars, your pickled pepperoncini peppers should stay good and flavorful for about 3 to 4 weeks. Always use clean utensils to avoid contamination and keep the brine covering all the peppers to extend shelf life.
-
Do I need to use turmeric in the recipe?
Turmeric is optional but highly recommended-it adds lovely color and a subtle earthy depth to your brine. If you don t have it on hand, you can skip it; your peppers will still taste delicious.
-
Why do I add ice to the brine?
Adding ice to the hot brine cools it quickly, which helps preserve the peppers’ crisp texture. Pouring hot brine directly over the peppers without cooling can sometimes make them soften more than desired.
Final Thoughts
This Pickled Pepperoncini Peppers Recipe quickly became one of my favorite homemade condiments because it s straightforward and yields such a vibrant, versatile result. Whether you sprinkle them on your salads, add them to homemade pizzas, or just snack on them straight from the jar, they bring a burst of tangy, savory goodness every time. I truly think you ll enjoy making and eating these as much as my family does-so give it a try and watch how it livens up your meals!
Print
Pickled Pepperoncini Peppers Recipe
- Prep Time: 10 minutes
- Cook Time: 10 minutes
- Total Time: 2 hours 20 minutes
- Yield: 4 pints
- Category: Pickling
- Method: Stovetop
- Cuisine: American
Description
This Pickled Pepperoncini Peppers recipe offers a tangy and slightly sweet way to preserve and enjoy pepperoncini or banana peppers. The peppers are sliced into rings and infused with a flavorful brine made from vinegar, water, garlic, sugar, kosher salt, and a hint of turmeric. After simmering the brine and adding ice to cool it quickly, the mixture is poured over the peppers in mason jars. The pickled peppers develop their full flavor after at least 24 hours in the fridge and can last up to 3-4 weeks refrigerated, making them a perfect condiment or snack addition.
Ingredients
Pickling Ingredients
- 1 lb pepperoncini peppers or banana peppers, sliced into rings
- 2 cloves garlic, minced
- 2 cups vinegar
- 1 cup water
- 1 tbsp sugar
- 1 tbsp Kosher salt
- 1/4 tsp turmeric
- 1 cup ice
Instructions
- Slicing Peppers: Slice the pepperoncini or banana peppers into rings, discarding the stems to prepare them for pickling.
- Preparing Jars: Add the sliced peppers into clean mason jars and set aside while you prepare the brine.
- Making the Brine: In a saucepan, combine vinegar, 1 cup of water, kosher salt, sugar, and turmeric. Bring this mixture to a gentle simmer over medium-high heat while stirring to dissolve the salt and sugar.
- Flavoring the Brine: Once the brine is simmering, remove the pan from heat and stir in the minced garlic to infuse the flavor without cooking the garlic too much.
- Cooling the Brine: Add 1 cup of ice to the hot brine and stir until the ice melts, quickly cooling the solution to safe pickling temperature.
- Filling the Jars: Pour the cooled brine over the sliced peppers in the mason jars, leaving about half an inch of headspace at the top of each jar.
- Sealing the Jars: Place the lids on the jars and hand-tighten to seal them properly.
- Cooling and Refrigerating: Allow the jars to come to room temperature before refrigerating them. Let the peppers pickle in the fridge for a minimum of 24 hours before consuming to develop flavor. For best taste, allow them to sit up to a week.
Notes
- Peppers will last for about 3-4 weeks in the refrigerator when stored properly.
- Use sliced peppers to ensure faster and more even pickling.
- Adjust sugar and salt levels according to taste preferences if desired.
Nutrition
- Serving Size: 1/4 cup
- Calories: 15
- Sugar: 2 g
- Sodium: 450 mg
- Fat: 0 g
- Saturated Fat: 0 g
- Unsaturated Fat: 0 g
- Trans Fat: 0 g
- Carbohydrates: 4 g
- Fiber: 1 g
- Protein: 0.3 g
- Cholesterol: 0 mg

