

If you’re anything like me and love a treat that’s both adorable and delicious, then wait till you try this Pink White Chocolate Fudge Recipe. It’s buttery, creamy, and just the right touch of sweetness with a fun pink twist that makes it perfect for gifting or brightening up any day. I promise, once you make this, you’ll find it hard to stop at just one piece.
Why You’ll Love This Recipe
- Simple Ingredients: You only need a handful of pantry staples to whip this up fast.
- Customizable Color: The gel food coloring gives you control over how subtle or bold that pink shade turns out.
- Perfect for Gifting: Cut into cute heart shapes, it makes a lovely homemade gift.
- No-Bake Ease: No oven? No problem. This fudge chills and sets beautifully in the fridge.

Ingredients You’ll Need
These ingredients come together to create that luscious, melt-in-your-mouth texture. Opting for good quality white chocolate really makes the flavor shine, and the condensed milk adds that perfect richness that fudge needs.
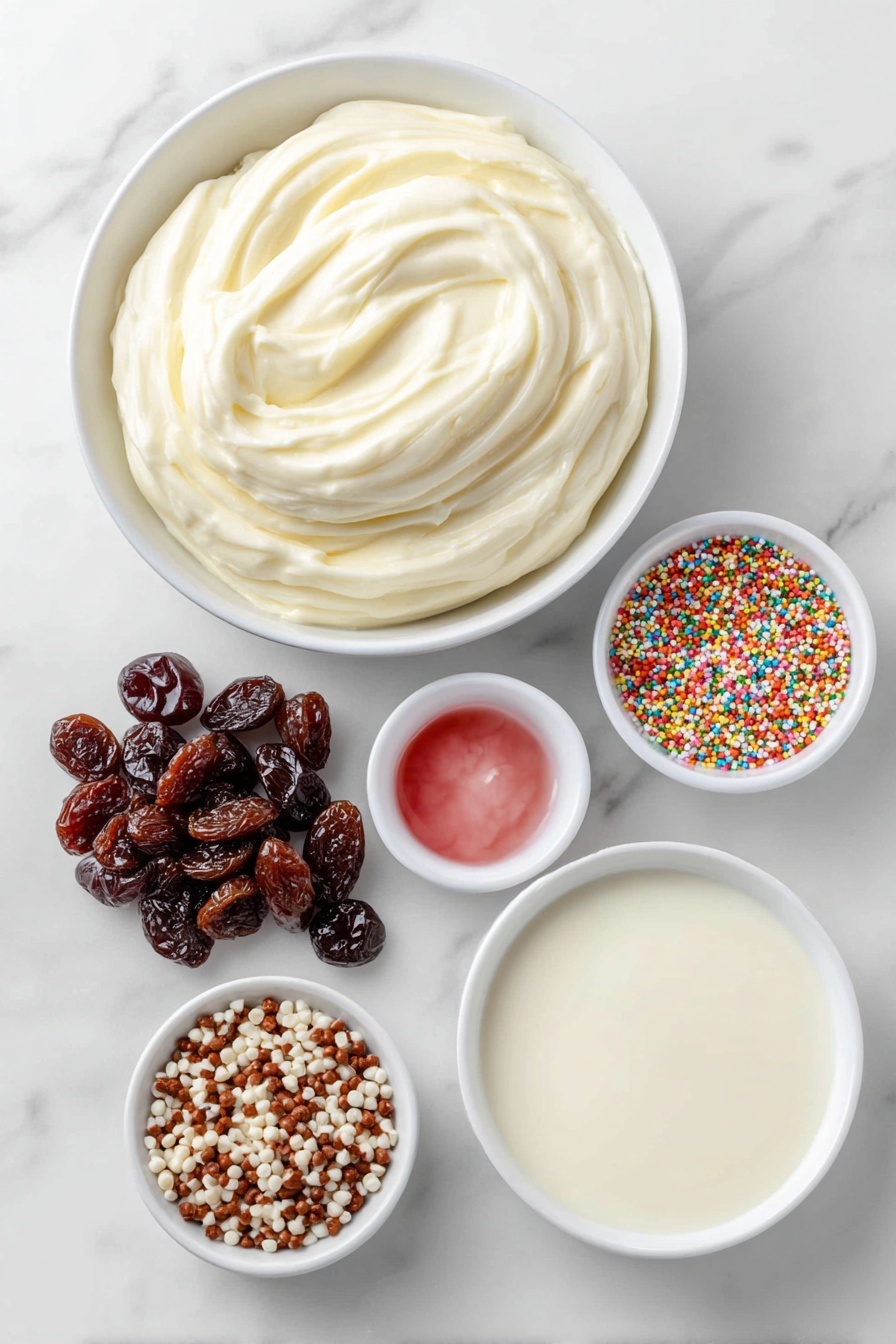
- White chocolate melting wafers or high-quality chopped chocolate: Choosing melting wafers helps with smooth melting, but if you pick chopped chocolate, just make sure to chop finely for even melting.
- Sweetened condensed milk: It adds creamy sweetness and helps give this fudge the perfect soft texture.
- Pink gel food coloring: Just a few drops are enough to tint the fudge without affecting its texture (avoid liquid coloring to keep the mix thick).
- Optional sprinkles: Adds a fun crunch and festive vibe, perfect for parties.
- Optional dried cherries: I love the chewy tartness dried cherries lend—it balances out the sweetness so nicely.
Variations
I love tweaking this Pink White Chocolate Fudge Recipe depending on the occasion or mood — it’s super easy to make it your own. Play around and you might discover your new favorite version!
- Add nuts: I once tossed in chopped pistachios for an extra crunch and subtle earthiness, which my family went crazy for.
- Use freeze-dried raspberries: Swapping dried cherries with crushed freeze-dried raspberries gives a tart pop of flavor and natural pink flecks.
- Make a layered fudge: Pour half the white chocolate mix plain, then swirl the pink dyed mixture on top for a marbled effect.
- Dye it differently: Try pastel hues by mixing in lavender or baby blue gel colors for various holidays.
How to Make Pink White Chocolate Fudge Recipe
Step 1: Prep Your Pan Like a Pro
Start by lining a 9×9 inch pan with parchment paper, letting it overhang on two sides. I always do this because it makes lifting the fudge out so much easier once it’s set. Set it aside while you work on the chocolate mix.
Step 2: Chop and Combine
If you’re not using melting wafers, chop your white chocolate into small, uniform pieces so it melts quickly and evenly. Place the chocolate and sweetened condensed milk into a large, microwave-safe bowl — combine them gently before heating.
Step 3: Microwave and Stir Until Silky
This part is key to smooth, creamy fudge: microwave your mixture in 20 to 30-second bursts. Stir well between intervals — I found it usually only takes two rounds for my chocolate to melt. The trick I learned? Stirring well distributes the heat so the chocolate continues melting without burning.
Step 4: Add Your Pink Touch
Once smooth, stir in just a few drops of pink gel food coloring. Have some fun here—if you want an ombre effect, mix only part of the batch so some remains its original white. That contrast is so pretty and adds dimension to your fudge.
Step 5: Mix in Extras (Optional)
This is where you can personalize! I love tossing in dried cherries or sprinkles for bursts of flavor and color. I’ve tried mixing in dried fruit before, and it really compliments the richness of the white chocolate beautifully.
Step 6: Chill Until Set
Pour your fudge mixture into the prepared pan, smoothing out the top. Pop it in the refrigerator for about an hour to set completely.
Step 7: Cut and Serve
Once firm, lift the fudge out using the parchment overhang. I love using a heart-shaped cookie cutter for this recipe — it adds a cute touch that’s perfect for Valentine’s Day or any time you want to show some love! To make cutting easier, place a kitchen towel on top of the cutter and press gently; it saves your fingers and gets a nice clean cut.
Pro Tips for Making Pink White Chocolate Fudge Recipe
- Use gel food coloring instead of liquid: Gel colors won’t thin your fudge mixture, so it stays thick and creamy.
- Microwave in short bursts: Chocolate burns easily, so short intervals and stirring make all the difference.
- Don’t skip parchment paper overhang: Removing fudge in one big piece is so much easier when you have handles.
- Press cookie cutter gently: I learned the hard way that too much force cracks the fudge; a kitchen towel helps distribute pressure evenly.
How to Serve Pink White Chocolate Fudge Recipe

Garnishes
I like decorating the fudge tops with a sprinkle of edible glitter or crystallized rose petals when I’m feeling fancy—it takes the treats from cute to absolutely stunning. If you’re keeping it casual, colorful sprinkles or small powdered sugar dusting works beautifully too.
Side Dishes
This fudge pairs wonderfully with a simple cup of tea or freshly brewed coffee — the creamy sweetness balances out bold or slightly bitter drinks perfectly. I also enjoy serving it alongside fresh fruit platters or delicate finger sandwiches for a tea party vibe.
Creative Ways to Present
For parties, I like arranging these fudge hearts in pastel paper cupcake liners on a beautiful tray. Tie a bundle with twine and a little tag for a charming homemade gift. Another fun idea I tried was layering fudge pieces in mason jars with layers of crushed cookies for a dessert jar spectacle.
Make Ahead and Storage
Storing Leftovers
I always keep leftover fudge in an airtight container in the refrigerator. It stays fresh and tender for up to two weeks — just bring it to room temperature a bit before eating so it’s perfectly soft.
Freezing
Believe it or not, this fudge freezes beautifully! I wrap the pieces individually in parchment paper and pop them in a resealable bag. When thawed in the fridge overnight, the texture is just as good as freshly made.
Reheating
If you want to soften leftover fudge quickly, leave it at room temperature for about 20 minutes. I wouldn’t recommend microwaving since it can melt unevenly, but if you do, use very short bursts (5-10 seconds) and watch it closely.
FAQs
-
Can I use regular white chocolate instead of melting wafers?
Absolutely! Just make sure to chop the chocolate into small pieces so it melts evenly and avoid overheating, which can cause it to seize.
-
Why is gel food coloring better for this fudge?
Gel food coloring doesn’t add extra liquid, so it keeps the fudge smooth and prevents it from becoming too soft or runny.
-
Can I make this fudge without sweetened condensed milk?
Sweetened condensed milk provides both the sweetness and the creamy texture essential for fudge. If omitted, the texture and sweetness will change a lot, so I don’t recommend skipping it.
-
How do I store leftover fudge?
Keep it in an airtight container in the fridge for up to two weeks, or freeze it for longer storage. Bring it back to room temp before enjoying for the best texture.
Final Thoughts
I absolutely love how this Pink White Chocolate Fudge Recipe turns out every single time—it’s quick, looks so pretty, and tastes like a dream. It’s been my go-to whenever I want to whip up something special without a lot of fuss. I bet you’ll enjoy making (and eating) this fudge just as much as I do! Give it a try and watch friends and family’s faces light up when you share it.
Print
Pink White Chocolate Fudge Recipe
- Prep Time: 10 minutes
- Cook Time: 5 minutes
- Total Time: 1 hour 15 minutes
- Yield: 12 servings
- Category: Dessert
- Method: No-Cook
- Cuisine: American
Description
This Pink White Chocolate Fudge recipe is a delightful and visually appealing sweet treat, perfect for gifting or special occasions. Made with creamy white chocolate and sweetened condensed milk, it is infused with pink gel food coloring for a charming color. Optional ingredients like dried cherries and sprinkles add texture and flavor, making this fudge both delicious and festive. The fudge is easy to prepare by melting the ingredients together, chilling in the refrigerator, and then cutting into fun heart shapes.
Ingredients
Main Ingredients
- 20 ounces white chocolate melting wafers or high-quality chopped white chocolate
- ½ cup + 1 tablespoon sweetened condensed milk
- Pink gel food coloring, a few drops
Optional Ingredients
- Sprinkles, as desired
- Dry cherries, as desired
Instructions
- Prepare the Pan: Line a 9×9 inch pan with parchment paper, allowing the paper to overhang on two sides for easy removal later. Set aside.
- Chop Chocolate (if necessary): If using regular white chocolate bars instead of melting wafers, chop the chocolate into small pieces to ensure even melting in the microwave.
- Combine Ingredients: In a large microwave-safe bowl, add the white chocolate and sweetened condensed milk.
- Microwave and Melt: Microwave the mixture in 20- to 30-second increments, stirring thoroughly after each interval. Typically, two intervals are sufficient for the chocolate to melt completely. Stir well to achieve a smooth mixture.
- Add Color: Add a few drops of pink gel food coloring to the melted chocolate mixture. For an ombre effect, only partially stir the color in, leaving some of the mixture white.
- Add Optional Mix-ins: If desired, fold in dried cherries and/or sprinkles to add texture and flavor.
- Chill the Fudge: Pour the mixture into the prepared parchment-lined pan and refrigerate for approximately 1 hour, or until the fudge is firm and set.
- Cut into Shapes: Once set, remove the fudge from the pan using the parchment overhang. Use a heart-shaped cookie cutter to cut the fudge into shapes. To make cutting easier, place a kitchen towel on top of the cookie cutter and gently press down.
- Serve and Enjoy: Arrange the fudge pieces on a plate and serve as a delightful treat.
Notes
- Ensure to chop regular white chocolate into small pieces for even melting.
- Be careful not to overheat the chocolate in the microwave to prevent burning.
- The pink gel food coloring is best for vibrant color without altering the texture of the fudge.
- Allow the fudge to firm completely in the refrigerator before cutting to avoid crumbling.
- Optional mix-ins like dried cherries and sprinkles add both flavor and visual appeal but are not necessary.
- Use parchment paper with overhang to easily lift the fudge block from the pan.
Nutrition
- Serving Size: 1 piece (approximate)
- Calories: 200
- Sugar: 24g
- Sodium: 30mg
- Fat: 11g
- Saturated Fat: 7g
- Unsaturated Fat: 3g
- Trans Fat: 0g
- Carbohydrates: 27g
- Fiber: 0.5g
- Protein: 2g
- Cholesterol: 10mg


